Claws for climbing poles: materials of modern varieties of devices (100 photos)
The operation of power lines, like any other equipment, is impossible without damage or malfunctions that occur at the most inopportune moment.
To eliminate them in a timely and efficient manner, it is necessary to have suitable tools and devices available. To eliminate malfunctions in the operation of power lines, there are special tools, and even equipment that can be used to quickly get to the location of the breakdown. Such equipment is monter's claws (cat's claws, monter's manholes), which help you easily climb up the pole.
This type of equipment is an integral part of specialized equipment for performing work related to power lines, so they must be in the arsenal of any enterprise related to the repair of power lines.
Purpose
The main purpose of the claws is considered to be quick and convenient climbing up the pole in order to perform planned or unforeseen work.
The design of the claws is simple: the main element of the device is two hooks with straps attached to them, with which they are directly attached to the legs (each separately).
The device is made from durable and reliable metal, which guarantees safety when working at heights.
The diameter of the hook is slightly larger than the parameters of the circle post. To conveniently and correctly climb up or down, you need to install the hook perpendicular to the vertical pole. Otherwise, the worker will not be able to move up or down. How difficult is it to climb a pole without claws?
Materials used
Wooden poles for power lines have been replaced by reinforced concrete poles that are more durable and resistant to use.
In this regard, the linemen's manholes also underwent some changes: they began to use inserts made of harder alloys, as a result of which the likelihood of them slipping decreased and the potential of the device increased.
The most commonly used claw material is high-strength steel, coated with an anti-corrosion protective layer for greater durability.
The structure of the belts is multi-layered; yuft and rawhide are used as the main material for their production; in addition, in the end they are also stitched with nylon threads for greater reliability.
Varieties and properties
To perform the work efficiently and efficiently, it is necessary to use suitable equipment and tools. To move along a wooden pole, you should select the appropriate claws, for concrete ones - similarly.
Today, claws used for climbing poles are classified into:
Auxiliary elements
Any specialist servicing power lines must have a full arsenal of tools and devices to perform the work. It must include: a protective helmet and a safety lanyard.
Selection rules
To make the right choice of claws, you need to have some knowledge in this area. When choosing a device, you should pay attention to the following nuances:
Product price. In this case, it is worth remembering that cheaper versions of the claws may use insufficiently high-quality metal, as a result of which the device will be unreliable and dangerous. Focus on medium or high price, which guarantees quality.
Manufacturer. As you know, it is better to trust proven and well-known manufacturers.
Quality. Products must comply with current GOST or TU and have quality certificates. Upon external inspection, no defects or unevenness of the seams should be noticeable. The thickness of the belts must be at least 0.3 mm, the stitches must be even and securely fixed.
and exploitation
Conditions of maintenance and operation are simple. Post claws are suitable for use in all temperature zones. The safe use period is indicated on the label. During their use, it is necessary to carry out preventive inspections and, if necessary, change components. Clean your claws regularly.
Storage conditions
If damage to the claws is detected, you should stop using them, have them repaired by a specialist, or replace them with new ones.
Photo of claws for climbing poles
Equipment operating conditions
The installation kit is allowed for use only if:
- Compliance with GOST or TU
- Availability of manufacturer's logo
- Availability of a passport for the product, which must indicate the serial number, technical characteristics, date of manufacture, purpose
- The presence of a mark on the test results, date, static load value.
A professional electrician must have specialized training, and when performing a task he must take into account: the degree of serviceability of the elements, the condition of the spikes, the seams of the clamps, the serviceability of the fasteners, the presence of nut locks, cotter pins.
The rules for working at height provide for maintaining the serviceability of all elements of the assembly claws. It is recommended that the specialist store his equipment in places inaccessible to unauthorized persons, as well as excluding physical impact, which will result in deformation, chipping, cracking, tearing, or the formation of sharp edges on parts that can be detected by hand or visual diagnostics.
The fitter's set of equipment provides the specialist with the safety of high-altitude work, provided that the welding seams between the elements are reliable, the elements of the step and replacement plates are properly fixed, the height of the thread ridges of the studs, and the lock nut.
Do-it-yourself claws for climbing poles - Metalist's Handbook
Electrician's claws are used for lifting electricians along wooden poles or reinforced concrete supports of power lines.
They are used if there is no aerial platform, or there is no way to quickly deliver it to a given pole, or there is simply an urgent need to make repairs.
Therefore, sometimes people make repair claws with their own hands, which is undesirable, as it can lead to injuries. The claws are also called monter's holes.
general information
This equipment is divided into the following types according to its purpose:
The latter are the most common, as they can be used for any standard supports. But any of them should be used strictly on those supports that are indicated in their passports.
Any electrical installation company that installs or maintains power lines must have claws.
Manholes can be classified as universal tools; they are used in different climates with different temperatures from minus 35 to 55 degrees.
The manufacturer indicates the service life, usually it reaches a maximum of 60 months. After a year, the devices must be reviewed. Some items may be replaced.
Therefore, if there is a need to buy used repairman’s claws, then first you need to familiarize yourself with the inspection and testing rules. Used repair claws may not have any markings or operating instructions.
How to climb a pole
Not often, but there is a need to climb a power line pole on or near your suburban area. And although such a rise to heights requires professional skills, many do it on their own. How to climb a power line or street light pole in this article.
About the task of climbing a pole
The task of climbing a pole is not everyday in country life. This problem arises when connecting a house to power supply and is often solved by professional electricians. It would be strange if everyone who was not too lazy climbed the poles of overhead lines and, even worse, power lines and solved their problems without the participation of the servicing electric company.
However, in theory and in life, a domestic situation may arise in which you will need to climb onto a VLI pole yourself. The simplest example is to change the lamp in a street lamp located on a pole near your house.
The task of climbing a pole is interesting in itself, like the task of quickly climbing to a height in a country house. You don't necessarily need to climb a pole. More common tasks are to climb to the base of the roof or the gables of the second floor.
Of course, climbing a pole is not exactly the same as climbing from the street side to a second-floor window, but some solutions may be similar.
VLI pole height 0.4 kV
The power line of a suburban area is designed from wooden or concrete supports, less often metal poles 9-9.5 meters high. (read about power line supports). When installing such a pole, it is buried 2-2.5 meters into the ground. (read about installing the support). It is not difficult to calculate that the end of the pillar remains about 7 meters above the ground. It is clear that no one needs to climb to the top. To work, it is enough to rise to a working height not exceeding 6 meters. How to climb a pole 6 meters high.
What types of street lighting poles are there?
How to climb a pole?
Professionally, the task of climbing onto a support is solved with the help of a special electrician’s device called claws or installer’s manholes. They are put on the legs and, when climbing up a pole, they cling to it, creating support for a person’s mobility.
For wooden supports, mounting claws marked KM are used. They only work on wooden supports and wooden supports with a concrete “stepchild”. (read what a stepson is)
For concrete supports of type SB 95, universal manholes LU or universal claws KLM are used. Their catching part is not round, but rectangular or trapezoidal.
The manholes are put on the feet on hard shoes. Fastened to the leg with straps. The safety of the person climbing depends on proper securing. Manholes cost, by today's standards, inexpensively, about 2500-3500 rubles.
Here is a description of the LU-1 manholes:
Universal manholes LU-1 are used to climb onto a reinforced concrete pillar of trapezoidal cross-section VLI type CBll0-la, CB95-1/2a, SV105. The hole opening is adjustable. Includes carbide studs and leather straps.
Claws for climbing poles and trees
Fitter's claws (fitter's manholes, crampons) are devices used by electricians and high-rise workers to safely climb concrete and wooden power line supports and trees. Despite the widespread use of specialized automobile towers and telescopic lifts, mounting claws still have a very large list of situations in which their use is more appropriate and convenient: when space is cramped and there is no possibility for equipment to approach power lines, when hydraulic mechanisms break down or fail lift at the work site.
Simple claw device
Design and principle of operation
The simplest manholes for concrete supports consist of 2 elements for attaching to shoes, each of which consists of the following main components:
Climbing onto a reinforced concrete pole using a similar device occurs as follows:
Using a similar principle, electrical claws designed for this type of support help you climb onto a wooden pole. Their only differences from the crampons used for concrete pillars are the semicircular shape of the grips and softer spikes.
Types of climbing cats
How to properly install street lighting
Depending on the design and purpose, all such devices are divided into claws for concrete pillars, manholes for wooden supports, dart climbers (devices used for climbing trees).
Manholes, claw-holes for reinforced concrete pillars
Catches for reinforced concrete pillars
This is the most common type of these devices, widely used by modern electricians and installers.
They consist of two oval support platforms with fastening straps for legs and rectangular grips up to 190-200 mm long, having 2 conical spikes on each of the short sides.
Claws for wooden posts
Crampons for wooden supports
Less common and less commonly used by modern electricians, manholes have one significant difference from the previous ones - their grips have a semicircular shape with a diameter of up to 220-315 mm and 5 spikes on each. The most famous model of such a device is the KM 1 brand claws.
Tree frogs
Tree climbers have claws for climbing tree trunks. They are a curved “L”-shaped splint with a semicircular casing for the shin and a sharp triangular spike located on the outer part and a belt for fixing the foot. A similar device is used by high-altitude tree trimmers and hunters.
Areas of application of KLM2
Lazy claws marked KLM 2 are the most popular and widespread device. They are used for lifting reinforced concrete trapezoidal or rectangular supports with a diameter of up to 190 mm.
On a note. There is also a universal type of these devices, which has grips that allow you to climb most modern power transmission towers. The most famous model of such manholes is LU-2.
Rules for using claws
Street lighting regulation
The procedure for using manholes consists of the following manipulations:
Important! Manholes of a certain model and type can be used for certain supports specified in the passport. The use of such devices for lifting onto supports with a diameter larger than that specified in the passport is strictly prohibited.
Safety during work
Who is assigned group 2 electrical safety?
Both the installer and the other person using the claws must adhere to the following safety rules:
When using tree climbers, be sure to have a safety rope attached to a strong branch.
Equipment operating conditions
The use of manholes is permitted subject to the following conditions:
All the details of working with manholes are described in special instructions for electricians and high-rise installers.
Defects in mounting claws
The main defects that can be found in an electrician's claws include the following:
Note! If one of the above-described defects is detected in factory-made models, experts recommend not to repair them yourself, but to take them to a specialized workshop for repairs. It is prohibited to use such installation equipment even with minimal damage.
Proper storage conditions
After each use, the claws must be cleaned of dirt, rust, concrete dust or crumbs.
Claws for climbing poles should be stored suspended (on hooks or special hangers), in well-ventilated, dry areas out of the reach of children and pets.
Another advantage of such equipment for installers and electricians is the possibility of making it yourself - on the Internet you can easily find both a visual drawing and video instructions for assembling claws from scrap materials with your own hands.
YouTube Premium
Do you want to save this video?
- Complain
Report a video?
Liked?
Did not like?
© Everything ingenious is simple
If you liked this video, subscribe to my YouTube CHANNEL.
Enjoy watching friends, thanks for liking and subscribing. ALL CHANNEL CONTENT IS FOR INFORMATION AND ENTERTAINMENT PURPOSES ONLY.
Stay up to date with all the latest events and take care of yourself.
Thank you for being with us.
All copyrights belong to their rightful owners. If you are the author of any of the fragments provided in this collection and the distribution of this material infringes on your copyright, please contact me.
Read also: Metal pickling by electrolysis at home
This video is a photo slide about Home Decor Ideas.PHOTO IS FROM INTERNET.If you are an owner of photo please contact me for tag you or if you wish to delete.
Thank you all very much.
Don't share your success with your friends.
Toki - "climbing equipment"
During their night operations, the “invisibles” often had to overcome palisades, walls, climb the roofs of houses, trees, and climb mountain steeps. To make their life easier, ninjas invented many special toki - “devices for climbing”: various hooks, ladders, brackets, etc. However, they were not always possible to use. Clanking, grinding, knocking - all these sounds were instantly caught by the sensitive ear of the sentry, who was in a hurry to raise the alarm. Therefore, during secret penetration into the castle, the “night devils” preferred to use their own “tools” - tenacious strong hands, mobile dexterous legs, and even their heads. Probably, most toki were used not for secret penetration, but during a surprise assault, when it was necessary to instantly cross the crest of the wall and gain a foothold on it before the enemy had time to pull up forces.
However, the walls of Japanese fortresses are not such an insurmountable obstacle. As a rule, castles were built around some kind of elevation - a hill, a small rock, which is why their walls turned out to be inclined. This design was fully justified during earthquakes, but was weak protection against spy climbers. In addition, the walls were made of barely hewn stones without mortar and were replete with many cracks, potholes, and cracks where you could easily stick your fingers. As the personal experience of the author, who had the opportunity to try climbing the wall of a Japanese castle, shows, with minimal physical training you can climb a ten-meter wall in a matter of seconds. But the author is no match for the medieval professional intelligence officer who trained in his craft from the cradle. Interestingly, the small castle of Hakuho-jo, located in the city of Iga Ueno, has the highest walls in all of Japan - 30 meters from the base of the masonry to the ridge, which is approximately equal to the height of a nine-story building! Apparently, its founder Tsutsui Sadatsugu knew very well the abilities of the local ninjas.
NAVA-"ROPE"
The simplest climbing device is a regular rope. Ninjas made their ropes from women's hair or hemp fibers. When operating in a group, the first, most experienced and prepared scout climbed the wall without any equipment, secured a rope at the top and lowered it to his comrades. After they climbed the wall, the rope was dropped on the other side of the wall and lowered down.
You could tie some kind of weight to the rope - a stone, a bag of sand, a piece of wood, throw it over a tree branch and climb to the desired height or pull the weight up.
KAGINAWA – “HOOK ON A ROPE” (UTIKAGI – “WORGED HOOK”)
Ninjas used different types of hooks. The simplest and most common was the single "forged hook" uchikagi, made of high quality steel and shaped like a crescent with a hole for passing the rope at the bottom. Two-pronged hooks with “claws” diverging in opposite directions are also known.
The kaginawa, a strong iron hook with a thin but strong rope attached, is an indispensable “companion” of the ninja (Fig. 113).
Using a special technology, the Kaginawa hook was made black so as not to glow in the dark. The samples that have survived to this day weigh from 112.5 to 187.5 grams.
Using several single-pronged hooks, ninjas constructed three- or four-pronged “anchors” (Fig. 114), as well as four-pronged anchor-type hooks (Fig. 115), which could be easily disassembled for ease of carrying.
When assembling such devices, triangular or quadrangular (according to the number of teeth of the “anchor”) metal plates with large cutouts were used, which made it possible to securely fix the “claws” in the structure. Descriptions of such options can be found in many sources on ninjutsu. For example, in “Ninpiden” a collapsible four-pronged “anchor” is described, and in “Bansenshukai” - a three-pronged one. In addition, in the “Ninpiden” section “About anchors” a four-toothed “cat” is described with a teeth length of 24 cm and a total length of about 45 cm.
Kaginawa had a very wide range of applications. It was used for climbing onto walls and descending from them, hanging from a tree, catching an enemy with a throw and then tying them up, for fixing doors in a closed position, anchoring a boat, etc., etc. (Fig. 116) As “Cats” were sometimes used by ninjas and small boat anchors called ikarinawa.
KASUGAI - "BRACKET"
A pair of kasugai (Fig. 117) of the “nagai” variety - “long kasugai” - with a crossbar length of 36–37 cm and teeth of 6–7 cm served as a reliable aid when climbing a castle wall, tree or fortress gate. The sharpened teeth of the bracket were inserted into the cracks between stones or struck into wood and served as a reliable support for the steeplejack.
In the book “Ninpo Hikan” there is a drawing of a “large kasugai” - “oo-kasugai” with a specified crossbar size of 55 cm. The size of the teeth is not indicated, but, as can be judged from the proportions of the drawing, they should be more than 10 cm.
Having penetrated an enemy castle, a ninja could easily perch himself on a decorative crossbeam - nageshi or under the ceiling in the corner of the room, using a pair of small kasugai - "ko-kasugai", or, for short, "ko-gai". Kokasugai had a crossbar from 12 to 18 cm. According to legends, a ninja could cross even a large oohiroma hall unnoticed, hanging with his back down on the ceiling beam, clasping it with his legs and moving the kasugai in small “steps” (Fig. 118).
Read also: Retro wiring in a log house
Hiding in the corner of the room, he rested his feet on the adjacent walls, driving the teeth of the kasugai into the ceiling. At the same time, the twilight that reigned in Japanese castles and the high height of the walls in the main halls - up to 5-7 m - allowed him to remain invisible.
TOBI-KUNAI - “FLYING KUNAI”
Originally, the kunai (119) is one of the kaiki - ninja thieves' tools. However, under the name "flying kunai" it also appears in the toki list. A long and strong rope was attached to the ring of the “flying kunai”, which was small in length - 25–30 cm. Having thrust it with a throw at a suitable height, for example, into a wooden beam of a tower, the ninja climbed the rope to the desired place.
TEKKO-KAGI (SHUKO) - “HAND-HOOK”, TEKAGI - “HAND-HOOK”
If you happened to watch the feature film "Revenge of the Ninja", you probably remember how the hero Kosu-gi Sho climbed the wall of a skyscraper using plates with iron claws on his hands. Such “paws” of the ninja were called “tekko-kagi”, “tekagi” or “shuko”.
There are two types of tekaga (Fig. 120).
In one, the claws were attached from the side of the palm, in the other, from the back of the hand, but in both cases, the base was a bracelet made of a thick iron strip into which the palm was threaded. When ascending and descending along a vertical surface, the claws stuck into the cracks of the masonry or into the tree. Tekko-kagi with a special bend of the teeth were also used for self-suspending on a ceiling beam (Fig. 121).
NEKODE - "CAT'S PAW"
Similar functions were performed by separate claws “nekode”, which were placed on each finger of the hand separately (Fig. 122). Interestingly, the idea of such ninja claws was borrowed from musicians playing the traditional Japanese string instrument koto.
Modern research has shown that using all forms of hand claws to climb a wall or tree is extremely difficult, requiring great physical strength and endurance.
But no one doubts the possibility of using tekko-kagi or nekode in hand-to-hand combat. With claws made of hardened steel, you can easily pierce the light leather armor of an ordinary infantryman, pierce the skull, tear out a piece of meat, or, by ripping open the stomach, dump out the intestines (Fig. 123).
And a type of tekko-kagi with claws attached to the back of the hand does not interfere with squeezing the hilt of the sword. Therefore, the “warriors of the night” often used shuko in combination with a sword in battle. At the same time, they deflected the enemy weapon with their left hand, and with their right they grabbed their sword and chopped.
But as for protection from a sword strike with a tekaga stand, this is a clear exaggeration. The Japanese katana sword is a terrible weapon. It can cut through bones like butter and cut through anything. So, by holding the blade between the spikes and turning your hand, you can snatch it from the enemy only by acting proactively, blocking the sword on the swing.
The tekagi fighting technique is very impressively shown in the first episode of the famous Japanese series, which aired here under the name “Shogun Assassin” (in the Japanese version, “Lone Wolf with a Child”).
ASIKO - “FOOT CLAWS”
Ashiko is a foot version of tekko-kagi. They were metal plates with spikes. Ashiko, combined with tekko-kagi, allowed the ninja to climb walls located at an angle to each other, resting their feet and hands on two adjacent walls.
Another technique was used for tree climbing. At the same time, the ninja tightly wrapped his arms and legs around the trunk.
TEPPASHI - “METAL HASHI[15]”
Metal nails, shaped like hashi chopsticks, about 15 cm long, sharpened on one side, with a hole for passing a rope on the other, were used by ninjas to drive into cracks between stones to serve as a step when climbing a rock or wall. Usually “invisible people” used a set of 12 teppashi - not very heavy, but quite enough for everyday needs.
UTIKAGI - “WORGED HOOK”
In some schools of ninjutsu, this was the name for a long pole with a hook at the end, which, when hung on a wall or branch, you can climb up without any problems.
SHINOBI-KUMADE - “SPY BEAR PAW”
In its use, Shinobi-kumade is generally reminiscent of the previous device, but its technological implementation is much more complex. The “bear paw” was made from individual 25–30 cm long pieces of bamboo with a drilled core. A rope with a hook at one end was passed inside the scraps. By loosening the rope, the shinobi-kumade could easily be folded into a small bundle of bamboo scraps, and by tightening it, it could be turned into a long pole with a hook at the end for hanging on the wall and climbing onto it. In some versions, crossbars were also provided, which made climbing the wall a trifle. In appearance, this design resembles the “flying staircase” of the tobi-bashigo, which will be discussed later. In addition, some authors mention shinobi-kumade of a telescopic design (Fig. 124).
However, Japanese historians are skeptical about shinobi-kumade, considering this device to be a purely cabinet invention, although non-demountable versions of the “bear paw” were undoubtedly used by Japanese warriors not only for climbing walls, but also for boarding in naval combat (Fig. 125).
If necessary, “rakes” such as shinobi-kumade or poles with hooks could be effectively used as melee weapons. With them, a ninja could easily disfigure his opponent by “slightly scratching” his face with teeth, or sever the femoral artery or stomach.
Read also: How to set the angle on a knife sharpener
SHINOBI-ZUE - "SPY CANE"
The shinobi-zue cane (Fig. 126) was a bamboo pole 120–150 cm long with a pointed metal knob (ishizuki) at the bottom, a strong steel hook at the other end and 4–5 rope loops. Climbing over the fence, the ninja could put the shinobi-zue against the wall or hang it on a hook and easily climb up using the body of the cane and rope loops.
MUSUBI-BASIGO - “KNITTED LADDER”
Musubi-bashigo (Fig. 127) is the simplest and quite familiar version of the staircase. When making it, crossbars 25–30 cm long made of the same material are attached to two long bamboo poles with rope. The only feature of the spy version is the straw wrapping of the poles at both ends, which prevents them from slipping and dampens the sounds when the ladder is placed against the wall and when it rubs when climbing.
The design of the musubi-bashigo staircase is so simple that it can be made in a very short period of time from scrap materials. But special collapsible versions of musubi-bashigo are also known, in which two long poles are used with metal brackets attached to them, into which the crossbars are inserted.
TOBI-BASIGO - “FLYING STAIRCASE”
In this type of ladder, several bamboo rungs are tied to one bamboo pole, and the upper and lower ends are wrapped with straw (Fig. 128). This staircase can also be made very quickly.
KUMO-BASHIGO - “CLOUD STAIRWAY”
Kumo-bashigo was used if the musubi-bashigo was not long enough to rise to the required height. In this case, a tobi-bashigo was tied on top of the musubi-bashigo, almost doubling the overall length of the structure (Fig. 129).
MAKI-BASIGO - “ROLLING LADDER”
This type of staircase is undoubtedly known to the reader, for example, from the novels of Alexandre Dumas. It was along these rope ladders that French womanizers climbed on dates with their lovers or ran away from them if their husbands returned.
Maki-bashigo consists of two parallel ropes with hooks at the ends with attached bamboo crossbars (Fig. 130).
This design easily allows you to turn a fairly long staircase into a small bundle.
A more complex version of maki-bashigo was assembled from equal-length pieces of bamboo with drilled partitions through which a rope was passed.
NAVA-BASIGO - “ROPE LADDER”
This is a variation of the previous ladder, distinguished by the fact that small sharp pins are attached to the ends of its rungs, which rotate freely on rope loops and make it possible to fix the ladder in the cracks between the stones and thereby prevent it from swaying in the wind (Fig. 131). Hence another name for this ladder: “kagi-bashigo” - “staircase with hooks”. Such options were used when climbing particularly high steep slopes, mainly in the mountains.
KUMO-BASIGO - “SPIDER LADDER”
Another version of the kumo-bashigo staircase of the same name is also known from sources, which, however, has nothing in common with its previous namesake (Fig. 132).
This version of kumo-bashigo was a bunch of ropes with hooks diverging in different directions, like the rays of the sun or the legs of a spider. The hooks hooked onto branches and tree trunks, and the ninja easily moved through the forest at high altitudes, remaining hidden in the foliage and pine needles and leaving no traces on the ground.
TAKA-BASIGO - “HIGH STAIRWAY”
I could not find a description of this staircase in the works of modern Japanese historians, but, judging by the illustration from an ancient manual on ninjutsu, given by Hatsumi Masaaki in the book “Ninjutsu history and tradition,” such a staircase was used as a bridge across wide chasms. To prevent the ladder from swinging in the wind, its middle was supported with a rope with a hook (Fig. 133).
Various staircase options are also shown in Figures 134–135.
KASYA - “ROLLER”
The kasha roller (Fig. 136) in combination with a long rope allowed the ninja to cross large open spaces in the blink of an eye and quickly move equipment and other loads from place to place. Often such “bungee bungees” were arranged ahead of time to ensure separation from the pursuit in case of failure of the operation. To do this, the rope was fastened at one end at a height, the other on the ground to provide it with a variable length tsugi-bashigo, and on the right - a gentle slope lowered on the ganseki-bashigo ropes. If you didn’t have a roller at hand, you could use a regular belt loop, specially treated for slipperiness.
NAGADZO - “LONG CLIFT”
This was the name of a durable bag that was used to lift and lower people or equipment. Firefighters currently use something similar.
IPPON SUGI-NOBORI - “SUGI TREE CLIMBING DEVICE”
When climbing smooth tree trunks and columns, ninjas used a “device for climbing the essence tree” (Fig. 137). Essence, or cryptomeria, is a tall coniferous tree whose branches start quite high.
Ippon sugi-nobori was a round iron bar with fairly long and strong spikes and a rope attached to both ends. The ninja wrapped a rope around a tree so that the thorns pierced the tree on the opposite side, pulled the rope, rested his feet on the trunk and leaned back. Due to this “spacer” he could hang on the trunk, and by quickly throwing the ippon sugi-nobori up and pulling his legs, he could climb higher and higher.
A similar technique for climbing a tree can be used with a regular belt or leather belt.
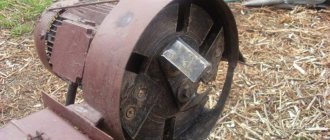
Claws for climbing wooden posts
Episode four (fresh).
There are many ways to climb poles and trees.
I have tried almost all of the above methods (with the exception of the crossbow and the BEAR style), and until this summer I preferred loop lifting with crawl and jumar. But in the summer they finally sent me an overseas parcel, on which was written “Klein Tree Climbing Spurs” , or in our language - gaffs .
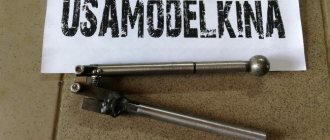
What it is?
Gaffs are special “side” crampons for climbing poles and trees. They consist of a metal arch of complex shape, replaceable spikes attached to this arch and a suspension to secure this entire structure to the leg.
I’ll tell you right away about the accompanying equipment. For convenient and quick lifting, you need a harness with power side lugs (for example, any PETZL harness for industrial mountaineering) and an adjustable loop; I use a braided cable loop, “kitchen” production. Why cable? The fact is that I rarely climb a tree without a chainsaw, and a chainsaw cuts through ropes and slings instantly.
Lifting is extremely simple. You secure yourself to the tree with an adjustable loop, stick a tenon in and stand on it, while loading the loop, stick a second tenon above the first, rise up, throw the loop over and do the same thing. When I tried it for the first time, it was, to put it mildly, a little scary. Still, you rely on just two spikes and hold on to a loop that simply wraps around the tree and is attached to the side ears of your harness. But after breaking a couple of times, and making sure that the loop holds perfectly, you yourself manage to stick the gaffs into the tree.
I realized that the method is quite safe, if there are any safe ways to climb trees. The third time you get the hang of it, you start climbing quite quickly. My speed, compared to climbing on loops, approximately doubled. Working with a chainsaw is much more convenient than hanging on a rope, because... you stand on your feet, leaning on the loop with your back. There is one drawback - at first the suspension rubs, but using high shoes, socks or some kind of shields, this problem is easily solved.
Claw-holes
Claws and manholes are devices that are used to lift the installer to a height without the use of an aerial platform. This device is used in conjunction with safety harnesses and slings and can be used to move along wooden, metal or reinforced concrete supports.
Design
The design of the claw manholes consists of a pair of steel parts, bent in a semicircle (in a crescent shape) or bent at a right angle, and having spikes that provide engagement on the support. These elements are attached to a special foot pad, which holds the foot using durable fastening straps. Claws are used in conjunction with harnesses and lanyards to keep the worker upright.
What is the difference between claws and manholes?
Fitter claws are used when climbing onto rounded wooden, metal supports, or wooden supports with reinforced concrete steps. The claws have a crescent-shaped gripping element with a fixed size.
Manholes are used when lifting onto concrete supports. Such devices are made curved at right angles, which makes it possible to climb trapezoidal or rectangular poles. This type of manhole can be adjusted in size depending on the parameters of the support.
Terms of use
Manhole claws can only be used for their intended purpose - the instructions (passport) clearly indicate the type of supports on which this type of device can be used.
Before direct use, you need to check the claws for any kind of damage and malfunctions (chips, cracks, burrs), and also make sure that they have passed the scheduled inspection. During inspections of claws and manholes, welding seams and bolted connections are thoroughly inspected, and the integrity of the spikes and fasteners is established. The frequency of scheduled inspections is at least twice a year. Also, you should not use manhole claws after the end of their service life - in this case, even without visible damage, the properties of the metal lose their effectiveness after a certain time, and the means of protection no longer meets the specified safety requirements.
Since safety harnesses, safety belts, etc. are required to be used in conjunction with manhole claws, these protective equipment must also be checked for serviceability before their use.
Only employees who have undergone special training and who do not have medical contraindications for working at height are allowed to work with claws and manholes.
Claw-holes can be used at temperatures from -40 to +50 degrees.
After each use, the claws should be cleaned of dirt and dust before storing them.
Storage and care
As is the case with all types of personal protective equipment, it is very important to observe the correct storage conditions for laz claws so as not to harm their performance. The recommended storage range of devices is usually -20 to +30
It is important to maintain a moderate humidity regime, protect the claw holes from moisture and exposure to direct sunlight
In any case, it is worth studying the instructions included with each device, because... it describes the storage conditions for a specific model
It is important to maintain a moderate humidity regime, protect the claws from moisture and exposure to direct sunlight. In any case, it is worth studying the instructions included with each device, because... it describes the storage conditions for a specific model
it describes the storage conditions for a specific model.
Claws do not require special care. After direct use, it is enough to wipe them from dirt and inspect them for damage.
How to make a homemade climbing wall with your own hands for children - instructions
In order for the carnival costume to be perfect and perfectly match the chosen image, you need to carefully take care of even the smallest details. For example, in order to realistically appear as a mutant or an evil predator, you need to inquire in advance about how to make claws from paper or other materials, and select all the necessary blanks.
In order for the carnival costume to be perfect and perfectly match the chosen image, you need to carefully take care of even the smallest details
What is a scratching post for?
If the animal has the opportunity to be outdoors, the length of the claws is controlled naturally: climbing trees, pebbles, dense soil, sand. For a pet who permanently lives indoors, a cat scratcher will help cope with the problem.
You can purchase a ready-made item at a pet store. Choose a device that will harmoniously fit into the interior, corresponding to the habits and characteristics of the animal, so that its dimensions correspond to the allotted space. However, the offered assortment may not always fully satisfy the buyer’s needs. Sometimes it can be difficult to choose which scratching post is better, whether it will interest the cat or not get his attention.
Those who prefer to make things with their own hands know how to make a scratching post for a cat themselves and what materials are best to use for this. When developing the design of a cat accessory, they very often create not just an object for sharpening claws, but an entire play town, a kind of simulator for a cat, which is also a unique element of the interior.
How to make paper claws: origami for fingers
Making crafts using the origami technique is very easy and simple. Even a child can cope with this task without much effort. A claw that completely covers the finger can be made according to the following scheme:
Using this principle, paper claws are made for all fingers.
How to make claws like Wolverine, a dragon, a predator
Most boys like to watch movies and read comics about Wolverine. Naturally, they have a desire to make themselves long claws, similar to those possessed by their favorite hero.
Most boys like to watch movies and read comics about Wolverine.
There can be no difficulties in this case; the manufacturing process is described in stages:
How to make an elegant arch from balloons with your own hands
To create the claws of a real predator or dragon, you need to follow the following instructions. For manufacturing you need the following tools:
Armed with everything you need, you can get to work:
In this form, the claws will be similar to those that can be seen on a cat or lynx. If you glue them to the gloves, they will begin to resemble the hands of Freddy Krueger.
DIY claws made of iron or wood
Iron and wooden claws like those of Wolverine or Shredder can only be made if you have all the necessary tools
During the work process, you don’t even need a drawing if you strictly follow the instructions:
How to make claws from cardboard or plasticine
The claws look impressive when they are made using cardboard rather than ordinary paper.
To make them, you will need the following materials:
Manufacturing is carried out as follows:
Plasticine claws are very easy to make
An even simpler way to create the main accessory of a costume is using plasticine:
How to make soap from soap remnants at home
It’s not just the claws that look much more impressive, but the glove on which they are attached.
The process of making such a glove is not that complicated, you just need to arm yourself with everything you need:
It’s not just the claws that look much more impressive, but the glove on which they are fixed.
The production of gloves is carried out in several stages:
The result is not just animal claws, but literally an entire paw. Naturally, the costume will look very realistic and will be remembered by everyone for a long time.
Another option for making a glove can no longer be called childish. These are real Wolverine claws, made of leather and metal. For this glove you will need:
In order to make such a glove, you must do the following:
Defects in mounting claws
Due to the non-uniform surface, a reinforced concrete pole often causes defects in the tenons, the metal structure is damaged, and the sharpness of the tip is reduced, which affects the safety of the electrician. After restoration of the parts, the device must undergo additional examination and withstand static loads on the fastening belts of the footrests with a force of 1350 N, and a tensile stress of up to 675 N.
The solution of crampons for reinforced concrete supports, as well as their maximum lifting load, are measured before and after the test procedure, the results are recorded in the technical data sheet. The service life of lineman's claws, produced in accordance with the characteristics of concrete pillars, is determined individually, but the manufacturer sets a period of 60 months. Persons over 18 years of age and who have undergone special training are allowed to work at height.
If malfunctions are detected, it is prohibited to use the installation device or carry out repairs on your own. According to safety requirements, after 7 years of active use, the crampon or safety belt must be written off.
Review of brands and manufacturers
There are quite a large number of manufacturers of claws and manholes of all types. The domestic market is predominantly represented by Russian manufacturers, whose products are distinguished by high quality manufacturing, reliability and relatively low cost. article: → “Maintenance and repair of overhead power lines.”
The following companies deserve mention and are trusted by consumers:
- CJSC "Potential";
- electrical engineering plant KVT;
- production association "ZMO".
(Nizhny Novgorod)
Installer's claws No. 2, manufactured (Nizhny Novgorod) are used for electrical installation work on wooden vertical supports or wooden poles with reinforced concrete attachments for overhead power lines. The opening of the device is 315 (±10) mm, the lift is 160 (±10) mm.
- The diameter of the supports allowed for use is 220-315 mm.
- The cost of the device is about 2-2.5 thousand rubles.
- The main characteristics of claws No. 2 2 are presented in the table.
Products of the KVT enterprise (KVT electrical plant)
The KVT enterprise produces the popular and sought-after model of KLM claws in two versions - KLM-1 and KLM-2. Both options are used for work on trapezoidal overhead line supports.
KLM claws from the KVT company are the standard of quality and reliability
- KLM-1 ensure safe operation on columnar supports of types SV110-1a and SV110-2a. The claw length is 168±4 mm, weight is 5.3 kg. The price of KLM-1 claws, depending on the region, is 2.2-2.8 thousand rubles.
- Claw-holes KLM-2 weighing 5.4 kg and opening 190±4 mm are widely used for posts SV105-3.6 and SV105-5. The cost of the device is approximately 3.5 thousand rubles.
Comparative characteristics of the KLM-1 and KLM-2 claws are presented in the table.
Production Association "Installation Equipment Plant"
KM claws ensure safety when working on power and communication lines
The production association "Installation Equipment Plant" boasts two popular models. KM-1 claws are widely used for work on wooden and wooden with reinforced concrete inserts power transmission line supports, on communication line poles with a circumference of 140-245 mm.
- The forged sickle and spikes are made from reliable 40X steel and are supplied with leather straps. The device's opening is 245±10 mm with a fairly low mass of 3.6 kg. The cost of KM-1 ranges from 2400 to 2900 rubles.
- Universal switchgear manholes are used on supports of trapezoidal cross-section of overhead lines of the SV110-1a, SV95-1(2a), SV105-5 and SV105-3.6 brands. The manhole has an adjustable opening in the range from 168 to 190 mm. Reliable adhesion to the surface of the supports is ensured by carbide spikes. Supplied with leather straps.
- The weight of the product is approximately 5 kg.
- KRU manholes can be purchased for 2900-3700 rubles.
Comparative characteristics of KM-1 claws and KRU manholes are presented in the table.
Safety Precautions - Inspection and Testing
When using this device, specialists working at height must have additional equipment in their arsenal in the form of a protective helmet, which will protect against an accidental blow, as well as a safety lanyard, which will help to avoid serious consequences.
Straps for fastenings should also be available. The design of the belts must guarantee convenience and reliability in use, therefore their thickness must be at least 3 mm. These devices are made of two-layer leather, which is impregnated with fat. Each access hole must be marked with the date of the next inspection.
Before climbing to a height, you should thoroughly inspect the claws and check the test date. In addition, it is necessary to ensure the reliability of the welds, the integrity of the spikes, and the serviceability of the worm mechanism.
The metal elements of the device must not contain dents, breaks, sharp edges, cracks, or burrs. The spikes must not be damaged, beveled or knocked down. It is prohibited to use claws whose spines are blunt or absent altogether.
The device must be loaded for five minutes, with the load passing through the center point of the footrest. Before testing, a visual inspection is carried out to ensure that all parts are fastened and that there is no damage to the belt firmware. The fixing nut must be tightened with a locking ring.
In addition, the correct sharpening of the spikes is checked. The tests are carried out on a wooden support, the diameter of which corresponds to the numbering of the claw. After testing on the claws and manholes, there should be no deformation of the elements, damage to the welds, or breakage of the belts. Then measurements are taken, which are compared with previous values and recorded in a special journal.
If, after loading, defects are revealed, then such devices must be repaired; spikes and other damaged components are replaced. After troubleshooting, the device is again subjected to load.
Types and their characteristics
You can purchase the required type of manholes by deciding on their purpose. If you plan to work on wooden poles, then you should buy one type of device. When working on concrete supports, a different type is chosen.
Manholes are divided into several types:
- lineman's claws (for round metal and wooden poles), now they are practically not used;
- assembly manholes for concrete (for round or trapezoidal concrete pillars), very common;
- Installer's manhole claws (for supports made of reinforced concrete in the shape of a trapezoid) are quite popular, the opening of the manholes is adjustable, which allows them to be used on any support.
Where and how to use a safety lanyard, read in this publication.
A safety harness is used to cover the worker’s body to prevent him from being caught in the future. What are the requirements for a harness, read here.
Terms of use
There are special instructions for electricians that tell you how to use electrician's claws. First of all, it is necessary to take certain safety measures when performing various works in electrical networks, especially on power lines.
- Before starting work, you need to agree on the procedure, draw up all the necessary documents, prepare the workplace and allow workers to complete the task. These measures are extremely important and necessary in order to protect workers. For example, when an electrician is working, voltage may be applied to live parts (namely wires).
- You need to be able to properly use the protective insulating equipment used during work.
- Installer's claws are used exclusively for those supports that are indicated in the device's passport.
- Before starting work, you need to check the product for damage and check the test date. In this case, yarns and belts, bolted connections, welds, fasteners, and spikes are checked. Electricians who use assembly claws must undergo additional instruction and training. They are also tested on their knowledge and checked whether they have a record of permission to carry out the work independently.
- Twice a year, claws and holes should be sent for inspection. This is necessary in order to detect and correct a defect or malfunction in a timely manner.
- If the integrity of the device is compromised (for example, there is a crack or a hangnail), then they are not allowed to be used.
- In addition to the structure itself, before carrying out work, you need to separately check the safety belt and climb the pole only with it.
- It is prohibited to change anything in the structure of the device or its belts.
- It is strictly forbidden to climb a pole through which fault currents passed to the ground.
- The structure must be stable and integral.
The video below clearly demonstrates how to use lineman's claws when climbing onto a support:
Care, storage, service life
Manholes are a universal device; they can be used in almost any climate zone with a temperature range from minus 40 to 50 degrees above zero. This means that work on power lines can be carried out both in the northern regions and in hot and sultry conditions.
The service life is indicated by the manufacturer. Time is counted from the moment the products are put into operation. No later than a year later, such a tool must be removed and recycled or disposed of. The maximum operating life of manholes is 60 months. Components are changed during operation as needed. The warranty period is usually 1 year from the moment the product is put into operation.
Store the device in a temperature range from minus 20 to 30 degrees above zero. It is unacceptable to store manholes in a room with an open roof; precipitation will leave a sharply negative mark on the quality of the devices.
Monter's manholes do not require special care. After use, they must be cleaned, any remaining dirt must be removed with a rag and stored away. Do not wash under water or wipe with wet material.
In conclusion of our article, we suggest watching a video of how assembly manholes are made and how to correctly lift using them: