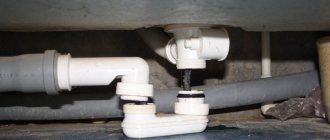
When connecting plumbing to drainage lines, one of the required elements is a water seal for the sewerage system. This is a device that always contains a certain volume of water, which prevents the penetration of unpleasant odors from sewer networks. A dry siphon reliably separates the interior of the drain from the plumbing or living space, positively influencing the atmosphere of the room.
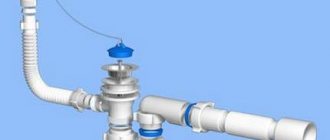
Siphon operating principle
The location of the device does not affect its purpose, which is:
- compensation of water hammer in order to limit the load on the gravity sewage system;
- removal of air with an unpleasant odor from the waste system into residential premises.
In the case when the water seal for the sewer system is selected correctly and installed in the bathroom in compliance with all requirements, there is no unpleasant odor from the sewer system in the room, and its operation will not have any malfunctions for a long time. This is thanks to knowledge about the operation of a water seal in a sewer and its correct use.
Structurally, the closure devices have differences, but, in essence, this design is a product made from pipes, on the bends of which water is stored, which blocks the lumen along the inner diameter.
There is always a plug of water inside the pipe, which is renewed from time to time. During a long break, the water in the water seal gradually evaporates, which allows odors from the sewer to enter the room. Owners of country houses that are visited periodically may encounter this factor.
There is an interconnection among the elements of the sewer system. For example, a drain pipe is necessary in order to prevent “water seal failure” - drawing water into the riser during descent by equalizing the pressure in the sewer pipe. Air valves of various designs are also used for this task. They are used when there are no ventilation pipes in the building.
Floor and drainage
Laying a sewer line is much more hassle than directly draining a bathhouse, but it is better to do it, the more carefully, the better.
Even if the floor in the bathhouse is covered with wooden gratings, it is still better to make a screed along the beacons with a slight uniform slope towards the ladder , and lay tiles on it. The final cutting of the drain extension can be done when it is known exactly at what height the tiles will approach the drain point. If the work is done very carefully, then even with a minimal slope there will be no puddles.
Providing access, with the ability to replace all elements, is too much of a luxury for an ordinary bathhouse. Therefore, you should not avoid work that may seem unnecessary, for example, the depth of laying the sewer system should not be less than the freezing depth . Insulating the floor under the screed with a 20 cm layer of expanded clay with a rich cement mortar is by no means an excess. A dry ladder is also not a panacea - dirt that gets into the shutter can prevent it from closing tightly. At the end of the season, it doesn’t hurt to wash the removable elements. Buying a dry water seal in a store or making it yourself - this question is not necessarily related to financial difficulties.
Features of dry water seals
To solve the same problems as hydraulic devices, the operating principle of dry valves is radically different. The operating principle of this device is based on the “nipple” principle. The water flows through a pipe in which a check valve is installed. Thanks to this, water remains in the pipe in any situation, and unpleasant odors from the sewer cannot penetrate into the room.
It is best to place a dry water seal in a bathhouse or bathroom, since here hydraulic devices usually dry out. Dry seals are strictly prohibited from being installed in kitchen sinks, as they cause blockages, but these products are especially effective in shower stalls.
There are several types of dry shutters:
- Membrane designed to block the lumen when water leaves with an elastic membrane. These devices are structurally the simplest and are the most common options. The entire working process is carried out thanks to a spring-loaded membrane, the opening of which is carried out under the influence of the flow of water, which freely enters the sewer. When the flow stops, the membrane returns to its original position, thereby creating a sufficient barrier that prevents the penetration of unpleasant odors.
- Pendulum, they allow you to quickly block access to the hole. They are equipped with a valve that must have one attachment point. The moment a flow of water hits the valve, it deviates from its axis and opens the path for liquid. Returning to the reverse position is carried out due to gravity.
- Float valves operate on the principle of a flush tank. They are often done independently when installing sewer lines in bathhouses. The simplest principle is the float valve. Light weight allows the float to float on the surface of the water. As soon as the water drains, the float falls down and blocks the drain. If the sewer lines dry out due to infrequent use, the dry seal will prevent the unpleasant odor from penetrating into the room.
There is another variety - molecular memory gates. Such devices can rightfully be considered high-tech; their price is much higher than that of other products. Thanks to the molecular memory of the material, the elements of the device always take the desired position, due to which the structure is sealed.
Differences between dry sewer valves and hydraulic (water) valves
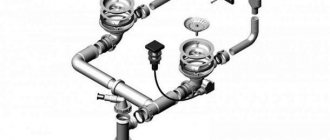
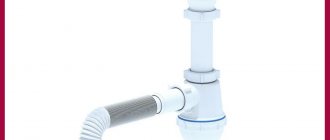
In order to connect a washbasin, bathtub or other plumbing fixture to the sewer network, various siphon configurations are used. The operating principle of a dry shutter is radically different from the hydraulic model. The water seal for sewerage is made in the form of a curved tube that is filled with water. It is water that performs the barrier function and prevents sewer gases from entering the room.
However, the water type of device has a significant drawback - the water in the U-shaped pipe can evaporate, which will open the way for sewer gases. Thus, this valve needs to be constantly replenished with water. In addition, due to the design features, such a siphon is not suitable for installing a drain for showers or baths.
The dry device is structurally significantly different from the hydraulic one. Such a device operates according to the “nipple” system. This device is made in the form of a polymer tube; the material for the valve body is most often polypropylene (PP). There are threads at the ends of such a pipe.
A dry seal does not require constant maintenance of a certain water level in the system
The internal structure of dry models involves the presence of a special membrane that acts as a check valve. Therefore, such a valve (unlike a hydraulic one) also carries out regulatory work - it prevents the water in the system from moving in the opposite direction. This function is especially important for plumbing fixtures that are located on the lower floors of multi-story buildings.
Important! Dry valves are strictly prohibited from being installed in kitchen sinks where dishes are washed. In such a system the shutter will last very little.
Unlike the water type, the dry valve does not require frequent checks and maintenance of the water level in the system. It is more functional and can work both autonomously and in conjunction with a water device.
Sewer drain with dry siphon
Installation of this design is carried out in rooms where drainage occurs from the entire floor surface. During construction, a sealed floor screed is installed, in which a siphon is installed to prevent air from entering from the sewer.
But in the case of a sewer drain in a bathroom or bathhouse, it is necessary to take into account long-term downtime of the room, which is especially true for shower rooms in bathhouses. In such situations, when the water in the seal dries out, air with an unpleasant odor from the sewer easily penetrates into the room.
Because of this, in addition to the water seal, a dry siphon is also installed in baths and bathrooms. It is not a special device, and its installation is carried out as part of the sewer drain structure. This valve allows you to block the lumen of the pipe even without water.
Installation recommendations
Depending on the configuration of the connected equipment, the location of the sewer pipe, as well as installation and maintenance conditions, several options for installing a dry water seal for an air conditioner are possible:
- Vertical. Installed perpendicular to the floor plane with the outlet downward.
- Horizontal. Installed with the corrugated side down at an angle of 10° to the floor plane in the direction of liquid flow. A slight tilt is necessary to prevent water from accumulating at the bottom of the device.
- Free The dry siphon can be installed at any desired angle (from 10° to 90°) to the floor surface, with the grooved side facing down.
Criteria for choosing a dry siphon
In order to prevent mistakes when choosing a shutter model in a particular case, the following factors must be especially carefully considered. The main conditions of which, when choosing, should be the following:
- A fairly important indicator for choosing the required dry seal for sewerage is the amount of waste that will pass through it. For example, a dry shutter with a passage diameter of 50 mm is well suited for a washbasin. For showers or baths, valves with a larger throughput capacity will be required. In such cases, it is necessary to purchase a device with a passage diameter of 100 mm.
- The second condition that must be taken into account is the height of the device. Horizontal bends, as a rule, have a height of 7 to 10 cm, while vertical bends require more free space (about 15-18 cm). Therefore, if you do not want to carry out installation in cramped conditions, it is best to choose a horizontal model.
Helpful information! When purchasing this device, you need to pay attention to the little things. It is advisable to make sure that the device is working. This is done quite simply - you just need to pass a certain amount of water through it.
Don't forget about the appearance of the device. Shower drains, the design of which includes dry seals, can be equipped with a grate of any configuration. There are quite a lot of design solutions in this situation. This allows you to turn the device into a decorative product that will delight with its aesthetics.
Do-it-yourself shower drain installation under tiles
When installing a shower drain during the construction of a private house, usually, questions about how to make a drain in the floor of the shower stall do not arise. In this case, the drain is installed in the floor screed, which is then tiled, and a vertical drainage pipe for wastewater is made into the sewer channel.
With the arrangement of drainage in the apartment, things are somewhat different. In the bathrooms of apartment buildings, most often, the thickness of the screed is not enough to install a vertical drain in the shower. Therefore, to equip a cabin with this product, the floor level in the room is first raised, at the same time ensuring its slope. As a rule, a height of 12-15 cm is enough to place a siphon and drain pipe under the screed.
Install a drain in the shower floor with your own hands, following the following sequence:
- First, using a tape measure, measure the location of the drain with the expectation that a multiple amount of tiles should fit from the drain to the walls, not forgetting about the joints between the tiles (1.5-2 mm). This way the floor will look more aesthetically pleasing than with cut tiles.
- The drain is then connected to the sewer drain through pipes. The slope of the drain pipe must be at least 3 cm per linear meter.
- If it is necessary to insulate the screed, use foam sheets with a thickness of 5 cm and a density of at least 35 kg/cu. meter, but it is better to use extruded polystyrene foam, as it is harder and less susceptible to moisture.
- Sheets of insulation are laid on the rough surface of the floor and adjusted to the dimensions of the plumbing drain, and a concrete screed is made on top with a layer of about 4 cm, which should fill the entire space up to the drain flange.
- It is necessary to allow the screed to dry until it hardens completely.
- Then you need to make a gasket for the flange from the waterproofing material, which should cover the flange with a margin. It is necessary to cut a hole inside the gasket along the inner diameter of the flange.
- The upper part of the flange must be placed on the gasket and screwed to the lower part of the structure.
- After this, the screed also needs to be covered with a roll waterproofing material. The laid material should overlap the flange gasket and extend onto the walls by a few 3-5 cm.
- Next, you need to insert its inner part with a siphon into the body of the shower drain.
- Then you need to pour the finishing screed with a slope of about 10 mm per meter of pouring. To do this, guide plastic slats are placed on the floor surface with waterproofing, bevelling them towards the drain. You can buy ready-made systems for making shower drains.
- The pouring of the second layer of screed should be lower than the height of the siphon so that it can be leveled with the tiles. The guide rails are not removed from the screed. At the same time, to prevent the solution from getting into the drain and onto the walls, it is recommended to seal the drain grate with tape, and the corner between the floor and walls with waterproofing tape.
- Next, the surface is tiled, starting from the drain hole to the walls. The tiles should be flush with the drain grate or a few 3-5 mm. higher.
- After the tile adhesive has dried, you need to seal the seams with a waterproof material matched to the color of the ceramic tile.
- Areas where the tiles come into contact with the drain body must be carefully and carefully sealed with silicone sealant.
- At the end of all work, a protective grille is mounted and secured to the body of the shower drain.
A properly installed shower drain will make taking water procedures more comfortable and give the bathroom an original appearance.
How to make a dry shutter yourself?
In order to make this device yourself, you will need a plastic ball and a gasket. The ball should be slightly larger than the diameter of the drain hole.
- A plastic ball must be placed on the drain hole.
- After this, you need to secure it around the edges. The ball must be securely fixed.
- To accomplish this task, you need to put a gasket on the sewer pipe that will securely fix the ball in the pipe. The height of the wall above the level of the drain pipe should not be less than 5 cm.
When using the system, the ball floats and water easily penetrates into the drain. When the structure is inactive, the ball lies on the drain hole, thereby blocking the path of sewer gases.
The indispensability of a water seal in winemaking
Why do you need a water seal? During the fermentation process, a large amount of carbon dioxide is released (about 4 m3/1 liter of alcohol produced). If carbon dioxide accumulates in the container, very high pressure will be created. And sooner or later there will be an explosion
Therefore, it is important to remove gas from the inside, but under no circumstances should oxygen be introduced into the container. Indeed, in this case, bacteria will multiply, which convert alcohol into acetic acid
Until oxygen penetrates into the fermentation chamber, the bacteria are in a dormant state.
.
In essence, this shutter is a special valve that removes carbon dioxide outside and prevents oxygen from entering inside. Without it, it is impossible to make wine, since the result will be vinegar. Experienced winemakers and moonshiners passionately discuss the need to use it. But if you are new to this business, then you cannot do without it.
If we talk about mash, there is no clear answer to the need for a water seal. But with this design, the mash can be kept longer without distillation, and it will not oxidize. And absolutely all the alcohol will be safe.
Water seal on the mash
Main stages of installation
To install a dry siphon yourself, you should carefully study the steps of its installation. If certain conditions are met and everything is done correctly, then the installation of this structure will not cause problems. The most common problem after installing a water seal yourself is leaks. If you don’t have confidence in your own abilities, you should seek help from a specialist who can carry out this task easily and efficiently.
Installation of this device is quite easy. Here are the main steps:
- First you need to check the device. Gaskets and seals must be in place exactly.
- During the second stage, a rubber sealing ring is placed between the siphon and the sink. This ring is necessary to seal the joint.
- A siphon is installed, and a sealant is applied to the joints, making the seams more reliable and reducing the chance of the structure leaking.
Dry sewer siphons are fairly reliable structures and do not require frequent checks and are quite resistant to blockages. To select and install this device, you must follow the recommendations and rules given in this article. You need to choose this device carefully and carefully, and in this case the result will not be long in coming; the device will work reliably for many years.
How to choose a water seal
The basic operating principle is the same for all types of devices. They differ only in form factor. Therefore, the choice of a water seal depends more on the type of container on which you will use it.
- A lid with a water seal is suitable for a glass jar.
- For a barrel, you can use a pneumatic lid with a water seal.
- For plastic containers or glass bottles, you can use a collapsible or non-removable water seal. It is attached to a rubber lid and the containers are sealed with it.
Specifications
- raw material for the grate – cast iron;
- raw materials for the body and float cap of the “dry” shutter are polypropylene;
- outlet diameter – 110 mm;
- throughput, not less than 1 l/s;
- ambient temperature – from -50 °C to +90 °C;
- temperature of the outlet liquid, no more than – +85 °C*;
- net weight, no more – 1.35 kg;
- maximum permitted load, no more than 1500 kg;
- service life is at least 50 years.
* Drains manufactured by TPK Tatpolymer LLC allow liquids with a temperature of up to 100 °C to be discharged into the sewer system, provided that its effect is short-term (100 - 200 liters with a temperature of no more than 100 °C). Increasing the temperature of the discharge liquids to 100 °C does not affect the throughput of the ladders and their performance). In this case, only the maximum permissible load on the ladder is reduced (since the ladder body acts as a load-bearing force element) - it should not exceed 750 kg.
The main dimensions are shown in Fig. 1.
Product composition and completeness
This ladder consists of the following parts (see Fig. 1):
- Cast iron grate;
- The ladder body is made of polypropylene;
- The float cap of the “dry” valve is made of polypropylene.
A batch of horizontal ladders, delivered to one address, is completed with a passport and a combined technical description in accordance with GOST 2.601-2006.
The appearance of the product may differ from the product shown in the photo. The manufacturer reserves the right to make changes to the design, design and configuration of the product that do not affect the quality of the product.