The process of making a lathe from a hand-held electric drill
The repairman almost always has a screwdriver or drill . Based on them, you can make an analogue of a full-fledged wood lathe. In order to make a lathe from a drill with your own hands, you will first need a drawing or sketch of the future device. During the manufacturing process the following will be used:
- clamps;
- crown or cutter for holes for self-tapping screws;
- the screws themselves;
- sandpaper;
- metal clamp with worm thread;
- two studs - M8 and M3;
- a little wood glue;
- Angle grinder, aka Bulgarian;
- mortise furniture nuts and a pair of bolts for them;
- scraps of plywood longer than 60 cm;
- a pair of wooden blocks.
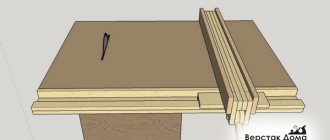
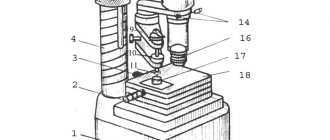
Thick sheets of plywood with a cross-section of about 2 cm will be used as the main material of the machine. You should start from the base, cutting out a wide (16-17 cm) and long (60-80 cm) rectangular sheet. Large sizes will only cause damage; working with workpieces that are too long will be inconvenient, and due to large axial runout, the workpiece may even jump out of the fastening. Next, we will cut out another sheet of plywood, completely identical in length to the previous one, but with a height of three cross-sections of the sheet of plywood used, which gives strength and stability to the entire structure.
To secure the drill , you will need a sheet slightly less long than the base of the electric drill, and the same width, three sections. a drill to it and mark the starting point of the handle. We drill a hole in this place, such that the fastening clamp can pass through there freely. Now we glue it with the second wood glue, securing them with clamps. While the glue dries, we make holes in the base along its entire length in increments of 5-7 cm exactly along the center of the mowing line. After the glue has dried, we attach the part to the base with self-tapping screws.
Do-it-yourself sawing machine from a drill
The tailstock is a U-shaped structure made of two pieces of wood as thick as the second cut part and 4-5 cm wide, fastened together with a piece of plywood (with self-tapping screws), so that they are in close contact with the vertical guide of our plywood base . For a lathe, you will need three such parts of identical sizes, the other two are glued together with wood glue and attached perpendicular to the blocks of wood with self-tapping screws. The tailstock thereby becomes like a chair with a backrest.
We drill a hole for the M8 stud, after which we attach a furniture nut from the side facing the drill. We grind the pin, turning one of its ends into a cone. We screw the pin to the tailstock, cutting off the excess with a grinder. We perform similar manipulations with the M3 stud, screw the second furniture nut onto it and insert it into the drill chuck, check the runout, and adjust it with a grinder.
Let's start making the handicraft. We make two more bars like the tailstock, only narrower, fasten them together with a piece of plywood, and screw a stop from a small block of wood onto it on top, such that it provides an acceptable working area along the axis of rotation of the workpiece. Now we need to solve the problem of fixing the stop. We drill a hole in the support of the tool rest for a furniture bolt and attach a nut there.
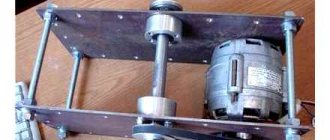
A similar mechanism must be used when attaching the tailstock, using clamps for additional rigidity. We bend the tenons of the furniture nut, which is intended for clamping in the drill in the opposite direction. We attach the electric drill to the clamp and perform a test operation. We re-center it by bending the nut pins. The drill lathe is ready. The power drill lathe base can be screwed to a heavier piece of wood or plywood for greater stability.
DIY making
A circular electric saw for wood can be made with your own hands from various devices. But there is one important condition, namely that you must have skills in working with metal products.
From the Bulgarian
It’s not difficult to make your own stationary circular saw at home. To begin with, you should decide on a project, draw a diagram and even make a drawing. The difference between a homemade table saw and a stationary one is that the height of the base is different. Before you start assembling the tool, you need to think about creating a “table”, that is, a frame. It should be made from wood, or rather from boards 3 cm thick, and then you need to cover everything with tin or even a sheet of aluminum. Also suitable for similar purposes is a steel sheet with a thickness of up to 0.6 cm, and the crossbars should be made from a corner (up to 8 cm).
The working disk will protrude beyond the table by about 30-35%; it turns out that for a bar with a thickness of 12 cm, the diameter of the disk should be 37 cm. The power plant will need 1 kW (maybe more). If the workpieces turn out to be more massive, then a homemade circular saw will not be able to “take” them. The emphasis will be made from angle No. 8 - this is a very durable and massive structure that can withstand heavy loads. The stop will extend beyond the boundaries of the tabletop by 4-5 cm, and one of the shelves must be processed on both sides, in which case the remainder should be equal to the length of the tabletop.
The main unit will be the shaft, and it is worth taking it ready-made. If you have experience working on a lathe, then you need to turn a similar part and it will not be difficult. You also need to buy bearings with a protective mechanism, and the pulley should be a V-belt. A power plant from a washing machine or refrigerator is suitable as an engine. Capacitors are usually oil-paper. Next, when the machine is assembled from available materials, it will need to be tested without loads, idle. All elements must “get used” to each other so that later they work in one complex. During testing, defects may appear that need to be eliminated. For a homemade circular saw, an engine from a washing machine is ideal.
Such power plants operate from a 220 V network, have excellent efficiency (we are talking about efficiency) and a normal rotation coefficient. If you install a three-phase motor that will be powered from a 380 V network, you will need to buy capacitors so that the unit is reformatted to 220 V. In some cases, devices on a gasoline engine are used - such power plants will have good efficiency, and they are also unpretentious in operation .
It’s not difficult to make a circular saw from a drill, but now it’s worth paying special attention to the shaft in a homemade unit. You can grind it yourself from metal. Making an element on a lathe is not difficult. It is important that the centering of the part is maintained so that there is no vibration of the mechanism in the future. Special grooves will be machined on the shaft where pulleys and saw blades will be attached. Sometimes it is necessary to grind out recesses for attaching knives. The size of the saw blade is directly related to the power level of the engine. The diameter must be 3.5 times greater than the thickness of the product. In addition, there are proven calculations - for 11 thicknesses of material, a motor power of 1 kW is needed.
Please note that home craftsmen often make a circular saw with a jointer on a single base. In this case, both tools will operate from the same engine. A jointer can literally clean the surface of wood to a mirror shine, and its combination with a circular saw is more than appropriate.
From a circular hand saw
Making a circular saw from a circular hand saw is also not difficult. The sliding support can be made from corners that will be mounted on both sides of the rotating elements (disc with teeth). The width of the slot is usually up to 0.5 cm, and all edges must be processed so that they are slightly rounded. All corners should be made with crossbars, which should tie everything together well. Bolts and nuts can be used as fastenings. You also need to attach a metal clamp to the surface of the body. A screw-type coupler will be mounted at the bottom of the block, and a clamp with a thickness of up to 0.2 cm in conjunction with the rear pillar will form a single unit that can withstand heavy loads. The stop will be attached to the back of the device. The washers that make the gap can be moved and the slots between the sidewall and the disc can be adjusted.
But the transmission is best done with the help of lino belts - if some object accidentally hits, then during jamming the pulleys will begin to slip, and this will eliminate the risk of injury. We place a large pulley on the engine, and place a pulley with a smaller diameter on the shaft for the circular saw - in this ratio it will be possible to achieve the optimal number of revolutions.
From a gasoline saw
To make a circular saw from a gasoline saw, you will need to use a metal canopy that will be mounted to the body of the saw. The engine is already there, and therefore making the device will not be difficult. You will also need two channels, the size of which is 18.5 * 800 cm. Also needed are corners 5.5 * 10 cm and a couple of pieces of rails that will turn with the soles up. At the base of the sawmill, make holes of 1.6 cm, and there should be a distance of 1 meter between them.
Next, you should make a coupler from a pipe, the length of which is 25.5 cm. We fasten the structure with bolts, and we also need to make separate stands on which the sawmill body will be attached. It is important to ensure that all elements are not deformed. The distance between the posts should not be more than 1 meter. The sawmill should also be equipped with a movable carriage. It needs to be made from a steel sheet measuring 62*5.5 cm, and medium-sized bearings should be welded to the metal from below. You can also weld a couple of corners at the top and attach a gasoline saw to them. Next, make a holder that will act as a clamp for a log or timber.
Please note that you will need a pipe with a diameter of 4.5 cm. To work, you need a hose that will be attached at a given height, which should not be more than the length of the pipe. Thus, a sawmill will be made, and a log/timber with any cross-section can be processed on such a device.
From a drill
How to make a circular saw from a drill with your own hands?
A drill is a multi-purpose tool that can be used to do the following:
- Turbinka.
- Miniature drilling machine.
- Mower.
- Lathe.
At service stations, mechanics even make winches out of drills in order to lift large loads. It is also actively used in construction, and especially in painting work. Farmers often use a drill to install seedlings in the ground.
A drill-based circular tool will be compact, and to create the tool you will need the following:
- The base is made of boards, thickness from 2 to 3 cm.
- Vertical supports.
- The shaft on which the disk will be attached.
- Electric drive in the form of a drill.
Instead of boards, you can use sheets of chipboard, the thickness of which is at least 3 cm. On such material you need to cut a rectangle, the size of which is 31 * 25.5 cm. In addition, for the desktop you need a duralumin sheet, thickness 0.5 cm. Such material has an acceptable stiffness coefficient and at the same time light weight. A hole will be cut in the designated place (with a marker), the size of which is 16.5 * 1.2 cm. You can make the mount for the drill yourself. The assembly for the shaft with the saw can be found in any construction market. During operation, a lot of dust will appear, and therefore it is worth finding a bearing with protection to increase its service life.
A circular saw made from a drill will be arranged according to the usual algorithm:
- All main parts will be attached to the base.
- Next we mount the table.
- Connect the drill and test the operation.
Certain safety precautions are also required:
- Clear your work area.
- Workpiece work must be smooth, without delays.
- The machine must be equipped with a protective screen.
- Garbage should not accumulate on the machine; it must be removed in a timely manner
- It is necessary to perform a preventive inspection of the unit, and also lubricate it regularly.
Please note that a mechanical type device will make it possible to process not only wood products - if you install good cutters, you will be able to work with LDPE, non-ferrous metals, chipboard and bars.
Making a wood lathe from a drill with your own hands
A wood lathe is designed for processing workpieces from different types of wood by turning. Most often they are used for the production of cylindrical parts with cutters with various cutting edge shapes. Such a cutter removes wood from the workpiece, layer by layer, giving it the desired shape.
The basis of the lathe is the bed - a massive part on which the headstock and tailstock are attached, as well as the tool rest. The front headstock has a spindle to which the workpiece is attached, and the back headstock has a cone for fixing and centering it. The tool rest serves to support the cutter when turning the workpiece. The tool rest and tailstock can move along the bed and be pressed against it with locking screws in the desired position. The headstock can be equipped with several devices for holding the workpiece and transmitting torque to it from the electric motor drive - a chuck, a faceplate or a trident.
The use of such machines on an ongoing basis in households is unlikely, which does not exclude a one-time need for them. This includes furniture repair, making a gift souvenir, and replacing a cracked wooden handle. Purchasing here is impractical, and temporary access to a carpentry workshop may be difficult or absent altogether, for example, if we are talking about arranging a summer house. The master is forced, using existing tools, to resort to various tricks that partially replace the missing functionality.
Further modernization of the machine
It is worth noting that the main material for the machine can be solid hardwood, metal angles or square pipes. In the latter case, the bed will consist of a long rectangle, and the stop and headstocks will be corners, like the rest. This version uses screws for fastening. It is worth noting that ready-made installations are available for sale, where the master only needs to secure a drill , holding the drill bits included in the kit in the chuck.
Circular saw device
The device of a circular saw, like most stationary machines, consists of the following main parts:
- Bed or base;
- Motor – most often it is an asynchronous electric motor;
- Belt drive - pulleys and transmission belt;
- Circular saw working shaft;
- Desktop;
- Security devices;
- Electrical equipment.
The entire layout of the device is based on a massive frame or base. It can be a solid part cast from aluminum cast iron, or have the form of a frame - a body assembled from scraps of pipes or corners. It is preferable to make a homemade machine from scraps of profile pipes, for example, you can use square profile pipes 25x25 mm or a rectangular profile 20x40 or 25x50.
The spindle for attaching the circular saw is used in the form of a thread on the shaft. The saw is clamped in this case using a nut. The spindle assembly can be made in a different way, as with a hand-held circular saw - drill a hole in the shaft, cut the internal thread and clamp the disk with a bolt. But as practice shows, the first option is better - the circular saw is clamped more securely, and the thickness of the blade can be selected in different ways.
READ How to drill through thick metal with a drill
When using a belt drive, the electric motor and the working shaft are connected by a V-belt. The rotational motion from the motor shaft is transmitted through a pulley to the operating shaft pulley. It is recommended that the circular sawing machine be designed exactly according to this design; this will increase the service life of the motor and eliminate the possibility of jamming. If the circular disk jams, it will stop and the belt will simply stretch, but the engine will continue to run.
A work table is necessary to ensure that the workpiece is in the same plane during work. The table of the circular table is made as wide as possible, so that you can easily rest the part on its plane.
In order for the woodworking circular machine to be safe, devices must be installed to ensure safe operation. This could be a protective casing, a pusher for working with small parts, or a parallel stop.
One of the options for assembling a simple budget machine for home work is the option of converting a manual circular saw into a stationary one, adding a frame and a wide working surface to the actually finished device.
Assembly
Assembling a circular saw begins with installing the motor on the frame.
After installing the engine, put on the belt.
After tensioning the belt and setting the engine position, it is secured with nuts.
To protect the motor from sawdust, protective screens are installed on the housing.
The circular saw is installed and clamped onto the working shaft.
For ease of switching on, a switch is installed. The last stage is the installation of the circular table.
As a test, various materials were cut: a slab of wood chips, a piece of chipboard, a board 30 mm thick.
Rotation transmission
This table saw will use a belt drive. From the engine pulley, rotation will be transmitted to the working shaft using a V-belt. The pulleys on the machine are of the same diameter, so the rotation speed of the working shaft will be the same as that of the engine - 1450 rpm. These are standard pulleys used in a washing machine.
Circular using a drill
The circular shaft is taken from a grinder. This decision is completely justified. There is no need to be tricky with turning work; there is already a ready-made thread with washers of the required mounting diameter. And you can adjust the diameter of the shaft with your own hands, simply by clamping the shaft in a drill and processing it with a file.
The working shaft with a pulley installed on the frame will look like this.
A simple circular saw made from a grinder or circular saw with your own hands
The design of a simple machine made from a hand-held circular saw or grinder allows you to use ready-made tools with a disk mounting unit and a motor. There is no need for a belt drive here, which means the number of technological operations will be less. The big advantage of this model is that the design will use a ready-made lifting mechanism for a circular saw, this will allow you to adjust the depth of cut of the workpiece.
At the same time, this scheme also has a number of disadvantages. So, a circular saw wheel in a tool based on an angle grinder will have a high rotation speed, about 7000 rpm, on the one hand, this is a big advantage, since high speed allows you to do the work better. But on the other hand, when working with hard wood or if the saw jams, there is a high probability that the motor will simply burn out. In addition, it is necessary to take into account that the grinder shaft cannot be moved closer to the working plate; the gearbox will interfere, so the depth of cut in such a tool will be small.
Another problem with this version of a circular saw is that the grinder does not have safety devices like a hand-held circular saw; they will have to be made separately.
But there are also positive aspects - the gearbox housing of the angle grinder has ready-made holes for handles and, when used as mounting holes, for fastening to the machine body. In this case, there will be no need to remodel the angle grinder by making changes to the design of the tool; it is enough to make brackets and fix them on the body.
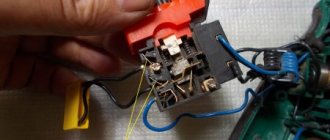
You can do the same with the power buttons - using electrical tape, simply fix them in the on position, and connect the wire to the starter connector. You can use an old switch with a large key as the main button; this will save time when assembling the machine and increase safety - in the event of an emergency stop of the tool, the large key is easier to find.
Making a circular saw with your own hands
The need to have a small circular saw on hand has probably occurred to everyone who has at least once tried to make an even cut on a small board or strip of laminate with a jigsaw or handsaw. It's another matter when such an operation is performed on a stable machine. Even though this circular saw was assembled with your own hands from metal and does not have a very presentable appearance, this woodworking machine allows you to do the work faster and with better quality. But how can you assemble a circular machine yourself at the lowest cost and use available parts, for example, a motor from a washing machine?
Tabletop
A sheet of metal 2 mm thick will be used as a desktop tabletop in the circular machine. This is quite enough for the workpiece to move freely on the work table.
Holes are made in the metal to accommodate countersunk screws. In addition to metal, you can also use chipboard as a table, and make it from plywood. It is recommended to make the working table of the circular saw so that a stop can be installed on it.
Main components, materials, tools
The algorithm for creating a circular saw with your own hands is quite simple. First you need to determine for what purposes the circular will be used. If this is a small portable machine for working with laminate and plywood, then it is worth considering a device made from a hand-held circular saw, and if there are more ambitious tasks, then it is better to think about a more reliable engine and the impressive size of the machine.
READ How to Choose the Right Impact Drill
In any case, you will have to make drawings of the device in order to calculate how and where the equipment will be installed, how the main parts will be attached, and at the same time think about what tools will be needed for the work.
Circular using a drill
For a small portable circular saw made from a handsaw, you can use the popular design of assembling a body from multi-layer plywood or pieces of chipboard. Well, if you plan to use a belt drive and a motor from a washing machine, then you will need a tool for working with metal. You can't do without welding work here.
Tabletop
A sheet of metal 2 mm thick will be used as a desktop tabletop in the circular machine. This is quite enough for the workpiece to move freely on the work table.
Holes are made in the metal to accommodate countersunk screws. In addition to metal, you can also use chipboard as a table, and make it from plywood. It is recommended to make the working table of the circular saw so that a stop can be installed on it.
Circular from Dremel
Dremel is a power tool with a huge number of names. You may know it as an engraver, straight grinder, mini drill or drill. The essence is the high speed of rotation of the working tool on the shaft with the compact dimensions of the Dremel.
To assemble a Dremel-based mini circular saw you will need:
- Discs;
- Plexiglas;
- Pipe clamps;
- Bolts;
- Wing nuts;
- Pipe insulation;
- Screws;
- Drill;
- Screwdriver;
- Knife;
- Wood glue.
The process of assembling a mini machine with your own hands follows the following instructions.
- Wooden boards with approximate dimensions of 2.5 by 20 by 120 cm are sawn into 4 elements - 2 by 25 cm in length and 2 by 10 cm.
- Other boards with dimensions of 2.5 by 5 by 120 cm are cut into 4 elements, each 14 cm long.
- According to the pre-prepared cardboard template, make markings on the board. Its size should be about 2.5 by 20 by 25 cm. The template may be different, since it directly depends on the specific model of the Dremel used.
- According to the markings, the board is sawn and drilled. Finish the edges with a cut to allow the tool to fit into the cutouts.
- Using screws, all the structural elements of the mini circular are connected.
- The Dremel is installed in place and secured with clamps. If necessary, do not forget to modify the grooves and notches.
- Using plexiglass, you need to make a covering for the worktop of the mini machine.
At this point, the assembly of the Dremel circular saw can be considered complete. In this case, we are dealing with a truly mini circular machine. But in most cases, craftsmen require a more impressively sized circular. Therefore, the following two examples of mini circulars may be more suitable for you.
Features of a DIY wood sanding machine
After cutting the wood, it must be sanded and only then proceed to the construction of buildings or the construction of other objects. There are several types of grinding machines:
Disk. The working surface is made in the form of a circle, onto which sandpaper or another sanding device is fixed on top. You can adjust the processing speed without changing the speed.
Tape. A continuous strip of sandpaper is stretched between the two shafts. It’s not difficult to make belt sanding machines with your own hands, just prepare a detailed drawing and read the instructions
It is important that the emery in the working surface does not bend under the weight of the workpiece
Drum sanders for wood are common among woodworkers. Used for horizontal leveling of planes using the jointer method. The principle of operation is to attach the sandpaper to one or two drums, and under them there is a table with height adjustment. You can set the required calibration and make workpieces of the same thickness.
Home Drum Wood Sanding Machine
Calibrating and grinding machines for wood are universal machines that combine grinding and leveling of workpieces. Two types of equipment are used: disk and tape. You can make such a device yourself, with the right choice of drawings.
Calibrating and grinding equipment in production
To correctly assemble the appropriate version of the machine for grinding and processing wood, select the appropriate drawing and all components. Below are some examples of accessible and convenient equipment schemes:
A simple belt optionAnother equipment option with a belt principle of operationUniversal machine for working with woodHome disk machine in action
With a motor from a washing machine
While designs based on a corded electric drill are popular due to their ease of assembly, machines driven by an electric motor attract attention for their versatility. To manufacture such a lathe, you can separately develop drawings with the main components and detailed dimensions
To manufacture such a lathe, you can separately develop drawings with the main components and detailed dimensions. This will help a lot during assembly.
Please note that when using a motor from a washing machine, several basic design solutions can be used
It is possible to implement both direct drive, when a special (often homemade) attachment is put on the shaft to fix the workpiece, and indirect drive, when rotation is transmitted to the spindle through a system of pulleys and belt drive.
The tailstock is attached to a movable platform, which makes it easy to move it along the bed, adjusting to the size of the workpiece or workpiece.
We make sure to make a housing made of metal or wood, inside which the electric motor will be located.
And the power button can be placed on the front side of the case. Additionally, if possible, you can install a speed control board.
Other homemade machines
Many users are interested in what else can be done using improvised tools from a drill with their own hands? There are many answers - home craftsmen are already making various homemade products from drills in garage workshops. A drill is a universal tool, so with a certain skill and imagination you can make anything your heart desires.
- A sharpener, you just need to buy some emery in the form of a circle and make a special holder in which the drill is attached.
- Drilling machine - there are special holders for vertical drilling or stand.
- Small lathe for wood processing.
- A mini-drill for various needs of the home craftsman.
- To easily mow the grass around your garden plot, you can make your own trimmer from a drill.
- A grinder from a drill is made quickly, just buy specific attachments.
- Garage auto repairmen install original engine replacement winches based on old, very powerful tools.
- Gardeners make holes for planting young trees using a homemade drill bit.
- When pouring the foundation for a utility room in the private sector, some users use a homemade vibrator made from a drill to quickly compact the concrete structure.
Making a stationary circular saw with your own hands
You can buy a ready-made stationary circular saw from 9 thousand rubles. It will ensure proper work safety and save time on sawing wood. But, you can not spend money and make your own machine according to drawings and blanks.
Circulation saw table
Despite the external complexity of the design, it is not so difficult to assemble it yourself at home. Any stationary saw model consists of several elements:
- table;
- disc with teeth;
- engine;
- adjustable side support;
- shaft
To assemble all the parts of the circular saw, prepare:
- metal sheet from 8 mm thick;
- metal corner 45 by 45 mm;
- electric motor;
- disc with teeth;
- ball bearing;
- welding machine;
- block of wood;
- a piece of plastic or leftover laminate.
To make all the elements correctly, you should choose a drawing that will indicate the dimensions of the table for a hand-held circular saw, as well as all other dimensions and materials for the work. Here are some examples of ready-made schemes:
READ How to Sharpen a Circular Saw with Your Own Hands
A simple version of the tableDimensions of the disk for home toolsDetailed plan with all dimensions3D model of the table
The assembly of the structure itself will proceed according to a certain plan, regardless of the chosen scheme:
The tabletop must be made strong and stable. Use sheet metal according to your dimensions
If you plan to install other devices on the table, then arrange a place for them using thick plywood.
When making a guide for a circular saw with your own hands, pay attention to its height. It should protrude 12 cm above the table
This way you will have the opportunity to process the boards in width and thickness. To make a guide, take two pieces of corner and a clamp.
Make the central saw adjustable in height.
For the motor, mount a separate platform on the same axis with the rocker arm. Fix it with a bolt with a diameter of 1.5 cm. Install a metal plate on the side of the saw, having previously made a hole in it through which the bolt with attached handles passes.
For more detailed instructions on making a stationary circular saw, see the video:
How to make a reciprocating saw from a screwdriver or drill
One day I needed a reciprocating saw. I thought about taking some simple, inexpensive one, but, as it turned out, there are no simple and inexpensive ones. Prices start at about 4 thousand. On Ali you can find such a nozzle for 1.5 with delivery.
I couldn’t find any in our large stores that sell tools. If you need a saber rarely and not in large quantities, this is quite an option. Plus, the output tool is wireless, which can be extremely convenient to use. According to reviews on the Internet, it performs its functions quite well for such a price.
sdelaysam-svoimirukami.ru
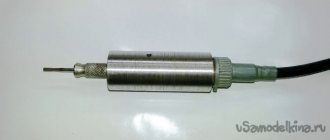
Imagine that you need to saw off a block of wood, but you don’t have a hacksaw at hand. Your favorite jigsaw is on another site or has broken down altogether, but the work process cannot be delayed. The situation is familiar to many, isn’t it? Most craftsmen know how valuable a working tool is at the right time. The work is in full swing, there are no delays, everyone is happy. It’s worse when it’s gone, and there’s simply nothing to replace it with. The homemade product we are considering today deserves attention, if only because it really helps solve the problem of sawing using a conventional drill or screwdriver. It is permissible to make it at home with your own hands. And this is not some disposable device. This is a full-fledged technical tool-attachment that expands the capabilities of the main electrical device, which, as we thought earlier, was intended only for drilling and tightening screws. With it, you can actually cut a block or even a board with a regular hacksaw blade and turn a regular drill into a reciprocating saw. Let's see how this can be done.
Operating principle of the saw
In fact, the torque of the drill does not go away. It is only transformed by a kind of friction transmission into reciprocating movements due to a crooked bearing. Its body slides between two small bearings mounted vertically on a small metal square. It is this element that sets in motion the canvas, which is tightened at its end into a special clamp. The nozzle is mounted on a shaft machined to a sufficient diameter for a drill or screwdriver chuck.
Making an attachment for sawing wood
Let’s make it clear right away that such a device cannot be assembled from improvised means. Most of it is quite accurately measured in size, machined on lathes and milling machines. However, if you doubt the capabilities of your workshop, they can always be made to order. Before starting work, it is worth making a drawing of this assembly, calculating the dimensions of each element and adjusting them proportionally. Our device is made entirely of metal, and therefore a vice is a must-have tool this time.
Making a shaft with a bearing
This element requires a metal rod. Its cross-section should be the same if possible, so it is best if it is turned on a lathe.
We clamp it in a vice, and approximately in the middle we grind off an oblique groove with a file as in the photo.
We turn the rod over to the opposite side and make a mirror groove, leaving a thickness of only 2-3mm to accommodate the bearing.
We place the bearing on the shaft seat, bored out with a file. We will need the most ordinary bearing - ball, single-row, open type. The mounting hole, as well as the diameter of the outer ring, will have to be selected experimentally.
Special clamps will help secure the bearing to the shaft. We make them from pieces of tube tightly fitted onto the shaft. These sections must be cut exactly to the angle of inclination of the bearing. To clamp onto the shaft, these tubes must be equipped with a hole with a screw for a small hexagon, similar to a stop for drills.
We fix these clamps by pressing them tightly against the bearing housing so that their walls only touch the inner ring.
We take four washers of a suitable diameter and place them in pairs on each side of the shaft. This will help reduce the friction of the shaft clamps on the side supports of our attachment during operation. The shaft and bearing are ready!
We equip the body of our device
Surely everyone understands that the shaft itself will not work separately. It requires supports on which it will rest and relative to which it will move. They should be like in the photo - two squares with holes for the free movement of the shaft on the side of the planes, and fastening holes with threads for bolts on the side of the ribs. This structure is assembled like this (photo).
We cover the structure with a small plate with four through holes along the edges and secure it with bolts. This will be the first case cover.
At this stage, our nozzle should look like this (photo)
On the opposite side we place two squares with mounting holes for bolts. They must be of such a size that the third square, which will be placed between them, can move freely relative to them.
The middle square needs to be prepared. We place two small bearings on it with screws. They will slide on the main large bearing mounted on the shaft.
We cover the squares with a lid similar to the first one and tighten it with screws. The nozzle is almost ready. You can see how the shaft and bearing move by pulling the middle square back and forth.
Making a tip for a reciprocating saw
In order to secure the hacksaw blade, an adapter-clamp is required. The tip proposed by the author has a square end groove. On the side of the planes there are clamping bolts for a hex key. When clamped tightly, they are recessed flush with the plane of the tip.
We place the clamp tip on the middle square and secure its position with a clamping bolt.
Now we insert the hacksaw blade into the tip and secure it with the next two clamping bolts.
To stabilize the work of the movable square with the blade when sawing, we add a stop angle (photo).
We fix it with two screws and center the groove on its edge relative to the blade.
The “reciprocating saw” attachment for the drill is ready. It is comfortable and safe to hold in your hands, and it takes up very little space. It’s really worth making such a tool for your workshop, since it can help out at the right time when sawing wood. All that remains is to try it in action and make sure of the wide capabilities of your instrument!
What other types of machines can be made?
Before creating your own lathe, you should study those varieties that were invented by many interested people. Among the machines, both home-made and factory-made, the following types are distinguished.
Making a CNC milling machine with your own hands
You can make your own numerical control equipment with your own hands. To do this, select suitable drawings of a CNC wood milling machine. You will need to assemble the model with your own hands strictly according to them.
Ready-made machine for a home workshop Equipment components Detailed assembly diagram Model of multifunctional equipment
Wood milling machines must have great strength, so it is better to take a rectangular beam mounted on guides as a basis. The lifespan of home equipment and its performance depend on proper assembly. Watch the video instructions for making such a device:
Below are photos of finished models of CNC woodworking machines with your own hands from professional “homemade” ones:
From a washing machine motor
It is a standard layout of a lathe with a motor, direct or belt drive, bed and two headstocks.
When constructing a lathe from a washing machine motor, it is necessary to remember that the motor of a household appliance is designed to circulate with an unbalanced load, but this does not mean that the tailstock can be abandoned. Its presence is mandatory especially when working with long and heavy workpieces. The design of such a lathe is easy to implement at home. To do this you need:
Weld or bolt two steel pipes and attach a motor from a household appliance to one end. Fix a block between the pipes with the ability to move it along the frame; the corner of the tool rest will be attached to it. On the opposite side, the tailstock is installed in accordance with the instructions outlined above.
We make a wood milling machine for a home workshop
Milling machines are necessary for working with shaped wood parts. They are used for flat milling and profile processing. Professional equipment is multifunctional and costs a lot of money, so more and more “homemade” people are assembling such equipment for workshops and garages on their own.
Small DIY milling machine
The set of homemade wood milling machines includes:
- Drive mechanism. This is an engine whose power ranges from 1-2 kW. With such a motor, you can use various tools to work with wood without fear of failure.
- Lift for adjustment. Typically, it includes a body, sliding skids, carriages, a fixing screw and a threaded axle. During operation, the carriage moves up and down, and a screw is needed to fix it at the required level.
- Support. The table is made from solid wood.
Before assembly, be sure to draw up a detailed drawing with all dimensions. For manual wood milling machines, you need to think through everything in advance down to the smallest detail.
3D model of a table for a manual machine Equipment components Dimensions of the working element Cutting on a milling machine
The sequence of self-assembly of a convenient and practical wood milling machine for a home workshop is described in the video instructions:
If you are thinking about buying your own equipment rather than assembling it yourself, then to understand how much a manual wood router costs, look at the table with models and prices:
Making a carriage for a circular saw with your own hands
The functionality and quality performance of a stationary circular saw is greatly influenced by the availability of accessories. One of these is the carriage. It’s not difficult to do it at home, but trimming and sawing the material at an angle of 45° will be much easier.
You can make this device for a circular saw from a sheet of plywood as follows:
- plywood is cut out to a size slightly wider than the circular table;
You can make a carriage for a circular saw yourself
- in the lower part, guide bars are attached to it using glue or screws, the distance between which should be equal to the width of the table;
- In a similar way, using screws or glue, thrust bars are fixed on top.
Using guides, the carriage is fed along the table onto a saw blade, which makes a through cut on the device. The height of the sides, which should be greater than the protruding saw blade, allows you to maintain the integrity and rigidity of the carriage. If the task is to make a cut at an angle of 45°, it is necessary to use an additional bar, which in this device is a removable element. The cut is made by pressing the workpiece against an angled plank.
In order for the plywood surface of the carriage to be easily cleaned of sawing waste, it must be coated with several layers of varnish.
The plywood should be slightly wider than the circular table
How to make a shaft for a circular saw with your own hands
In the general design of a circular saw, the shaft is the main element that forms the entire machine. To make it, you will need round steel grade 45. But you can only make this important part yourself if you have your own lathe or have access to it. The diameter of the workpiece must correspond to the size of the saw blades that are intended to be used.
Main standard sizes of disk mounting holes:
- 16 mm;
- 20 mm;
- 22 mm;
- 30 m;
- 32 mm;
- 50 mm.
From the indicators listed above, the size of the shaft for the circular is selected.
To make the shaft you will need round steel grade 45
The most common hole diameter is 32 mm. This is the mounting socket that discs with different outer diameter sizes have. Alternatively, you can make a thinner shaft so that you can do “jewelry” work. Then an adapter will be used to use large disks. It is worth complicating the design of a home circular in this way only in cases where it will be used by a professional.
The saw blades are installed between two flanges and pressed using a nut, which is screwed onto a thread made on the edge of the working surface of the shaft.
Important! The thread must be left-handed. During the inevitable jerk when starting the circular, the nut in this position will tighten, and not vice versa.
Seats for bearings are determined taking into account the dimensions of the latter. The middle part of the shaft has the largest diameter. If the indicator is significant, additional load on the belt will be created during rotation. Drilling will help get rid of the problem, which will lighten the heavy part of the shaft.
The diameter of the workpiece must correspond to the size of the saw blades
Making a crosscut from a circular saw with your own hands
Laying a wooden floor, replacing platbands, covering the facade with plank, clapboard, and creating landscape design elements require a dimensional board. The process of preparing such a board is called trimming. That is, the ends of the material are cut off in order to obtain the desired size of the workpiece and make the cuts aesthetically pleasing.
READ DIY diamond drill dust extractor
Do-it-yourself trimming makes work faster and more economical
To make a crosscut from a manual circular saw with your own hands, you will need available materials and used tools. The standard characteristics that a future trim should have are:
- maximum cutting length – 350 mm;
- optimal engine speed – 4500 rpm;
- light weight.
The upper part of the power tool is attached to the kingpin using a large bearing - 150 mm (it is not difficult to purchase on the market.) Ears are attached to the outside of the bearing. They are used to fasten the tool to the surface of the frame using M6 screws.
The main devices for making a circular saw with your own hands are car shock absorbers (they are convenient to use as a broach), a soft start button and additional protection that is attached to the power tool and the bed.
The upper part of the crosscut is attached to the kingpin using a bearing
Important! Before assembling the structure, the shock absorbers must be disassembled, the oil drained and air holes made.
The advantages of a homemade miter saw include the following:
- The design is easy to disassemble, and the power tool can be used for its intended purpose.
- Small
Among the significant disadvantages, it is worth highlighting the high noise level. It is almost impossible to eliminate this drawback. In addition, it is necessary to make a test cut (selecting and fixing the draft) to ensure good quality of subsequent work.
Reciprocating saw
KRESS 1200 will allow you to quickly and efficiently cut window and door openings in a new log house or frame walls. It is very good at dismantling old windows and door frames (nails are not a hindrance), old plumbing fixtures (completely safe compared to working with an angle grinder). It makes it easier to install metal structures and perform plumbing work, and you can cut wood for a barbecue in the country if such a tool is at hand. Using the KRESS 1200 SPE reciprocating saw, they cut wood up to 300 mm thick, plastic (in particular PVC) up to 160 mm thick and steel pipes up to 130 mm in diameter.
Two-mode speed adjustment using a “wheel” and a start button is also convenient. Using the electronic control wheel, you can set the maximum number of revolutions required for the job being performed. Smoothly pressing the start button of the switch, regulate the number of revolutions of the already switched on tool. As the load increases, the electronics ensure that the required power is maintained.
The saw fits well and comfortably in the hands. although it weighs about 4 kg. Thanks to the soft rubberized non-slip coating on the surface of the gearbox and handle, additional comfort is created, vibration is smoothed out and hands hold the tool securely, which ensures safe operation even in conditions of high humidity.
The saw blades in this tool can be replaced without using a special key: just turn the ring counterclockwise (there is a marking on the ring) until it stops, insert the blade and then release the clamping ring (photo 4). Be sure to check the strength of the blade before work. It can also be secured “tooth up”. The support saw sole (platform) does not require the use of additional tools to install it in a position convenient for specific work. It is fixed in the selected position with a special lever (photo 5). If necessary, you can adjust the “exit” of the saw blade to improve access to hard-to-reach places. By using this adjustment, you can optimally use the length of the saw blade and thereby increase its service life. Do not change the position of the lever during operation. The 4 m long rubberized network cable provides sufficient freedom of maneuver at the workplace. A special plastic suitcase is designed for storing and carrying the reciprocating saw. Since the number of power tools in my workshop is gradually increasing, I treat the convenience of storing them with a certain pedantry.
For all tests of the KRESS 1200 SPE I used one bimetallic blade. It is universal and allows you to saw both metal and wood with equal success. Sawing wood. In order not to waste the tool, I tried to cut wood for the barbecue in the garden. When the pendulum mechanism was turned on, the speed of operation increased noticeably. The speed was set to the maximum. And the tool did an excellent job with such work (photo 7). What if the wood has nails? I conducted one of the most interesting experiments. I remember how, after an “encounter” with a nail while processing wood, I usually had to re-sharpen or replace the knives and saws of any tool, both manual and electric, or replace the jigsaw blade. And the test tool showed only a subtle increase in body vibration as the blade passed through the place where the nail was. If I had not specifically expected this moment, it might not have been noticed (photo 8). And then I tried sawing a 01″ metal water pipe. When sawing, there are no sparks, which is fireproof. The sawdust from the work area was then easily collected with a household vacuum cleaner. You can work with this saw without fear that particles of hot metal that appear when working with an angle grinder will damage tiles, plastic, and leave marks on wooden walls and interior decoration. When cutting metal, the instructions recommend setting the speed control to positions 2 or 3, that is, choosing relatively low speeds. At the same time, it is convenient to “cut” at an even lower speed, without pressing the start key all the way. And the new blade cut metal “like clockwork.” One cut took less than a minute. The edges of the processed metal turned out smooth and neat (photo 9).
Now let’s evaluate the processing accuracy of this saw. For precision carpentry work, such a tool with a thin vibrating blade is not always suitable. Although, with some skill and experience, the quality of work will be no worse than when using conventional hand tools. But for construction work, where special precision is not required, it can be very useful (photo 10). Another important point. Thanks to the ability to smoothly adjust the speed by pressing the start button of the reciprocating saw, you can “cut” into the wood without first drilling it. To do this, the tool must be supported and held at a slight angle to the surface. Gradually, rotating it vertically above the fulcrum, immerse the saw into the material being cut. The initial position of the tool is shown in photo 11. This technique can be very useful when performing construction work.
Determining the parameters of a homemade circular saw at home
The primary task is to choose the power of the future stationary circular machine. Typically, devices with a power of up to 850 W are recommended for home use. If you are planning not to carry out repair work, but to build, for example, a bathhouse or a summer house, as a result of which you will need to cut a lot of material, then you can use a 1250 W motor. A device with a higher rating is not recommended, since such powerful circular machines require not only a solid stand-table, but also fixing the latter to the floor by fastening or concreting.
An important characteristic is the cutting depth. In home devices, it should not exceed 8 cm. In fact, this indicator is quite enough for sawing boards, plywood or wood boards.
When making a mini-circular saw or a full-scale sawing structure with your own hands, be sure to take into account the rotation speed. If you just plan to cut boards to make certain wooden elements, then you can limit yourself to a motor with a low or medium frequency. If you need perfectly smooth and clean cuts, it is better to use a high-speed motor. The optimal indicator for a home power tool is considered to be 4500 rpm.
For a circular machine, you can use a motor from a washing machine
Be sure to take into account the height at which the start button will be located. Its location should be convenient for pressing.
Important! The control panel of a homemade circular saw must be accessible.
A simple circular saw from a regular drill
In this publication, we will make a simple circular saw with a rip fence from an ordinary drill. Of course, this fake will not replace a full-fledged machine, but for the first time this craft can be a great help.
In principle, this machine doesn’t need much, just a few blocks for the legs for the parallel stop, and two pieces of plywood for the table top.
First, let's drill into the plywood where the legs will be attached.
drill holes for attaching the legs
For greater reliability, epoxy resin can be applied to the mounting points of the legs.
We strengthen the leg fastenings with epoxy
We install the legs and tighten the screws on the back side
Now our machine can stand on its own feet.
the machine has legs
Drill a hole in a regular rectangular piece of plywood with a crown. The diameter of this hole should be equal to the diameter of the drill chuck, maybe a little larger, then we will fix the whole thing with a bolt.
drill mount
This part needs to be secured under the table top of our machine. I advise you to immediately make markings where the saw blade will come out. We fasten this part with self-tapping screws on the reverse side; for reliability, you can, of course, add epoxy glue.
screw the part for attaching the drill with self-tapping screws
As you can see in this photo, I have already marked the slot for the saw blade to exit. The next step is to drill a hole in the marking, and then carefully use jigsaws to cut out a slot.
make a slot for the saw blade to come out
After this, we will need another piece of plywood, equal in size to the first one, and on this plywood we need to make an identical slot for the saw blade to exit. On this piece of plywood you need to make a slot equal to the width of the block, and it should be at an angle of 90˚ from the previous slot. It turned out a little chaotic, but as the publication progresses everything will become clear. This slot will serve as a guide for the rip fence.
slot for parallel fence
Glue the second plywood on top of the first.
glue both plywood together
Well, the features of the future machine are emerging. Let's try installing the drill and putting on the saw blade. To do this, simply insert it into the pre-prepared piece with a round hole, which we previously attached under the tabletop.
The saw blade must be secured to the bolt with a nut, inserting a washer on each side of the blade.
Let's fix the bolt in the drill. Do not forget that the saw blade should be at an angle of 90˚ with respect to the tabletop.
Now tighten the self-tapping screw and the drill is fixed.
On the reverse side, secure the drill with a pair of clamps.
fix the drill on the back side
All that remains is the matter of emphasis. We insert the block into the groove, and glue a flat piece of plywood in front, at an angle of 90˚.
assembling the rip fence
And now in this way we attach the parallel stop to the tabletop. The bolt on top is needed so that after the stop is set it can be fixed.
fix the parallel stop
This is how this structure is attached from below.
so this structure is attached from below
Well, basically everything, we can use it.
Design elements of a self-made wood sawing machine
To make a stationary machine for sawing materials at home, you first need to know what structural elements it consists of. Whether it’s a homemade machine made from a manual circular saw, a grinder, or a tool assembled from disparate elements, the set of basic parts is the same.
The surface of the table must be made smooth for a higher quality product at the output.
The main elements of stationary circular installations are:
- Table for connecting and securing mechanisms. If the circular saw is powerful and massive, it is better to use a metal table. Options made from chipboard, wood, plywood are suitable, the main thing is that the surface is smooth.
- Shaft. The most important detail. When making it, a lathe is used separately. The dimensions should be calculated accurately to avoid runouts.
- Casing. This element ensures safe use of the circular saw.
- Engine. When using a grinder or circular saw, it is part of the power tool.
Helpful advice! If the design is supposed to be prefabricated, then when creating a circular machine with your own hands, the engine from a washing machine will be the most successful option.
The design of the circular must necessarily have moving parts of the drives, and a button must be built into the power supply circuit to stop the engine in emergency situations.
Circulars of any fixed type consist of main parts
Scope of application of a homemade circular saw
During the construction of a new house, when wood material is used in large quantities, a homemade circular saw will not be enough. And such a device will require more functionality. But when performing repairs, a home circular becomes an indispensable technical assistant.
A DIY circular saw allows you to carry out safe work and speed up the construction process
Quite often, the dimensions of wooden elements are determined directly during the work. The ability to independently provide the process with the necessary materials significantly saves money and time. And often the quality of wooden blanks is guaranteed to be higher.
Using a homemade homemade circular saw, you can cut boards into bars, make planks, slats, trim blanks, saw slabs of wood materials into fragments of the required sizes.
Using a homemade circular saw, you can make such types of furniture as a table, shelf, rack. A similar stationary home tool is applicable when creating wooden sports equipment, making containers, etc.
When installing a disk with certain technical characteristics on a sawing machine, the mechanism can be used as a circular saw for metal. It is allowed to saw soft aluminum and sheets of other types of metal, the thickness of which does not exceed 2 mm. When working with thicker material, the mechanism will overheat, triggering an automatic shutdown.
For harvesting firewood and simple cutting of pieces of wood, a firmly fixed table with a slot for a saw will suffice
Manual circular as the basis of a homemade design
One of the most popular tools on the basis of which homemade saw structures are created at home is a circular saw (hand-held circular saw ). This electric mechanism, using a round disk, makes straight cuts on wood materials, as well as on soft and thin metal. The tool is quite simple, it has all the basic elements that allow you to make a circular saw from a circular saw with your own hands.
The circular saw consists of the following parts:
- electric motor;
- one or two handles;
- protective casing;
A manual circular saw makes straight cuts on wood materials, as well as on soft and thin metal
Manual circular saws stand out from other similar tools due to some technical features. For example, the depth and angle of cutting can be changed directly during work. Plunge-cut saws provide special capabilities. They can make isolated fragmentary cuts of the required size.
The accuracy and quality of sawing with a manual circular saw depend on the number of teeth on the disk and the angle of their sharpening. With a large number of teeth, the quality is higher, but productivity is slightly reduced.
When making a circular saw with your own hands from a hand-held circular saw, you need to pay special attention to the engine power. This is very important if you intend to perform significant amounts of work. The total weight of the saw also matters. Lightweight models are suitable for occasional sawing.
It is permissible to change the depth and angle of the cut directly during operation of the circular saw
Sources:
https://lesoteka.com/instrument-i-oborudovanie/tsirkulyarnaya-pila-svoimi-rukami https://aizmedia.ru/tokarnyj-stanok-po-derevu-svoimi-rukami.html https://remoo.ru/ instrumentyi/circulyarka-svoimi-rukami
Step-by-step instruction
Circular saw based on an electric drill.
When building a circular saw with your own hands, you should take into account that 2 clamping brackets are designed to fix the main unit. The holes in the clamp brackets should be the same diameter (about 6mm) as the holes made in the bottom support panel. It is recommended to carry out such work using a drilling machine or a thin drill. In this case, you need to make sure that the alignment is accurate. The hole expands to the required diameter gradually.
The next step is to connect the previously made parts. Screws are used for this. They screw the side panels and supports to the support board. Initially you will need to drill pilot holes. This operation will prevent the wood from splitting. In this case, you need to use a 2 mm drill.
Before installing the upper working surface of the table, attach a clamp to it. Screws are used for this. Please note that the holes for these fasteners were made earlier. The center of the clamp must coincide with the cutout for the circular saw.
If you turn the work panel over, you can see that because of the clamp it is impossible to install it in a horizontal position. For these purposes, it is recommended to use a sanding drum. It will allow you to quickly make recesses for the clamp. The work panel is then screwed into place.