Design and functionality
An edge miller is a highly specialized piece of equipment. Most often it can be found in the hands of a furniture maker who processes parts and elements, bringing them to the desired shape and characteristics.
An edge router (other names are an edging router or trimmer) has a vertical structure. The cylindrical housing contains an electric motor connected to a special cartridge holder for equipment. The working part makes translational movements in a special frame, which, with the help of adjustments, limits the stroke of the cutter.
Advanced professional routers come with a set of frames or one frame with wide functionality. It may have a slope, special stops and other elements that facilitate the performance of complex work.
Using an edge router, you can chamfer the workpiece, make grooves and grooves of the desired profile, make recesses for hinges and various inserts. Obtaining a figured edge of any configuration is possible thanks to the use of special equipment.
Edge router from Raitool or “process with a file after assembly”
A router is definitely difficult to classify as a popular group of tools, unlike a drill, hammer drill, or screwdriver, but nevertheless, in some situations this tool can be of great help. I can’t say that I consider myself at least some kind of specialist in terms of working with milling cutters, but I’ve had to deal with it several times in my life, so today I’ll tell you what I understood during the communication process. Along the way, I’ll tell you about the different types of routers. I’ll start the review with what a router is in general and what they are, but since this part of the review is essentially additional, I’ll hide it under a spoiler.
Milling cutters
To begin with, you should omit those milling cutters that are various attachments for another tool, as well as all sorts of small models for manicure work. We will talk about milling cutters that were originally designed to work with one of the most popular materials - wood. I myself really love working with wood, and I admit I’ve been wanting a router for a long time. But since I work very rarely, I would hardly buy an expensive one, and cheap ones have their own characteristics, however, I’ll start with what kind of milling cutters there are in general. I don’t think I’d be much mistaken if the most popular is the vertical plunge router. This is a very convenient machine for many types of work. Typically, such milling cutters have quite a lot of power, about 800-2000 Watts, and an adjustable plunge mechanism with several adjustable levels. Those. when you press the handles of the router, it lowers along its guides to the stop you set.
The “two-handed” option is shown above, I personally didn’t like this option, but at one time I used a “one-handed” router, although in fact it is also “two-handed”, but can be used with one hand without any problems. It was just convenient and that’s all. I tried this 10 years ago with a couple of Fiolent models, 650 Watt and 1100 Watt, and it so happened that first I used a powerful model, and then a low-power one, and I can say that there is never too much power. After the 1100 Watt model, using a shallow one was very unusual and difficult.
Unfortunately, as far as I know, only one other company produces a model with a similar layout - Festool. I'll try to explain what upset me. The fact is that even 8-9 years ago there were some complaints about Fiolent’s work, they criticized crooked guides and a sinking mechanism, despite the fact that the old models were very good and could easily claim the title of “people's router.” But judging by modern reviews, the quality has now fallen even lower and there is simply no point in taking it. What’s wrong, you ask, because you can take a Festool and enjoy life, it’s a great tool. Yes, it’s possible, if it weren’t for the price of the tool, it’s definitely not suitable for this one 
So it turns out like in that saying - I can buy a goat, but I don’t want to, I want to buy a cow, but I can’t.
Another relatively popular type of router is the edge router. It allows you to process the edge of wood, for example, trimming a protruding edge to fit the overall size of the part. Typically, such milling cutters are low-power, about 300-750 Watts, and are designed for one-handed operation.
It is designed much simpler; it does not have a submersible mechanism, stops, etc. In essence, this is a vertical router, but with a rigidly fixed height, which cannot be changed during operation. Those. set the depth, cut through, set another depth, cut through. But in addition, a plunge router allows you to cut into a part simply from top to bottom; it is very inconvenient to do this with an edge router; it is more oriented for entering from the edge of the part.
In addition, there are still a huge number of different milling cutters, but they belong to even rarer types, at least in “household” use and are focused on a narrow range of tasks. These include - Lamellar Additives For paint removal Disc Modular edgebanders (essentially a hybrid of edgebander and plunger)
A good article on choosing a router, I recommend reading it.
When I was choosing a router model, I was guided by the fact that I wanted to get the most powerful model, although there were other models in the store. The key difference between them was in power; there were models of 300, 450, 500, 650, 700 and 800 Watt. There was also a model with a suitcase, I would probably even choose that, but it had a power of 500 or 550 watts, which was not very suitable for me.
In general, I chose the most powerful model, ordered it, received it, and was a little stunned by the form in which I received it. The box is badly damaged, and judging by the video on YouTube, I am not the only “lucky” one, although judging by the reviews, I was “luckier” than anyone in the sense that my box was very damaged. As it turned out later, this had no effect on the device itself, but stuffing an instrument weighing about 1.5 kg into such a box is somewhat optimistic, especially taking into account sending it by mail.
By the way, it turned out along the way that in the store there are two outwardly absolutely identical models, slightly different in price, the one in the review costs $50, and there is also a model for $46.
Inside, everything was neatly piled into one big pile, but nothing seemed to be lost.
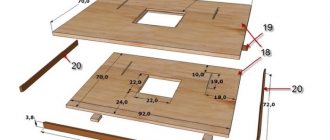
Total kit includes: 1. Router 2. Edge guide 3. Corner for attaching an additional guide 4. Additional guide 5. Screw + wing 6. Fixing screw 7. Two wrenches 8. Instructions. 9. Adapter
The instruction deserves a separate statement. If you do not understand what is shown in this photo, then I will explain. There are no photographs in the instructions, there are explanations with a reference to the photos, but there are no photos themselves, and the instructions themselves are of very low quality, I would even say that you can immediately throw them away.
1. Two wrenches and additional fasteners. 2. Edge guide, poor workmanship, everything is somehow crooked and askew. 3. Additional guide, everything seems to be neat here 4. The corner for the additional guide was also slightly damaged, but not critical and was straightened in a few seconds.
The router even looks quite neat, there is no unpleasant smell, and it fits well in the hand.
And then I remembered that I had seen a similar router somewhere, out of curiosity I typed it into Google - Makita 3703 router, similar to Raitool 3703, and I was thrown into similar models of routers. As they say - find three differences
Although no, due to confusion in the models and the great imagination of the Chinese, the router under review is similar to the “carcass” of another model, Makita RT0700CX2, a cool model, but costs about 400 bucks.
In any case, what I was looking for was found, the instructions for the Makita router are almost completely compatible with the model from Raitool, almost the same equipment, even the sole is made of plastic. Actually, that’s why further in the text I will insert screenshots from its instructions to explain some technical points.
The adapter, which is physically incompatible with the power plug of this router, lifted the mood a little. I temporarily installed another adapter, which, by the way, I also once received from Banggood in the kit for a power supply with a European plug, miracles
There is a switch in the upper part of the case; speed control is not provided, however, this is a characteristic feature of such devices. For a router, usually the higher the speed, the better, within reasonable limits of course. The cable output is protected by a long rubber tube, the cable itself is relatively soft, if not for the plug, I would give 5 points. There are caps on the side that block access to the brushes. In this case, the caps are not screwed in completely, but simply flush with the body; you can screw them in further, but I left them as they are. The sticker contains some strange information about the model name. If the model 3703 was written on the box, then here it is 3701. The declared power is 800 Watts, the speed is up to 30,000.
In the equipment list, I somehow forgot to indicate that there is also a sole, which is clamped to the router body using a screw clamp. As for me, this option is so-so, but again, this solution is found quite often with edge routers, for example with Makita.
On one side of the metal part of the case there is an improvised ruler; in fact, it is not tied to anything and serves to facilitate work.
The locking mechanism is even convenient in its own way; a rubber insert has been added for a more comfortable grip. Since the router is quite compact, it will be comfortable for a person with a medium-sized palm to hold.
There is also a place for a mechanism for fixing accessories, an edge guide or a straight guide. But here the screw is screwed into a thread cut into the plastic itself, so I have some doubts about the durability of this solution.
The sole consists of two parts. In general, there is clearly some kind of design in this, otherwise the sole would have been made in one piece, but I haven’t gotten around to it yet. But because the slot on one of the screws was slightly pulled up, I want to swear, I had to grind it a little so as not to scratch the surface on which the router will move.
Well, it’s worth mentioning separately about the unevenness of the sole; it is curved approximately 1mm from each edge. By the way, plunge routers usually have a large sole, and some work is actually more convenient to perform with a large sole, but edge milling cutters usually have a small sole. Actually, you can use a router with a shallow sole for other work, it will just be less convenient to use. But the curvature is somewhat annoying, I don’t know how it is with Makita, I haven’t checked, but now I’ll think about how to level it, because the very essence of the router is that the router should stand perpendicular to the sole or at least the sole fit tightly and not wobble.
Milling cutter with the sole removed. I think that in this form it can be used in some kind of milling machine as a spindle. The diameter of the metal part of the case is 64mm.
The net weight of the router is 1120 grams, complete with cable and sole 1380, in the maximum configuration the weight is close to 1.5 kg.
The collet chuck is designed for shanks of only one diameter, 1/4 inch or 6mm. The size is not very common, this must be taken into account when choosing a router, since sometimes a more expensive router, but with a common chuck diameter, will benefit from less expensive cutters. Therefore, when choosing a router, it is better to simultaneously inquire about the prices of cutters. The more common cutter shank diameter is 8mm.
The test showed that the collet is designed specifically for 1/4 inch, 6.35mm and 6mm does not want to be clamped.
Here, along the way, I noticed manufacturing flaws. To begin with, a flash in the area where the spindle shaft exits is not critical, but unpleasant. The “ruler” is made by milling the aluminum body and there are also metal residues that would be nice to remove. In general, if there is quality control, then the salary is in vain.
The impeller of the cooling fan is visible inside, air is captured from above and directed to the cutting area to remove wood dust (there is usually no sawdust from the router) and then spray it in an even layer over all horizontal areas in the room where the work takes place. Yes, unfortunately there is no option to connect a vacuum cleaner here.
The cutter fixation design is not convenient; there is no spindle stopper, so you have to use two keys. In addition, the collet itself is quite tight and has a slight runout, so the process of installing the cutter looks like this: Insert the cutter and tighten it tighter. Checked the runout. If there is any runout, loosen the cutter, turn it a little. Tighten the nuts more tightly.
At the same time, the spindle itself has no noticeable beats, and in general the rotor is perfectly balanced; the tool practically does not vibrate in the hand.
Knowing the peculiarities of “Chinese folk instrument making,” I disassembled the milling cutter before using it, just in case. First we take out the brushes, but in order not to confuse where they are and where they are, I made marks on them with a marker.
There is nothing under the top cover except a switch, the grounding wire is hanging in the air, so perhaps instead of replacing the power plug, I’ll replace the original cable with a long and soft two-wire cable from a vacuum cleaner, it’s still lying around idle.
The switch is the most common, maximum current is 8 Amps. It is slightly recessed in the case to reduce the chance of accidentally turning it off.
Next, we divide the body into two halves. Both parts are tightly ground to each other and it was necessary to make a decent effort to separate them, here everything is quite decent.
A rather thick electrical cardboard is laid inside the stator as additional insulation.
The windings have traces of varnish, some more, some less.
The front bearing was not knocked out, it sits tightly, the rear bearing is marked 627RS and has a closed design.
The rotor and collector assembly were made quite normally, I didn’t have any particular complaints. You can, of course, argue about the fact that the windings, although varnished, are covered with a very thin layer. The fact is that the milling cutter belongs to a class of tools where there are no heavy sawdust or metal shavings, so it is difficult to damage the windings, especially since air is captured from above and not from the cutting zone.
Since I didn’t have my own milling cutter before, and I came across similar milling cutters for sale at a relatively high price, I simultaneously ordered a milling cutter for this review. The cutter is the most common, straight, with carbide tips. This cutter costs $3, it’s called 1/4 x 3/8 Inch 60mm Long Blade Two Flutes Straight Router Bit
At the very beginning of the review, I wrote that “there is never too much power,” which is why I ordered a small cutter, because as the diameter increases, the required power also increases, or the cutting speed will begin to drop significantly and the work will be very inconvenient. There are special shaped cutters, with the help of which you can make beautiful edges, but I would not recommend using such a router with such a router, since it requires a power of more than 1000 Watts, or better yet, closer to 1400-1500. However, if you really need it and there’s not much work, then you can mill with similar cutters even at 500-600 Watts, but if there’s a lot of work, then it’s better to look for a more powerful router.
Although Makita for the model 3703, which has a power of only 440 Watts, allows working with cutters with a diameter of up to 20-25 mm and publishes a plate in the instructions with different types of cutters and the corresponding diameters. And since I am inclined to believe that in reality the router under review is unlikely to have 800 watts, this plate also applies to the model under review.
Table of cutter diameters.
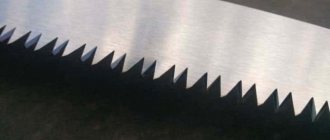
The cutting edges of the cutter are not entirely symmetrical, although the cutter itself has no runout.
I'll digress a little here. When working with a milling cutter, it must be moved so that the cutter always cuts in the opposite direction to the movement of the tool.
The cutter rotates clockwise, so if the right edge is being processed, then we move the tool away from us, if the left edge, then towards us, although the second is not very convenient and dangerous. For example, in the left photo the movement is made away from you, in the right photo - towards you. This is necessary so that the cut is clean, without scoring, and so that the cutter does not “run” along the edge.
When processing an edge, everything happens exactly the same, but due to the way the router is installed, it turns out that you will have to move along the right edge towards you if you hold the tool with your right hand.
Now about the options for using guides. Using a router without guides at all is also possible, but I will skip this option and move on to the edge guide. It is placed on the router in a specially designated place; on the guide itself there are two screws, one adjusting, the other fixing. The installation principle is simple, first we adjust the adjustment so that the outer part of the hinge mechanism is in the same plane with the edge of the cutter, then we fix this position with the second screw.
On a real instrument it looks something like this. And here I have a big remark about the quality of the guide. To begin with, it is somewhat... crooked, it can, of course, be “finished” to a normal state, but in general, somehow everything is not as intended; in the original design, it is possible to accurately set the mechanism, but it is difficult.
The additional guide can be used to mill simply straight grooves or work as a cut-off width limiter.
In principle, the idea is not bad, this type of application is more necessary for me, since I will use this tool much less often as an edge router, but cutting out a place for a hinge or lock on a door is quite possible.
But here, too, a “surprise” awaited me: this entire mechanism has quite large backlashes, which interferes with the accurate installation of the cutter. In the large routers that I used before, the guide was rigidly fixed with two rods, but here we use one rather flexible piece of iron. Again, you can use it, but the discomfort is obvious and if you want to adjust the space for the door hinge “to zero”, you will have to suffer.
The backlash is mainly due to two things: 1. The guide on the rail does not press completely due to its curvature and the poor design of the screw. 2. The rack does not normally press against the plastic part; the screw tries to rest against the housing protrusion earlier than against the rack.
There is a second option for installing the guide, in the opposite direction from the router. In this case, the emphasis is placed on some additional plane, but in general, by design, this mode is intended for milling circular grooves and cutting large-diameter holes. In this case, a pin or something sharp is inserted into one of the holes to act as an axis of rotation (Figure 10-12). Figure 13 shows the router in edge processing mode.
Photo of the guide on a real instrument. In this option, the backlash may be even greater due to the greater overhang of the mechanism.
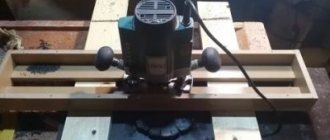
Of course, I tested this router a little. Unfortunately for the test for its main purpose - edge processing, I didn’t find anything at home, but I was more interested in how it behaves under load and how realistic it is to work. For the test, I took a long-suffering board, which I had previously drilled, sawed, tightened hundreds of screws and generally abused as best I could. Because of all of the above, it has become even more similar to some of our roads, i.e. it does not have a smooth surface.
As a first test, I simply ran it along the ruler a couple of times with a depth of 5 and 10 mm, the cutter has a diameter of 10 mm, the router didn’t even really notice both runs, but in the process the fastening of the cutter loosened and I had to re-clamp it, then this did not happen again. Unfortunately, in the process of fixing the cutter in the chuck, I was unable to align it so that there would be no beating.
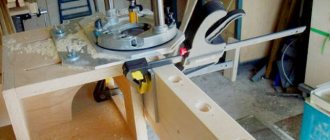
The second test is partly simpler and partly more visual. Typical use of a router, installing a hinge. In this case, a brutal steel loop was used, a set of which I have had for quite some time.
Loop length 130mm, insert width 28-29mm, thickness 3mm. Accordingly, I set the cutter overhang to 3mm and the guide to 28mm.
Just a little time and the seat is ready. Along the way, I can say that during the process it turned out to be convenient to hold on to the protruding part of the guide and use it as a handle.
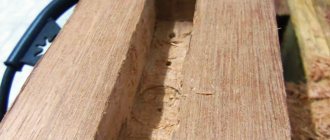
In the process, two things became clear: 1. I overdid the loop width. 2. Made the depth too small.
I decided to repeat the test, but this time I made the markings more accurately, and set the cutter offset along the loop itself, i.e. I attached the loop to the sole and adjusted the offset of the cutter along the edge of the loop, which turned out to be even more convenient than using a ruler.
The result became better, the plane of the hinge fell into the plane of the board, although of course this cutter is not very suitable for hinges with such a large radius of rounding the corners, but still not bad, especially taking into account the roughness of the board, which stubbornly prevented the router from sliding.
Last test, measuring power consumption. To do this, I set the cutter offset to approximately 10-12mm and quite actively milled a certain amount of board.
The maximum power during operation was about 290 Watts, the idle power was 180 Watts. From myself I can say that with such parameters (10mm cutter and 10-12mm depth), the router only gnaws the wood on its way, I think you can easily use larger cutters.
And about 9 years ago I tried to mill the space for hinges using Fiolent 1100, of course the result is far from ideal, but this was my first experience.
After all my tests, now the entire floor on the balcony is covered in sawdust, and there is sawdust inside the sole as well.
To be able to work with this router, I had to make a couple of modifications. First, bite out a piece of the plastic part in the area of the clamping screw so that it can press the guide; before that it just rested against the plastic
Well, add a washer so that the guide structure is rigid and does not move during operation due to the protrusion of the square part of the clamping screw being too high.
I don’t know yet whether I’ll shoot a video or not, but for a better understanding of the work I’ll attach a video from another author, although he works with it somehow very gently, the reach is small, the feed speed is low.
And here’s another interesting video, but it’s more interesting not because of its content, but because the person on the box says model 3703, and they check in front of him, it’s not the same model as mine, at least it states a power of 500 watts, I have 800 and I immediately noticed the difference in power even just by ear; in the video you can clearly hear a decrease in speed under load.
Now we can summarize, first of all, what’s good: 1. Excellent rotor balancing. 2. Pretty good assembly of the router itself 3. Sufficient power reserve 4. No noticeable spindle play
The disadvantages, although small in themselves, are many: 1. Weak packaging 2. There are difficulties with installing the cutter, there may be runouts. 3. Incorrectly selected screw for fixing the guides. This can be corrected by installing washer 4. The screw securing the guide to the body is too large and rests on the plastic. Corrected by biting out excess plastic. 5. The surface of the sole is not flat, not very critical, but unpleasant, I think it can be fixed by loosening the screws. 6. Crooked edge guide, I haven’t corrected it yet and it’s not a fact that I will do it. 7. Inflated power, with the indicated 800 Watts, I really think it’s closer to 450-500. 8. Burrs and flaking on the body are not critical, but rather indicate a low production standard.
Actually, it’s hard to say anything more, the whole essence is reflected in the title of the review, or more precisely, after assembly, process it with a file. It turns out that the router itself is quite good, the vibration is minimal, the traction is good, it cuts easily, but a large number of minor flaws spoil the whole impression.
Important addition
, the collet has a size of 1/4 inch and although the product page indicates
Collet Diameter: 6mm(1/4″)
, it does not want to clamp 6mm, be careful.
That’s all for me, as usual I will be glad to ask questions and advice, and also apologize for possible errors in the review, since in this topic I am “not a worthwhile welder.” Perhaps some of the more experienced users will give their useful advice.
The product was provided for writing a review by the store. The review was published in accordance with clause 18 of the Site Rules.
Variety of cutters for wood trimmer
In many ways, the capabilities of an edging router depend on the equipment that is connected to the device. It is the specially shaped cutters that result in the grooves, edges and chamfers that are required in accordance with the design and construction of the furniture.
Among the large assortment of cutters, we can distinguish the following classes:
. Allows you to make a smooth edge by drawing an angle with the plane. It can also be used to make a rounding depending on the diameter of the working part, usually in the range from 2.5 mm to 2 cm.
Round- Conical . Cuts the corner of the edge, forming a chamfer with the required bevel. The most common cone cutters grind the edge at 45°.
- Disk . After using this cutter, a groove remains in the side face of the workpiece, which is usually used for installing various elements - mirrors, glass, inserts, as well as for connecting with other wooden elements using glue.
- Folded . During processing it forms a step. Suitable for creating connecting edges for joining with other units and parts.
- Filling . Geometrically it is a hemisphere. When rotated, it gives the edge a concave shape of a given radius and curvature. Used for decorative milling.
- Kalyovochnaya . The result is the opposite of using a fillet cutter. After processing it leaves a rounded edge. Indispensable when creating safe edges.
- Profile . It has a complex shape. After application, the side edge takes on the appearance required by the project. Used in decorative woodworking.
Most cutters are made from high-hardness tool steel. For wood species such as oak or ash, special carbide cutters with tungsten carbide tips are used.
Additive
A highly specialized tool for creating paired holes intended for connecting parts on dowels. Used in furniture production.
What type of router you need depends on the nature of the tasks you face and their volume. For example, in furniture production, milling is one of the main operations; in a home workshop, the need for such a tool usually arises only occasionally.
The most versatile and most widely used is the plunge router. It is this that those who are trying to decide for themselves the question of how to choose a manual wood router for their home should first pay attention to. And it is on this type of milling cutter that we will concentrate our main attention here.
How to choose a tool
Professional furniture makers are not born experienced; they also purchase equipment for the first time. However, despite the specificity of the work, the edge router is no less popular in everyday life, so you need to approach the choice responsibly so as not to overpay for unnecessary functionality, but also not to end up with inappropriate equipment on hand.
Scope of application
Household milling cutters are characterized by low power in the range of 350 – 550 watts. They are designed for occasional work that does not last long. The service life of the engine and other parts is short, but the price of such power tools is moderate. A characteristic feature of household edge trimmers is their limited functionality. Here you will hardly find a rotating frame or rich equipment.
Expert opinion
Levin Dmitry Konstantinovich
A professional tool is, above all, reliability. Advanced milling cutters for chamfering and edge milling are designed for continuous operation for several hours a day. Convenient for furniture shops and woodworkers.
The power of devices usually starts at 700 W, but it cannot be too high, as it requires the installation of a large, heavy motor that will be awkward to hold in your hands. Professional tools often come with different options for frames and attachments, which allows you to get impressive functionality.
Power
Edge routers do not require a lot of power. The parameter range ranges from 350 W to 1.3 kW. Low-power devices are convenient for removing small amounts of material and for fine milling. To work on hardwood, it is better to opt for a more powerful device.
Tooling diameter
Replaceable cutters have a standard shank size for fixing in a collet.
Small hand routers, working to a depth of up to 25 mm and held with one hand, are equipped with collets for 4 or 6 mm shanks. Powerful units allow the installation of equipment with a shank diameter of 10 mm. What edge router do you use?
HouseholdProfessional
Speed adjustment
Useful for working with different types of materials. Particle boards are processed at lower speeds, MDF allows higher speeds for better accuracy. The need to reduce the speed of the cutter is necessary in order to prevent smoking and charring of the binding glue in the composition of wood boards or resin in solid wood. Therefore, for example, coniferous trees are milled at a lower speed.
Milling depth
Ranges from 17 to 55 mm. Milling to greater depths requires adequate power. A large cutter stroke is needed for thick furniture panels made of solid wood and pressed boards, otherwise the edge cannot be processed over the entire thickness. For decorative and artistic milling of MDF products, a cutter stroke of 25 mm is sufficient.
Safety precautions when working with a hand router
Now, we hope, you have an idea of how to choose a manual wood router.
Let me hold your attention for a few more moments... Whatever router you choose, so that the joy of purchasing it is not overshadowed by anything, remember the main rule when working with power tools: the quieter you go, the further you will go.
Haste is fraught with injury, tool breakage, or, at best, damage to the workpiece. Before replacing accessories, disconnect the router from the power supply. Secure the workpiece using clamps. These operations take a matter of seconds, and we strongly recommend that you do not save time on this.
You should not try to remove a thick layer of material in one pass: you are unlikely to like the quality of the processing, and the cutter may not withstand increased loads.
And, of course, do not regret half an hour or an hour to carefully read the instructions before starting work. Even if you have experience with such a tool and you feel like a cool pro, you should not neglect reading the instructions, because, firstly, you might have forgotten something, and secondly, each model may have its own specific features .