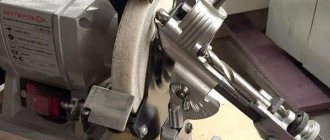
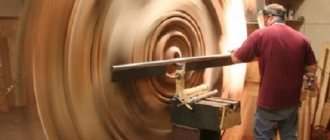
Frequent use of drills for processing metal and other hard materials requires constant monitoring of the technical condition of the tool and bringing the geometric parameters of its cutting part to their original values. Special devices and equipment allow you to restore the geometry of the cutting part of a drill as accurately and efficiently as possible, the most effective of which is a drill sharpening machine.
Even simple devices help maintain the required drill sharpening angles
Drilling metal and other hard materials are not the only reasons why the cutting part of a tool may lose its original characteristics. Such reasons also include the following factors.
- Wrong choice of drills. To process various materials, as is known, manufacturers recommend using different types of drills, differing from each other both in the design of the cutting part and in the material of manufacture. If you do not take these nuances into account, then a drill intended, for example, for processing wood, but used for drilling metal, will very quickly fail.
- Sharpening drill bits at incorrect angles. The angles at which the elements of the cutting part of the drill are sharpened are also selected depending on the characteristics of the material being processed. If you do not follow the recommendations of specialists when choosing the values of such angles, this will also lead to the fact that the tool will quickly lose its original characteristics.
- Overheating is one of the most common causes of both dull and broken drill bits. When the drill is heated to a certain temperature, the material from which it is made is released. As a result, the material becomes softer, which leads to a deterioration in the cutting properties of the drill, an increase in friction and, accordingly, to even stronger heating of the processing area and the tool itself. That is why when drilling (especially drilling hard materials), it is recommended to cool the drill as often as possible. To do this, you can use plain water or an aqueous solution of soda.
Checking the sharpening angle of a drill using a homemade template
Restoring the geometry of the cutting part of a dull drill, if you have a sharpening machine specially designed for this purpose at hand, does not cause any particular difficulties. It is much more difficult when such equipment is not available in the home workshop, but even in such a situation, you can use various ways to bring the drilling tool into working condition.
How to sharpen a drill without special tools
Many experienced specialists, who often deal with drills, sharpen them without special tools, using for these purposes only a sharpening machine equipped with a tool rest. It should be said right away that for those craftsmen who do not have such experience, it is better not to try to sharpen the tool in this way: otherwise the drill, which can be expensive, will have to be replaced with a new one. You should especially not experiment with this sharpening method in cases where you need to restore a drill whose diameter exceeds 3 mm.
When manually sharpening a drill, you have to rely only on your eye and experience, if you have it.
Those who are faced with the need to frequently drill various materials and do not yet have sufficient experience to sharpen drills without the use of special devices can purchase a similar device: the modern market offers a wide variety of models in different price categories. Moreover, many of these devices, ranging from a full-fledged drill sharpening machine to the simplest sharpening device, can be made with your own hands on a minimal budget.
Tips for making tools for sharpening drills with your own hands
It is worth noting that drills used for working on wood, plastic, drywall and other materials that have a relatively low density (with the exception of hard trees: oak, hornbeam, white acacia, etc.) rarely need sharpening. A similar tool for metal behaves completely differently. Here, restoration of the cutting edge may be required frequently, depending on the intensity of work and the characteristics of the material being processed.
Oddly enough, but more often it is professionals who prefer to use their own devices.
Sharpening a metal drill with your own hands requires certain professional skills:
- developed eye;
- knowledge of the features of electrical devices;
- understanding the specifics of metalworking specific products.
Manual processing is ineffective even with a high level of professionalism simply because it takes a lot of time. A homemade device must be mechanized. To manufacture it, it is necessary to make certain calculations, select an electric motor and additionally manufacture other structural elements that meet the technical requirements.
By making devices with your own hands, you can create exactly what is needed for your work.
In order to ultimately get a device with the desired functionality, you should first complete a drawing. Today there are quite a lot of devices for sharpening drills. If difficulties arise in terms of design, you can turn to the Internet, where many schemes for homemade sharpening installations are offered.
On a note! The drawing of the future sharpening device must contain the dimensions of all structural elements, including fastening devices.
The simplest sharpening devices
Before you start sharpening a drill yourself (even using the simplest tools), you should thoroughly study the device and the geometric parameters of its cutting part.
One of the simplest devices with which drill sharpening can be done quite efficiently is a clamp called a “Swift”. To sharpen a drill using such a clamp, you will need the device itself and a sharpening machine equipped with a reliable tool.
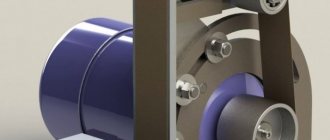
Fixture diagram
The process of sharpening a drill using the Swift clamp is as follows.
- The tool is fixed in the clamp at the angle at which the cutting edges should be positioned.
- Having rested the device against the tool rest of the sharpening machine, it, together with the fixed drill, begins to be slowly brought to the working surface of the rotating abrasive wheel. In this case, it is important to control that the angle at which the cutting edge is sharpened always remains constant.
- Having formed the cutting edges of the drill, they proceed to processing its back surface (backing), without changing the sharpening angle.
Sharpening a drill using a holder
When using such a device, which assumes that the angles of the sharpening being performed are controlled visually, it is imperative to use a template to check the correctness of the procedure.
Successful use of such a device for sharpening drills requires the presence of certain skills, which are better obtained by practicing on defective tools.
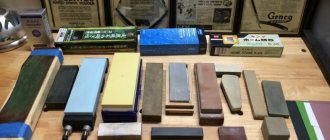
When starting to sharpen drills yourself, no matter what device or equipment you use, you should also familiarize yourself with special tables that contain information about the geometric parameters of drills used for processing various materials.
Table 1. Drill sharpening angles for various materials
It is advisable to use such a simple device for sharpening drills, such as the “Strizh” clamp, in cases where the need to perform such a procedure does not arise too often and too high demands are not placed on the quality of drilling. In cases where you have to sharpen a tool quite often, and the accuracy of such a procedure is very important, it is better to use a special sharpening machine for drills, which you can purchase or make yourself.
Devices for sharpening drills: simple and affordable homemade devices
Keeping a tool in good condition is a matter of honor for any professional or home craftsman. For cutting applications, perfect edge functionality is of paramount importance. A device for sharpening drills allows you to maintain it in the desired condition. It can be purchased ready-made or made independently. how to make a machine, a device for sharpening drills , and what you need to know for this.
Drill sharpening devices are needed to maintain the tool in proper condition.
Design of a machine for sharpening drills and recommendations for its manufacture
Special machines for sharpening drills are designed in such a way as to simultaneously solve two main tasks, which are to provide:
- feeding the cutting edge of the tool being processed to the flat side of the abrasive wheel at the required angle (for this, production machines and simple devices for sharpening drills are equipped with an angular radius scale, which allows you to set and control angles in the vertical and horizontal planes);
- the ability, after sharpening the main cutting edges of the drill, to backfill it (for this, a rotation axis must be present in the clamping mechanism of the drill sharpening machine).
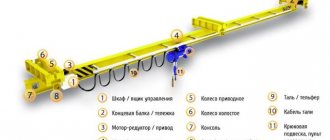
Machines designed for sharpening drills have been in use for over 100 years. Of course, the sharpening machine of earlier times, when compared with modern models, looked like a simple sharpener, but the principle by which such devices work has not undergone major changes. Making such a device yourself is very simple.
The machine must ensure the location of the drill according to the sharpening diagram
Before making a drill sharpener with your own hands, you need to prepare the following consumables, equipment and tools:
- welding machine;
- electric drill;
- grinder;
- standard set of locksmith tools;
- corner with shelf dimensions 30x30 and length 10–15 cm;
- metal plates of various thicknesses (3–5 mm);
- a hairpin or a piece of steel rod with a diameter of 10–12 mm;
- washers, screws, bolts and nuts of various sizes.
Before making a sharpening machine, it is advisable to find drawings of factory models and use them as a guide during assembly.
Drawing of a device for sharpening drills (click to enlarge)
The first thing to make is the frame of a homemade sharpening device, for which a steel plate is used, to which, based on factory drawings, a piece of steel rod with a diameter of 12 mm is welded. The angle at which the rod is welded to the plate should be 75°.
A washer is mounted on a rod welded to the frame, acting as an axis: it will be used as a support bearing. The angle through which the bed must rotate during sharpening of drills will be small, so there is no point in using a standard ball bearing as a support.
A stock for placing a tool that needs to be sharpened is made from a piece of angle iron. One of the sides of the corner profile, facing the grindstone, is ground at an angle of 60°. Based on the drawing, you need to weld a bracket to the stock, which will be fixed in the rotary unit of your machine. As a result, you will get a design whose angle relative to the surface of the grinding wheel, with the stock and bed in a parallel position, will correspond to the sharpening angle of the drill.
Complete machine
The sharpening machine of the proposed design has a fixed angle of inclination, but it is better if this angle is adjustable. In this case, you will have the opportunity to use the machine to restore the parameters of drills used in processing various materials.
After making a homemade sharpening machine, it is necessary to carry out its adjustment tests, which are as follows:
- The bed and the tool placed in it are installed in such a way that the tip of the drill is perpendicular to the axis of rotation of the grinding wheel.
- By rotating the stock by the appropriate degree, a backing cone is formed on the back surface of the drill.
- After the test sharpening is completed, its quality is checked both visually and using a template.
Securing the machine with a clamp
If the setup tests were successful, you can begin finalizing the machine:
- A guide is welded to the bottom of the stock along which the stop for the drill shank will move.
- Then you need to make the stop itself, for which you use a metal coupling and a piece of angle, connected by welding. The movable stop in the design of such a machine is needed in order to set the limit values for grinding the edges of the drill with its help. This ensures that both edges are processed evenly. The stop is fixed in a certain position using a screw.
Sharpening a drill on a homemade machine
When using such a device, which has the ability to be rotated to any angle, the drilling tool can be sharpened both with the outside of the grinding wheel and its side (radial) surface.
In order to be able to make precise adjustments, it is better to fix the device in question on the frame of the sharpening machine using a clamp, rather than installing it permanently. Despite the fact that the device described above has a fixed bed angle, this parameter can be changed. To do this, it is enough to place a wedge with the required slope under the frame.
A homemade sharpening machine for straightening drills can also be made in a different design.
- Next to the drive motor of the grinding machine, parallel to the axis of rotation of its shaft, a U-shaped portal is fixed, in the upper part of which a tool bed is installed, operating on a swing principle.
- When choosing the height of the portal, it should be taken into account that the working end of the tool placed in the stock must be above the axis of rotation of the grinding wheel.
- The bed in the sharpening machine of the proposed design can be rotated almost 180°, which allows it to be used for sharpening tools with both upper and lower pressure.
- The horizontal angle at which the stock and the sharpened tool placed in it can be rotated can also be adjusted and is selected depending on the type of drill.
- The stops for the drill shank in a machine of this design are made of bushings with clamping screws, which allows you to adjust the overhang of the working part of the tool with millimeter precision. Such bushings, which securely fix the drill and prevent it from moving horizontally, are installed in special grooves in the stock.
- To ensure the correct position of the drill in the sharpening plane, the thrust bushings are equipped with diametrical pins. Having fixed the drill in the required position using such pins, they first process one side of the tool, and then, turning it 180°, sharpen the second cutting edge. An indicator that the drill has been sharpened is the free movement of the machined end of the tool along the surface of the sharpening wheel when the bed is rocked.
The machine of the described design can be used to sharpen drills with a diameter of 3–15 mm. This equipment provides the same high quality processing as factory models for similar purposes.
How to make a simple machine for sharpening drills
Hello, dear readers and DIYers! Almost each of you has had the opportunity to drill various materials, and you know very well that the key to success in this matter is sharp drills.
Of course, you can sharpen them yourself, but buying a full-size sharpening machine is not always advisable. In this article, the author of the YouTube channel “KJDOT” will tell you how he made a miniature sharpening machine designed specifically for sharpening drills.
This project is very easy to make and can be repeated at home.
Materials. — Electric motor 555 DC 12 V-24 V 6000-12000 RPM — Bracket for mounting the motor 555 — Set of diamond blades 3 mm hole — Adapter for saw blade M3 3.17 mm — Universal adjustable power supply 12-24V 4A — Power connector, wires , solder, switch - PVC tube with an internal diameter of 45 mm - Aluminum corner - Sheet plywood, sandpaper, wood screws, instant glue.
Tools used by the author. — Screwdriver, magnetic bits — Countersink wood drill bits — Spade wood drill bits — Electric soldering iron with adjustable temperature, soldering iron knife — Electric jigsaw — “Third hand” with magnifying glass and light — Digital square, ruler, pencil, tweezers, side cutters , screwdriver. Manufacturing process. So, the main material for the machine body will be sheet plywood 10 mm thick. From it the master cuts a couple of rectangular blanks measuring 70X55 mm and one 60X40 mm.
These parts are connected to each other with countersunk self-tapping screws, for which the author pre-drills pilot holes with a countersink drill bit for wood.
The base of the machine is made of the same plywood, with the first part of the body located at an angle of 30 degrees. This part, like the previous ones, is cut out using an electric jigsaw. Then all edges are sanded with sandpaper.
Now the author marks and drills holes for attaching the bracket on which the engine will be supported.
For ease of soldering, the author uses a “third hand” and solders the wires to the motor and switch.
The toggle switch is installed in its place. The length of the neck was not enough, so the toggle switch is fixed using second glue.
The master made the protective casing from PVC tubes with an internal diameter of 45 mm and a length of 86 mm. This part is cut out using a knife attachment for a soldering iron. You can make such a nozzle yourself by reading the following article.
The author has provided a recess in the casing for a wrench, it is marked with an arrow. The casing is glued to the body with the same second glue.
By the way, it would not hurt to provide a partition that isolates the motor housing from the diamond disk. After all, the engine has very powerful magnets that will easily attract metal dust that inevitably forms during drill sharpening.
Of course, this is not the best solution, because drills have other sharpening angles. You can make an adjustable support quite simply.
So, the machine is ready. Of course, it would have been worth treating the wooden parts of the body with wood impregnation or applying a couple of layers of paint.
Having supplied power to the motor, the master begins sharpening the drills.
By the way, on Aliexpress they offer this
screwdriver attachment
, with which you can sharpen drills.
I thank the author for recommendations on making a small machine for sharpening drills.
Good mood, good health, and interesting ideas to everyone!
The author's video can be found here.
Source
Become the author of the site, publish your own articles, descriptions of homemade products and pay for the text. Read more here.
Homemade sharpening machine for autonomous type drills
If desired, you can make a sharpening machine for straightening drills, the design of which will have its own electric drive motor. Such equipment will be completely autonomous and will not have to be attached to an existing grinding machine.
The frame of such a compact machine can be made of plexiglass or textolite 10 mm thick, and an electric motor from an old fan can be used as a drive motor. The guide element of such a machine, on which the stop for the drill shank is fixed, works on the principle of a conventional caliper. The angle at which the drill, which has the ability to move in the horizontal direction, is sharpened is set by using a rotary platform.
Homemade device for sharpening drills from nuts
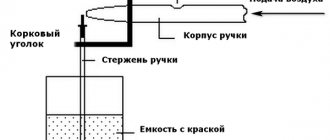
One of the simplest and most accessible devices for sharpening drills is a device made of nuts.
The algorithm for its production may be as follows:
- You need to take two nuts of different sizes. On the larger one, measure 9 mm on three sides of one edge and draw it with a marker. Do the same on the opposite side. Then clamp the nut in a vice and cut out the marked fragments.
- Next, you should lay the drill and make sure that the sharpening angle of the tool, which is 120°, and the edges of the nut coincide.
- Using welding, weld the smaller nut to the larger one, placing it against the cutout surface.
- A bolt must be screwed into the smaller nut to secure the drill. You will get a self-made sharpening angle holder.
On a note! When making a device for sharpening drills from nuts, you should not simplify the design by replacing the clamp with a bolt by simply fixing it by hand. This will significantly complicate the processing process.
The sharpening device can be made from two nuts and a bolt.
The inserted and clamped drill is brought to the sandpaper and ground. The nuts hold the desired angle and do not allow you to grind off more than necessary.
There are many skeptical views on the functioning of this device. First of all, concerns are expressed that the metal of the nut will also be worn down when touched by an abrasive wheel, and quite intensively, since it is soft. As a result, the device will not last long.