An airbrush (air brush - translated from English) is a compact spray gun with which paint is sprayed (splashed) in a thin strip onto any surface. In principle, its operation is similar to the action of a spray gun, but there is also a significant difference, one might say fundamental. This is that with the help of an airbrush you can create beautiful images and apply them to almost any surface. This device is convenient for applying unique images, even with small details. Despite the fact that you can find various models on sale, many people wonder how to make an airbrush with your own hands at home and how difficult it is and how expensive it is.
Types and classification
All airbrushes are divided into several types, according to the following characteristics:
- A method of mixing air and paint flows. There are external and internal mixing. The first option has a simpler design.
- The method of applying paint and positioning the container. There are models with top, side and bottom feed, in addition, there are devices in which paint is supplied using air under a certain pressure.
- Control type. Single, double and independent action.
Airbrush with external paint mixing from cork and ballpoint pen
The easiest way is to make an airbrush yourself if its design involves the presence of an external paint sprayer, that is, during operation of the device, external mixing of air with paint will occur. Below is a drawing according to which you can make a device for spraying paint in just a few minutes.
The airbrush is made as follows.
- Remove the refill from the ballpoint pen and blow the ink out of it, after first removing the writing part.
- Take a wine cork and draw a line through its center.
- You should also draw 2 segments, starting from the previous line, on both sides of the cork. The length of the segments should be 15 mm.
- Connect 2 vertical lines and cut out the outlined part of the cork to make a corner.
- Next, cut off the excess part of the cork so that you get a stand 8-10 mm high.
- Drill or pierce a hole in the stand with a sharp object into which the rod will be inserted.
- Also drill a hole of a suitable diameter for the body of the ballpoint pen.
- Cut a small part of the stand as shown in the following photo.
- Since the hole in the pen body through which the writing part of the rod comes out has a small diameter, it needs to be widened to 2-3 mm using sandpaper.
- Insert the prepared handle body into the corner made of cork.
- Also insert a rod into the bottom of the stand.
- Place the rod on the paint container and determine its length (it should reach the bottom, but not touch it).
- Cut off the excess part of the rod with a utility knife.
- In the lid of the paint container, drill a hole of a size corresponding to the diameter of the ballpoint pen refill.
- Apply glue to the lid using a glue gun, insert the rod into the hole and fix the stand in the desired position.
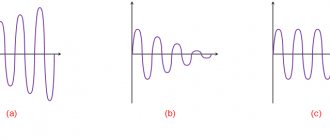
Operating principle and design
The principle of operation of all airbrushes is the same and lies in the fact that the air pressure that passes through the tube is greater than that of the external environment. The paint is mixed with air after rising through the tube. In this case, an even and fairly powerful jet is formed (Bernoulli's principle). The amount of air is adjusted using a trigger (control mechanism). When pressing on the trigger, paint or varnish is sucked from the container and sprayed in the form of a conical jet.
The design of most models is the same, regardless of the location of the varnish or paint container. And although some details may have certain differences, the principle of operation remains the same.
The process of applying a pattern to a car
Airbrushing a car with your own hands is an incredibly interesting, exciting process that requires a lot of effort and time. To obtain a high-quality result when performing work, you should adhere to certain rules:
- the design that will appear on the hood, roof, wings or other parts of the car should be chosen according to the personal preferences of the owner of the vehicle,
- The place of application should be such that the design does not get lost against the general background and is clearly visible. When it is necessary to perform a complex, multi-color image, it is recommended to remove the part,
- it is necessary to ensure the safety of the work process - the room where paint will be sprayed from a spray gun must be clean and well ventilated. When working with chemicals, it is imperative to use personal eye and respiratory protection,
- Since the design is not applied to the headlights, mirrors and handles, they must be removed before applying paint. Thoroughly clean the metal surface from dust and small debris. Using coarse sandpaper, remove the paintwork. The metal being processed should have a matte finish. If there are scratches and microcracks on it, they should be eliminated with putty and primer,
- special attention should be paid to working with images. So, before applying it, the unused surface on the machine is carefully covered with film or special tape. The application site is degreased, dried well with a hairdryer,
- The finished drawing needs to be fixed; to do this, it is covered with 2–4 layers of varnish and left for a day until completely dry.
Substances used for painting
Each airbrush paint composition has its own unique characteristics and cost. Therefore, when choosing this or that option, we recommend taking into account all the negative and positive qualities. The desired color is selected by mixing paints of different tones in a separate container. Today the following are sprayed with a spray bottle:
- non-toxic acrylic mixtures, which are diluted with water to the desired state. Their main advantages are: a wide selection of colors, excellent tone reproduction and the ability to easily remove the top layer. The disadvantages include the inability to clearly draw small details in the drawing due to long drying and a rather thick consistency,
- enamels are fast-drying water-based paints. Their advantages are safety for human health and low cost. The disadvantages are poor color reproduction, loss of original brightness and saturation when mixing,
- nitro paints containing polyester, urethane or synthetic substances. Advantages: since they dry quickly, they are suitable for neatly drawing small elements. Disadvantage: they are very toxic, after mixing they form an unstable composition, which is why they have low color rendering.
Important! Before using the spray gun, the paint is diluted to the desired consistency with a special solvent, which prevents clogging of the nozzle and, as a result, failure of the device itself.
Execution technology
How to properly airbrush the hood, body, roof or other parts of a car if you have never used a spray gun before? We recommend trying to make a small drawing on a separate steel sheet. Start learning by drawing straight horizontal and vertical lines, followed by curved stripes and circles. Having filled your hand, you can move on to giving the car itself an original appearance.
Proper drawing is impossible without following the following important rules:
- the thickness of the applied lines will be directly affected by the distance of the device’s nozzle from the surface being processed - the larger it is, the thicker the line will be,
- when paint is sprayed over a large surface or scatters in different directions, this means that it is applied at an angle. This is incorrect - the jet should always be directed perpendicular to the surface,
- The brightness and density of the lines are determined by the time the device is held over the treated area: to obtain a dim spot, the device must be held for several seconds, for a bright one, more drops of paint will be required, and accordingly, the duration of application will increase.
Important! To prevent the appearance of blurry, sloppy spots on the working surface, the spray gun should be moved from side to side very smoothly. No sudden movements of the hand or a long stop in one place are allowed. When applying a design, its light shades are applied first, followed by all the others.
Fire extinguisher receiver
One of the most optimal options for a receiver is a fire extinguisher for an airbrush with your own hands, especially since you can find such a product without much difficulty. You can search at enterprises, contact your friends, purchase from firefighters or companies that service fire extinguishers. They usually always have decommissioned fire extinguishers ready for disposal. It is better to choose specimens with a capacity of 15-20 liters, but only so that they are in decent condition. Rust inside the container is unacceptable.
Important: a fire extinguisher for assembling an airbrush with your own hands must be in good condition, without external deformations, and there must be no rust inside.
If there is rust, you can use a special remover, paint stripper, solvent, metal brush or drill with special attachments. It is advisable to treat places where there was rust with a special solution to bind rust. After this, the surface must be treated with a metal primer and painted. This must be done strictly according to the instructions.
Tip: Particular attention should be paid to the inside of the neck and the lid.
Assembling a homemade airbrush
If you want to properly assemble a homemade airbrush with your own hands. You need to follow the following algorithm:
- Remove the core (paste) and completely clean it of the ink paste, the remains of which are certainly retained inside, even when the pen stops writing. First you need to remove the pen tip from the rod, on which the writing ball is located.
- Rinse the pen shaft thoroughly with warm water, solvent and alcohol-containing liquid. It should become absolutely transparent and clean.
- Take a 20-30 cc medical syringe and soften its tip (into which the needle is usually inserted) using heat treatment. This is where a lighter comes in handy (however, you should not overheat the syringe so that the plastic does not leak). This can also be done using any other heat source.
- While the nose of the syringe remains heated, it must be expanded with an awl to such a size that the removed ballpoint pen refill can fit into it.
- Make a small hole about 15 millimeters deep in the wine bottle cork. In this case, its horizontal and vertical walls should form a right angle. The width of the notch should be approximately two centimeters, and the height - one and a half.
- Mark the cork using a marker and cut out unused pieces using a utility knife. In this case, the height of the plug should be reduced so that a distance of 1 centimeter remains from its bottom wall to the horizontal edge of the previously made recess.
DIY airbrush
- After this, you need to make a couple of through holes with different diameters in the remaining part of the plug. The rod of the ballpoint pen will pass through the vertical one, and its body will pass through the horizontal one. It is better to first make these holes using an awl, and then drill them with a previously prepared drill with a drill of the appropriate diameter.
- The hole at the bottom of the outer body of a ballpoint pen is usually narrower than necessary, so it will need to be made a little wider. To do this you will need sandpaper. You need to rub until the diameter increases to 3 millimeters.
- Insert the body of the ballpoint pen through the horizontal hole in the cork. In this case, the tip should only peek out a little.
- Pass the pen shaft through the vertical hole and bring its upper end to the hole in the pen (it should only overlap it slightly).
- In fact, now the main working unit of your homemade airbrush can be considered completely ready. You just need to adjust the length of the rod so that it matches the height of the container in which the paint will be stored. It is necessary to ensure that the rod under no circumstances comes into contact with the bottom of the container. If it is a little longer than the bottle of paint itself, it’s not a problem. It can be cut with a knife at any time.
- Make a hole in the plastic lid of the prepared glass bottle, which will be the same diameter as the pen refill.
Airbrush at home
The rod will need to be inserted into this hole and secured with water-repellent terminals. In this case, it is best to use hot-melt adhesive, because it will ensure proper fixation and guarantee the absolute tightness of the connection. If you couldn’t find such glue, then “Moment” will do. At this point, the homemade airbrush can be considered ready for work.
As can be seen from all of the above, such a process is not overly complicated and can be done by any car owner (it is also not difficult to create a homemade compressor for an airbrush).
Author: Baranov Vitaly Petrovich
Education: secondary specialized. Specialty: car mechanic. Professional diagnostics, repair, maintenance of passenger cars of foreign production 2000-2015. Extensive experience working with Japanese and German cars.
2 comments
- Doc says:
Vitaly Petrovich. The process of making an airbrush is described so confusingly and incomprehensibly that people will not have any comments or questions. And the attached photo does not add any information. They would give a normal drawing with short comments and that’s it.. - Vasily says:
How many atmospheres is the homemade one designed for, will it not tear it, will the paint fall off like a fog?
Recommendations for beginning artists
Don't have enough experience in applying multi-colored airbrushing to cars? It is worth using ready-made stencils or vinyl stickers. A stencil is the same template that professional craftsmen use in their work. The main disadvantage is that the resulting images often have to be corrected by hand, shadows, highlights, etc. must be added.
Stickers on film require preliminary preparation of the surface, its thorough cleaning and degreasing with chemicals. After that, soapy water is applied with a spray bottle to the areas that will be covered with film. The sticker is heated with a hairdryer and smoothed from the middle to the ends. After this, the car cannot be washed for about one week.
Handmade stencil making
A reusable and disposable template can be purchased at a specialized store or made on your own. Some manufacturing nuances:
- a homemade stencil is cut out of thick cardboard or special oilcloth,
- you can find the desired drawing on the Internet, then print it on a color printer or transfer it to paper using a pencil, then carefully cut it out with sharp scissors,
- the template is carefully applied to the metal surface and secured at the ends with construction tape, this will prevent paint from flowing under the template,
- To ensure uniform application of the paint composition, it is not recommended to bring the nozzle too close to the working surface,
- the necessary shadows and highlights are added by hand.
Proper image care
If you follow simple rules for caring for airbrushing, the design on your car will remain bright and colorful for many years:
- To avoid scratches when washing, you need to use a soft sponge and special shampoos. After rainwater gets on the pattern, it should be dried thoroughly, otherwise it may lose its bright color and deteriorate over time,
- the same should be done if gasoline or oil gets in contact with
- any mechanical damage to the drawing is unacceptable.
As for servicing the spray gun, after use it must be disassembled, all parts must be thoroughly washed of paint in running water, otherwise dried chemicals will simply ruin the device.
To practice airbrushing, you don’t need any special knowledge or skills; the main thing is to have a reliable and high-quality spray gun on hand, which you can make with your own hands from improvised materials. The device will become an indispensable assistant in construction and repair, and by equipping it with a compressor with a receiver, you will be able to give your car a unique, unique appearance without much difficulty and serious material investments.
The following video will tell you more about the technology of applying airbrushing to a car: