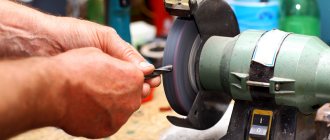
The main task of any drill sharpening device is to maintain the exact angle of inclination of its cutting edge to the plane of the grinding wheel. The drill is always sharpened along the rear surfaces and the bridge (see figure below), as a result of which a cutting edge and bridge are formed, which plays an important role in the initial cutting into the material.
Between themselves, the cutting edges form a main angle, the value of which during sharpening is selected depending on the material of the workpiece. For drills for metals of the steel group, it is equal to 116÷118º. The rear surfaces must be strictly symmetrical and inclined towards the cutting edge to reduce friction.
If you have certain skills and a good sharpening machine, you can sharpen a drill with high quality manually, controlling the sharpening angles using special measuring templates. For those who are not confident in their qualifications, it is better to perform such operations using a sharpening device, which you can make yourself or purchase in a store.
The simplest drill sharpener to make is a rectangular piece of wood with a hole of the required diameter and an end beveled at the required sharpening angle.
When should you sharpen your tool?
Turners who have worked for a long time will understand the condition of the working edge without prompting, but beginners can use these signs:
- an extraneous sound is made - creaking, whistling;
- rapid heating occurs;
- the resulting hole is of poor quality and has jagged edges;
- Chips do not form from all grooves.
If the procedure is not carried out in time, a faulty tool may break (the tip will break off, the workpiece will deteriorate) or get stuck in the steel. As a result, the device will be torn out of your hands. Possible broken equipment or injury.
Purchased devices for sharpening drills
You can buy a specialized machine that has already been created, but its use always has a certain range of functions, that is, the tasks are always highly specialized. The use of a homemade device, in turn, has the following advantages:
- profitability - it can be made from scrap materials;
- gaining experience - you will better understand the specifics of each device if you make it yourself;
- unique purposes - if you work with non-standard shapes and sizes, the easiest way is to make your own sharpener.
But if you want to buy a ready-made machine, let's see how they differ.
Main types of factory devices
They are divided into two types:
- with a standard set of modes for classic sizes;
- with the ability to adjust all parameters.
The latter is much more functional, but also more expensive. It is made in the form of a mechanism on a frame, static, made of steel, so it is not subject to transfer. The second is an attachment for a drill, therefore it is fully adjustable with this construction tool (the number of revolutions is created manually).
Ready-made devices for sharpening drills
Devices for sharpening drills are divided into two main types: with adjustable parameters (diameter, sharpening angle, reverse angle, etc.) and with a fixed set of diameters and non-adjustable sharpening characteristics. The former are essentially full-fledged semi-professional accessories for sharpening machines.
They are made of metal, screw-fastened to the workbench and are designed for sharpening drills of both small and large diameters. The latter, as a rule, have a plastic body with a small cup-type sharpening stone and a jig with holes for certain diameters.
The first type in Russian stores is represented by a device for sharpening drills from the British company Draper Tools and its twins (see photo below).
This device is designed to work with drills with a diameter of 3 to 19 mm with the following fixed sharpening angle settings (1/2 main angle):
- 88º - hard and thin-sheet materials;
- 68º - thin drills for large volumes of work;
- 59º - universal use;
- 49º - plastic, wood, lead, copper, light alloys;
- 41º - countersink.
In addition to Drapper, there are two complete copies of it on the Russian market: sharpening devices Riss 8100v and Craftsmann 9-6677. Judging by the appearance and reviews, the workmanship of the first is somewhat inferior to Drapper and Craftsmann.
Sharpening devices with a set of fixed holes for certain drill diameters are externally somewhat different from each other, but in principle they are designed the same. Their sharpening angle is ensured by tilting the side surface of a small cup disk, and the drill is fed by lightly pressing the end of the shank.
Structurally, such devices are an attachment for a drill, they look very similar and cost about 700 rubles. (Sparta, KWB and others). The BOSCH S41 sharpening device stands out from this series. With the same design solution, its price is about 4,700 rubles. In the photo below: Sparta nozzle 912395.
All these devices allow you to only edit the cutting edge with more or less accurate adherence to the main and rear angles. It is very difficult to sharpen a broken or rounded drill on them efficiently. In addition to them, the Aliexpress trading platform offers plastic attachments and other designs, whose functionality raises certain doubts (see photo below).
VIEW Drill sharpener on AliExpress →
Most manufacturers of such sharpening devices do not indicate the recommended rotation speed. Therefore, the determination of this important parameter remains up to the user.
Tips for making a jig for sharpening a drill yourself
Nuances and features:
- Beginners more often use purchased devices, while experts prefer those made by themselves;
- working on home equipment requires high precision, understanding of the operation of electrical devices, knowledge of the behavior of tool steel;
- manual drive is ineffective, you will need to connect the engine;
- preliminary drawing up of a drawing is required;
- The diagram must reflect the dimensions and methods of fastening.
Specifics of sharpening with different cutting edge shapes
There are 4 types of edge, they need 2 different approaches:
- single-plane and two-plane are processed by approaching the planes (alternately) with an abrasive wheel; there is no need to move the tool;
- cylindrical and conical ones undergo a slightly more complicated procedure - the working part is also brought to the moving abrasive, but with one hand the master presses on it, and with the other he holds the edge and rocks it from side to side to achieve uniform grinding.
Errors and their prevention when working with emery for sharpening drills
Mistakes are often made:
- Different edge lengths. Leads to their breakdown. You can avoid this with an accurate eye and measurement before starting work.
- Asymmetrical angles. The result obtained is the actual exploitation of only one edge. Solution - review the drawings, perhaps your holder is not very functional, its tilt will lead to asymmetry.
Homemade drill attachment for sharpening drills
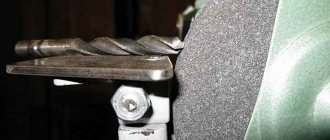
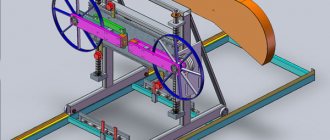
All drill attachments for sharpening drills (with the exception of very exotic homemade products) have the same design, differing from model to model in minor details. They appeared on the market relatively recently, and in our country the description and assembly drawing of such a device, intended for its independent production, were first published in the magazine “Modelist-Constructor” (see below).
Here the nozzle body (4) is made of a piece of metal pipe. A jig (1) with holes corresponding to the diameters of the drills being sharpened is inserted into its upper end and secured with a screw (2). Before starting work, the housing is attached to the drill neck (7) using a bushing (5) and a screw (6).
For sharpening, the drill is inserted into the corresponding hole in the jig, having previously oriented the cutting edge along the mark towards the axis of rotation. Then lightly press it with your hand, pressing it against the surface of the grinding wheel for several seconds. After this, take it out, turn it 180º and sharpen the opposite edge in the same way.
The most difficult thing to make yourself in this device is the grinding stone, because to sharpen a drill to 120º, the inclination of its upper plane must be strictly 30º. The magazine recommends shaping it into the desired shape on a lathe using a special tool (probably a diamond pencil for dressing abrasive wheels).
Such an operation is hardly possible in a home workshop, and ordering a sharpening stone from outside will certainly not be cheap. In addition, almost the same factory-made nozzles are sold at a price of about 700 rubles. Their only difference from the sharpening device shown in the drawing is the shape of the sharpening stone, which has the shape of a cup, and therefore the drill is sharpened by its inner surface.
VIEW Drill sharpener on AliExpress →
What angles should be used to work with different materials?
Metal alloys have different densities, so products made from them must be processed under different conditions, let’s present them in the form of a table:
| Metal | Sharpening in degrees |
| Steel and cast iron | 115-120 |
| Bronze, brass | 125-135 |
| Copper | 125 |
| Aluminum, wood, porcelain stoneware | 135 |
Stand - a device for sharpening drills for metal: design features
Depending on the scale of the tasks, they can be of different sizes. The unit is mounted on a lathe or sharpening machine using bolts. Their design consists of:
- grounds;
- a fastening element for clamping a tool;
- thrust mechanism;
- feed regulating screw;
- clamps.
There is a scale on the purchased sample; it adjusts the angle with high accuracy. If you are using an independent device, it will be more convenient to use templates of different diameters; they can be made of wood.
A simple device made from a nut for sharpening a drill at home
For production you need a minimum of available materials. Let's look at the image:
Creation instructions:
- Take two nuts of different sizes, cut out 9 mm cuts from the smaller one on three edges on each side.
- The sharpening angle should correspond to the resulting edges - 120 degrees.
- Weld the second product to the first using welding machines so that you get holes in the form of a triangle.
- Select and screw in a bolt that is the same size as the small nut. It will clamp the tool being processed.
The workpiece is inserted into such a holder. It is securely fixed with a clamp. Now you can bring the part to the abrasive wheel and not worry about cutting off too much or at the wrong angle.
Do-it-yourself drill sharpening device for drills
We told you that you can buy an attachment for an electric drill. They are usually made of plastic and have standard connectors. You can make an analogue at home, recommendations:
- make parts from metal, not plastic;
- connect the sanding wheel to the cartridge using a ring;
- the emery cone can be made on a lathe;
- The outer casing (a cover with holes of different diameters to suit the required dimensions of the tool) is best made of wood, but it can also be made of steel.
To make it easier for you to do your homemade product, let’s see what the purchased model consists of. This is explained in the video and shown by the commentator after the analysis:
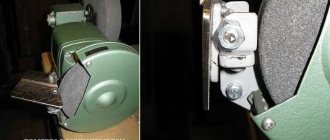
Device for grinder
This power tool is also used for sharpening, this is easy to explain - installing an abrasive disk is a natural task of an angle grinder, and fastening at the desired angle to a rotating abrasive is easy to do. Let's see what it looks like:
A metal corner must be attached to the casing; it will act as a guide. The adjustment is done manually. There are also disadvantages, including the fact that the disk itself is subject to uneven load and can crumble with prolonged use.
Mandrel for sharpening drills from door hinges
Another interesting home option.
Many people think that it is overly complicated. But we will consider making:
- the lower part is fixed on the hand rest;
- the upper one moves the workpiece;
- the lower finger needs to be pulled out, leaving only the upper one;
- one of the loops should be cut into two parts - one of them regulates the tilt;
- you need to weld a metal corner, cut a thread for a bolt in the drilled holes;
- Next you need to weld the lamb in order to rotate the thrust mechanism.
More detailed step-by-step instructions in the video:
Spiral type
To do this, you need a sleeve whose diameter exactly matches the size of the drill. These can be tubes made of copper or aluminum. The guides should be carved from wood. Holes are drilled in the block at a given angle - a tool will need to be inserted into them. Separately, you need to create a tool rest, which is responsible for the stop and the correct position of the workpiece.
Review of popular models
In Russian stores, equipment for sharpening drills is represented by a rather small assortment.
This is probably due to the fact that the price of even the simplest device, on which you can only sharpen a drill, starts from two thousand rubles (which is comparable to the cost of an angle grinder), and the quality of sharpening, judging by numerous reviews, leaves much to be desired. In addition, most home craftsmen need to sharpen drills several times a month, and they prefer to do it manually. The table below shows a list of the most popular models, among which the Darex sharpening machine stands out for its price, quality and functionality.
All of the listed devices have housings and accessories made of plastic.
| № | Name | Drill diameter range (mm) | Drill fixation system | Weight, kg) | Abrasive wheel material | Average price (RUB) |
| 1 | Sturm BG6017S | 3÷10 | Conductor | 1,5 | Electrocorundum | 1 900 |
| 2 | "Instar" STCH 60090 | 3÷10 | Conductor | 2 | Electrocorundum | 2 100 |
| 3 | Parkside PSS65A1 | 3÷10 | Flat holder | 1,35 | Electrocorundum | 2 700 |
| 4 | "Diold" MZS 0.2 | 3÷13 | Cartridge | 1,9 | Electrocorundum | 3 100 |
| 5 | Darex Drill Doctor 500 X | 2.4÷12.7 | Cartridge | 2 | Diamond | 20 500 |
In addition to stores that offer new models of machines, there is also a market for used sharpening equipment. On these sites, for a very reasonable price, you can purchase professional machines from both Russian and well-known foreign manufacturers, for example, the Swiss company Meteor.
VIEW Multifunctional drill sharpener on AliExpress →
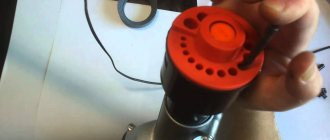
How to sharpen a drill for metal: a device for a drill
We have covered all possible options; we will dwell in more detail on one of the most popular. His photo:
Design
Comprises:
- plastic case;
- emery wheel;
- coupling for connection with an electric drill;
- cover with holes of different diameters.
Advantages and disadvantages
Pros:
n
- low cost;
- ease of control;
- size range – from 3 to 10 mm.
Minuses:
- not suitable for factory, permanent use;
- cannot be used for broken incisors;
- low fixation in the cartridge;
- The angle cannot be adjusted individually.
How to sharpen correctly
In principle, it is possible to sharpen drills for metal without “assistants”, with proper skill.
To properly sharpen drills for metal, a bevel measurement will not hurt.
Bulgarian
The basic tools for sharpening are a grinder and a grinding disc. Regular cut-offs will not work - they are too thin. Since the load is transverse, the disc may burst. Considering that the protection will be from below, the fragments will fly straight into the face or body. Otherwise, you can sharpen a drill with a grinder quickly and without the skills of a mechanic.
To properly sharpen drills for metal, follow the instructions:
- The shank is clamped into a clamp or vice. It will be easier if you immediately set the tilt to 120 degrees so that the angle grinder produces a flat plane.
- The grinder should be held parallel to the floor and the metal should be gradually removed from the edge.
Every few passes, the edge is “tested” with a fingernail. If it is cut off, it means the drill has been sharpened.
It must be taken into account that the quick cutter from which consumables are made is very capricious. You can’t overheat it, so you shouldn’t get carried away with the grinder. You should regularly water the edge with cold water and work for no longer than 3 seconds.
On sandpaper
This is already a special sharpening tool, so it’s easier to work with. To work with HSS and P6M5 steels, medium speeds are required.
So, the sharpening machine can be prepared. On the “table” near the circle, you can measure 60 degrees in advance to orient it towards it. Place a glass of water nearby and periodically dip the drill into it.
Now you can start:
- The drill is set at the 60 degree mark.
- Now, without moving the center, you need to carefully rotate it along its axis. With your left hand we hold the spiral near the edge, and with your right hand we turn the shank.
- Dip it into a glass of oil every 15 seconds to remove the dull edge.
You can make a 120° slope in advance to compare. This will make it easier to sharpen drills for metal.
In this
You can clearly see the degree.
How to choose a nozzle
Factors for selection:
- diameter compatibility with drill;
- sharpening angles;
- drill hole sizes;
- manufacturer;
- the presence of a second sharpening stone with a less common inclination.
What other attachments are there?
To make the electric drill as functional as possible, it is equipped with sharpening devices:
- circular saws;
- knives and chisels.
This is a convenient multifunctional option for home use.
Equipment
It is very convenient to use a stand so as not to hold the drill suspended; it consists of a metal body (Element A), a cover (B), a holder ring (C) and a grinding head (D). Let's see what the complete device looks like:
A device for sharpening drills with your own hands
Translated by alexlevchenko for mozgochiny.ru
I admit, sharpening a tool has always caused me quiet horror.
You need to think not only about the rotating sharpening stone, which is a source of potential danger, but also maintain the sharpening angle... I think the article will be useful for beginning brainiacs, and I kindly ask experienced comrades to supplement the information below or tell us about your method of maintaining the sharpening angle .
- Materials
- Tools
- Protractor;
- Malka (device) is a carpentry and metalworking tool for marking and measuring angles, drawing parallel lines. Consists of two parts, fastened together with a clamping screw. The thicker part (block - base) is pressed against the workpiece, and markings are made along the thin part (ruler). Sometimes a scale for measuring angles is applied between the two parts of the fish. Large fry can be used for construction work;
- Drill with wood drill;
- Screwdriver.