When making furniture, repair or welding work, you often cannot do without a belt sanding machine - a grinder, manual or stationary. You can purchase this equipment in a store, but for a person who does what he loves unprofessionally, the price of such equipment is unreasonably high. Therefore, many people prefer to look for ready-made drawings of a grinder, so that they can then make a useful thing themselves. These designs are distinguished by a wide variety - both in the materials used and in the size of the belt grinding machine. There are very simple options, and more complex ones that require professional help.
“Responsibilities” and features of the grinder
This machine is universal. A grinder is used to remove rust, remove burrs or paint, clean welding seams, and get rid of sharp edges. The variable sharpening angle makes this tool indispensable when a part that has an extremely “tricky” shape requires grinding. The grinder works with any material: wood, metal, plastic, glass.
Before deciding on the feasibility of self-assembly, it will not be amiss to become closely acquainted with the machine: you need to look at the drawings of the grinder and understand the principle of its operation. The belt grinding structure consists of a motor (3), a straight (drive) and tension rollers (7,8), on which there is a belt (10) of the required grain size. Other elements:
- a bed having a stable base (1);
- stand (2);
- pulley (4);
- swivel unit (5);
- spring (6);
- turntable-table (9).
The usual design has a table with clamps for fastening to a stationary frame or workbench. Some models provide for its rotation along one axis by 90°, in others it is perpendicular. The frame is equipped with a drive motor or foot drive.
Tricks for assembling a grinder
The design must be reliable, so there are rules regarding the elements of the grinder.
Turntable
It is extremely important for precise machining of complex parts. Duralumin sheet is the material most suitable for this element. A bracket is attached to it, allowing the table to rotate in a horizontal plane. The minimum thickness is 15 mm, thicker is better, if you choose a smaller value, the platform will not withstand the load.
Rollers, pulley
They can't be very heavy. This is the main condition for the effective operation of the tool, since a large weight will provoke jerks that threaten the tape with stretching or damage. Therefore, heavy steel is not the best option. On the other hand, a steel roller can be made hollow, but the cost of such a part ordered from a turner will be much higher.
The optimal solution is to choose duralumin. To ensure that the tape holds well, an end groove is made. Excessive smoothness of the roller will lead to permanent rotation of the belt, so you need to ensure a surface roughness of 1.25 to 2.5 RA. A higher value is synonymous with faster wear of the sandpaper. The rollers are secured to the grinder with cotter pins.
The belt sander pulley is made from various materials - wood, plywood of varying thicknesses, a motorcycle wheel, thick-walled steel pipe, or any other material that is at hand. A good choice is to make the part from D16 duralumin or higher.
Bonding tape
This element requires cloth-based sandpaper. When evaluating grinder drawings, you need to pay attention to the width of the sanding belt and its length. It is better to choose those schemes that provide standard values: 100, 50 mm and 610, 915, 1230 mm, respectively. The last value is the limit, since the longest tape automatically means the need to search for an engine with increased power.
Other requirements for an ideal element:
- elasticity of the base fabric;
- good abrasive resistance;
- no fear of extreme angular speeds (minimum - 1500 rpm);
- minimal heating even during long-term work;
- Possibility of elongation without large loss of quality (relative tension - at least 15%).
Operation and design of the belt grinder
The principle of operation of the grinder is simple. There is a group of rollers through which a sanding belt of the required grit is passed. If you rotate the drive roller mounted on the output shaft of the electric motor, the others will automatically begin to rotate. By adjusting the relative position of the driven rollers, it is possible to grind surfaces with defects of varying depths. To compensate for the possible stretching of the belt (during its long-term operation), a mechanism is provided for tensioning one of the rollers (as a rule, the one that is located somewhere between the driving and driven ones in the kinematic chain of the machine).
The design of the belt grinder includes a table on which the product being processed should be fixed. It is better if such a table has the ability to rotate along one of the axes at an angle of up to 90º: then it is possible to grind two mutually perpendicular planes from one installation of the part. As a safety feature, it makes sense to provide a folding protective glass made of transparent acrylic on the machine frame - then there is no fear that flakes of sanded paint or scale will get into the operator’s eye. Naturally, you will need controls that are located in the bed or on the frame of the machine. Portable versions are equipped with a durable stand, on the base of which there are mounting holes, with which the grinder can be mounted on a workbench.
Let's try to abstract from the elegance of design and color, and take a sober look at the design. The visual instability of the machine immediately catches your eye: the overhang of the cantilevered rollers is much greater than the supporting surface under the bed. In addition, the absence of a table does not allow processing relatively massive surfaces, which are simply inconvenient to keep in a canopy for a long time. The increased length of the belt (and the accompanying mechanical friction losses) becomes the reason for the use of increased power in the motor drive, and, consequently, energy intensity. The tension unit is elegant and easy to set up, and the machine comes with replaceable grinding attachments that allow you to grind even internal surfaces - but is it worth shelling out more than 100 thousand rubles for this?
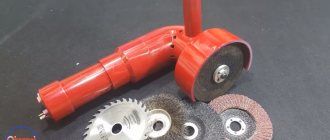
Grinder - a construction made from a drill
A drill is a tool that is found in almost every home. If the body or armature breaks, the tool becomes unusable. Or the owners purchase a more convenient copy, and send the old one into exile - storing it in the garage or at the dacha. One way to transform a drill:
- Wooden blocks are used to make the frame. In one, a recess is made for the drill body. The handle of the tool will be installed between the other two; it is attached to the bars through a metal pin. The body is attached to the first part with a metal coupling and self-tapping screws.
- To protect the air intakes in the housing from dust, a casing is made. This role is played by a plastic strip, PVC profile or plastic bottle.
- The first version of the working surface is a disk from an angle grinder, it is secured with an adapter expropriated from the output shaft of the angle grinder.
- For the sanding belt tensioner, 2 duralumin parts are prepared. Holes are made in them for mounting the roller. The main element itself is assembled from 2 bearings (for example, motorcycle bearings), a bolt of the required diameter, and rings. For sealing, use electrical tape if the diameters of the fasteners and bearings do not exactly match.
- The drill chuck is a straight roller design. To prevent the sanding belt from slipping, rubber is glued onto it.
- A base for the drill is made from a piece of board by cutting out a recess in the shape of the bed. It is secured with several self-tapping screws. The drill turned grinder is ready.
DIY grinder rollers - Metals, equipment, instructions
A tool in the household is a necessary thing. A home craftsman cannot do without a drill, grinder, screwdriver and many other devices necessary for repair and construction. But not everyone has the opportunity to endlessly buy mechanisms if they are needed only for some temporary or urgent work.
There is a lot of information on the Internet about homemade products that can be made from scrap materials. Today the editors of HomeMyHome.ru have prepared for you all the most useful information on how to make a grinder with your own hands.
Drawings with dimensions, options for using different engines and practical advice from professionals in our material.
Grinder is a belt machine for sharpening and grinding
What is a grinder and what is it intended for?
The word "Grinder" is of English origin and literally reads as crusher. In technical terms, this term is used to refer to a grinding device. So one could simply call this unit a sander, but then there would be confusion with manual sanders, which have a slightly different design. A grinder is a stationary unit with an electric drive.
Otherwise, its design is very similar to a manual sander and is based on a rotating pulley with a strip of abrasive paper
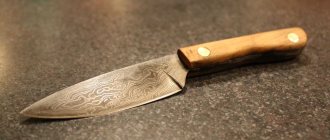
What is a grinder used for? First of all, it is a mechanism for sharpening home cutting tools. With a certain skill, you can perfectly sharpen kitchen knives or scissors, wood cutters. In addition, craftsmen grind wooden parts, stone and metal parts using a stationary machine. The grinder will help you level the edge of glass, fiberboard or MDF.
With the help of a blade, it is easy to clean metal from paint and rust.
Professional machines are not cheap - from 30,000 rubles, so the question of how to make a homemade grinder with your own hands is hotly discussed on many forums.
Schematic diagram of the grinder design and the principle of its operation
As we have already said, the design of the grinder resembles a simple device of a manual grinder. The movement of the sanding belt is carried out using rollers, and they are rotated by an electric motor.
To ensure that the tape is tensioned without sagging, there is a tension mechanism that moves one of the rollers. The difference from a manual unit is only in the presence of a device that fixes the workpiece.
It is a table with a rotating mechanism and reliable latches. The table can be rotated to process parts from different angles.
To ensure safety measures when working with a rotating mechanism, the grinder is equipped with an acrylic screen.
LSM design
The entire mechanism is connected to the universal machine using reliable fasteners. Factory-produced models are, without a doubt, quite powerful and give the impression of ease of control.
But home craftsmen complain about the unreliability of standard fasteners and the excessive length of the tape, which requires a high-power motor. So, not only because of the high cost, but also for purely practical reasons, many decide to make a belt grinder with their own hands.
This work is not as difficult as it seems at first glance, and you can also use used spare parts from other mechanisms.
An example of a well-thought-out mechanism is the grinder from Chapai
The brand “from Chapay” is a universal tool due to its competent and practically thought-out device and design
Chapaev machines are capable of processing wood, metal, plastic, and stone. They are ordered by people who need constant use of this tool and its special settings. Such grinders are an example of homemade devices with high productivity. Here is a short overview of one such model:
and photo recommendations for making a grinder with your own hands at home
The device has gone through more than one modernization, and now there are many “clones”. For a person who is at least somewhat knowledgeable in mechanics, it is possible to repeat such an assembly with a little patience and perseverance. Let's take a closer look at the details of the process.
What to make a grinder drive from
The drive is the most important part of any mechanism. It is important to choose the right motor for the machine. The grinder requires an engine of one and a half to three thousand revolutions per minute with a power of 0.75 kW.
You can also use high-power motors, kilowatts or more, but there is a danger that the sanding tape will break
The performance of the device depends on the engine power. It is very convenient if it is possible to manually adjust the drive to solve various types of problems. When starting to make a simple grinder with your own hands, rummage through the trash in your garage or shed: there are probably suitable motors from units that have served their purpose.
Is it worth making a homemade grinder with a washing machine motor?
Let's start with the controversial issue of making a grinder with your own hands based on an engine from a washing machine.
It is controversial for one simple reason: during operation, a lot of dust and shavings, paint particles and other waste are generated on the device. They get clogged in the holes of the washing machine motor, and the structure quickly fails.
But, nevertheless, for some craftsmen, such units work successfully. An example of such a device in this video:
Step-by-step recommendations on how to make a grinder from a drill
A drill is a must-have tool in every home. Often something breaks in it, the body or the anchor, or maybe a new, more powerful and convenient model just comes out, so the old one gathers dust somewhere in a box in the garage.
Using a drill drive, you can build a fairly powerful grinder
How to do this in practice - we will analyze the process in detail in photos and video instructions:
IllustrationDescription of action
| Prepare the bed. It will require wooden blocks: one with a semicircular recess for the drill body and two for the handle. Install a switch on one side of the handle mount, which will then connect to the drill wiring. |
| Install the drill as shown in the photo. The handle is fastened through with a metal pin. |
| The front part of the drill body is fixed with a metal coupling and self-tapping screws. |
| To protect the air intake openings of the housing from dust, make a protective casing from a strip of plastic. You can use a PVC profile or a regular plastic bottle. |
| The first working surface of the machine is a regular grinder disc. It is attached through an adapter from the output shaft of the angle grinder. |
| For the belt tensioner you will need two pieces of duralumin with holes for attaching the roller. |
| To make a roller, you will need a pair of motorcycle bearings, a metal bolt of a suitable diameter and a ring. |
| The bearings are placed on the roller. If the diameters do not match slightly, use electrical tape to seal. |
| When assembled, the video looks like this. |
| The drive roller of the grinder is the drill chuck. To prevent the tape from jumping off it, it should be covered with rubber. |
| The base for the drill is a piece of board with a recess in the shape of the bed. |
| Secure the backing to the frame with several self-tapping screws. |
| This is how a homemade tape machine works |
Do-it-yourself grinder from an angle grinder: drawings and ready-made attachments
An angle grinder, or in common parlance, an angle grinder, is an almost ready-made basis for a blade grinder. On its basis, a machine is assembled using the same algorithm as the above-mentioned device from a drill. The scheme is like this:
Drawing of a blade grinder based on an angle grinder
As a result, you will receive a DIY mini-grinder that will sharpen knives and scissors. There is an option not to bother with homemade products, but to purchase a factory nozzle. It is attached to the angle grinder using a bracket.
Finding such a device is not easy, but in our age of online commerce, nothing is impossible. Such a gadget is convenient because it is possible to use a working angle grinder without fundamentally disturbing the design of a working device.
This grinder is suitable for straightening seams after welding. For other work, you will have to think about a stationary mount
How to make a grinder from a grinder with your own hands: video instructions
Another easy-to-make version of a homemade blade grinder is made from a regular grinder. Almost all you need to do is mount the device on a workbench and set up a system for turning it on and off. More details about this in the video.
How to make a grinder with your own hands: drawings with dimensions from different authors
Each craftsman brings something different to the design, so before you start making a grinder sharpener with your own hands, explore the possible options. Here are some example drawings:
How to glue grinder tape with your own hands and special requirements for it
When developing a homemade grinder with your own hands, it is better to use a standard size sandpaper belt. Standard sizes are lengths of 1830, 1600, 1230, 915 and 610 mm and widths of 100 and 50 mm. Then you won’t have to rack your brains on how to make a grinder ribbon with your own hands. The tape, homemade or factory-made, must meet the following requirements:
- elastic fabric base;
- high ability to withstand angular speeds;
- abrasive resistance;
- possibility of extension without breaking the integrity by 10-15%;
- minimal heating during long-term operation.
Do-it-yourself grinder according to drawings and dimensions
A grinder is a belt grinding machine that is used for dry grinding of materials made of various alloys. This machine is quite expensive, so many people wonder how to make it themselves? Before creating a belt grinder, you should sketch out drawings, buy a drill, grinder and jigsaw. To make your work easier, you can take the diagrams of a branded machine as a basis and use it to make a grinder. If you want to make an easy grinder that doesn't require much investment, watch the tutorial video.
Homemade grinder: drawings with turntable dimensions and assembly tips
At home, you can design both a simple version of the machine and a more functional device. In order to expand the operational capabilities of the unit and ensure ease of operation, a rotary-type support table is manufactured. This surface is installed on the side of the largest pulley.
The drawing of the machine is prepared in accordance with its design features
The advantages of using a rotary table are obvious. First of all, this will allow you to fix the part in a certain position, which will simplify its processing. When assembling a rotary grinder with your own hands, it is worth considering the possibility of changing the direction of the abrasive strip. The emery must necessarily move in the direction where the working surface was turned.
The table must be equipped with a movable locking element - a bracket. This part must implement the function of rotation relative to a horizontal axis at fixed angles.
Most often, for simple machines created at home, a table made of duralumin is used. A wooden option is also available. The drawing of the machine is prepared in accordance with its design features. The thickness of the surface for the manufacture of which duralumin is used must be at least 15 mm. This is very important as a thinner table may not be able to withstand workloads.
The function of the pressure plane in this case is performed by the frame of the unit. To do this, it is necessary to prepare the frame. It is enough to simply grind one of the surfaces of the frame - the one located near the object stage.
For the manufacture of simple machines created at home, a table made of duralumin is used
Do-it-yourself grinder at home from a drill: assembly features
Such a grinding device can be made in a simpler way. Of course, assembling a stationary unit, which is designed to be installed on a table, is the best option, allowing you to grind various parts on an ongoing basis. There are other, less complicated options for creating a do-it-yourself grinding device.
If you wish, you can make your own grinder from a grinder or drill. The drill is an electric tool, so you must follow safety rules when working with such a device.
The need to process metal and wooden workpieces arises quite often in everyday life. Purchasing a factory-made unit for small volumes of work is not the best solution. The easiest way to make a simple grinder is to use a drill.
Most often, improvised materials such as wood, plastic, and plywood are used to assemble such a grinding attachment. Before starting work, it is recommended to prepare a nozzle diagram, which will allow you to make a grinder with your own hands. Videos on this topic are also recommended by experts for viewing, as they cover all the nuances associated with the assembly.
Stationary grinder made from a drill on a wooden base
It is worth saying that when working with small workpieces made of plastic and wood, this grinding machine performs almost no worse than stationary equipment.
Another advantage of this solution is that modern drill models have a special controller. Its function is to regulate the drive speed. Structural simplicity and high efficiency are reflected in the popularity of this solution.
The process of creating a grinder
When creating machine parts, it is best to use sheet metal 10 mm thick. To correctly depict the contours of the parts for cutting , it is worth using a drawing . Dimensional accuracy does not matter.
- You can draw the contours of the parts using a marker, and cut them out with a grinder or jigsaw. The easiest way to cut a part is to use a plasma cutter. To make a base that will be reliable, you should use a sheet of metal 12 mm thick. When assembling the base of the machine, you can use screw connections or do everything using electric welding.
- The most time will be taken up by the grooves that are on the parts. These grooves provide rotation of the platform on which the rollers are located. To create such grooves you need to work with a drill and file. If you don’t want to tinker for a long time, entrust the work to a milling machine.
- To create rollers for a homemade machine, it is better to use titanium or duralumin. If you can't find these materials, you can use steel, but make the rollers from the inside. When creating videos, you will need the help of a turner, especially if you are a beginner. When the master arrives, you should prepare drawings and explain the scope of work. If you want to make a large roller, you will have to choose steel. For a DIY machine, you will need to make four rollers with different sizes, from 70 mm to 150 mm. When making a mini grinder, you can reduce the diameters of the rollers. If you want a grinder with ready-made rollers, it is very important that they are in one line. Otherwise the tape will come off.
- The width of the rollers will depend on the size of the sanded belt. When creating a drawing for making rollers, remember that the rollers must be barrel-shaped, this will ensure that the tape is held. The surface of the rollers must be smooth and the bearings must be closed. If you want your device to work efficiently and without failures, you should choose bearings of class 6 and higher.
Grinder: Belt Grinder
Recently, quite a lot of homemade designs of belt grinding machines, popularly called “grinders,” have appeared on the Internet. So I decided not to deviate from the trend and make a similar machine for my workshop. After making this machine, it exceeded all my expectations.
Of course, it is said loudly about exceeding expectations, but the resulting machine really showed good results, although there was nothing special to compare with, except perhaps with those homemade products shown on YouTube.
The machine itself is quite versatile and can process various materials (wood, plastic, metal) with very good speed and surface cleanliness.
The machine is based on a sanding belt, in my case it has dimensions of 50x900-1300 mm. The belt is driven through a pulley with a diameter of 128 mm mounted on the shaft of an asynchronous motor with a power of 1.1 kW and a maximum rotation speed of 2980 rpm. Based on these data, you can calculate the maximum linear speed of the belt, which will be 1200 m/min. It is limited by a frequency converter connected to the motor.
Design
The design of the machine is quite simple, and at the same time very rigid due to its massiveness, since it is based on a sheet 12 mm thick. It is used to make a base for an asynchronous motor, to the flange of which a plate is screwed, forming the supporting frame of the entire machine. In order to at least slightly relieve the load on the electric motor flange, the base and the supporting frame are connected to each other through a part - the rod guide. Next, the rod itself is inserted into it, onto one end of which a plate is attached, which carries a part in the form of a “crescent”, as well as a guide for the mechanism for installing the work table. There are two rollers at the ends of the “crescent”, and an axis passes through the center, allowing this assembly unit to be rotated at different angles. The assembly unit, the “crescent”, also includes a guide stop for the sanding belt.
A lever with a roller for centering the sanding belt is attached to the supporting frame through an axis. This lever also plays the role of a tensioner, due to the fact that a gas lift is installed between it and the frame.
The working surfaces of the drive pulley and tension roller have a semicircular truncated profile to better hold the tape on their surface.
The work table fastening mechanism has several degrees of freedom, this makes its positioning very convenient for subsequent work.
Manufacturing and assembly
The design of this machine took quite a long time. Everything is the way I like it - I modeled it in a CAD program and distributed the details with drawings. There was a lot of mechanical processing, I gave it to a friend - he is engaged in metalworking. In addition to turning and milling work, it was necessary to produce a number of parts from sheet iron. As you probably already guessed, these parts were ordered by laser cutting. As a result, after some time a heavy box of iron appeared in my workshop. And then I realized: “If nothing really works, then at current metal prices, I’ll hand over everything to ferrous metal and break even” (just a joke, of course). I modified some parts myself: I drilled holes, cut threads, welded, and even did a little milling on my SF-16 (but that’s a different story, since I don’t have enough experience and knowledge). In general, I did all the plumbing work myself. The engine was purchased in advance.
Assembly has begun. Since everything was done according to the drawings, overall it went together well - I had a blast. But there were some problem areas, I’m still a human being, and people, as you know, tend to make mistakes. I made a mistake with the dimensions in a couple of details, in the models, of course, I corrected everything right away, but with the hardware I had to work a little, but everything was resolved with that.
After preliminary assembly and test run, disassembly and painting followed. I didn’t paint it myself, I gave it to the “specialists”, all the parts were sandblasted and divided into those that needed to be painted and those that needed to be chemically coated. oxide. I painted it traditionally in blue gloss, with polymer powder paint.
Operation and setup
Since I had a 1.5 kW frequency converter, the setup was simplified. The whole setting comes down to ensuring that when the tape is untwisted, it does not fly off the rollers and is always in the same position when the workpiece is applied to the tape.
In order to center the belt, I started the rotation at low speeds and adjusted the position of the tension roller with the set screw. Then I gradually increased the rotation speed to make sure that the belt was centered throughout the entire speed range.
Started testing. After applying the workpiece to the tape, it began to move to the side. I adjusted the position of the guide stop between two rollers located on the part in the form of a “crescent”. The rollers and the guide stop must be in the same plane; to do this, we even had to mill the stop into a corner, since after welding it moved a little.
This completes the basic setup and you can get to work. Here, a lot depends on the material being processed and the required roughness that needs to be obtained, and, therefore, for this it is necessary to select the grain size of the belt and its rotation speed.
We have yet to learn how to operate this machine, but we have already gained some experience.
Conclusions and recommendations
During operation, one, but rather significant, design flaw was also discovered so far: there is not enough power. There are two solutions: install a more powerful motor or reduce the diameter of the drive pulley. The second option is still more preferable, but I haven’t decided on the diameter yet.
Perhaps in the future I will alter the base a little so that it will be possible to rotate the working part to a horizontal position. For the rest, everything is fine so far. Of course, there are many options for modification, including a magnetic table on a carriage for grinding the surface and all sorts of devices for holding workpieces, installing additional rollers and wheels of various diameters, etc.
Question of price
Grinder turned out to be not in the budget category. I have never seen anything similar in quality to what is sold in online stores. In some places it is possible to lighten the design a little and thereby reduce the cost, but I don’t see much point, since the machine was originally made for one’s own use. What is sold is mainly molded from a sheet of reduced thickness, cut with a CNC laser, everything is designed for low cost. But the most important thing is that they are all functional and it doesn’t matter how much metal is in them.
Working belt
Any belt grinder made from an angle grinder has a spring that creates automatic belt tension. If you use such a spring , then you can easily change the tape.
- when processing one product, the tape will have to be changed several times; do not forget to pay attention to the process of gluing the tape;
- to create it, you need to use sandpaper on a special basis;
- To glue the emery, you should use high-quality and elastic glue. If you don't understand the gluing process, watch this video, everything is shown in detail.
To properly glue the sanding tape, you first need to prepare properly. You need to glue the tape using a glue stick for a hot-melt gun, and use a technical hair dryer for heating.
With a little effort, you can make your grinder even more versatile with your own hands; to do this, simply attach an additional table to it on the pulley side.
These steps will greatly simplify the processing of parts on a tape machine. Before creating a table, it is worth considering the possibility of changing the direction of movement of the emery. After all, it should always move towards the desktop due to its stability.
Choosing a grinder belt
It is advisable to start selecting a belt grinder from the end, namely, to determine what width and height of the surface will be processed by grinding. Then compare these needs with the actual sizes of sanding belts that are commercially available.
As you know, endless sanding belts differ in their length, width and grit level. The size range of sanding belts of domestic and imported production, which are intended for use in grinders, is as follows: length 610, 915, 1230, 1600, 1830 mm, with a width of 50 and 100 mm. You can look for others, but subject to the unconditional fulfillment of the following requirements:
- The sanding belt must have an elastic fabric base;
- Maintain angular speeds of at least 1500 min-1;
- Possess high abrasive resistance;
- Allow relative elongation without rupture of the material of at least 10...15%;
- Minimum heating during prolonged continuous grinding.
It should be noted that for a homemade grinder, sanding belts with a length of no more than 1230 mm are better suited. Short belts wear out more because they do not have time to cool down during their idle movement, and longer ones automatically increase the dimensions of the machine without giving any visible advantages in return.
The mechanical strength of the tape material is also important. It is strictly not recommended to rely on composite tapes, even if glued with double tape: during operation, the joint stretches, and the tension of the tape weakens. Moreover, a sudden rupture of the tape with all the ensuing consequences is possible. Taking into account the fast speed of movement of the belt along the surfaces of the rollers, the specific grinding forces should not exceed 0.7...0.8 kg/cm2. This corresponds to the parameters of the mechanical strength of the electrocorundum tape within the range of 800...900 MPa.
It is important that before use the tape must be hung on a cylinder with a diameter of 50...60 mm for at least 48 hours. This will ensure natural elongation of the product before use.
How to make a grinder with your own hands at home for almost free?
- Grinder specification
- What does a homemade grinder consist of?
- Assembling the frame of the grinder
- Preparing the washing machine motor shaft
- Collecting videos
- Tensioner and driven rollers
- Tensioner pulley lever
- Tool rest and stop
- Console left
- A selection of videos of homemade belt sanders
Having a belt sanding machine in your household is not a cheap pleasure, but it is extremely useful. Because its presence solves many problems with sharpening, straightening, fitting and grinding.
Therefore, today we will make a grinder with our own hands at home from parts that can be found in a landfill. And you can buy some of them at any hardware store. So, let's start with the specification.
Disc or tape? And drive
There are almost more types of grinding machines used in industry than lathes. The emery known to all craftsmen - a motor with a pair of grinding wheels (or one wheel) - is also a grinder. For yourself at home, it makes sense to make either a disk end grinder (plate grinder) or a belt grinder. In the first, the abrasive is applied to a rotating hard disk; in the second - on an elastic band running around a system of pulleys and rollers. The disc type is more suitable for grinding simple wooden parts and coarse or medium clean metal parts. Using a belt grinder, it is also possible to produce precise and clean finishing of profiled parts of complex shapes, incl. large-sized, see below.
A disk grinder is very easily obtained from the same emery or a motor of suitable power, see below. You need to order an adapter from the electric motor shaft to the shank of a metal-based grinding disc. Or under a clamping chuck, then on the same motor it will be possible to build a mini lathe, see figure:
Homemade disk grinder
A worn-out “plate” is suitable: a disk made of thin (4-6 mm) fibrous plastic is glued to the edge of its side, and an abrasive is placed on it. How to make an end grinder, see next. video clip.
Video: homemade end grinder
The difference between a disk and tape grinder is not only in the possibilities of use. If we take ordinary household crafts, then for a disk grinder a drive power of 250-300 W on the shaft is enough. For small wooden parts - and 150-170 W. This is a motor from an old washing machine, a straight (ordinary) drill or a screwdriver. But for a belt grinder you will need an engine from 450-500 W: three-phase with batteries of starting and operating capacitors. If you plan to process large items, then the motor power is from 1-1.2 kW. Moreover, capacitor batteries for both will cost not much less than the engine itself.
Note: a 100-200 W drive uses a mini belt grinder (see below) for precision knife dressing, grinding/polishing jewelry, etc.
A drill or screwdriver as a grinder drive is also convenient in that it allows you to quickly change the speed of movement of the abrasive (see below) using a standard speed controller. You just need, firstly, to make a holder for the drill that rigidly fixes the tool. Secondly, an elastic transition coupling from the drill to the disk shank, because It is difficult to achieve their precise alignment without special equipment, and runout will negate the accuracy of processing and can damage the drive tool.
Drawings of a drill holder for using it as a drive for a home metal-cutting machine are given on the left in the figure:
Drawings of a drill holder for driving a grinder (grinding machine)
Since shock and irregular alternating loads on the drive in a grinder are an order of magnitude lower than, say, in a lathe, the drill holder for it can be made of hard wood, plywood, chipboard, MDF, on the right in Fig. The diameter of the mounting (large) hole is along the neck of the drill. It is highly advisable to use a drill without an impact mechanism and with a steel shell on the neck (for installing the front handle).
coupling
For the adapter coupling, you will need a piece of steel rod (not necessarily turned) of the same diameter as the shank of the grinder drive shaft, and a piece of PVC-reinforced hose (garden irrigation) with a clearance such that it stretches tightly over the rod and shank. The length of the “free” hose (between the ends of the rod and the shank in it) is 3-5 cm. The length of the protruding part of the rod should be sufficient for reliable clamping in the drill chuck. After assembling the coupling in place, the hose on the shank and rod is tightened tightly with clamps; can be wired. Such a coupling completely counteracts the misalignment of the drive and driven shaft up to 1-1.5 mm.
Grinder specification
Any belt sanding machine consists of a reliable frame and auxiliary parts. The main task when manufacturing a machine is to place the rollers in the same plane, otherwise the tape will constantly move to the side.
DIY grinder
You also need to pay attention to the speed of the drive. For this, a washing machine motor is perfect.
Before we begin production, we need to prepare:
- Square pipe 30x30x2 - 250 mm.
- Square pipe 25x25x1.5 - 1250 mm. Taking into account the cut.
- Channel No. 21 – 350 mm.
- Steel strip 50x8 – 700 mm. (With reserve). Or the eyes from the Gazelle spring earrings.
- Old door hinge.
- Sheet 170x190x4 for making a stop.
- Plywood sheet 500x200x8 mm.
- Bearings 201 – 9 pcs.
- Polypropylene couplings for 32 – 6 pcs.
- Polypropylene pipe PN20 – 250 mm.
- M8 hairpin – 1 pc.
- M12 hairpin – 1 pc.
- M8 nuts.
- Spring for tension arm.
- Angle No. 5.0 for mounting the engine to the frame.
- Motor from a washing machine.
Do-it-yourself grinder at home - text and video instructions
Not everyone can afford to buy a ready-made grinder, especially for household needs. We suggest you study detailed instructions on how to make a grinder yourself, without additional expenses. However, you will have to try and put in considerable physical effort and zeal here and there.
What can a grinder drive be made from?
The grinder drive is one of the most basic design elements. The choice of the “heart” of the car should be approached thoroughly.
Homemade grinder with a washing machine engine
Let's look at all stages of work in detail. We decided to make a small attachment for the drill for a standard 75x457 mm tape
We also purchased a door closer for work.
We screw the pre-machined workpiece onto the shaft. Secure the drive roller with a bolt. The motor itself, as you can see, is mounted on a rigid stand. To work, you will also need an abrasive belt, in our case - 610x45 mm (the width was cut to fit our rollers).
Cut off the excess part of the bolt. Just in case, we make a slot in the bolt if it suddenly becomes necessary to remove the shaft.
We disassemble the wires for connection: brown and red starter, brushes - gray.
We weld a wooden base to the frame, which will dampen some vibration.
Let’s align the position of our “closer”; pay attention, it is important to ensure that it is properly fixed on the frame!
We attach a 10-piece to the handle with a bolt, attach the adjusting nuts and the rollers themselves to it, and install the bearings. We select them according to the width of the tape
Based on the tension of the tape, we tighten the closer in the desired position. We align the structure so that the tape is sufficiently stretched.
| Illustration | Description of action |
| To operate, you will need a regular commutator motor from an old washing machine. | |
| Checking the position of the rotating shaft with a laser |
This grinder will do an excellent job of repairing dull drills, sharpening knives, and small parts.
Grinder for drill
A grinder for a drill is a special attachment that can be made in several stages. We will show you the stages of work. By the way, there are hundreds and hundreds of options. Let's look at some photos that will help you decide on the option that is suitable for your purposes. Such grinders help to perform simple work.
Also, using a drill, you can make a stable structure on the frame. Such grinders can help sharpen knives or any flat parts.
Do-it-yourself grinder from an angle grinder: drawings
This is one of the most popular grinders that you can make yourself. It is usually used for small jobs, for grouting welding seams, and sharpening small parts. Especially if you fix such a design on a table, you can cope with more complex tasks. For example, such a grinder can be used for straightening cutting tools or sharpening knives, axes, etc.
What does a homemade grinder consist of?
Let's look at the main components from which our homemade belt sanding machine is assembled.
Assembly drawing of the grinder
- Leading video
- Tension roller
- Driven roller
- Second driven roller
- Tensioner pulley lever
- Podruchnik
- Console
- Emphasis
- Frame
All components of the machine are easy to manufacture, and anyone can assemble it if desired. If you don’t have a welding machine, you can always negotiate with your neighbor for a small fee. Or allow you to use a homemade grinder if necessary. The grinder will be compact and not heavy.
Belt grinder: main advantages and disadvantages
Any equipment used in home or professional workshops has its pros and cons. Such machines are also no exception to the rule. The first and perhaps most significant advantage of the grinder is its versatility. Some models can be used for a large number of tasks, for example, like the grinder from Chapai.
Another advantage of such equipment is a consequence of its design. The point is that during grinding the working area does not overheat. An increase in temperature is a drawback common to most grinding units. Moderate heating is achieved due to the dimensions of the working element (pulley). The dimensions of the circle contribute to its cooling when moving outside the operating point.
All surfaces of such a tabletop machine are polished, which is also considered a serious advantage. This characteristic makes its operation as simple and convenient as possible. Belt grinders have a smooth operation, which allows you to evenly process metal parts and products made from other materials.
The main advantage of a belt grinder is its versatility
Industrially manufactured equipment is distinguished by high precision in the location of the rollers. Due to this, the likelihood of distortion of the abrasive belt as the pulley moves around its axis is reduced.
The downside of any factory grinder, of course, is its cost, which is far from affordable. However, today it is possible to purchase a prefabricated kit, which includes all the necessary parts (except the engine). One of the most popular sets is the Mastak belt grinder, the price of which is only 7 thousand rubles.
And finally, it is worth noting the special design of the pressure pad. Tabletop machines of this type are designed for processing parts that differ not only in material, but also in shape.
Collecting videos
The drive roller for the engine is made of plywood. Cut out 10 circles with a diameter of 85 mm. Mark the center and drill a hole with an 8 mm drill. We coat each disc with PVA glue. We collect it in a bag on an M8 stud and compress it from both ends through washers with nuts.
We compress the drive roller on both sides with clamps.
Let it dry overnight for further finishing. Next, drill a hole 24 mm deep. If you don't have a finger cutter, you can use any drill. In our case, the cone from the drill is not a hindrance.
Driving Roller Hole Dimensions
Your motor shaft may be different from the drawing, but this is not a problem. The principle of fastening remains the same, only the dimensions will change, which can be measured with a special tool. Read how to use a caliper here.
Another option for a washing machine motor
After preparing the roller and shaft, you can begin finishing the drive pulley. Attach the motor to the platform, put on the drive pulley, turn on the motor and carefully sand the roller with a flap abrasive wheel.
Finishing drive pulley
After cleaning, the edges need to be beveled a little to get a barrel look.
Tensioner and driven rollers
Made from propylene couplings, they are sold at any hardware store. Assembly drawing and step by step guide below.
Assembly drawing of the coupling
We assemble a package of couplings and D20 tubes onto the M12 stud; they serve as spacers between the bearings and install the bearings themselves. The photo below shows the entire assembly.
Step 1. Assembling the roller
Step 2. Tighten the nuts with a wrench
We pull together the assembled package into one whole. We process it with a grinder and a petal wheel on all sides, achieving a barrel-shaped shape.
In the same way we assemble the next two driven rollers. But we give the barrel shape only to the tension roller.
Console left
The console is easy to assemble. The parts are welded according to the drawing. First, one pipe must be bent using a manual pipe bender or simply clamped securely in a vice.
After welding, clean the seams and blacken them to prevent corrosion. Or you can paint it with enamel.
This is what you should end up with.
Homemade grinder assembled without tape
If you need to change the maximum grinding speeds, then, as an option, you can change the diameters of the rollers.
The diameter of the drive pulley is calculated using this formula: D=V x 1000 x 60 / π x N
Or use a frequency regulator to change the speed. There are many options for implementation, the main thing is the desire to do everything with your own hands and not be afraid of difficulties.
Design features
The design of the grinder rollers is of great importance for work productivity.
For a homemade device, an electric motor with a nominal speed of 1500 per minute is most often used. With a slip rate of 9%, the actual rotation speed will be 1380–1400 rpm. Based on this, the dimensions of the parts are calculated. The drive roller deserves special attention. It is made massive in order to smoothly accelerate the belt to a given peripheral speed due to a significant moment of inertia. If you make the drive pulley from solid steel, it will turn with difficulty when starting. Therefore, it is made hollow or from duralumin grade D16 and higher. It is recommended to machine driven and tension rollers from light and hard duralumin, then there will be no need to make cavities.
The larger the diameter of the drive roller, the deeper the cavity should be.
Pulley drawing
The standard diameter of the drive pulley is 150 mm. The tension one is made with a size of 100 mm, and the other two are 70 mm each. Dimensions may vary slightly depending on the dimensions of the machine. The width of the parts corresponds to the size of the sanding belt with a small margin.
The generatrix of the drive pulley must be straight, otherwise the belt will bend along its entire length when rotating. It is reliably kept from sliding by the remaining rollers.
The speed of movement of the belt will depend on the diameter of the pulley. If the belt runs slowly, it will tear the material being processed. And from rapid sliding it will soon wear out. A simple rule to keep in mind is that hard parts and fine abrasive grains require high belt speeds.
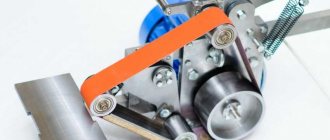
Compact grinder with working pulley and tensioner
To avoid slipping of the sanding belt when the planes of the rollers do not coincide, a groove is made on the generating surface, corresponding in width and depth to the section of the belt. However, this design has a drawback: under heavy load, the tape slides onto the flange. A proven and reliable option is to use barrel rollers. In some cases, the products are covered with rubber material.
During installation on the grinder, you need to ensure that all the rollers are located in the same plane.
VIEW GRINDER from AliExpress →
When processing, it is necessary to ensure the roughness of the forming surface in the range of 1.25–2.5 Ra. Large values will lead to wear of the belt, and on a surface that is too smooth it will turn. The “barrels” are installed on the shafts using bearing supports. The bearing assemblies are sealed to protect them from debris and abrasive dust. Bearings will be required to be self-aligning, not lower than 6th accuracy class. Their load-bearing capacity must correspond to the drive speed and planned loads. The prefabricated structure is fixed to the axis through cotter pins or through a collar and a fastening kit. For the drive pulley, you need to make a keyway in the mounting hole for installation on the engine shaft key or hole for the goujon.
The tensioner roller is made movable. It has a support spring to tension the belt, compensate for runout on the pulley and rollers and sagging when the part is pressed. This way the tape will last longer and will not break.
The rollers must have a barrel-shaped profile to securely hold the rotating belt. The central part is made 2 mm higher than the edges.
Based on the connecting dimensions, a working drawing is drawn up, according to which the turner can produce parts.
Typical drawing of a roller
VIEW RUBBER ROLLER from AliExpress →