Box for welding kit from a canister
Hello, readers of this site. Today I will tell you how I made a convenient box for transporting a welding machine from a plastic canister.
Most of the time I live in a city apartment. I have a workshop in the basement under a nine-story building, where I do my hobby - homemade things. There I can do everything except welding work - firstly, there is a 10-amp circuit breaker installed in the electrical panel, which can be knocked out if the electrode gets stuck (And the electrician has the key to the panel). Secondly – fire safety! And thirdly (and most importantly), the ventilation there does not allow welding.
Therefore, in order to perform welding work, I go to the country house or to a private house. And since I’m always short on time, most often, after work, I pop into the basement, grab everything I need, and go.
I use this welding inverter “Gerard-MMA200”.
He has served me faithfully for many years. I kept it in its “original” box. But the problem with all factory packaging, as you know, is that once you take out its contents, it is almost impossible to put everything back in! )))). Fortunately, a “souvenir” welder’s shield was supplied with the device! Without it, the device fit easily. But only him!
And so, I arrived at the dacha. I lay out the tool in anticipation of interesting work. . And then it turns out that I forgot my mask.
Another time I took both a mask and welding. but I forgot the electrodes. Next time I took everything except the cutting wheels. ))))).
It was events like these that gave me the idea to make some kind of box that would hold the entire set - a welding machine, a mask, wires, electrodes, clamps, a hammer. In short, grab one box, throw it in the car - and don’t forget anything! )))))
And I began to think about what I could make one out of! My choice fell on this 30-liter canister, of which I have quite a lot:
Having estimated, I came to the conclusion that this is exactly the volume I need. (To be honest, it wasn’t this particular canister that went under the knife. I just forgot to take a picture of the one I cut.))))
As a result, I ended up with a box, which you can see in this video (it was filmed crookedly, but sorry):
And now I will tell you in detail how I did it.
I needed:
1. Plastic canister 30 l. 2. Blind rivets with a diameter of 4.8 mm of different lengths. 3. Loops 2 pcs. 4. Chest latches 2 pcs. 5. Strips of tin. 6. Cuttings of PVC pipes. 7. Trim of linoleum. 6. M5 washers enlarged.
So, let's begin. At first I wanted to do a horizontal layout. But, after thinking about it, I came to the conclusion that, firstly, I would significantly lose the rigidity of the structure, and secondly, I was still going to carry it by the handle (i.e., vertically), and therefore it would be better if the tool was laid out will be done in the same position.
So I took the canister and cut off the top part:
These are just strips with a curved edge. Left over from something, I don’t remember. If necessary, they could be easily cut and folded.
I took a narrower strip and riveted it around the edge of the cut top part, using a regular rivet gun and pop rivets. At the same time, I slightly pushed the double-folded edge of the tin beyond the cut:
Communities › DIY › Blog › Homemade Welding Storage Container
Hello. Those who bought resant welding know that a case or box for transportation and storage is not included in the package. Buy separately, price for quality is inconsistent. There was a sheet of plywood, a little free time, an idea, and this is what happened. The sheet was 10 mm. Of the minuses, the box itself weighs around 3 kg. Good luck to all!
Comments 62
I put mine in my suitcase. pulled out the handle and rolled it
Where are the carrying handles?
Great. Mine is currently being returned to its original box for storage. I just wrapped the box with tape.
Great idea! To bookmarks!
I would glue batting inside the box so that it doesn’t get scratched. I look at it’s still new, but you’ll still end up with the wires being replaced with KG25, at least 5 meters long, original ones from Fig, and the power cable is short (already replaced by 4 m) and cold insulation can’t stand it. The standard cables on Resanta are too fake. My Resanta 220A has more than one cooler, at least a couple
My resanta was recently repaired, the reason is that a lot of crap has accumulated on the IGBT, how to deal with it? I was thinking about such a little thing. Is it possible to insert a dust filter with holes?
I was just thinking about ventilation. I will improve
mask in a bag.
Cool, but most importantly convenient. Rolls around, no need to stand up, carry it or hold it on your shoulder)
My blueweld already came in a case... but it’s not convenient
different ways to increase the cost of a product. When you buy welding, you paid for it, and not a small amount at that. But as a rule the quality is not very good.
I made the same case for Shurik... well, there’s still a thread on the topic. with a stream. Yes, the main goal... I grabbed it and everything was in place. Probably it needs to be stirred up for welding.
But how would such welding be suitable for a non-professional? Because I don’t know much about welding myself, so in the absence of welding at work, I can spit on something and cut it off. I mean, is it suitable for an entry level, for the home? (I want it, it’s a really necessary thing)
Will do. The best thing to do is to train. If you pick up another one after this one, it will seem like a fairy tale.)))
But how would such welding be suitable for a non-professional? Because I don’t know much about welding myself, so in the absence of welding at work, I can spit on something and cut it off. I mean, is it suitable for an entry level, for the home? (I want it, it’s a really necessary thing)
This welding is designed for a teapot, it has 3 functions that help. When starting, the current itself regulates the starting (namely ignition), protection against sticking, and some other things. I'm not good at regular welding with a magnetic core, but this one is beautiful. We compared the industrial Svarog and this Resanta, no worse. The only thing is that you can’t cook it for a long time, it gets very hot because there’s only one cooler. But it seems like the automation should turn off when it overheats. During all this time I never switched off. Moreover, I took 220 a, but cooked a maximum of 160
Case for welding inverter
A welding inverter has become a mandatory attribute of a professional or amateur welder. Welding equipment is used to solder or cut metal, and the case for the welding inverter is designed to store the main units and components designed to work with metal surfaces. For those who are constantly engaged in welding, the priority quality of the work will be the convenient location and placement of the main parts and components that are intended for welding work.
Features of industrial cases
The industry produces several options for boxes for welding inverters, but most equipment users believe that making a case with your own hands would be an excellent option. By the way, some developments of do-it-yourself welding inverter cases have become the basis for industrial production, which have gained popularity among welding specialists.
Industrial series have convenient compartments and sections for storing tools and other auxiliary components and parts. As a successful example of industrial production, we can point out the 18″ FIT case series, which has the following parameters:
- External overall size - 450*240*200 mm.
- The inner part of the case is 440 (390 mm internal working part) * 225 * 180 mm.
The side handles used in this design allow the usable volume of only 390 mm. The height of this design is 180 mm, with a size of 145 mm allocated for the direct construction of the box, and 35 mm belongs exclusively to the closed part of the body in the form of a lid. The weight of this design is about 2.5 kg. As practical experience shows, this option is excellently used as a case for the welding inverter Resanta, Torus, etc. The only drawback is considered by many to be the inability to fully accommodate wires and cables provided for the design of inverter welding equipment.
Preparing the connection
Unlike traditional methods of welding workpieces, which involve the formation of a seam joint, welding of conductors inside a junction box is possible only after they are twisted.
Before welding the twist, the ends of each wire must be thoroughly stripped. The outer insulation from the wires should be removed by 7-10 cm, which ensures a convenient length for the twist being formed. .
The length of the bare parts obtained after stripping, according to the requirements of the PUE, should be about 5 cm, which eliminates excessive heating and melting of the wires during the welding process.
To better understand the features of welding wires with your own hands, it is advisable to familiarize yourself with the rules for choosing the equipment used. To do this, two important questions need to be considered: what types of welding equipment are applicable in the given conditions, as well as which welding electrodes are optimally suited for the stated purposes.
Advantages of industrial designs
Considering that welding work is classified as complex and responsible, the presence of additional accessories and items intended for mobile carrying or long-term storage plays an important role in this. The advantages of industrial designs are as follows:
- The front part of the box body, bottom and back wall are made of a metal base.
- The side walls, as well as the closed part of the top in the form of a lid, are made of impact-resistant plastic with a suitable varnish coating.
- The service life is at least 5 years.
- The movable tray mechanism, as well as the built-in organizer components, are used to accommodate basic accessories and additional spare parts for inverter equipment.
- Universal and strong locks made of chromed metal add not only aesthetics, but also reliably protect the drawer from intentional opening.
An industrial case is more expensive than a do-it-yourself welding inverter box, but at the same time, you can use this device as a full-fledged working tool for storing and carrying a welding inverter.
Features of self-assembly of a case for a welding inverter
To assemble a box for a welder yourself, you need to have minimal knowledge of mathematics, in particular geometry, in order to correctly cut the structure and make a useful accessory for temporary storage of inverter equipment.
How to make a semi-automatic machine from an inverter?
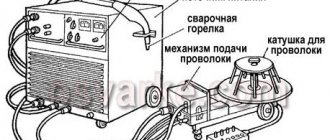
Any welder knows about the advantages of semi-automatic welding over manual electric welding. Due to their widespread use and low cost, MMA inverters are in the arsenal of many craftsmen. But with MIG welding it’s a different matter – these devices are more expensive. But there is a way out - you can make a semi-automatic device from an inverter with your own hands. If you delve into this issue, the matter turns out to be not so complicated.
How to make a cart for a welding machine with your own hands
Knowing how important tools are for welding profile pipes and knowing how to use them correctly, the welder can complete the tasks assigned to him quickly and efficiently.
In everyday life, a large number of mechanisms and structures are used for welding pipes. These auxiliary devices are most often manual and universal.
They help to quickly assemble a structure with securely fastened parts, and also allow you to do the work with virtually no deformation.
Semi-automatic welding
There are fundamental differences between MMA and MIG welding. To operate a semi-automatic machine, you need carbon dioxide (or a mixture of carbon dioxide and argon) and electrode wire, which is fed to the welding site through a special hose. Those. The very principle of semi-automatic welding is more complicated, but it is universal and its use is justified. What is needed to operate the semi-automatic machine:
- wire feeder;
- burner;
- hose for supplying wire and gas to the heating pad;
- current source with constant voltage.
- And to turn an inverter welding machine into a semi-automatic machine, you will need a tool, time and desire.
Welding current indication
Even if a digital current setting indicator is installed on the inverter, it does not show its real value, but a certain service value, scaled for visual display. The deviation from the actual current value can be up to 10%, which is unacceptable when using special brands of electrodes and working with thin parts. You can get the actual value of the welding current by installing an ammeter.
A digital ammeter of the SM3D type will cost around 1 thousand rubles; it can even be neatly built into the inverter housing. The main problem is that measuring such high currents requires a shunt connection. Its cost is in the range of 500–700 rubles for currents of 200–300 A. Please note that the type of shunt must comply with the recommendations of the ammeter manufacturer; as a rule, these are 75 mV inserts with an intrinsic resistance of about 250 μOhm for a measurement limit of 300 A.
The shunt can be installed either on the positive or negative terminal from inside the housing. Typically, the size of the connecting bus is sufficient to connect an insert about 12–14 cm long. The shunt cannot be bent, so if the length of the connecting bus is not enough, it must be replaced with a copper plate, a pigtail of cleaned single-wire cable, or a piece of welding conductor.
The ammeter is connected with measuring outputs to the opposite terminals of the shunt. Also, for the digital device to operate, it is necessary to supply a supply voltage in the range of 5–20 V. It can be removed from the fan connection wires or found on the board at points with potential for powering control chips. The ammeter's own consumption is negligible.
Preparation
Manufacturing a semi-automatic welding machine at home begins with planning the work. There are two options for making MIG welding from an inverter:
- Completely make a semi-automatic welding machine with your own hands.
- Only remake the inverter - buy a ready-made feeding mechanism.
In the first case, the cost of parts for the feeding device will be about 1000 rubles, excluding labor, of course. If a factory semi-automatic machine includes everything in one case, then a homemade one will consist of two parts:
- Welding inverter.
- Box with feeding mechanism and wire reel.
First, you need to decide on the body for the second part of the semi-automatic device. It is desirable that it be light and roomy. The feeding mechanism must be kept clean, otherwise the wire will feed jerkily; in addition, the reels must be changed periodically and the mechanism adjusted. Therefore, the drawer should be easy to close and open.
The ideal option is to use the old system unit:
- neat appearance - it doesn’t really matter, but it’s much nicer when the insides of the homemade product don’t stick out and the semi-automatic machine made from an MMA inverter looks good;
- light, closes;
- the body is thin - it’s easy to make the necessary cutouts;
- The gas valve and wire feed drive operate on 12 Volts. Therefore, a power supply from a computer will do, and it is already built into the case.
Now you need to estimate the size and location of future parts in the body. You can cut out approximate layouts from cardboard and check their relative position. After this, you can begin work.
The best option for electrode wire is a 5 kg coil. Its outer diameter is 200 mm, inner diameter is 50 mm. For the axis of rotation, you can use a PVC sewer pipe. Its outer diameter is 50 mm.
Burner
A homemade semi-automatic machine must be equipped with a burner. You can do it yourself, but it’s better to buy a ready-made kit, which includes:
- Burner with a set of tips of different diameters.
- Supply hose.
- Euro connector.
A normal burner can be purchased for 2-3 thousand rubles. Moreover, the device is homemade, so you don’t have to chase expensive brands.
What to look for when choosing a kit:
- what welding current is the torch designed for;
- the length and rigidity of the hose - the main task of the hose is to ensure free flow of wire to the torch. If it is soft, any bend will slow down the movement;
- springs near the connector and burner - they prevent the hose from breaking.
Organizer for welding machine
pogranec 17-12-2017, 10:09 11 743 Devices
Those who use a welding machine know how inconvenient it is to store and carry it because of the wires. A DIY master decided to make an organizer for a welder. Below we will consider what came out of this and what he used for this
Tools and materials:
-Welding machine;-Metal strip;-Drilling machine;-angle grinder;-Metal corner;-Metal rod;-Bending machine;-Vise;-Clamp;-Roulette;-Spray paint;-Magnet;-Fasteners;-Stainless steel tube ;Step one: hooks Marks a metal strip 3*30 mm. Drills an 8mm hole. Cuts off plates. Cuts four rods from 8 mm reinforcement. Inserts them into the holes in the plate and scalds them. Bends the edges of the plates at 45 degrees. From the reinforcement he makes two more hooks with an angle of 90 degrees. Cuts two strips, drills a hole and welds the hooks. Makes another semicircular plate for the magnet. Step two: frame The master made the upper part of the frame from a 10 mm metal rod. He cuts two rods and bends them in a U-shape. The master makes the lower supporting part from a 30 mm angle and strip. Cuts off two corners. Weld a strip at the ends. Moreover, on one side there is a strip with a hook. It welds a U-shaped frame to the bottom. Welds a plate with a hook onto one U-shaped frame, in its middle part. The result is a hook at the bottom and top of the frame; the power cord will be wound around it. Welds hooks on the sides of the frame, welding cables will be wound on them. Welds the eye under the magnet. Step three: painting and assembly Cleans the seams, paints the surface. Makes a holder for the fork from plastic. Screws the holder to the eye on one side and the magnet on the other. Installs the welding apparatus. Wraps cables around hooks. Attaches the tube for electrodes to the top. The organizer is ready. The entire manufacturing process can be watched in the video. Source Become the author of the site, publish your own articles, descriptions of homemade products and pay for the text. Read more here.
Feeder
The electrode wire must be fed continuously and evenly - then the welding will be of high quality. The feed speed must be adjusted. There are three options for making the device:
- Buy a fully assembled mechanism. Expensive, but fast.
- Buy feed reels only.
- Do it all yourself.
If the third option is chosen, you will need:
- two bearings, guide roller, tension spring;
- motor for feeding wire - a motor from windshield wipers will do;
- metal plate for fastening the mechanism.
One pressure bearing - it should be adjustable, the second serves as a support for the roller. Manufacturing principle:
- holes are made on the plate for the motor shaft and for mounting bearings;
- the motor is fixed behind the plate;
- a guide roller is put on the shaft;
- bearings are fixed at the top and bottom;
It is best to place the bearings on metal strips - one edge is bolted to the main plate, and a spring with an adjusting bolt is connected to the other.
The completed mechanism is placed in the housing so that the rollers are located in line with the burner connector, i.e., so that the wire does not break. A rigid tube must be installed in front of the rollers to align the wire.
Implementation of the electrical part
For this you will need:
- two automotive relays;
- diode;
- PWM regulator for the engine;
- capacitor with transistor;
- idle solenoid valve - for supplying gas to the burner. Any VAZ model will do, for example from a V8;
- wires.
The wire and gas supply control circuit is quite simple and is implemented as follows:
- when you press the button on the burner, relay No. 1 and relay No. 2 are activated;
- relay No. 1 turns on the gas supply valve;
- relay No. 2 works in tandem with a capacitor and turns on the wire feed with a delay;
- wire pulling is done with an additional button, bypassing the gas supply relay;
- To remove self-induction from the solenoid valve, a diode is connected to it.
- It is necessary to provide for connecting the burner to the power cable from the inverter. To do this, next to the Euro connector, you can install a quick-release connector and connect it to the burner.
The semi-automatic device has the following operating sequence:
- The gas supply is turned on.
- The wire feed starts with a slight delay.
This sequence is necessary so that the wire immediately enters the protective environment. If you make a semi-automatic machine without delay, the wire will stick. To implement it, you will need a capacitor and a transistor through which the motor control relay is connected. Operating principle:
- voltage is applied to the capacitor;
- it is charging;
- current is supplied to the transistor;
- the relay turns on.
The capacitance of the capacitor must be selected so that the delay is approximately 0.5 seconds - this is enough to fill the weld pool.
After assembly, the mechanism must be tested, and the manufacturing process can be seen on video.
Inverter conversion
To make a semi-automatic machine from a conventional inverter with your own hands, you will have to slightly alter its electrical part. If you connect an MMA inverter to the assembled case, you will be able to cook. But at the same time, the quality of welding will be far from that of a factory semi-automatic machine. It's all about the current-voltage characteristics - current-voltage characteristics. The electric arc inverter produces a falling characteristic - the output voltage floats. And for the correct operation of a semi-automatic device, a strict characteristic is required - the device maintains a constant voltage at the output.
Therefore, in order to use your inverter as a current source, you need to change its current-voltage characteristic (volt-ampere characteristic). For this you will need:
- toggle switch, wires;
- variable resistor and two constant;
Getting a hard characteristic on an inverter is quite simple. To do this, you need to place a voltage divider in front of the shunt that controls the welding current. Fixed resistors are used for the divider. Now you can get the required millivolts, which will be proportional to the output voltage, not the current. There is only one drawback to this scheme - the arc is too rigid. To soften it, you can use a variable resistor, which is connected to the divider and the output of the shunt.
The advantage of this approach is that the arc stiffness can be adjusted - this setting is only available in professional semi-automatic machines. And the toggle switch switches the inverter between MMA and MIG modes.
Thus, converting an MMA inverter into a semi-automatic device, although not an easy task, is quite feasible. The result is a device that is not inferior to the factory ones in its characteristics. But at the same time it is much cheaper. The cost of such an alteration is 4-5 thousand rubles.
Assembly sequence
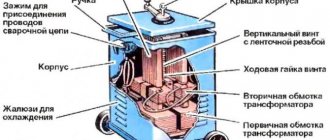
Transformers connected by primary and secondary windings are built into it. A parallel connection circuit is used for the primary winding, and a serial connection circuit is used for the secondary winding. This design provides a current supply of up to 60 A. The maximum welding voltage at the output will be 40 V. The resulting performance characteristics make it possible to weld small metal structures for domestic use.
Continuous operation of the inverter device causes overheating. To prevent this from happening, a cooling system is built into the design. The easiest way to reduce heat is to install fans on the sides of the case. They are placed opposite the transformers so that they work for exhaust.
For semi-automatic welding machines, a cooling unit from outdated computer models is used. A number of holes in the housing with a diameter of at least 5 mm will help ensure the removal of warm air and the entry of fresh air. The number of holes is 20-50 pieces.
Converting a welding inverter into a semi-automatic machine
A semi-automatic welding machine is a fairly popular device among professional and home craftsmen, especially those involved in body repair. This unit can be purchased ready-made. But many owners of inverter welding machines are wondering: is it possible to convert the inverter into a semi-automatic machine, so as not to buy another welder? Making a semi-automatic machine from an inverter with your own hands is a rather difficult task, but with a strong desire it is quite feasible.
Process modes and features
Due to the limited welding currents, devices for fusing electrical wires can have very small sizes.
Thermite welding of wires, which is widely used among specialists and is organized using a special powder mixture, makes it possible to further simplify the welding procedure. In this case, it is possible to significantly reduce the dimensions of the portable equipment used.
When carrying out ordinary electrical operations (including welding copper and aluminum wires), special equipment is used, which uses direct current of direct polarity to form an arc.
The plus of the supply circuit is connected to the electrode holder in such a device, and its minus is connected to the grounding wire, which is usually called “ground”.
When welding with certain types of copper-coated electrodes, reverse polarity is used.
The magnitude of the welding current in any case is determined by the dimensions of the electrical wire harness being installed and the cross-section of the individual cores collected in it. During the welding process, the required value of this parameter is set using a regulator located on the control panel.
Various models of small-sized welded units provide adjustment of the output voltage. Some manufacturers and even home craftsmen further improve the design of their models by installing special current limiters in them.
Data on the output parameters of such devices can be found in the tables of the dependence of the operating voltage and current on the cross-section of the wires being welded and their number in the twist.
Required materials and tools
To assemble the unit you will need the following elements:
- inverter welding machine;
- a burner, as well as a special flexible hose, inside of which there are a gas pipeline, a wire guide, a power cable and an electrical control cable;
- mechanism for uniform automatic wire feeding;
- control module, as well as motor speed controller (PWM controller);
- cylinder with protective gas (carbon dioxide);
- solenoid valve for gas cut-off;
- coil with electrode wire.
Characteristics and materials
For use at home, homemade inverters are required, connected to a 220 V power supply . The welder, powered from a 380 V network, is also easy to assemble. Domestic inverters must meet the following requirements:
- voltage – 220 V;
- input current 32 A;
- output current strength at 250 A.
To build an inverter welding machine with your own hands, prepare the following materials:
- fasteners;
- sheet metal;
- thermal paper (cash tape is suitable);
- radio components for forming electrical circuits;
- copper strips or wires;
- textolite;
- mica;
- fiberglass fabric.
Electrode wire feeding mechanism
Since the feeding mechanism will be placed in a separate box, the case from the computer system unit is ideal for this purpose. Plus, there is no need to throw away the power supply. It can be adapted to the operation of the broaching mechanism.
To begin with, you need to measure the diameter of the coil of wire or, having outlined it on paper, cut out a circle and insert it into the body. There should be enough space around the reel to accommodate other components (power supply, hoses and wire pulling mechanism).
The wire drawing device is made from a windshield wiper mechanism from a car. It is necessary to design a frame for it, which will also hold the pressure rollers. The layout must be drawn on thick paper in real scale.
The feeder should be installed in the housing so that the connector is located in a convenient location.
In order for the wire to be fed evenly, all components must be fixed exactly opposite each other. The rollers must be centered relative to the hole for the inlet fitting, which is located in the connector for connecting the hose.
Bearings of suitable diameter can be used as roller guides. A small groove is machined on them using a lathe, along which the electrode wire will move. For the mechanism body, you can use 6 mm thick plywood, textolite or durable sheet plastic. All elements are fixed to the base, as shown in the following photo.
A bolt drilled along the axis is used as the primary guide for the wire. The result is something like a wire extruder. At the inlet of the fitting, a cambric reinforced with a spring (for rigidity) is put on.
The rods on which the rollers are attached are also spring-loaded. The clamping force is set using a bolt located below, to which the spring is attached.
The base for securing the reel can be made from a small piece of plywood or textolite and a piece of plastic pipe of a suitable diameter.
Next, all components must be carefully placed in the case.
Installation mechanisms
These devices allow you to install profile pipes in the required position.
Exactly how they will be located in the end. Based on their functional and structural design, they are divided into: Resistant. They fix the workpieces on the main surface, and can be used constantly, removed, and there are also folding ones (used for retraction and rotation).
Permanent fixtures are plates that are welded to the base.
And removable devices are used in situations where a permanently installed device cannot be used.
Angular. With their help, profile pipes are installed at a given angle.
Prisms. They fix cylindrical profile blanks in the required position. This device uses very simple designs that are made from corners.
This mechanism helps to install profile pipes in the required position in relation to existing parts of the future structure.
Mechanical control circuit
To achieve good quality seam when welding, it is necessary to ensure wire feed at a certain and constant speed. Since the motor from the windshield wiper is responsible for the feed speed of the equipment, a device is needed that can change the speed of rotation of its armature. For this, a ready-made solution is suitable, which can also be purchased in China, and it is called a PWM controller.
Below is a diagram from which it becomes clear how the speed controller is connected to the engine. The controller regulator with a digital display is located on the front panel of the case.
Next, you need to install a relay that controls the gas valve. It will also control the engine start. All these elements must be activated when the start button located on the burner handle is pressed. In this case, the gas supply to the welding site should be ahead (by about 2-3 seconds) of the start of wire feeding. Otherwise, the arc will ignite in the environment of atmospheric air, and not in the environment of the protective gas, as a result of which the electrode wire will melt.
A delay relay for a homemade semi-automatic machine can be assembled based on an 815 transistor and a capacitor . To get a pause of 2 seconds, a capacitor of 200-2500 uF will be enough.
The solenoid shut-off valve is placed in any place where it will not interfere with the operation of the moving parts, and is connected to the circuit according to the diagram. You can use an air valve from GAZ 24 or buy a special one designed for semi-automatic machines. The valve is responsible for the automatic supply of protective gas to the burner. It turns on after pressing the start button located on the semi-automatic burner. The presence of this element significantly saves gas consumption.
Next, after installing all the components in the housing, the attachment to the inverter for semi-automatic welding will be ready for work.
But as already noted, the current-voltage characteristics (CV) of the inverter are not suitable for full-fledged operation of a semiautomatic device. Therefore, in order for a semi-automatic attachment to work in tandem with an inverter, minor changes need to be made to its electrical circuit.
Inverters for those who will cook with “four”
The advantages of inverters are undeniable: light weight, compact body, simple operation. Only the price can deter you from buying. But in skillful hands, an inverter will not only pay for itself over time, but will also be able to generate profit. Knowing all this, you finally decided to buy it. Naturally, you want to make sure you're getting your money's worth. After all, the welding machine must cope with the tasks assigned to it and serve properly for many years.
For the home handyman
Let's get acquainted with one of the most popular devices in Russia, which is used for household use. Telwin Force 165 is produced by a well-known Italian company specializing in the production of welding equipment.
Overheat, low voltage and overcurrent protection ensures it has a long service life. Let's pay attention to the "CE" mark. This is a safety certificate that must be on any product sold in Western Europe. For the future owner of the Telwin Force 165 inverter, it guarantees protection against electromagnetic radiation. Even if you have never thought about the invisible threat of fields, you will agree that it is nice that the manufacturer took care of you.
Having tested the inverter in operation, you will be convinced that it welds metal well at both low and high currents. It has a full range of functions: hot start, arc forced, anti-stick protection. Everything works as smoothly as on more expensive models.
It is worth paying attention to the configuration of the inverter. Along with it you will receive a mask, wires, terminals, an electrode holder, a brush for removing slag and a case in which it is convenient to store and carry all this.
Expert commentary
Unfortunately, the welder's mask in this set is not the best; it is made in the form of a shield with a removable handle. If you don't like it, you can buy another one over time. The main thing is the quality of the inverter itself, and Telwin has it at a high level.
Note that this device, like the other models presented in the review, works perfectly with a motor generator. With your own diesel or gasoline power plant, you can use welding where there is no power grid.
Profitable offer
Let's now get acquainted with a wonderful set, which includes a Fubag IN 160 welding inverter and a chameleon mask. A good semi-professional welding machine allows you to appreciate all the advantages of inverter technology. Due to the increase in current during starting, the arc is easily ignited. There is an anti-sticking function that prevents the electrode from sticking. If this does happen, she helps to tear it off.
If you want to purchase a “chameleon” mask, then by purchasing it in this set, you save up to half its cost.
There are 2 more inverters that are sold in profitable kits - Elitech AIS 160. The first option - also with a chameleon mask, the second - Elitech AIS 160CAP - with a carrying case, a welding shield, thick cables 3 m long, an electrode holder, a ground clamp and a brush -with a hammer.
Expert commentary
The case is really good. The locks are locked with a key; the interior is lined with polyurethane. It contains all the welding accessories. This kit is convenient for work on the road. The mask from the first set is made of durable plastic with a carbon coating. It is equipped with a darkening degree regulator; the welder can adjust it in a way that is convenient for him.
The Elitech AIS 160 welding machine is made in China. The build quality is excellent. A layer of thermal paste is laid between the transistors and radiators, which provides better cooling of the parts. The elements are secured with screws. The boards are coated with a triple layer of compound - this polymer protects parts from external influences and mechanical damage. The built-in fan effectively cools the “insides” of the inverter. After turning off the device, the blades continue to rotate for some time, allowing the elements to completely cool down.
In addition to such functions as quick start and anti-sticking of the electrode, the low open circuit voltage is noted as an advantage. Electricity consumption is automatically reduced during idle times, ensuring not only savings but also user safety. Voltage reduced to 9 W does not pose a risk of electric shock. According to its characteristics, the inverter is suitable for professional use in production and at home.
Svarog ARC 165. - made in China, produced under the Russian brand. The inverter is assembled from components produced by the Japanese company Toshiba. The Svarog ARC 165 device uses bipolar transistors with an insulated gate, resistant to adverse environmental influences (temperature, dust). Therefore, the manufacturer recommends its use in open repair and installation areas.
Welders will be pleased with the device's high power, arc stability and efficiency (only 30 W are consumed at idle), which is important for large volumes of work.
Compared to all the models discussed above, the EWM PICO 162 inverter costs 2.5-3 times more. Moreover, apart from himself, there is nothing in the delivery kit, not even wires. The welding machine was manufactured in Germany by a company whose history goes back more than half a century. You were not mistaken if you immediately thought about German quality. For its exceptional reliability, this inverter is rated very highly compared to other welding machines.
Professionals use the EWM PICO 162 in construction, as well as for the repair of large equipment and machinery. It is perfectly suited for working in difficult conditions. The metal case protects the device from damage. Thanks to the special design of the channels through which air is supplied for cooling, even with heavy dust, the internal parts are less contaminated.
In addition to durability, it has excellent user characteristics. The material does not burn, the arc ignites stably. The device has high power, so welding with a 4 mm electrode is not its maximum capability, but a normal operating mode.
If you pay attention to the technical characteristics presented in the table, you will notice another important advantage: EWM PICO 162 is excellent for work outside the city, where the network voltage is often low. It welds metal perfectly, receiving only 190 V from the mains.
Comparing technical specifications
| Telwin Force 165 | Fubag IN 160 | Elitech AIS 160, Elitech AIS 160 ATS | Svarog ARC 165 | EWM PICO 162 | |
| power, kWt | 4,1 | 4,6 | 5,3 | 5,3 | 6 |
| Welding current, A | 10-150 | 10-160 | 10-160 | 10-160 | 10-160 |
| Supply voltage, V | 230 | 220-10%+10% | 220 | 220-15%+15% | 230-40%+15% |
| PV, % | 60 | 60 | 60 | 60 | 60 |
| Dimensions, mm | 380x420x170 | 380x190x220 | 315x123x177 | 313x120x198 | 365x115x225 |
| Weight, kg | 4.1 | 4.2 | 4.2 | 5.2 | 4.8 |
The review examines welding inverters, which are in great demand. The trust of many buyers is a good indication of the reliability of the purchased device. The devices are of high quality, but in operation they will show different results, despite the fact that each of them is designed to use a 4 mm electrode. If you often weld thick metal, pay attention to more powerful models, such as Elitech AIS 160, Svarog ARC 165, and, of course, EWM PICO 162. If four in your work is a rare case, and mostly three is used, we recommend Telwin Force 165 and Fubag IN 160.
www.vseinstrumenti.ru
Changing the current-voltage characteristic of the inverter
To change the I-V characteristic of an inverter, there are many circuits, but the simplest way to do this is as follows:
- assemble the device using a choke from a fluorescent lamp according to the diagram below;
- to connect the assembled device, you will need to assemble another block according to the following diagram;
- To prevent the overheating sensor from triggering on the inverter, an optocoupler must be soldered to it (in parallel), as shown in the following diagram.
But if the welding current in the inverter is controlled using a shunt, then you can assemble a simple circuit of three resistors and a mode switch, as shown below.
As a result, converting a welding inverter into a semi-automatic machine will cost 3 times less than a ready-made unit. But of course, to independently assemble the device you will need to have certain knowledge in the radio business.