In the manufacture of various metal structures, rolled steel angles (angles) are among the most commonly used materials. In addition to welding corner pieces together, it often becomes necessary to weld a corner to a pipe or to a flat surface. Such compounds are used in construction and installation work, in the manufacture of furniture and crafts.
Types of connection
Welding steel products using angle iron comes down to several main types of connections:
- butt welding of billets from angle bars;
- welding corner blanks at an angle of 90 °;
- welding of angle steel with other products.
When creating a structure, a good welder solves at least two problems. The first is to weld a strong product that can successfully withstand certain loads. The second task is to ensure that the completed work looks aesthetically pleasing. After all, the work of a true master is always pleasing to the eye.
Let's look at typical examples showing how to weld iron corners to each other, as well as to other surfaces.
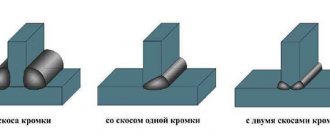
Types of fillet welds
Fillet welding is the joining of two metal products or profile pipes at an angle of less than 180°. However, bayonets are often created in metal structures where the sides are at an angle of 90°. This distance must be maintained so that during the welding process, both sides are subjected to the same load and the structure itself is more durable.
Fillet welds during welding are differentiated into several types. Stand out:
- lap joint,
- seam with edges joining at the connection point,
- a seam with one end attached to a flat plane, also a similar type of connection is called a T-joint,
- connection with and without edge preparation.
Fillet welds are classified depending on how they are laid. Based on this criterion, continuous and intermittent connections are distinguished. There are also types of seams in length: short (up to 250 mm), medium (they are formed from the point of mating of the surfaces of both metal products to the edges of the part being welded, the size of such a connection varies from 250 to 1000 mm). Long fillet welds are created with a length of 1000 mm or more.
Butt joint
You can butt weld pieces of corner profiles. This type of welding is often required to lengthen an existing piece of steel. The technology for making such a connection is simple and basically does not differ from the butt connection of sheet blanks. But there are still some features.
First, you should make even trimming of the areas to be joined. This procedure must be preceded by careful marking of the material. In general, this should be the rule when working with metal if the goal is to do the job well. The sharp edges of the cuts must be processed with a file, removing burrs and scraps of metal from them.
In order to weld metal parts evenly, it is best to first combine them and clamp them in a special clamp. After carefully checking and, if necessary, adjusting the position of the workpieces using a level, you can make the first tacks.
You should not start welding by applying a finishing weld along one of the angle bars. With intense heating during the welding process, the metal is deformed, as a result of which the joint along the second flange of the corner workpiece may separate. It is more correct to first weld the metal with tacks along the edges of the shelves and in the middle of the corner, and only after that finally weld the workpieces to each other.
.. | Connection of metal pipes,
Connection of metal pipes having different diameters or shapes.
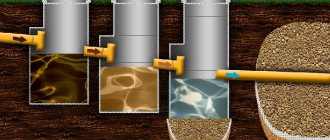
How to connect pipes. Water and gas pipes and electric welded pipes are used for gas supply, heating distribution, sewerage installations, and the manufacture of various structures in mechanical engineering, aircraft manufacturing, and agriculture. In this case, it is necessary to connect two or more pipes to each other.
The advantages of using steel pipes are that the pipes are easily bent and welded with gas, the structure is sealed and the work takes little time, the structure lasts for at least 20 years and does not need frequent repairs. However, metal pipes are subject to corrosion and are heavy. There are galvanized metal pipes, as well as pipes coated with polyethylene or epoxy applied to them. When burying pipelines in the ground, use a bitumen coating on the pipes.
Today, the following options for connecting steel pipes are possible:
joining steel pipes by welding,
connecting pipes using fittings,
joining pipes using flanges.
Welding steel pipes
Depending on the required quality and the material used, metal pipes can be welded: with electrodes using an electric arc, gas welding machines, MIG/MAG (consumable electrode in a gas) and TIG (non-consumable electrode in a gas, most often argon) machines.
Before welding, the edges of the pipes must be cleaned of rust and oxides and chamfered. The welding seam is filled with molten metal, resulting in a smoother and more airtight seam. If gas pipes are butt welded, the seam must be convex and even along its entire length.
When welding with a gas torch, the end of the seam occurs with a slight voltage to prevent lack of penetration. A gas burner with two nipples is used. An oxygen cylinder is connected to one nipple, and a flammable gas cylinder or gas generator is connected to the second. Oxygen is mixed with flammable gas in the burner, forming a flame at the exit of the nozzle that heats the pipes. Gas welding of steel pipes is used mainly for pipes with a wall thickness of no more than 4 mm, since there is a risk of overheating of the weld area, which makes it less durable.
Welding of steel water pipes or electric welded pipes, ferrous metal or galvanized steel pipes is carried out using a semi-automatic machine or manual arc welding is used. This welding is applicable for pipes with a small diameter and thin walls, 1.5 - 5 mm thick. For welding water pipes, arc welding is most often used, as well as automatic or semi-automatic. Hot rolled steel sheets are used. Arc welding is also used to connect profile black and stainless pipes. When welding a profile pipe with a thickness of 0.8 mm, the joint is welded with a short arc, with a thickness of 0.8 - 3.0 mm - with conventional arc welding, more than 3 mm - arc welding with gas-consumable electrodes is used. When welding a profile pipe, the root of the pipe seam is welded, but the metal itself should not be burned.
Before arc welding of heating pipes, the ends are cleaned, chamfered, the pipes are centered together, grabbing at 3-4 points along the entire circumference of the pipe, then the seam is welded, filling the chamfer with welding material to 2/3 of the chamfer height. First, use a smaller electrode with a diameter of 3 mm, then - if higher quality is needed - a second seam with an electrode of a larger diameter is placed on top. The joint surface is cleaned and any remaining slag is removed. When manually welding heating using a semi-automatic machine, a mixture of gases is used, which consists of argon, carbon dioxide, oxygen. When welding this way, the diameter of the welding wire must match the pipe. Typically, wire with a diameter of 1 - 1.2 mm is used to weld pipes with a wall thickness of up to 5 mm. There should not be much time between removing the electrode and connecting the surface, because this threatens to harden the surface and deteriorate the quality of the seam.
If in a design one pipe is larger in diameter than the other, then such pipes are connected using flanges - special flat rings with holes for studs and bolts. Steel flanges are widely used for pipeline transport and public utilities. Flange connections consist of flanges, gaskets, and fasteners. Depending on the parameters, flange structures are divided into solid and free. Solid ones undergo the same loads along with the body. Solid flanges are distinguished:
1) cast - produced as one piece with the body,
2) steel, which have a thread on the neck, is used for pipelines with low pressure,
3) collar - a product welded end-to-end,
4) flat steel welded flanges - for process pipelines.
Loose flanges, in turn, are divided into:
flanges with collar (used in aggressive environments),
flanges on flanged pipe,
flanges on a welded ring (for pipelines made of non-ferrous metals and stainless steel).
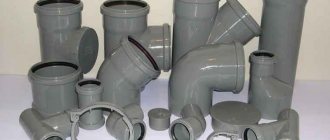
Steel fittings are the connecting part of the pipeline, which is used for turns, branches, and transition to another pipe diameter. This connection ensures the tightness of the pipeline overlap. Fittings that connect the ends of pipes with the same diameter are called straight, those with different diameters are called transition fittings. They are threaded, welded, crimped and flanged.
Pipe fittings are divided into:
steel bends, pipe corners (for turning the pipeline by 45, 90, 120 degrees),
connecting couplings - designed for connecting identical pipes in a straight section,
tees and manifolds - connecting pipes without welding in one direction from the main pipe. In apartments, with a tee pipeline layout, pipes are led from a common riser to places of water consumption; with a collector circuit, pipes are led to each point of water consumption.
crosspieces - in two directions from the main pipe,
pipe adapters - for connecting pipes of different sections and types (for example, polypropylene and metal), has 2 - 4 holes. Using adapters, you can connect round and square pipes; for greater tightness, you need to choose adapters that have the most suitable dimensions.
plugs, caps, plugs - hermetically sealing the ends of pipes,
fittings - for connection with a flexible hose.
Fittings for steel pipes are produced with a nominal diameter (Dy) of 8 - 100 mm.
To join pipes of different diameters, they also use fittings - adapters (they look like bushings or nuts), which have internal and external threads, and the external thread has a larger diameter than the internal one.
© 2001-2020 JSC Metallotorg, All rights reserved rolled metal, wire rod, galvanized, cold-rolled sheets, cold-rolled galvanized sheets, profile pipes Metallotorg - sale of rolled metal
Welding profiles at an angle of 90°
When questions arise such as how to weld a frame from a corner, you need to be able to correctly connect the parts at an angle of 90 °. There are three versions.
The first method is that the outer part of one of the shelves of one corner is superimposed on the inner part of the shelf of the second. This method is the simplest, but when it is performed, one corner is higher than the other by the thickness of the shelf.
The second method consists of preliminary cutting the shelf of one of the corners to the height of the shelf. After this, the second corner can be attached flush to the cutout and welded with the first.
The third welding method also allows you to weld workpieces at the same level. To do this, each of the blanks is pre-cut at an angle of 45 °C, after which they are connected at the corners, ultimately forming a right angle.
To weld the frame, you need to take four blanks from angle bars, prepared for welding at right angles using one of the above methods. For preliminary fastening, it is better to use a clamp.
Having combined all the blanks, it is necessary to control the geometric dimensions of the future product. Then, having made tacks at the four corners, again take measurements of the diagonals of the frame, if necessary, adjusting them with light blows of a hammer along the larger diagonal. After this, you can weld the joints.
Welding products from metal corners
In the manufacture of various metal structures, rolled steel angles (angles) are among the most commonly used materials. In addition to welding corner pieces together, it often becomes necessary to weld a corner to a pipe or to a flat surface. Such compounds are used in construction and installation work, in the manufacture of furniture and crafts.
Types of connection
Welding steel products using angle iron comes down to several main types of connections:
- butt welding of billets from angle bars;
- welding corner blanks at an angle of 90 °;
- welding of angle steel with other products.
When creating a structure, a good welder solves at least two problems. The first is to weld a strong product that can successfully withstand certain loads. The second task is to ensure that the completed work looks aesthetically pleasing. After all, the work of a true master is always pleasing to the eye.
Let's look at typical examples showing how to weld iron corners to each other, as well as to other surfaces.
Butt joint
You can butt weld pieces of corner profiles.
This type of welding is often required to lengthen an existing piece of steel. The technology for making such a connection is simple and basically does not differ from the butt connection of sheet blanks. But there are still some features. First, you should make even trimming of the areas to be joined. This procedure must be preceded by careful marking of the material. In general, this should be the rule when working with metal if the goal is to do the job well. The sharp edges of the cuts must be processed with a file, removing burrs and scraps of metal from them.
In order to weld metal parts evenly, it is best to first combine them and clamp them in a special clamp. After carefully checking and, if necessary, adjusting the position of the workpieces using a level, you can make the first tacks.
You should not start welding by applying a finishing weld along one of the angle bars. With intense heating during the welding process, the metal is deformed, as a result of which the joint along the second flange of the corner workpiece may separate. It is more correct to first weld the metal with tacks along the edges of the shelves and in the middle of the corner, and only after that finally weld the workpieces to each other.
Welding profiles at an angle of 90°
When questions arise such as how to weld a frame from a corner, you need to be able to correctly connect the parts at an angle of 90 °.
There are three versions. The first method is that the outer part of one of the shelves of one corner is superimposed on the inner part of the shelf of the second. This method is the simplest, but when it is performed, one corner is higher than the other by the thickness of the shelf.
The second method consists of preliminary cutting the shelf of one of the corners to the height of the shelf. After this, the second corner can be attached flush to the cutout and welded with the first.
The third welding method also allows you to weld workpieces at the same level. To do this, each of the blanks is pre-cut at an angle of 45 °C, after which they are connected at the corners, ultimately forming a right angle.
To weld the frame, you need to take four blanks from angle bars, prepared for welding at right angles using one of the above methods. For preliminary fastening, it is better to use a clamp.
Having combined all the blanks, it is necessary to control the geometric dimensions of the future product. Then, having made tacks at the four corners, again take measurements of the diagonals of the frame, if necessary, adjusting them with light blows of a hammer along the larger diagonal. After this, you can weld the joints.
Welding to pipes and planes
It is most convenient to weld a corner with a profile pipe, since its flat surfaces fit tightly to the flanges of the corner and, when welded, form a reliable connection.
For example, if you need to weld a workbench, a table for a workshop or a stand, then the base of the future tabletop can be a frame from a corner, and the legs can be sections of pipes.
In this case, the frame can be oriented with the plane up, and steel pipes - legs - can be welded to its inner corners. When performing this work, it is also useful to use clamps of the desired shape and round pipes.
If the strength of the intended connection is insufficient, you can weld reinforcing elements in the form of triangular gussets made of sheet metal or sections of corners.
Connecting the corner to a flat surface does not cause any difficulties. If you need to weld a corner with the shelf adjacent to the plane, the seams along the shelf securely fasten the corner.
If the corner workpiece needs to be welded at the end, welding is performed as with a classic T-joint, which is described in detail by GOST.
Welding to pipes and planes
It is most convenient to weld a corner with a profile pipe, since its flat surfaces fit tightly to the flanges of the corner and, when welded, form a reliable connection.
For example, if you need to weld a workbench, a table for a workshop or a stand, then the base of the future tabletop can be a frame from a corner, and the legs can be sections of pipes.
In this case, the frame can be oriented with the plane up, and steel pipes - legs - can be welded to its inner corners. When performing this work, it is also useful to use clamps of the desired shape and round pipes.
If the strength of the intended connection is insufficient, you can weld reinforcing elements in the form of triangular gussets made of sheet metal or sections of corners.
Connecting the corner to a flat surface does not cause any difficulties. If you need to weld a corner with the shelf adjacent to the plane, the seams along the shelf securely fasten the corner.
How to cook, technology
It is important to position the electrode correctly; in one plane it tilts in the direction of its movement, and in another plane along a bisector relative to the angle between the parts.
The current is adjusted depending on the thickness of the metal and the diameter of the electrode according to the formula, it is important to know that if the current is low, then the electrode will stick, if the current is high, then burns will occur accordingly.
The electrode itself is selected and safety precautions are observed. Technological preparation of the parts to be welded is carried out, a gap of approximately 2 mm is made, and tack welding is performed.
Video
This video clearly shows how important it is to make tacks before welding.
If one part to be welded is thinner than the second, then lack of penetration and burning must be avoided by grabbing and transferring the metal of the thicker part to the thin one . The movement of the electrode can also be from left to right, right to left, up and down. You should also choose the oscillatory motion of the electrode that is most convenient and suitable for high quality welding.
The slag is removed and the surface is cleaned with a metal brush. If during work the electrode runs out, you should beat off the slag to avoid lack of penetration, clean it and continue welding from the end point.
To avoid sagging, undercutting, lack of penetration and other defects, maintain the correct angle and monitor the weld pool. The welding speed must be such that a weld with the specified dimensions is formed.
Advice! Just like in a T-joint, it is convenient to make a fillet weld in a “boat” manner, if such a position is possible.
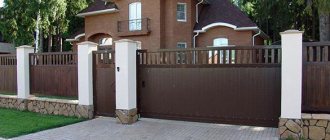
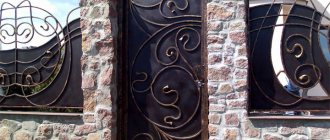
Installing hinges
To ensure that the gate opens well, you should choose hinges on a bearing or ball. The hinges are marked no closer than 30–40 cm to the edges of the frame, after which the hinges are welded to its surface. To ensure reliability of the welding connection, the hinges are first welded onto metal plates (4mm thick), and then these plates are welded to the gate and post.
Once the hinges are installed, you can begin installing the deadbolt. Vertical pins are used as a deadbolt. The manufacture of such a design is not so difficult; in addition, this design itself is highly reliable.
DIY corner gate video:
To restore order and free up space occupied by accumulated things, a metal rack is assembled. You can buy a ready-made design or make it yourself. If the weight of the objects is small, an aluminum corner is used as the material. To store preparations for the winter in city apartments, racks made of steel corners are installed on the balcony. To accommodate a large number of heavy objects, make a rack from pipes in a garage, shed, or cellar.
How to bend a corner into a ring with your own hands
It is necessary to heat the metal to half the value of its melting point, so, for example, an aluminum corner will have to be heated to at least 250⁰ C, and a steel profile - to 600⁰ C. To do this, you will need a natural gas burner or a gasoline blowtorch, and it is best to use welding acetylene cutter if the corner is large.
Using an angle grinder and a welding machine, you can also bend a steel corner into a ring, but for this you need to make fairly accurate calculations, mark and outline the sectors to be removed, bend and weld the seams. Unfortunately, no matter how hard you try, in this case you will end up with a circle in the form of a rounded polyhedron.
Advantages and disadvantages of metal shelving
The advantages of metal structures include:
- Reliability and durability. The shelves can support significant weight without damage.
- Easy to care for.
- Wear resistance. Even with intensive use, metal pipe racks retain their characteristics and appearance unchanged.
- Full compliance with fire safety requirements.
- Storage of items made of any material.
- The metal frame is resistant to moisture and temperature changes.
Disadvantages include:
- It is more difficult to make a rack from a metal profile than from wood;
- the price of metal structures is higher.
Types of shelving
When choosing a metal storage system option, the complexity of manufacturing and operating conditions are taken into account:
- Modular structures are assembled from perforated profiles of different sizes. They are reliable, and the height of the shelves can be easily changed if necessary. However, the price is steep.
- Aluminum frames are attractive in appearance; their low weight allows you to quickly move the collapsible rack to another place. The disadvantages are the high price and deformation from impacts.
- Shelves of any size and configuration can be made from profile pipes. The shelves can withstand a lot of weight. For manufacturing you will need a welding machine and skills in working with metal.
- In terms of price and labor costs, frames made from metal corners are similar to the previous option, but are inferior in strength and aesthetics.
- The CD profile for fastening drywall is good because welding and expensive tools are not required to assemble the frame. Sold in building materials stores at affordable prices.
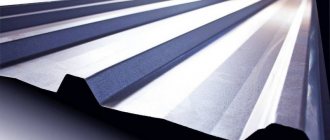
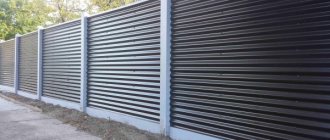
Fence made of corrugated sheets
In this article we will show you photographs and give a detailed description of how to install poles and make veins from a metal corner for a fence made of corrugated sheets with your own hands by one person.
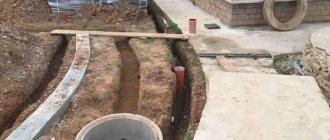
For the posts for the future fence, pipes from three to four meters long were purchased, the walls were all different, the pipes were welded together, since they bought everything at the metal collection point.
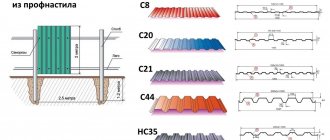
Instead of veins or logs, I used a forty by forty corner, 3-4 millimeters thick; I didn’t spend any money on a 40*20 millimeter profile pipe.
how to choose pipes for the fence, minimum length is three meters
I poured the pillars manually with a concrete mixer, placed the pillars in the ground from 1 meter to 1.2 meters, even though the level of soil freezing in our region is approximately 1 to 1.5 meters, the pillars are heavy and will stand that way.
We install poles along the lacing, the distance between the poles is 2.5 meters
cement for fence posts, nothing without it
We must install all the pillars by lacing, we place the first and last pillar first, after they are concreted, we pull the string between them and install the remaining pillars. I did not use paint for the pillars; I painted the pillars with a rust primer.
concreted all the pillars, painted them with a rust-resistant primer
I welded a corner for the profiled sheet.
we install fence posts with logs for corrugated sheets
The distance between the two corners is 1.5 meters, this is the optimal width; the top and bottom of the sheet will be 25 centimeters each.
Welded the top corner to the post according to the level
General view from the reverse side.
We weld the pillars together with a metal corner, everything is level, so that the screws do not jump
I cut some of the corners from the edge, and in some, as in the photo below, I made a cut in the corner itself, measuring the width of the pipe initially. Then we scald everything on all sides and you will be happy.
We weld a metal corner to a round post
weld a corner to a round fence post
joining made from a corner for a fence under a corrugated sheet
In this case, the corner was trimmed and only the edge was cut off, I made a mistake in size, and welded another plate on top.
metal corner for pole
I would like to note that the rigidity of the fence is much higher than that made from a profile pipe.
logs from a corner for a corrugated fence
align the corner and screw it in
It is very difficult to twist the screws for corrugated sheets into a 3-4mm metal corner; to make it easier, I first drilled with a drill, and then twisted the screws with a screwdriver. When the drills all broke, I tightened them with a drill without a ratchet, which caused the seal on the washer to wrinkle in some places and I had to replace them.
We twist all the screws for the corrugated sheet fence along the lacing
do-it-yourself fence made of corrugated sheets with metal veins from a corner
fence on the back side
I love beauty in everything, even in my simple fence, everything must be beautiful, which means all the screws need to be twisted along the rope so that they do not “jump” horizontally.
how to achieve one horizon for self-tapping screws for corrugated sheets
lacing helps to twist the screws in the center of the corner
Before installing the sheets, we painted all the pillars and corners with two layers of primer
trying on the first sheets for the fence
DIY corner fence photo
do-it-yourself corrugated sheet fence photo
Connection by welding or bolting
Metal structures assembled with bolts are easier to make than welded racks, but their rigidity is low, since there are backlashes at the joints. To increase stability, the frame is attached to the wall with plates with holes screwed to the posts. They are nailed down with crutches or dowels. They are attached to a wall made of foam or cinder blocks with anchor bolts. The prefabricated option is chosen if rearrangement is expected in the near future or there is no possibility of welding. Perforated angle frames are assembled without bolts. The horizontal crossbars have hooks that are inserted into the grooves of the posts. However, such a connection also suffers from backlash. Therefore, when installing high racks, the structure is welded.
Requirements for racks
To ensure that the metal rack is safe to use, the installation is guided by the requirements of GOST 16140-77:
- distance between racks 0.9 - 2.9 m;
- rack width 0.45 - 1.35 m;
- the curvature of the posts and crossbars should not be more than 3 mm per 1 m or 0.1% of the length;
- permissible deviation of the racks from the vertical is 1 mm per 1 m without load, and under the influence of weight 4 mm, but not more than 6 mm in length;
- sharp corners and edges must be smoothed;
- if the load does not exceed 60 kg, the shelf does not need an additional bar (stiffening rib), for 90 kg one crossbar is installed in the middle, for 120 kg - two;
- Cracks, lack of penetration, sagging, slag inclusions larger than 1 mm in size, and undercuts deeper than 0.5 mm are not allowed on welded seams.
How to assemble a rack from an aluminum profile with your own hands
Assembling a rack with your own hands from a profile can be done even by a person taking up this task for the first time. It is easier to work with than wood.
Materials and tools
To calculate how much material is needed, first sketch out a sketch indicating the dimensions and number of shelves. Profile dimensions are selected depending on the expected load. To connect the parts, you will need self-tapping screws with press washers, since their fastening is more reliable. It is better to take pointed ones, since drill ones make large holes, so the strength is reduced. Shelves are made from boards 2 - 3 cm thick, 10 mm or more plywood, OSB sheets no thinner than 12 mm.
To work you need to stock up on tools:
- Tape measure, pencil or felt-tip pen, square for checking angles.
- Metal scissors for cutting profiles.
- Screwdriver. If you screw in each screw manually with a screwdriver, it will take several days to assemble the frame.
- A wood hacksaw for cutting shelves. The process will speed up if you have a circular saw or jigsaw.
Build process
When the materials and tools are prepared, begin assembly:
- On the profile, mark the length of the racks, crossbars, and crossbars along the width of the shelves. To prevent the rack from turning out crooked due to errors with the dimensions of the workpieces, you need to re-check the correctness of the markings.
- On the side walls of the profile, cuts are made to the base and bent at this point. The workpiece is cut along the fold line.
- Longitudinal cuts are made on the crossbars to a depth equal to the width of the profile of the vertical supports. Internal bends, if any, are cut off.
- The crossbars are inserted into one another to form a rectangular cross-section. The cut ends are bent 90⁰. You need two of these parts for each shelf. They are installed on both sides of the frame.
- The assembly of the sidewalls, so that there are no distortions, is carried out on a flat surface, possibly on the floor. Cross members are inserted between a pair of vertical supports. After checking the corners, each bend is screwed with 1 - 2 self-tapping screws.
- After both sidewalls are ready, the rack is assembled from the profile. First install the lower crossbars, then the upper ones. If no distortions are found during inspection, the rest are fixed. It is more convenient to screw in the screws by placing the frame on its side. Having secured the parts on one side, it is turned over to the other.
- On profile racks with wide shelves, additional supports are installed from below in the middle of the lower crossbar. After determining the height, bends are made on them and screwed with self-tapping screws.
- After measuring, the shelves are cut. To increase the rigidity of the frame, cutouts are made in the corners so that they extend onto the side crossbars. To fasten wood, it is better to use self-tapping screws with fine threads.
Frame corner connections
The easiest way to make a frame is to connect the planks at right angles.
In this case, the joining area will be equal to the cross section of the plank. If you cut the planks at an angle of 45 degrees, the cut will be noticeably larger and, therefore, the connection will be stronger. However, it's not just about durability. With this combination of parts, the frame looks more elegant. And yet, as a rule, one adhesive connection is not enough. Even on medium-sized frames, not to mention large ones, the connections should be additionally secured - with nails, insert or through tenons, corners.
The most common frame shape is rectangular. But it can be either hexagonal or octagonal. It is clear that with such a frame the joining seams run at a different angle. However, in any case, this seam should divide the corner of the frame itself in half.
The slightest deviation from the given angle - even by one or two degrees - will lead to the fact that the cut strips will be impossible to fit closely to each other. This means that an accurate and therefore durable connection will no longer be possible.
To make a frame for a picture according to the scheme described on pages 206-209, you need to have a solid set of materials and tools and the qualifications of a cabinetmaker. For our home craftsmen, this material is unlikely to have “applied” value. Wrong requests, wrong opportunities.
Such connections can be seen on any picture frame. The glue seam between the two planks runs exactly at an angle of 45 degrees, that is, it bisects the right corner of the frame.
It's done like this
- Cut the planks according to the markings.
- Treat the cut with a plane, in some cases just clean it with sandpaper.
- For additional strength, drill holes for tenons in the cut areas.
- Cover the sections with glue and secure the joints using clamps until the glue sets.
- Secure the frames on the outside with nails or on the back with corrugated wire or corners.
- If necessary, glue thin ridges on the outside.
What you will need
Materials:
- Frame strips.
- Carnations with a hidden head.
- Wavy wire.
- Picture or window corners.
- Glue.
- Screws.
- Thin pieces of wood or plywood for tenons.
- Wooden rods for tenons.
Tools:
- Saw with a “back”.
- Drill or drilling machine.
- Bow saw.
- Hammer.
- Miter box.
- Plane.
- Marking pins.
- Sandpaper.
- Frame clamping devices.
Corrugated wire and corners
How to make a metal rack from a profile pipe with your own hands
Depending on the capabilities, the profile pipe frame is assembled with bolts or welded. An alternative option made from metal corners will be cheaper, since their price is lower. To simplify installation, make a combined rack with your own hands. Instead of a pipe for the side posts, use a metal corner.
Preparatory work
To determine the dimensions of a rack made from a profile pipe, you need to measure the location of its installation. When installed along the entire length of the wall, its sides should not reach the corners by 10 - 15 cm. A metal structure for a garage where there is little space is made up to the ceiling. Due to this, you can reduce the length and width without sacrificing capacity. The height and depth of the shelves depend on the size of the items being placed. Having decided on the parameters, drawings are drawn up indicating the general dimensions, dimensions and cross-section of the parts. Even a simple sketch will help you avoid mistakes when cutting workpieces and installation, as well as accurately calculate the amount of materials.
The frame is assembled from a profile pipe with a cross-section of at least 20×20 mm with a wall of 2 mm. If you intend to store heavy objects, the dimensions are increased to 20x40 - 20x50 mm. Shelves are made of plywood, boards, chipboard, and for heavy items - from corrugated iron. For large objects, a flooring made of wooden blocks or reinforcing rods at intervals is sufficient.
In order not to drill many holes using the bolt method, the parts are connected with elements (clamps) of the crab system. They are made in the form of metal plates with grooves into which the pipes to be connected are inserted. Then the clamps are tightened with bolts.
Manufacturing process
For convenience, the frame is assembled on a workbench or large table. Clamps will be required to secure the parts. Installation is carried out in the following order:
- Blanks for racks, cross members, and longitudinal crossbars are cut from pipes according to the dimensions indicated in the drawing.
- To assemble the sidewall, mark the installation locations of the crossbars on the rack. They are welded or secured with clamps.
- After installing all the crossbars, a second rack is attached to them.
- The welds are cleaned flush with the base metal.
- Using the finished sidewall as a template, the parts of the second are laid on top, securing them with clamps. Then the elements are welded. If the assembly is carried out using a bolted method, clamps are not needed, otherwise it will not be possible to install clamps.
- At the level of the crossbars, longitudinal crossbars are welded to the sidewall, and a second one is welded to them.
- Metal plates are welded to the lower ends of the racks.
- To attach the shelves to the crossbars, metal strips with holes for self-tapping screws are welded in increments of 30 cm. If the frame is welded from a corner, embedded plates are not needed.
- The finished metal frame is cleaned of dirt and rust, treated with an anti-corrosion compound, primed, and painted.
- Wooden shelves cut to size are treated with an antiseptic, covered with drying oil or painted with enamel, and after drying they are screwed to the mortgages.
Truss (sections from paired corners)
A constructive solution for a truss made of paired corners.
Trusses with elements made from paired corners are designed with knotted gussets, which are placed between the belt corners. The outline of the gussets is determined by the layout of the unit and the length of the seams, or the number of bolts securing the lattice rods. The shape of the gussets should be simple for ease of manufacture and reduction of metal waste.
View the building model in AutoCAD format:
DOWNLOAD FILE TO GOOGLE.DISK
DOWNLOAD FILE TO YANDEX.DISK
view the rear wheel model in Advance Stee format:
DOWNLOAD FILE TO GOOGLE.DISK
DOWNLOAD FILE TO YANDEX.DISK
The ends of the lattice rods are cut perpendicular to their axes, but in corners with a shelf width of more than 90 mm, oblique cuts are allowed. To reduce the concentration of welding stresses, at the end of the corners of the grid, they are not brought to the edges of the chords at a distance of a = 6tf - 20 mm, but not more than 80 mm (Here tf is the thickness of the gusset, mm). The same distances must be maintained between adjacent lattice elements in a node.
The lattice elements are welded to the gussets using two flank seams, with a 20 mm extension at the end. To ensure the transfer of the resultant forces perceived by each of the two seams to the center of the assembly (along the axis of the rod), fillet seams are distributed along the butt and feather in inverse proportion to their distances to the axis of the element.
As a rule, the gusset is extended beyond the edges of the waist corners by 10-15 mm, however, in places where the load-bearing elements of the roof rest on the upper belt, the gussets are not brought to the edges by 10-15 mm and are not welded in this place. When the thickness of the belt corners is 10 mm or less (with a truss pitch of 6 m) and 14 mm or less (with a truss pitch of 12 m), it is necessary to reinforce the belt with overlays in the places where the ribs of the reinforced concrete covering slabs support. The overlay is 12 mm thick and is welded to the waist with longitudinal seams.
Rice. Supporting the ribs of reinforced concrete covering slabs (a) and purlins (b) on the upper chord of the truss
The purlins are attached to the truss chords through corner stops. When installing them, the difference in the top of adjacent purlins must exceed 20 mm, which is achieved by sheet pads of appropriate thickness.
The trusses are assembled at the manufacturing plant on special stands in a horizontal position. After welding is completed from the accessible (upper) position, the truss is turned over and welding is completed by making the remaining welds.
When edging around one of the chords, the nodal gussets, which have little flexibility outside the plane of the truss, may bend. To prevent this from happening, the gusset is reinforced with special ribs located in each node on at least one side. The ribs located in the plane of the truss posts are simultaneously used to fasten the elements of vertical connections between the trusses.
Changing the sections of the waist corners is carried out at a distance of 200-500 mm from the center of the unit, shifting the joint towards a smaller section. The elements are joined in height; it is allowed to shift by no more than 1.5% of the profile height. For larger displacements, it is necessary to take into account the bending moments resulting from this in the nodes.
Rice. Truss nodes from paired corners (a - change in the section of the upper chord; b - installation of additional ribs from the plane of the truss)
The waist angles are joined with a gap of at least 50 mm, covering the joint with plates made of sheet steel or angles.
The cross-section of the linings and the corner seams that are fastened are calculated on the force that acts in the panel where the joint is located, that is, on the belt forces.
The length of the overlay is determined based on the placement of the welds. Truss mounting units are made with split or solid gusset. The overlays are welded to one side of the gussets at the factory, and to the other side during installation. To perform installation welding, both starting marks are pre-connected with bolts.
The racks at the junction are designed with a cross section, each corner of which is welded at the factory to one of the sides of the gussets. During installation, both corners are connected with bolted spacers.
Rice. Mounting units of trusses from paired corners: a - with a split gusset; b - with a continuous gusset
The height of the vertical overlays is taken according to the larger value hн, obtained under three conditions:
ensuring that the gusset is included in the work at the junction hн≥ 2b;
placement of welds securing the plates to one side of the gussets hн ≥ lw and designed for force N1 = 0.5 × 1.2 N;
for design reasons hн≥ 250 mm.
Here: b is the width of the vertically placed shelf of the waist corner; N - force in the belt.
In an assembly joint with a solid gusset, the latter is welded at the factory on one of the sending marks, and in the places where the elements of the rest of the truss are attached, holes are provided (at least two for each element) for mounting bolts.
The second shipping mark (without gussets) is transported with temporary mutual fastening of the lower chord with the adjacent brace by an inventory sheet part, which is designed to prevent the fairly flexible brace from swinging during transportation. The end of the top chord remains free because its rigidity, as a rule, is sufficient to resist transport influences.
After connecting the two shipping marks with belt bolts, the brace is welded with assembly seams, the dimensions of which are determined by the dimensions of the gusset. The belt posts are covered with overlays, which are calculated similarly to the option described above.
Trusses from paired corners are perhaps the simplest design solution from the point of view of their design. The truss may have parallel belts, or it may have a slope. The principle of design and calculation does not change. Such a truss can be considered according to a hinged scheme (in the absence of misalignments). General view of the calculation scheme:
After performing the calculation, based on the obtained forces in the rods, their cross sections are selected. The cross-section of the truss rods is paired angles.
Only compressive and tensile forces occur in the rods.
Rods in which compressive forces (with a minus sign) are considered as centrally compressed rods:
Rods in which tensile forces (with a plus sign) are considered as centrally stretched rods:
In the truss nodes, plates with a thickness of 8-10 mm are used with a tension in the rods of up to 25 tons. At high voltages, the plates are set to 12 mm. You can view the table in the series. See the list of episodes below.
Do not forget to place small plates in the rods between the plates, the distance between them is approximately 600 mm (we specify this based on flexibility). The width of the plate is approximately 40-70 mm, and the length depends on the cross-section of the corner.
The corners are attached to the plates by welding. The general view of the truss support nodes looks like this:
Nodes for attaching the lattice to the truss chords:
After calculating the welds, the dimensions of the plates are assigned. The length of the seam must be no less than the calculated length. Calculation of welds can be viewed here:
Helpful tips and layout ideas
The functionality of a metal rack will improve if you implement the recommendations of knowledgeable people:
- to increase the number of shelves for storing jars with blanks, they are made 30 cm high;
- in order not to be distracted from work by searching for what you need in garages and workshops, workbenches are built into the storage system;
- metal rack on wheels with a stand for tools, convenient to roll out for repairs on the street;
- to increase the usable area of the greenhouse, racks are installed, on the shelves of which boxes with soil are placed;
- space for wheels and bulky items can be left under the bottom shelf, raising it 60 - 70 cm from the floor;
- If you make a drawer with compartments for hardware on one of the shelves, they will always be at hand.
A self-made metal rack is not only cheaper than a factory one, but also more convenient to use. It is collected taking into account the characteristics of the room, the number and size of objects. The assembly of a metal structure with the required parameters can be performed even without a welding machine.