Snowmobile and swamp vehicle made from a walk-behind tractor
There is no fundamental difference between these homemade products, since a snowmobile made from a walk-behind tractor, like a swamp vehicle based on it, is united by one fundamental requirement: minimum pressure on the ground. When
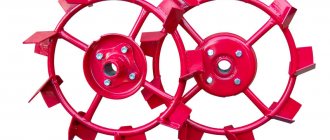
converting a walk-behind tractor to a new 4-wheeled chassis, special attention must be paid to the quality of manufacturing of wide snow-swamp wheels
It is best to make the lugs in such a way that they can accommodate standard walk-behind tractor wheels.
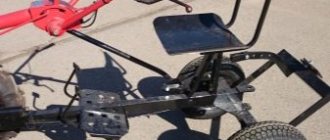
Owners of heavy walk-behind tractors with a trailed cart can make a homemade snowmobile out of it without changing the design at all. To do this, it is enough to change your manual tractor into new off-road “bast shoes”. Before doing this, you need to deflate the tires, then jack up the frame, insert the wheels into the lugs and inflate them again. After this simple work, you can safely go on a trip through wetlands or deep, loose snow.
Practice confirms that such a homemade swamp vehicle, even with a not very powerful 6-horsepower gasoline engine, drives quite briskly on the plain and confidently overcomes small slopes.
Do-it-yourself walk-behind tractor adapter, drawings and dimensions
Below are the drawings and dimensions, as well as the materials required for the manufacture of an adapter for a walk-behind tractor of complex design.
What you will need to make the adapter
— Metal sheets for footrests
- Square metal. Profile
Below is a kinetic diagram that will help ensure the balance of the structure and avoid additional load. The drawing below shows the diagram of a mini tractor made from a Neva walk-behind tractor.
The engine of the power unit (2), driving the front wheels (1), transmits torque through the chain (3) to the reverse gearbox (4), and from it, through the cardan transmission (5) to the rear axle (6), driving rotation of the rear drive wheels (7).
— When making the frame, you must not forget about the arrangement of the bushing and fork to ensure free rotation of the trailer.
— The body of the adapter to the walk-behind tractor is made of steel sheet, and the sides of the body must be at least 30–35 cm high.
— The seat is installed on a beam welded to the main frame using bolts. The distance from the beginning of the frame to the seat should be 80-90 cm.
— Checking the robotic capability of the entire mechanism.
Additional simple adapter drawings
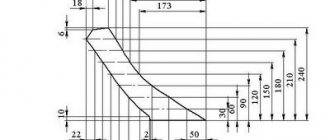
Below is a drawing of one of the simplest adapters in terms of design.
The following are welded to a frame made of square profiled pipe measuring 50*50 mm and thickness 2 mm:
— Footrest in the form of a perpendicularly installed pipe;
— A stand with a seat installed on it;
— Square pipe of the same cross-section for installing wheels;
Drawings of key adapter components
Hitch mechanism
. It looks like a welded structure inserted into the main frame and secured with bolts. It consists of two sections of a square pipe welded onto each other and a section of a regular “water” pipe with a caliber of 1-1.5 inches.
A rod with a welded homemade tee is inserted into the pipe, not fully inserted, clamped with a bolt. The rod is lubricated with grease and ensures that the tee rotates along the axis to ensure a rolling effect when moving on uneven ground.
Wheel mount
. The design consists of two pipe sections welded perpendicularly. The horizontal section is inserted into the mounting pipe and fastened with a bolt. An axle with a wheel is mounted on the vertical part (on bearings).
Other adapter components are not so important, and we will not consider them.
Adapter for walk-behind tractor Neva
Drawings and dimensions for different walk-behind tractors may vary depending on the design. So for popular models of walk-behind tractors Neva, MTZ, OKA, homemade adapters can differ significantly.
By making a homemade adapter for a walk-behind tractor and using various types of attachments with it, you can not only make your work easier, but also significantly increase productivity.
Creating a trunk for the adapter
What is primer-paint?
You will need a trunk for harvesting and transporting crops. Due to the fact that after installing the trunk the center of gravity of the walk-behind tractor is transferred, this element will also become indispensable when driving on hilly terrain. The manufacture of the trunk is carried out in the following sequence:
- First, assemble the frame - to do this, take several water pipes. One of them should be central and have a diameter of 1 inch. All other pipes should have a diameter of ½ or ¼ inch;
- Place the support pipe on the central pipe and weld it to the trunk;
- Secure the support pipes to the block rod and gearbox.
You can select the height of the supports based on the position of the trunk. At the same time, remember that it should not lie on the walk-behind tractor, but hang above it. The trunk is mounted using supports above those elements of the walk-behind tractor that do not require free access. Under no circumstances mount the part above the instrument panels, as well as the fuel and oil tanks.
Maintenance and storage
As a rule, you need to check the oil level every time you turn it on, and replace it at least once every six months. The air filters are checked before turning on the unit. Clean it when it gets dirty or once every three months. The sump tank is cleaned every six months. If it is necessary to replace consumables, they try to buy original parts or those with similar quality characteristics.
They will help extend the life of agricultural equipment and will not cause engine failure. As for cleaning the air filter, this is necessary to maintain the working condition of the carburetor.
Do not use a solvent with a low flash point for this, as this is flammable and can lead not only to a fire, but also to an explosion. You cannot use equipment without an air filter, because this causes accelerated engine wear.
Repairs are carried out in a well-ventilated area with the engine turned off. In this case, it is necessary to ensure a sufficient level of ventilation in the work area. Exhaust gases are hazardous to human health and inhalation can be fatal. Motor vehicles should be stored in a dry, ventilated area .
Operation and Maintenance
We choose which pillow filler is best. What is bamboo fiber, what is it made from?
The lifting mechanism of the adapter attachment is nothing more than a lifting lever, which greatly simplifies the work with additional attachments. Typically, the lifting mechanism on steering models is located behind the adapter. Attachments necessary for a particular job are attached to it. For example, this could be a plow for plowing or preparing the soil for hilling. The mechanism itself is structurally simple and can be driven by manually turning the lever.
By fixing the two-wheel adapter to the walk-behind tractor, you can take a comfortable position and work while sitting. This will contribute to greater stability of the walk-behind tractor. Options with a hand cart are relevant for large farms. They can also be used not only for harvesting, but also for transporting construction waste and various cargoes. Using an adapter, you don’t have to worry about your feet getting under the cutter.
To extend the service life of the walk-behind tractor and adapter, you must not forget about the first start, for which you should first fill in oil and gasoline, and then run it in. It should also be taken into account that during operation, overheating of the engine of the main unit is unacceptable and timely lubrication of parts is necessary. Depending on the type of model, some of them will have to cover the operator's seat due to the material it is made of. For example, if the base of the seat is plywood, it may become deformed in the rain.
Considering that the adapter can be made independently, using available means (for example, wheels from a wheelbarrow or other spare parts), it is important to observe all the details of the drawing and the correct assembly of the attachment lifting mechanism. As for the wheels, it’s worth keeping in mind: metal options are better for working in the fields, rubber ones with treads are suitable for working on dirt roads
At the same time, their radius is of great importance in operation, because excessively large or, conversely, too small wheels will lead to frequent overturning of the unit.
At the same time, for models with a rear engine, the track width should be larger, since otherwise the walk-behind tractor will not be able to balance correctly during operation. The bridge for the wheels in this case should be wider. While working with a walk-behind tractor, you can use landmarks or cultivate the ground in a circular pattern. This depends on the size and shape of the area, as well as the adapter model. For example, plowing or loosening the soil is easier to do in rows with a turn at the end of each of them.
During operation, the user can ensure that the tillage is uniform and that the attachment does not go deeper into the ground than it should. The adjustment must be made before work. It is necessary to inspect the adapter and walk-behind tractor in a timely manner. This will ensure uninterrupted and safe operation of the walk-behind tractor during its entire service life.
It is necessary to promptly change the oils in the walk-behind tractor units, perform preventative maintenance on electric motor systems, and adjust control and lifting mechanisms
It is also important to keep the unit and adapter clean. This means that they must be cleaned of dirt and soil, after which the walk-behind tractor must be installed in a horizontal position, using a third wheel (if available) or a stand that can ensure a stable position of the unit
We must not forget about sharpening tools, since soil cultivation and the quality of its loosening directly depend on this. If your area is small, it is advisable to walk through it in advance and remove large stones that could dull the attachment.
The walk-behind tractor with the adapter must be properly stored. The room must be dry and well ventilated. In this case, it is advisable to place the equipment in conditions in which it will be free from contact with alkalis and acids. The car must not only be cleaned of dirt, but also the fuel must be drained from the tank and carburetor. It is also necessary to drain the oil from the engine crankcase. If the walk-behind tractor will remain idle for more than three months, you need to install it on stands, unloading the tires.
It is recommended to periodically inspect your tires for damage and defects. You cannot use a walk-behind tractor with low tire pressure, as this will shorten the service life of the wheels. High pressure will also accelerate their wear.
It is important to check the air filters of the walk-behind tractor, spark plugs and, if necessary, replace the muffler. In addition, you need to inspect the strength of the adapter connections, because the operator’s safety depends on this
To learn how to make an adapter for a walk-behind tractor with your own hands, see the following video.
Varieties
Adapters with steering can be classified according to the type of wheel arrangement. The steering gear is performed in the format of a separate unit. The steering wheels can be located at the front or rear.
As for the position of the steering gear, this depends on the design features and spare parts, because during operation it is impossible to avoid repairs and replacement of worn parts.
Models in which the adapter is located at the front are called front-steering varieties. In such modifications, the engine is a kind of tractor for the entire unit.
If the adapter is located at the rear, and the walk-behind tractor has to pull it behind it, such a device is called rear-wheel drive. In other words, if the adapter is located in front of the walk-behind tractor, it is a front-type product, and if at the back, it is a rear-type product.
The choice of one or another option is made by the buyer himself, based on his own preferences.
For example, the front version is more suitable for loosening and plowing the cultivated soil. Here, in addition to the power of motor vehicles, there is no need for an overview of the site. If you need to hill up the crop being grown, then the rear analogue is better suited for such purposes.
However, you can take a closer look at the option where the adapter is located closer to the drive axis. In this case, the operator’s weight will create additional load, preventing the walk-behind tractor from jumping out of the ground while the equipment is operating.
Based on the variety, adapters can be classified into body and bodyless. The former involve the transportation of goods, the latter are more suitable for cultivating the soil. Depending on the power of the unit, the adapters are connected to the walk-behind tractor using a long or short drawbar. The first modifications are used on heavy equipment, the second are used on light equipment.
Technical characteristics of the adapter without coupling
What are marching stairs
If you need an adapter for the Neva walk-behind tractor, you can purchase one that does not have a hitch. In this case, the cost will be 8,600 rubles. By adding this element to your equipment, you will be able to mow grass, cultivate soil, transport cargo and remove snow. Additionally, you can use attachments that are attached to the pin of the walk-behind tractor, including a snow blower, broom, shovel and mower. Additional equipment can be connected to a lowering hitch; it must be purchased separately; in this case, we are talking about a hiller, a plow or a potato digger.
If you have a Neva walk-behind tractor, the adapter with a steering wheel, which is described in the article, will fit perfectly. The kit includes a rear tow bar, which is typically used to attach a coaster brake or cart. The adapter has pneumatic tires and a seat spring, the latter of which provides the ability to comfortably move on uneven surfaces. The footrests are adjustable and the weight of the device is 22 kg. The track is 520 mm, and the operating speed is 12 km/h. This equipment is manufactured in Russia, and is guaranteed for a year.
Purpose of the adapter
The adapter for a walk-behind tractor in its classic form is a trailer with a seat on two wheels, attached to the walk-behind tractor, and to which attachments are mounted. It is the adapter that allows you to install additional equipment as easily as possible. The adapter turns the walk-behind tractor into a mini tractor and thereby makes it not only universal, but also as comfortable as possible.
The adapter allows you to sit while working, thereby making work easier. In addition, the adapter gives the walk-behind tractor greater stability, which also simplifies and facilitates work. It is also convenient that the immediately adjusted attachments will not go too deep or, on the contrary, rise too high. The attachments on the adapter are adjusted using a manual device. You can safely use the adapter even with light walk-behind tractors such as Neva and Cascade.
Maximum comfort can be achieved by using a steering adapter or a front adapter for a walk-behind tractor. In this case, the steering wheel allows you not to use the handles of a walk-behind tractor for control, which, of course, is much more convenient. Thanks to this device, you can get an ideal mini tractor - multifunctional, easy to operate and with an operating speed of about five kilometers per hour.
The dimensions of such an adapter for a walk-behind tractor are usually about two meters long, eighty centimeters wide and one and a half meters high. The adapter with the steering wheel is not small in size, since it is practically the front part of the mini tractor. This adapter is also suitable for the Neva walk-behind tractor - the lightest on the market today.
Considering all of the above, the adapter can be called necessary for a walk-behind tractor.
How to make it yourself
Of course, purchasing a ready-to-use adapter for a walk-behind tractor is the best and easiest way out of the situation. With all that, they really cost quite a lot, so not every farmer or just a summer resident is ready to afford to purchase them. It’s no wonder why many people wonder how to make an adapter with their own hands.
This is, of course, possible, and you can find quite a lot of recommendations on the Internet that relate to making adapters yourself. Moreover, there are many drawings that make it possible to examine this device more clearly and in detail.
Using them, it is quite possible to create such a unit at home, using a minimum of tools and materials. To produce a homemade adapter you will need:
- welding machine;
- pair of wheels;
- steel angles and sheets;
- driver's seat;
- fastening connections; iron pipes.
All work will consist of several steps:
- We take a square metal profile, approximately 1800 mm long. We weld the same piece of iron across it, only smaller in size - approximately 600 mm. Wheel stands will later be attached to this profile sheet, the height of which should be about 300 mm.
- After this you need to attach the braces. They are attached to the central frame and to the wheels. The angle of the wheel hubs relative to the frame is allowed to be whatever you want. A beam is additionally welded to the metal profile. This is necessary to strengthen the frame.
- The frame for additional equipment is welded from channel No. 10.
- It is combined with the wheel axle using a piece of square pipe, and the seams are welded with a welding machine.
- Now we weld a control lever with three bends (200, 350, 550 and millimeters) to the frame.
- We attach another one to the lever (size 800 mm), it will regulate the force.
- The levers are connected to each other with ordinary bolts.
The first stage has been completed. Let's move on to the next one.
Working with the adapter design
Now it starts working with the adapter. To do this, perform the following steps:
- A piece of 300 mm pipe needs to be welded to the central frame - this will be a stand under the driver's seat.
- On top, perpendicular to this stand, we weld 2 pieces of pipe in the same way. This is required so that the seat does not come off during operation and is more stable during shaking during operation. The seat can be ready-made, or you can make it yourself from a piece of plywood and foam rubber, this is at the discretion of the master.
- We attach the seat to transverse pieces of pipe, which we weld to the stand itself, as well as to the stand under the seat. We use ordinary bolts as fastening elements.
- We weld the coupling mechanism to the walk-behind tractor at the front, after which the work can be considered complete.
Adapter with steering
If you have the skills, then, if desired, the design can be somewhat complicated by making a homemade adapter for the walk-behind tractor, to which you can also attach a steering control.
To implement this idea, you will need to prepare the following materials and tools:
- welding machine;
- seat;
- 2 wheels; steel pipes and angles;
- iron sheets.
With this design, the adapter frame must be firmly connected to the walk-behind tractor, otherwise the device will, as they say, “drive to the sides.” For the design, you can take any ready-made steering wheel, even from old “Soviet” cars (from the same VAZ, for example).
Adapters for any walk-behind tractor, including the Neva, make it possible to significantly increase operator comfort when operating a mini-tractor. In fact, the driver will no longer have to constantly drag the device. Now he can simply sit in a comfortable seat and do all the same things, only in comfort and in greater warmth.
The design of such units is quite simple, and their independent production at home is quite possible. Here it is necessary to take into account that home assembly implies the presence of at least basic skills in welding, as well as related tools. You will also need to stock up on a large number of angles and metal pipes so as not to stop working due to a lack of material. In general, it is advisable to assemble the adapter yourself, especially considering that this significantly saves money.
Improvement of the chassis
The first thing users of a walk-behind tractor think about is how to make a cart with a seat for it. Using equipment in normal mode using levers requires the application of great physical effort. However, the use of a trailer reduces the stability of the vehicle. This problem can be eliminated by extending the wheelbase.
This is done using extensions that are attached to the axle shaft with pins or bolts. Having solved the stability problem, the operator is faced with another issue: the unit is poorly controlled. The differential for the walk-behind tractor helps to give it good maneuverability. This device is made by analogy with components of passenger cars. Homemade unlockers for walk-behind tractors are made using ordinary household tools - an angle grinder, welding and a sharpening machine.
The low weight of the walk-behind tractor causes poor traction between the wheels and the ground. Slipping is a common occurrence when lifting virgin soil, working on wet ground or driving in snow. To avoid slipping, weights are attached to walk-behind tractors.
These devices are divided into the following categories:
- Wheeled. They are discs that are mounted on wheels or hubs. Disks are made monolithic from metal, concrete or hollow, filled with sand. The weight of wheel weights can be 30-70 kg.
- External. Made from any heavy material (steel, lead, concrete). Attached to the body using hooks or bolts. Some craftsmen weld a frame from a corner to the body. Sandbags, bricks, scrap metal and other heavy objects are placed in it.
It is important Which KUN to install on MTZ
You can improve the transmission by installing a homemade variator on the engine. The system of belts and discs will allow you to smoothly change the speed of the unit, without jerking or vibration.
Minitractor from the Neva walk-behind tractor
Converting a walk-behind tractor into a small tractor may be slightly different. It all depends on the design features of the walk-behind tractor and its capabilities. Let's consider the principle of manufacturing a mini-tractor from Neva brand walk-behind tractors.
As in the first case, before making a mini tractor, you need to study the diagrams. They detail the dimensions of the elements and the order of their installation during assembly.
The procedure for reworking will be as follows:
- The manufacture of the frame is carried out in the same way as in the first case. To create it, use pipes of different sections. Fastening of frame elements is carried out by bolts and welding;
- Next, proceed to the manufacture and installation of the chassis. To install the rear wheels, use an additional axle, which can be made from a steel pipe. Press bearings and bushings that will be equipped with the rear wheels into both ends of the latter;
- Next, the tractor from the Neva walk-behind tractor needs to be equipped with a motor. Moreover, the engine can be installed both in the front and in the rear of the frame. In the second case, the front and rear wheelbase of the mini tractor will need to be expanded;
Advantages and disadvantages
After the walk-behind tractor has undergone modernization, the designers note the positive qualities of the front adapter:
- ease of operation;
- disclosure of traction resource - existing abilities increase;
- the possibilities of work are expanded - soil cultivation will speed up;
- if necessary, the unit is disassembled and assembled;
- good balance in weight and axles;
- You can move around on the device.
The disadvantages include the fact that in the presence of a movable coupling, stability deteriorates.
The adapter for the walk-behind tractor consists of the following structural elements:
- The frame is built central or staircase. Suitable materials are metal pipes and corners. The design model must include a fork and bushing that will ensure free rotation of the trailer. There are converted vehicles in which the aggregate device and the trailer are combined. In this option, you should make a new stand for the transmission and engine.
- Suspension systems can be axial, bridge, rotary, portal. It is constructed without the use of elastic fragments.
- A steel sheet is used for the body.
- The hitch is an important element of the converter; it makes the walk-behind tractor stable and securely connected. The coupling unit is made of a 15 cm pin.
- The seat is the driver's workplace.
- The steering is used with a rigid connection. You can build it with your own hands or purchase it in a special store. Craftsmen install steering rods and racks from a VAZ or Volga car.
How to make a mini tractor from an MTZ walk-behind tractor
To remake walk-behind tractors of this brand, you should also take into account their design and capabilities.
MTZ units have sufficiently high power, which makes it possible to make a full-fledged mini-track tractor out of them. It will be distinguished by high cross-country ability and excellent traction with the soil, due to which the quality of soil plowing for such a machine will be many times higher than that of wheeled mini-tractors. Before you begin, be sure to study the drawings, in which you will find all the information required for the alteration.
The procedure for assembling a mini tractor is as follows:
- First, switch the walk-behind tractor to operating mode with a mower;
- After this, completely dismantle the front platform of the unit;
- Install a caterpillar drive in the front part of the mini-tractor being manufactured;
- In the niche intended for mounting the steering rod, install the adjusting rod. This element will increase the rigidity of the entire structure;
- Weld the driver's seat to the top of the frame;
- Next to the engine, arrange a platform for mounting the battery and hydraulic distributor.
How to install?
Let's look at the principle of installing an adapter with a steering wheel using the example of a model for a KTZ walk-behind tractor with a steering column. Connecting the adapter to the walk-behind tractor begins with installing the trailer on the pin of the walk-behind tractor, which is located in its front part. The knot is secured with a cotter pin.
After this, you need to move the gas to its place under the seat, carrying it with the original cable. To do this, use a 10mm wrench and a screwdriver, remove the throttle control lever, remove the top plug under the seat, and lay the cable. If necessary, change the bolt, since depending on the adapter model, it may be larger than necessary.
Next, tighten the bolts with a 10mm wrench. When moving the gas, make sure that the cable does not interfere anywhere. Remove the steering wheel from the walk-behind tractor and unhook the clutch and gearbox release cables.
Next, remove the steering wheel using a stand for ease of use. Having removed the steering wheel, remove the support and begin installing the pedals. At this stage of work, use a cable with an adapter plate, which is included with the adapter.
The plate is installed on the wing of the walk-behind tractor and secured with a bolt and nut. The lever screwed to the cable is placed in place of the roller bracket. After this, install the second cable, secure it and attach it to the installed bracket, fix it until the moment allows the cable to move.
Now you need to set the forward gear to the right pedal. There is no need to remove it for this. At the same time, adjust the components, checking the forward tension . After this, reverse is installed.
Scheme, drawing, dimensions
Before you start developing a diagram or drawing of a device, you should understand that there are two types of adapters: simple and complex.
- The universal adapter is capable of transporting loads and cultivating soil. It turns out that with the help of such a device you can easily transport home the harvest that was collected at the dacha. Such devices are in constant demand. They can be equipped with additional functions such as increasing furrow width or automatically lifting equipment.
- Simple ones are designed exclusively for tillage. Their design is much simpler, and therefore the work list is based on just one item.
In addition, adapters can be:
- bodywork, which can transport loads weighing up to 500 kg at a time, depending on engine power;
- bodyless, which are simply designed for the most convenient, quick and easy cultivation of the soil on the site or in the garden. They are most suitable for light walk-behind tractors.
In addition, walk-behind tractors of different power will require adapters of different types: if the machine is not powerful and is designed only for cultivating a personal plot, a device with a short drawbar is used. If the device has more power, then it is better to make a long drawbar.
When selecting a drawing, it is important to take into account the basic idea of the device.
Thus, the motor of the power unit, which rotates the front wheels, transmits torque via a chain to the gearbox. But with the help of a cardan transmission - to the rear axle, which makes the rear wheels spin too.
When making the frame, be especially careful about the design of the bushing and fork, which will be responsible for ensuring that the trailer turns easily and without obstacles. Next, a little about the body of the adapter: it is made of a single sheet of metal, and the sides must have a height of at least 35 centimeters.
Next you need to work on the seat on which the worker will sit. It must be mounted to the main frame using large and strong bolts. The approximate distance from the beginning of the frame to the seat is 90 cm or slightly less.
Design and principle of operation
Essentially, the adapter is presented in the form of a trolley that is attached to the walk-behind tractor. After which the structure turns into a mini-tractor. The main details of such a unit:
- a frame to which other constituent elements are attached;
- driver's seat with lift lever;
- 2 wheels;
- clutch device;
- wheel axle.
In this video we will analyze the front adapter:
Frame
It is one of the most important elements of the device, since other elements are connected to it. Therefore, it must be made of high-quality and durable materials.
Driver's seat
One of the main advantages of the adapter is a comfortable seat for the operator.
Wheels
There are 2 types of wheels available - metal and rubber. The former are used for heavy types of work in the field. The latter are designed for driving on dirt roads.
Clutch device
The hitch is responsible for connecting the attachments and the mechanical unit itself. This fastening is defined as one of the most important, therefore it is made of high-strength metals - steel or cast iron.
The length of such a device is about 2 meters, width – 80 centimeters.
Depending on the clutch, the following design options can be considered:
- with movable clutch. This device is the lightest. The clutch here is located in the front, but control in this case is more difficult, since it is necessary to deploy the entire power unit;
- with steering. The clutch here is rigid, and control is achieved through a mechanical steering unit. This control is easier to use, but more difficult to produce.
There are different adapters for walk-behind tractors of different performance. For mechanisms with low power - with a short mount, for powerful ones - with a long one.
Making a swivel bracket and rear view mirror
To make this adapter part, proceed in this order:
- Weld or bend a pipe blank with a diameter of 5–6 cm. Weld 2 steel bushings to its upper part - they are necessary to ensure the effect of rocking the adapter frame in the longitudinal and transverse axis;
- Put on the bracket and fix one side of it on the shank attached to the frame, and the other side directly on the walk-behind tractor.
In order to quickly install and remove the bracket, weld a handle to it. You will need a rear view mirror when transporting a cart with a load. Install the part on the handle of the walk-behind tractor or secure it in the rear of the trunk.
To save time on making the part, you can take a ready-made mirror from a car or moped.
Adapter for the Neva walk-behind tractor: drawings of a homemade device
Cultivating large areas of agricultural land is labor-intensive. It presupposes the need to use small-scale mechanization tools accessible to small farmers. For example, walk-behind tractors and other equipment are used. This allows you to significantly simplify the process of cultivating land and processing it. To make it more comfortable to use such technical means, it is recommended to purchase or independently build a front adapter for a walk-behind tractor. It makes the unit easier to use.
Design Features
The design of this device is very simple. At its core, the adapter is a trolley that is attached to a walk-behind tractor. It consists of a frame on which the driver's seat or body is mounted. The frame is mounted on a two-wheel chassis. Another indispensable element of this equipment is the drawbar, with which the trolley is attached to the main unit. It pulls the trailer, and this force is transmitted to the wheels of the adapter. You can attach many different devices to this device: a milling cutter, a flat cutter, a harrow, a potato digger and much more.
This ensures the reliability of the device
When making homemade equipment of this kind, it is necessary to pay great attention to the strength of the coupling between the adapter and the walk-behind tractor, since this is the weakest point of the entire unit. The hitch must be made of steel or cast iron
As a rule, it is performed by welding, and special attention should be paid to the welds.
Modern models of this technology also include a control panel conveniently located near the driver’s seat. From this panel you can control the vertical movement of various equipment that is attached to the adapter. You can also change the angular movement of attached devices.
For this purpose, the device is equipped with a system of levers or hydraulic units.
In addition to the equipment set that is sold with the adapter, various additional devices can be used to make gardening work easier. Some of them are purchased in the store, others can be made independently if you have the appropriate tools, materials and skills.
Buying a new adapter for a walk-behind tractor is not difficult. There are many different types of this equipment on sale. The more functions this equipment performs and the more convenient it is to use, the higher its price. Even the cheapest adapters have a considerable cost, so many owners of walk-behind tractors decide to make this trailer with their own hands.
In this case, it is necessary to perform a preliminary calculation of the strength and mechanical characteristics of the device.
Types of adapters for walk-behind tractors and their features
If you have already chosen a walk-behind tractor for your needs, then an adapter is the next purchase or modification you can do yourself. The type of walk-behind tractor adapter is determined by its design features, for example:
Adapter with lifting lever. The lever simplifies the control of the walk-behind tractor and allows you to accelerate it up to 10 km/hour. Adapter with body. Designed for transporting any cargo, from construction materials and garbage to harvested crops. Adapter with a short drawbar. Designed for light (power up to 5 l/s) walk-behind tractor. Adapter with long drawbar. Designed for heavy (power up to 10 l/s) walk-behind tractor.
Knowing about these nuances, you can choose the appropriate model and make the right adapter for the walk-behind tractor.
Kinds
Today there are several modifications of adapters. At the same time, they can be classified according to the type of clutch and location. In terms of coupling, the devices are either steering or with a movable joint. By location - rear and front.
Depending on the purpose of use, they can have an elongated or shortened drawbar. The first options are used for powerful walk-behind tractors, the second ones are purchased for units with less power and less weight.
Products can also be classified according to the presence (absence) of a body. Options without a body are inferior to their counterparts with a body, which have the ability to transport various cargo. Walk-behind tractors with a body are especially convenient during harvesting.
With steering
Products of this type are characterized by a rather rigid connection with the walk-behind tractor. The implementation of control in this case is carried out at the expense of a separate node. The adapter itself is in fairly close contact with the walk-behind tractor. The steering wheels in this type of device can be located at the front or rear.
With movable joint
Structures of this type are characterized by a change in angle in relation to the vertical axis, which is located between the connecting elements. Such models are good because they provide tilt angle adjustment, but they are more difficult to operate due to maneuvers with an increasing turning radius. It takes more energy here.
Front
The coupling of such devices to the walk-behind tractor is carried out from the rear. The adapter itself is located in front of the equipment. Due to the steering and greater design complexity, such a device is more expensive compared to rear-type analogues.
Rear
The clutch of such an adapter is performed from the front, which is why the attached device is located at the back of the walk-behind tractor. Such products have proven themselves well when hilling beds, since they allow you to control the work process. When working with them, it is easier to see the area being treated.
Device
Regardless of the type, structures always consist of the same parts. The difference lies in their layout and size. You need to have a good understanding of each element so that when creating a drawing or assembly, you can understand the details and do everything reliably and correctly. Any errors lead either to a decrease in reliability or to the need to remake the unit.
- The frame bears the entire load, the rest of the parts are placed on it, so strength is important here. It can be rigid or with a movable joint in the middle. The second option is more difficult, but you can turn around in a smaller space, and controllability improves. A separate type is a complete frame, where the engine and control unit are mounted on the frame; in this case, you will have to make mounts for the motor and transmission.
- Wheel assembly. There is no suspension, so it consists of bearings that are placed on a common axle or separate levers mounted on the frame. Often the design is made adjustable, then you can quickly change the track width for different types of work. Wheels can come from any type of equipment, the main thing is to choose the appropriate size.
- Steering gear. For options with a front location, it may be different, but the easiest way is to buy a ready-made rail and fix it in place. The second solution is a gear drive in a flexible joint, when two modules bend relative to each other when cornering.
- Seat. Use any option that is at hand, and if you don’t have it, buy it at a dismantling station for little money. Select it to suit you, attach it to a sled so that you can adjust the position for people of different heights.
- Foot pedestal. The pedal assembly, if present, is also located here; the hand brake, which is used in the rear adapters, is also attached to this part. Make it from a durable sheet of steel with perforations; your feet will not slip on the surface.
- The coupling connects the two parts of the structure. The easiest way is to buy a finished product; it is sold separately in the same place as the equipment. It is desirable that the coupling device be movable in a vertical plane, then when driving on uneven ground, the wheels firmly cling to the ground and do not lift up on bumps.
In addition to the main parts, there may be additional parts in the design, it all depends on the drawing. It is often supplemented with a tool box; it is most convenient to mount it behind the seat or under it, if there is space there. The brake and steering systems are developed separately.
Adapter for motor blocks
Most often, the adapter has two hitches - one is used to attach additional attachments, and the second makes it possible to attach it to the walk-behind tractor. For example, you can connect the following additional elements to the adapter:
- seeder;
- plow;
- hillers;
- harrow and other equipment.
https://youtube.com/watch?v=6QhaZFG4wzg
The wheelset and axle in the adapter are quite durable structures that allow the walk-behind tractor to be used even on the most difficult areas of the earth, as well as for transporting quite heavy loads
It is important to understand that transporting goods on public roads using such a unit is prohibited, for this reason they are used only in rural areas. However, despite a certain structural similarity between all adapters, they are also endowed with some significant differences
For example, rear steering adapters, all-wheel drive adapters and front units are available for sale.
Arrangement of a multifunctional model
To manufacture a multifunctional device, you need to prepare:
- Steel pipes and angles;
- Sheet steel;
- Two wheels;
- Comfortable seating;
- Welding machine and set of tools.
This adapter is a multifunctional model. It can be used for basic agricultural work and transporting goods over uneven terrain over short distances. The structure can be equipped with agricultural implements such as a plow, harrow, hiller, and potato digger. During the winter months, you can attach a snow scraper to the adapter for clearing snow.
The main elements of the equipment are: frame and coupling devices, as well as wheelset and seats
The process of producing an adapter at home takes place in several stages.
Stage #1 – drawing up a kinematic diagram
To ensure the balance of the structure and prevent additional overloads at the design stage, it is necessary to draw up a kinematic diagram. You can make it yourself or use a ready-made version.
This circuit is designed for the manufacture of an adapter designed to work on the Neva walk-behind tractor.
Creating a wheel locking mechanism
To make an adapter brake system, you will need to purchase a ready-made mechanism. The order of installation of its elements is as follows:
- Dismantle the rod of the locking unit and extend the thread on its surface using a special die for this;
- Make a strong steel stop;
- Drill holes in the rod body with a diameter of 3 and 10 mm;
- Install and secure the heavy duty return spring.
After installing the locking mechanism, install the axle with wheels on the adapter. You can take them from old motorized equipment - a moped, motorcycle or garden cart. If the axle you are using is too long, it should be shortened using an electric hacksaw. The video will tell you more about making an adapter for a walk-behind tractor.
If you wish, you can equip a walk-behind tractor with an adapter with mounted rakes, a bulldozer blade or a spacious dump body. Thanks to the adapter, the operation of all these structures will become much more convenient and productive.
All of the recommendations listed are suitable for making adapters that can be used with Neva, Salyut, Agro and MTZ walk-behind tractors. The towbars on units of these brands practically do not differ from each other in design, due to which the principle of connecting the adapter hitch and the towbar of each walk-behind tractor will be almost the same.
What to look for when choosing a trailer/adapter for a walk-behind tractor
When planning to purchase a trolley for a walk-behind tractor, consider:
- trailer category. Only a walk-behind trailer is suitable for a walk-behind tractor. A car is absolutely not suitable because it is not equipped with a brake system and an operator’s chair. Even if such a design can drive on a flat surface, and even then not without errors, it simply will not hold up on a slope. This is especially true for low-power walk-behind tractors;
- material. Galvanized and steel models are the most practical and durable, but they are also more expensive. Plastic ones are cheaper, but they will not last long and are only suitable for light loads;
- load capacity - this is indicated by the number in the model name.
Wheels are also of great importance - especially if the garden is located in a lowland, where the soil is viscous and has a high level of humidity. Most often, models with 4x10-inch wheels are purchased.
Assembly, step by step instructions
The procedure consists of a serial connection:
- frames;
- steering wheel and control pedals;
- trunk;
- swivel bracket;
- braking system.
At the last stage, the axle with wheels is installed. Spare parts from an old moped or motorcycle may be suitable for this. Elements that are too long are shortened with an electric hacksaw.
Sources:
https://www.meduzhastiki.ru/ogorod/perednij-adapter-na-motoblok-svoimi-rukami-kak/
General information about the tractor
The walk-behind tractor can be used separately, as well as connected to a wide variety of additional equipment, such as:
- cultivator;
- harrow;
- mower.
Such devices can significantly increase the possible range of work that a walk-behind tractor can handle. In addition to this, you can use a mini-tractor as a means of transportation if you prepare a special block adapter for it in advance.
This device makes it possible to sit quite comfortably on the seat with which it is equipped, and then perform exactly the same work, but with an incomparably greater degree of comfort. For example, in specialized stores you can purchase an additional unit with steering control for the Neva walk-behind tractor, or you can make it yourself. Fortunately, there are plenty of drawing materials on the Internet, which greatly simplifies the assembly process.
Homemade adapter for walk-behind tractor with steering control
Before you start constructing a homemade front adapter for a walk-behind tractor, read the drawings. Using them you can make all the necessary elements. If you have sufficient knowledge of the operating mechanism, you can draw them yourself or use the Internet by asking the search query “drawings on how to make an adapter for a walk-behind tractor.” First of all, prepare all the necessary components:
- metal,
- fastening materials,
- wheels,
- grinder,
- unit for welding work,
- drill,
- spanners,
- bearings,
- consumables (electrodes, various drills, grinder discs),
- lubricating mixtures.
Please ensure your measurements are correct before starting assembly. For a device with steering, you will definitely need a frame with a fork and bushing. Due to this design, it will be possible to control the walk-behind tractor.
- The first step is to make a frame. Cut the pipes and bolt them together, you can weld them.
- Next, make the chassis. In the case of a front-mounted engine, the width of the chassis must be provided by the base wheels.
- With a rear engine, the width of the undercarriage should be wider. This way the tractor will not fall over and will be stable. Remove the wheels included in the walk-behind tractor kit and weld a slightly wider bridge for them.
- Make a steering wheel. You can use a car one or take a walk-behind handle. Using it, controlling a homemade device will be similar to controlling a motorcycle.
- Using a frame made of a single piece of metal, it is advisable to place the steering on the front axle.
- Weld the pre-prepared seat to the frame.
- If you plan to use additional attachments during operation, be sure to weld the bracket.
- Attach the hitch part under the steering column. You can buy it in a store or make it yourself.
Using the drawings of the front adapter for a walk-behind tractor with the necessary instructions, you can easily make a mini-tractor yourself.
Rear
If you decide on an adapter for a rear-wheel drive Neva walk-behind tractor, you need to make it in front of the entire device.
This arrangement is very convenient for performing various types of work in the garden, when you cannot do without attachments from the back or front.
Full
This device also comes with all-wheel drive.
In this case, the unit can be located in front or behind. However, a significant difference in characteristics from the above-mentioned varieties is that four wheels are simultaneously involved in the work. This design is more reminiscent of a miniature tractor.
Important! This adapter drive is the most powerful, although not popular.
The most powerful adapter - complete
Self-production
You can now buy a ready-made adapter in stores, but they are usually quite expensive. And if this device is taken for an inexpensive walk-behind tractor, then this is not always justified, since a simple adapter can be made quite easily yourself. This requires basic skills in working with machinery and metal. It is somewhat more difficult to independently make such a device with a steering wheel for a walk-behind tractor, as well as a homemade breaking adapter.
Design features. When you start making a mini-tractor with your own hands, you will feel like a real designer. Before you start implementing your project, you need to decide what type of work it will be used for, because depending on this, the design of the unit is developed. So, if you need a mechanism for agricultural work, then the best option would be a solid frame, and if you use the machine not only for work, but also for off-road travel, then a broken frame would be the best choice. This design will provide better maneuverability and maneuverability in difficult places. Another type of such equipment is equipped with a removable trailer.
After you decide on the choice of design, you need to find information on how to make an adapter for a walk-behind tractor with your own hands. Drawings, videos, descriptions can be searched on the Internet
It is important to check the finished drawing to ensure it matches your size.
Now you can proceed to manufacturing the device. The work can be divided into stages.
- Initially, we make a frame from cut pieces of metal. Structural elements can be fastened by welding or bolts.
- Next, the chassis is made. Depending on the location of the engine, the track width is determined. An axle is made from a piece of pipe, onto the ends of which bushings with bearings are pressed. We put wheels on them.
- Install the steering column. If the frame is all-metal, then the steering will be transmitted to the front axle. You can also do a so-called break, then the steering column will turn the entire front half-frame.
- We install the seat, then install mechanisms for working with attachments.
- According to the drawing, we make a hitch from a metal channel. This unit is one of the most important structural elements, so it must be made of high-strength and high-quality engineering steel.
https://youtube.com/watch?v=wyMYslaXoko
Thus, a front adapter is made for the walk-behind tractor. After assembly, lubrication, testing, you can work on the walk-behind tractor. The driver will be able to work comfortably on such a walk-behind tractor; there is no need to constantly go after the unit, but he can sit in a comfortable chair and manage all the work. You need to be patient, because the result will be not only significant cost savings, but also pleasure from the result you achieved with your own hands.
Types of structures
All options are divided into three large groups, each of them has its own differences. You should choose based on the characteristics of the work being performed and the design of the walk-behind tractor; only one of the options is suitable for some models. If you wish, you can collect different projects. It all depends on desire and skills.
- Rear adapter. The simplest solution is that it is connected to the walk-behind tractor via a hitch; equipment is usually placed on it. Another module is added at the back to hang and attach equipment already there. To control using a standard handle, during sharp turns it is not very convenient, you will have to bend over a lot. This variety is the easiest to collect.
- Front option. The frame is placed so that the engine is located at the rear, and attachments are installed on a standard hitch. This solution is much more difficult to assemble, since you will have to think through and manufacture the steering on the front axle or make a flexible joint between the two parts. But it is more convenient to drive; there is a regular steering wheel, but all the controls will have to be moved.
- All-wheel drive design. It differs in that torque is transmitted to two axles at once, and this increases cross-country ability and power, and you can perform heavy work. The rotation of the second axis is provided by a power take-off shaft, to which a small cardan is attached; the frame is much more massive and rigid. This option is the most difficult to make.
Homemade options are no worse than ready-made ones if they are made correctly and adjusted to the design of the walk-behind tractor. You should select one taking into account your own capabilities and skills, understand the features of each type, and decide which one you can assemble. Consult with someone who has an adapter, take into account all the shortcomings and try to eliminate them yourself.
Main varieties
With the help of a homemade adapter, you can greatly facilitate the work with the Neva mechanism, because it acts as a kind of transitional link between the unit and the working elements: a plow, attachments for planting potatoes, etc. Physical stress will have a different effect on the body, because while working you can sit and simply direct the process, and the work itself will go faster, because you will be able to increase the working speed almost 2 times - up to 12 km/h.
The adapter for the Neva walk-behind tractor can have a lifting rod, with the help of which movement around the territory is much easier, as well as a body, which, in addition to performing work in the field, also allows you to transport materials and products (see photo). Most often, such designs have steering control. Also, the adapter with steering wheel for the Neva walk-behind tractor can have a short or long drawbar. Units with short drawbars can only work with light mechanisms, while long drawbars are designed for heavier structures.
The homemade adapter is attached to the Neva walk-behind tractor using a single hitch consisting of two parts, one of which plays the role of an adapter between the device and the lifting mechanism, and the second attaches the equipment to the device. In order to be able to simultaneously use several additional tools, a double hitch can be used instead of a single one, as, for example, in the photo.
Simple design
How to make an adapter for a walk-behind tractor? The simplest version of the mechanism is made by hand as follows:
- a frame is made from a metal pipe more than one and a half meters long;
- at one of its ends, a half-meter long pipe is welded perpendicularly, which will act as a basis for attaching the wheel stands;
- the height of the racks is made equal to 30 centimeters;
- The braces are attached by welding;
- the dimensions of the adapter for the walk-behind tractor can be anything - everything will depend on your own preferences;
- in order to attach auxiliary equipment, a metal beam is welded to the frame;
- side metal pipes are fastened with bolts;
- an adjusting rod is welded to the frame, which should have three inputs 20, 30 and 50 centimeters long;
- a coupling assembly of the structure is created, which can also be purchased at a specialized store;
- if necessary, another adjustment rod 75 centimeters long is made;
- a metal seat support is made by welding;
- A soft or wooden seat is installed on the support.
The video shows how to properly make a simple walk-behind tractor adapter with your own hands. But it can only be created if you have certain skills, equipment and strictly adhere to the presented drawings.
Multifunction device
To make a multifunctional adapter with steering for the Neva walk-behind tractor you will need:
- steel sheets;
- steel corners and pipes;
- sitting;
- 2 wheels;
- welding machine;
- other tools that every owner must have.
Such a device can be used both for work in the field and for transporting materials and products even over long distances. The multifunctional design for the Neva walk-behind tractor can be equipped with a plow, a device for planting potatoes, a harrow and other devices. But in the cold season it can be useful for removing snow from the garden area.
So, in order to create a homemade steering adapter for the Neva walk-behind tractor, you need to:
Make a diagram
In order to avoid distortions of the structure, as well as to protect it from excessive loads, it is necessary to draw up a diagram. You can either create it yourself or use ready-made examples.
Make the main parts
The main parts of the structure, of course, include the frame to which everything else is attached (see drawings). In addition, it is necessary to think over a special mechanism that will ensure free turns of the trailer. The body of the device is usually made of steel sheets, and the height of the sides is about 40 centimeters. The coupling of additional elements and the adapter is carried out using a pin with a ring, which is put on the towbar. The only “disadvantage” of such a clutch is the rapid wear of the elements due to the constant turning of the mechanisms.
Install the seat
The seat is usually attached using bolts, after which the device is considered ready for use.
More detailed information on how to properly make an adapter for a Neva walk-behind tractor with your own hands can be obtained from the presented video, as well as by viewing the drawings.
Diagram and device of the adapter to the walk-behind tractor
The adapter for the walk-behind tractor is a trailer with a seat based on a two-wheel frame. Its purpose is to make it easier to work with a walk-behind tractor, which it transforms into a device for transporting goods, similar to a mini-tractor.
The adapter provides a significant reduction in the labor intensity of agricultural work and increases the operating efficiency of the walk-behind tractor many times over. It is worth noting that there are two types of heavy adapters: long and short. They can be connected to different walk-behind tractors. A lightweight adapter for a cutter, which is attached to one wheel of a walk-behind tractor, is also known, in contrast to a heavy adapter.
Adapters, being the main link in connecting the walk-behind tractor and attachments, are equipped with a seat, an extended or short bed (drawbar) and hitches. Structurally, the adapter contains two couplings. One of them ensures the connection of the adapter with the walk-behind tractor, and the task of the second is to aggregate attachments: harrows, plows, cultivators, diggers, mowers, etc. The attachments are usually connected to the adapter using a single hitch. The attachments are brought into the working position by means of a manual drive.
Today, many different types of adapters are produced, which, based on the main features of their design, can be classified into two main types: body (universal) adapters are suitable for both agricultural work and cargo transportation; bodyless - only for processing.
Adapters with long or short drawbars are connected to walk-behind tractors of various capacities. Adapters with short drawbars are used only on light walk-behind tractors, and adapters with long drawbars are used on heavy ones. As a rule, adapter models are equipped with devices for adjusting the track width, sliding drawbars, as well as drives for lowering and raising attachments.
Adapter for walk-behind tractor preparation and production of basic elements
Despite the simplicity of the design, making an adapter is a rather complicated procedure. To make a device, you first need to study the drawings. The more accurate diagrams you have at your disposal, the better the result of your work.
Manufacturing will require certain tools and materials.
Be sure to prepare:
- electric drill;
- hammer;
- file;
- welding machine;
- steel sheet, 5 mm thick;
- several square pipes, 1 inch in diameter;
- electric hacksaw;
- square;
- set of bolts and nuts.
Next we move on to manufacturing the main structural elements. You will need:
- Make a hitch - it is a welded mechanism, which will later be installed in the base of the adapter frame and attached to it with bolts. The coupling mechanism consists of two pieces of square pipe welded to each other and one piece of water pipe, each no more than 1 inch in diameter and 20 cm long. Insert a rod with a welded tee into the water pipe, which is not completely pressed by the bolt. Be sure to lubricate the rod with grease or grease - this will ensure free rotation of the tee along the horizontal axis when the walk-behind tractor with the adapter moves over bumpy terrain;
- Make a unit that secures the wheels - to do this, take 2 pieces of pipe, 1 inch in diameter and 10 cm long, and weld them perpendicular to each other. After this, insert the horizontal section into the mounting pipe and securely secure it with a bolt. The vertical section of the pipe will serve as a place for attaching the axle and bearing with the wheel.
Having prepared the equipment, materials and made the main elements of the adapter to the walk-behind tractor, you can proceed to assembling the equipment. Be sure to follow the instructions in the drawings, as the slightest mistake will lead to incorrect operation of the entire structure.
Universal device
To create a universal adapter, you will need:
- corners;
- pipes;
- sheet iron;
- 2 wheels;
- seat;
- welding unit.
Important TOP 2 budget chainsaw models Comfort
The described mechanism is practiced for the implementation of basic agricultural work and cargo transportation. The manufactured device can be equipped with a lifter, harrow, or plow. The universal adapter includes the frame, hitch, wheels and seat.
To achieve structural stability and prevent overloads, a graphical display of the working units and blocks of the device mechanism is initially developed
When creating the design, the fork and bushing require special attention. This device ensures unhindered rotation of the trolley
The frame is welded from corners and iron pipes. The body can be constructed from iron sheet. Along with this, the height of the sides should be higher than 30 centimeters.
The coupling device is presented in the form of a rod (15 centimeters in size) installed in the hole of the trailer coupling device. The disadvantage of such a system is rapid breakdown. In order to reduce wear, it is advisable to increase the coupling. The next step is installing the seat. An 80 cm indentation is made on the frame from the front end. Afterwards the seat is fixed with bolts. The next step is testing the functionality of the manufactured device.
Front adapter
Structurally, it is similar to the previous type of adapter, but its coupling mechanism is located at the rear.
This means that we get a full-fledged front adapter for the Neva brand walk-behind tractor. The presented design is completely disassembled, which greatly simplifies its subsequent transportation. Naturally, the cost of any additions to the unit is determined separately. Front adapter specifications:
- length - 190 cm;
- width - 81 cm;
- height - 140 cm;
- ground clearance - 30 cm;
- wheel track - 75 cm;
- speed indicators - approx. 10 km/h;
- total weight - 65 kg.
The cost of such a device is approximately 27 thousand rubles.
Instructions on how to make an adapter
Open photo Instructions on how to make an adapter in an enlarged view. If this is a drawing or diagram of a device, you can download it to your computer by opening it in large size and using the “Save picture as” function. "(right mouse button). Please rate this material by highlighting the appropriate number of stars.
- 1
- 2
- 3
- 4
- 5
Most often, together with this material on the topic
"For the Salute walk-behind tractor"
You can view all photographs, drawings, pictures and diagrams from the “Homemade adapters for walk-behind tractor” category by clicking on the link. You will find even more materials with descriptions of how to make a motor-cultivator and accessories for it yourself in the section “ Attachments for a walk-behind tractor ” or by selecting from all the materials on the site motoblok.populjarno.com at the following TARKS: description, how to make, instructions, adapter.
Perhaps what you are looking for is in one of the most viewed sections of our website:
Comments on the material “ Step-by-step instructions for making a walk-behind tractor adapter ” are located at the bottom of the page - here you can express your opinion, ask for advice from visitors to our site, share interesting materials, talk about your positive or negative experience in assembling walk-behind tractors and trailed equipment with your own hands. If you have questions or suggestions about this material, please leave your comment below.
For those who want to share their photos using the keywords “homemade adapter for the Salute walk-behind tractor, how to make it, step-by-step instructions, design features” or any other questions about diesel, gasoline, light, medium or heavy homemade walk-behind tractors, motor cultivators and attachments for him - you need to register and use the link “Add a photo.
"(visible after registration on the page of all Photo Albums of walk-behind tractors and attachments ).
| Photo dimensions: 531px by 504px; 56.9 Kb
Algorithm of actions
To begin assembling additional equipment for a motor cultivator, you will need a drawing, in accordance with which the fastening elements and the construction of fragments will be made. If you have special skills and experience, you can make a homemade adapter for a walk-behind tractor and a drawing yourself. If you are afraid of making a mistake, you should take ready-made drawings. Before designing, it is recommended to check and verify the compliance of dimensions and numbers.
Tools and consumables:
- metal corners, square profile;
- bearings for the steering wheel and column;
- metal sheets;
- a pair of wheels, preferably on an axle;
- drills, electrodes, discs for grinders;
- fasteners;
- wrenches of various sizes;
- electric welding machine;
- lubricants – grease;
- Bulgarian;
- screwdriver;
- drill.
Work progress:
- The beginning of work is the manufacture of the frame. The structure is made from cut parts of the selected steel building material. The metal is cut to the required length using a grinder. The fragments are fastened with bolts or welding.
- A 1.8 m piece of square metal profiled product is welded to a metal profile 60 cm long. The elements are placed perpendicularly. This fragment will serve as a mount for tires. The wheel stand must be at least thirty centimeters high.
- The spacers are welded to the main frame and wheel bushings. The size of the frame is 40x40 cm, it can vary depending on the individual project.
- A profile is welded to the edge of the frame. The axial pipes are bolted together.
- The control lever is welded to the frame. To increase power performance during control, the lever is constructed with one or more elbows with a length of 70-80 centimeters. The knee fragments are fastened with bolts. It is recommended to check the dimensions of the adapter for the walk-behind tractor with the drawings and diagrams, because they will help you create an error-free design with your own hands.
- A pipe 30-40 cm long serves as a stand under the seat; it is welded to the main frame. With a driver's seat, the equipment is easier to control during gardening.
- The coupling part of the mechanism is welded to the walk-behind tractor at the rear. The fastening is made of steel or cast iron material. An electric welding machine is used to connect spare parts. The fastener is an important component that ensures reliable coupling. The most suitable is a U-shaped connecting node. Thanks to this spare part, transport becomes sustainable.
- There are two types of wheels suitable for the walk-behind tractor adapter - rubber or metal. The latter option is used for work in the field. The rubber wheel has a deep tread, which will allow you to move on unpaved roads and, if necessary, drive off-road. Wheel radius fits 15 to 18 inches. Suitable wheels are from the domestic automobile industry - VAZ, Moskvich.
- I treat the resulting device with a primer and paint it. This technique will prevent metal corrosion.