Anton Sviridov
1433 0 0
Anton Sviridov March 11, 2019
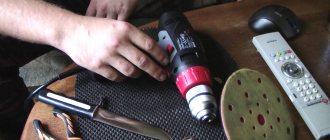
Antagonizer from instructables.com shared his experience building a drill press. Further from his words.
I had a drill press, but unfortunately the motor burned out. I was just working on a project, so I didn’t have the funds to replace it, and I had to come up with and assemble a homemade drilling machine from scrap lumber and a screwdriver. As a result, the project was successfully completed, and the machine was permanently installed in my workshop.
Modernization of children's vehicles
And of course, all the best goes to the children. Using a screwdriver, you can modernize many children's vehicles. For example, convert a children's pedal car into an electric car.
Electric car
To make a car with electric drive you will need:
- Frame made of steel profile pipe. You can make it yourself.
- The wheels can be used from a rubber garden cart.
- You can take the body from an old pedal car or come up with some creative solution. For example, soldering from plastic pipes.
- As an electric drive, it is necessary to use two motors from screwdrivers and a gearbox from the same power tool. Separate housings are made for them, in which the output shaft is mounted on 201 bearings.
- Battery. You can use a regular automobile 6ST60.
After all the components are prepared, all that remains is to assemble the electric car. This process is simple and can be done by every man who has even a superficial understanding of plumbing.
Electric scooter and electric bicycle
Another use of a screwdriver in creating vehicles is an electric scooter or electric bicycle. The principle of this modernization is based on installing a chain drive between the wheel sprocket and the electric motor sprocket with a screwdriver gearbox. This device is powered by a hand tool battery. This solution does not require large expenses. As a result of the improvement, a vehicle with a speed of 5 to 15 km/h is obtained.
Electric snowmobile
Using a screwdriver you can make not only a vehicle on wheels, but also a real snowmobile. To do this, you need to use an electric car, having carried out a number of appropriate upgrades. It is necessary to improve the electric vehicle frame to install a drive wheel on it. Instead of driven wheels, you need to install skis, and replace the plastic steering wheel of the car with a metal bicycle handlebar. The drive wheel is driven through a chain transmission from a screwdriver.
Assembling such a wonderful technology will not take much time, and most importantly, money. All costs will be paid off by the joy of the child, for whom an electric vehicle will be a real gift.
What can you make from an old screwdriver with your own hands: from a battery, a motor, an engine
At home, you can make household electrical appliances or equipment for various purposes from an old screwdriver. This will require a little imagination and additional tools. Homemade devices and tools will cost much less than their factory-made counterparts, and their service life will be several orders of magnitude longer.
Generator
Cordless screwdriver models are perfect for creating a homemade generator. By rotating its handle, the device will be able to supply electrical energy. Such a generator can be used during a camping trip or when there is a power outage in a country house. A homemade generator can be used to recharge batteries (6-12V).
A screwdriver with an operating voltage of 18 V or more is suitable for the job. Craftsmen advise following the following sequence of actions:
- Disassemble the screwdriver body.
- Unsolder its electrical board.
- In place of the battery, install a diode bridge that is suitable in terms of technical parameters and characteristics.
- Make an easy-to-use handle by securing it in the screwdriver chuck.
Once these simple modifications are completed, all that remains is to assemble the body. The homemade generator is ready to work.
Bulgarian
If you don’t have a grinder, you can replace it with a homemade grinder made from an old screwdriver.
To do this, use a nozzle or adapter equipped with a gearbox, which can be purchased ready-made. The possibility of making such devices with your own hands cannot be ruled out.
For this, studs, nuts and washers are useful, the diameter of which is similar to the diameter of the screwdriver chuck.
After disassembling the tool body and dismantling its gearbox, insert the end of the nozzle or adapter into its chuck in place of the gearbox. Having assembled the body of the new tool, the homemade angle grinder is ready for use.
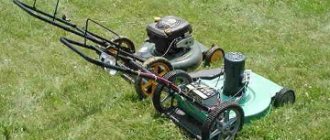
Trimmer or lawn mower
Equipment for mowing grass on the site is not cheap. If necessary, it can be made at home using an old screwdriver. In addition, you need to prepare the following materials:
- plastic pipe up to 2 m long;
- fasteners;
- stub;
- motor from an electric screwdriver with a power of 12 V and its battery;
- the wire;
- adapter for pipe (40-50 mm);
- button;
- plastic bucket;
- crocodiles (clips);
- blade of a stationery knife.
The workflow for creating a trimmer or lawn mower consists of several stages. To obtain the desired result, you need to follow their sequence:
- Disassemble the screwdriver body by removing its motor.
- Mark the mounting locations on the plug and drill them out with a drill.
- Secure the motor to the plug by screwing it with 2-3 screws.
- Solder the leads for the motor.
- Install the motor into the seat. Pass the wires coming from it through a plastic pipe.
- Mark on the pipe the place where the power button will be located using a marker. Drill a hole.
- Connect the wires to the button. To quickly turn on the device using a battery, you can also solder crocodiles.
- Make a battery holder from an adapter.
- Install the storage tank by connecting it to the adapter on the pipe.
- Make knives for future equipment from the blades of a stationery knife.
- Connect the motor shaft and the attachment using a terminal clamp.
- The protective casing can be made from a plastic bucket, connecting it to the lower end of the pipe.
This homemade device can be used for mowing young vegetation.
Engraver
Both cordless and electric models of screwdrivers are equally suitable for making a drill. To remake it, it is enough to purchase a special adapter and make a bit whose diameter fits the adapter.
Using a homemade cartridge makes it possible to use various devices for the engraver’s work.
Garden shredder
Using an electric screwdriver, you can make a shredder of garden branches (with a diameter of no more than 1 cm) or grass. The power of the screwdriver should not exceed 0.5 kW.
When working, it is recommended to follow the following sequence of operations:
- Prepare a container that will contain the grass or branches to be chopped. This could be a boiler or a large bucket.
- In the central part of the bottom of the container, drill a hole into which the shaft will be inserted to fix the cutting elements of the chopper.
- To install the container and convenient work, you can install it on the edge of the table or make a frame for this from wooden slats.
- Install the cutting elements on the shaft, securing them with bolts. For this purpose, hacksaw blades installed with the sharpening point downwards are better suited.
- Install a screwdriver with installed knives at the bottom of the frame.
- Solder the button to turn on the unit.
- Cut a hole (10x20 cm) in the lower part of the container wall. Insert a metal or plastic sleeve into it, through which the crushed raw materials will be discharged.
The device is ready for use. To ensure efficient operation, it is recommended to first break the branches into small pieces.
Wind generator
An old cordless screwdriver is suitable for creating a simple model of a wind generator that will look like a weather vane. It is necessary to disassemble the tool and disconnect its contacts, dismantle the mechanical elements.
Insert the electric motor shaft into the chuck, clamping it securely. Attach a metal plate no more than 1 mm thick to the gearbox with bolts, which will subsequently serve as the basis for mounting the wind generator blades.
A plastic pipe cut lengthwise into 2 parts is ideal for making blades. Place a clamp on the shaft located between the gear and the chuck. The motor and cartridge are securely attached to the base made of plywood.
You can protect the wind generator from precipitation by placing the working elements of the device in an empty aluminum container.
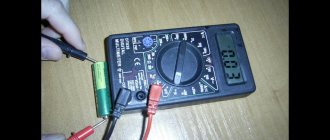
After making the weather vane, attach the generator to its end and connect the wiring to the engine. To check the power of a wind generator, use a multimeter by rotating the blades.
Manual router from a screwdriver
To convert a screwdriver into a manual router, you will need a sheet of plywood or chipboard, a clamp, fasteners and a feather drill (crown) for woodworking. To attach the future router using a plywood clamp, a stand and stop are made. Their sizes depend on the dimensions of the screwdriver.
Using a drill, a hole with a diameter of 40 mm is drilled in the central part of the rack. It will provide access to the cutting part of the milling cutter to the workpiece being processed.
Secure the screwdriver to the stand with a clamp. In this case, you need to leave a small gap (2-3 mm) between its cartridge and the stand. Secure the cutter in the chuck.
A homemade hand router has little power. Its spindle rotates at low speed. Therefore, the router can be used for processing small workpieces.
Children's catamaran
To create such a vehicle, you can use plastic pipes. Plastic ties are used to secure them. The catamaran motor can be made from a screwdriver engine.
Metal cutting tool
The unit is easy to assemble. To create it, it is enough to attach a metal cutting disc to a screwdriver at the location of its drill.
Flashlight
To work, you first need to disassemble the tool body, removing all mechanical parts from it. The groove in which the screwdriver gear is mounted is used to install an LED lamp (5 or 12 W). For this you can use the G5.3 cartridge.
If a small gap appears when screwing the case, you should slightly sharpen the edges of the case. Such a homemade flashlight will shine very brightly for a long time.
A circular saw
You can use a hammer to make a circular saw. To fasten future equipment, a plywood sheet is used, in the central part of which a hole is cut to the size of a screwdriver. The tool is secured at the top and bottom of the base with self-tapping screws or clamps.
The cutting element of the saw can be secured using an M10X 50 bolt, onto which a washer and a rubber gasket are placed. The cutting part is tightened in the upper and lower parts of the bed.
To create the sides of a circular saw, a plywood sheet measuring 11.5x15 cm is used. They are assembled using self-tapping screws. A cut (27x40 cm) is cut in the central part of the frame to install the disk. It is important to securely fasten the saws to the frame in order to prevent it from playing during operation.
Electric motor for boat
To install a motor from a cordless screwdriver on a boat, you will need an impeller and a metal pin.
Drill a hole in the impeller to the diameter of the stud. It is inserted into the screwdriver, allowing the screw to move.
To attach a converted screwdriver to a boat, you can use strong clamps or self-tapping screws.
Cool ideas and lifehacks for using a screwdriver at home
In addition to the listed mechanisms, a screwdriver can also be used to implement other ideas on the farm. This hand-held power tool will help you automate the opening of an entrance gate, make a winch for a car, or make scissors for cutting metal. If you attach an attachment for cutting tin to it, you can turn an ordinary rubber boat into a motor boat, and modernize the process of drilling holes for ice fishing. In addition, everyone knows that a screwdriver is used as a drive for a mixer, meat grinder or juicer.
After reading the article, the reader gained knowledge about the unconventional use of a screwdriver. Now he can use this hand tool to create carpentry equipment, improve children's vehicles and other useful things in the home.
Carpentry workshop equipment
A few more interesting suggestions on how to make equipment for home carpentry using a regular screwdriver.
Wood lathe
When making wood products, it is difficult to do without a lathe. You can build it yourself. A flat wooden workbench is ideal for the bed. A screwdriver can be used as a headstock and rotation drive. You need to place the tool in a wooden bed made from a block in the shape of a screwdriver and secure it with a clamp. The block can be secured with a clamp, and if the machine is constantly used, screwed with self-tapping screws. A tooth mandrel must be inserted into the chuck. The tailstock is made of two bars with an adjusting screw, which is sharpened to a cone. It is installed opposite the fixed screwdriver so that the axis of the tool coincides with the axis of the tailstock adjusting screw. The back support structure is secured with a clamp. If you plan to process large parts, then the fastening should be more reliable. The tool rest can also be made from a block, securing it to the workbench with a clamp. A primitive lathe for the home workshop is ready.
Bench Drilling Machine
Another equally important piece of equipment is a drill. It can also be made from a screwdriver. To do this you will need a used screwdriver. From it you need to take a motor with a gearbox and a cartridge. Now you need to make two clamps from textolite, which will perform the function of fixing the drilling head of the machine. To achieve maximum alignment of all holes on the clamps, it is better to process them together, in one installation. Then you will be able to avoid distortions.
Bushings with internal threads are used as limiting posts. They must be the same size, corresponding to the distance between the clamps. After this, another clamp is made from textolite and two bosses from caprolon. They are drilled off-center, resulting in two eccentric bushings. The clamp is installed on the rod and the backlash is selected using eccentrics. After this, install a wooden lever on a spring so that the drilling head returns to its original position. To supply power, you must use a transformer with a power of more than 150 watts and an output voltage similar to the screwdriver you are using. After this, you need to install a diode bridge and a capacitor, and install the drilling head on the frame.
Manual router from a screwdriver: step-by-step instructions
It can be converted into a hand router. To do this, you do not need to purchase expensive materials. Everything you need can be found in the workshop or garage, practically under your feet. To make a manual router from a screwdriver, you will need pieces of thick plywood or chipboard, a clamp for attaching the tool, fasteners in the form of bolts and self-tapping screws, plumbing tools and a feather drill for wood. In the latter case, you can use a drill bit.
Assembling a homemade router is quite easy. To do this you need:
- From pieces of the selected material, cut out a base, a vertical stand on which a screwdriver will be attached using a clamp, a stop and a gusset to impart rigidity to the structure. The dimensions of the parts are chosen arbitrarily, in relation to the dimensions of the power tool.
- Using a pen drill, drill a Ø 40 mm hole in the base for free access of the cutting tool to the processing area.
- Make a clamp according to the diameter of the hand tool.
- Using a clamp, secure the screwdriver to a vertical stand so that its chuck is a few millimeters from the base.
- Install the stiffener.
- Secure the screwdriver with the stop on the vertical stand.
- Install the cutter into the tool chuck.
The screwdriver cutter is ready for use. Such a machine cannot become a full-fledged replacement for a manual milling cutter due to its low power and low spindle speed, but it will solve the problem of milling small parts in a home workshop.
Circular Saw
In addition, for your carpentry workshop you can make a circular saw from a screwdriver. To do this, you need to make a working surface using a sheet of chipboard or thick plywood. You need to make a cut in the tabletop to allow the circular saw to exit. The screwdriver must be securely fastened to the underside of the work surface using metal or wooden clamps. In the same way it is necessary to mount the shaft
It is important that the saw blade extends above the working surface of the table by no more than a third of its diameter
Assembling guides
So that the screwdriver can lower and rise strictly vertically, I assemble the guides:
- I select two boards slightly wider than the holder boards.
- I drill a hole in the top for the adjusting bolt.
- At the bottom I use an electric jigsaw to cut out a U-shaped arch for the drill.
- I make racks from 42 cm boards - I screw 2 of them on each side.
- I screw 2 flat guides to the screwdriver holder on the sides.
- I insert the screwdriver into the casing and install it into the rack together.
- I screw a board with a hole for a bolt on top.
Please note that I had to reassemble this assembly several times to achieve the distance between the posts so that the screwdriver box would slide smoothly along the guides, but not so much as to cause vibration.
boat motor
How nice it is to take a boat ride in warm summer weather. The only problem is that I don’t want to pick up the oars. Ingenuity comes to the rescue.
What if you adapt a motor from a screwdriver to a boat using available tools?
It’s easier to use the following materials for this “idea”:
- Screw (rabbit):
- Long metal pin;
- Battery powered screwdriver.
The essence of the idea is as follows. A hole with a diameter equal to a metal pin is drilled in the propeller (in this situation, the propeller). The screw is installed on the stud and securely fastened. The long pin itself is inserted into a screwdriver, which turns the pin together with the screw. The boat engine is ready!
All that remains is to come up with some kind of metal structure that will allow you to securely attach the screwdriver to the boat itself. But this is too simple a task to discuss. And every amateur will be able to show his inventive abilities in this matter.
We lower the screw on the hairpin into the water and turn on the screwdriver. All that remains is to slowly swim and enjoy the beauties of nature that you see around. There is only one thing - realistically evaluate the capabilities of the batteries and “don’t swim behind the buoys.”
Conducting tests
I'm doing my first test:
- I clamp a screwdriver into the box.
- I insert the drill into the chuck.
- I turn it on and try to drill a hole in a piece of wood.
The hole is not quite at a 90 degree angle.
- I loosen the adjusting screw and change the position of the screwdriver.
- I drill the hole again.
- I get an acceptable result.
Preparing the electric drive for a bicycle
First of all, you need to remove the clamping chuck from the remains of the screwdriver. This is extremely simple to do, and therefore there is no point in describing this action. Then a thrust nut is screwed onto the shaft. It serves to ensure that the installed sprocket does not touch the body. By the way, it makes sense to immediately change the position of the power regulator to “drill”.
PHOTO: YouTube.com An internal thrust nut is installed on the shaft
Next, you need to put the sprocket on the engine drive shaft and secure it with a second nut, which can be removed from the chuck. But if everything is left in this form, the fixing nut will loosen when moving. Therefore, first it is thoroughly pulled, after which a screw with a reverse thread is screwed into the internal thread of the shaft. This system will ensure that the sprocket is fully secured and eliminates the risk of the outer nut coming loose while driving.
PHOTO: YouTube.com The second nut is fixed with a screw with a reverse thread for reliability
Fastening the engine to the bracket
Now it remains to understand how the electric motor will be attached to the bracket that will be installed on the bicycle. Everything here is extremely simple. For this, a regular plumbing clamp designed for sewer plastic pipes with a diameter of 50 mm will be used. The pin with the anchor should be unscrewed from it, and the clamp itself should be placed on the motor housing. The photo example below shows how this is done.
PHOTO: YouTube.com A plumbing clamp is perfect for attaching to a bracket
At this point, the work on preparing the electric motor is completed, you can proceed to the manufacture of the bracket.
Epilogue
This is how you can assemble an electric bicycle without any expense. Of course, additional work is needed here, but the foundation is already there. It's quite fun to see people's reactions when they see such an interesting vehicle. Of course, it’s unclear what’s moving along the road. In fact, if you work on the bike for a couple more days, it will not be inferior to expensive factory products in almost any way. Considering that all the work is done “on the knee” in one day, without financial investments, we can say with confidence that the idea is very good.
We hope that the material presented today will be useful to the dear reader. If you still have questions about what you read, you can ask them in the discussions below. The HouseChief editors will be happy to answer each of them as quickly as possible. There you can comment on the article and express your opinion about the rework. Tips for improvement, as well as pointing out the wizard's mistakes, are welcome. And we have one request. Please don't forget to rate what you read.
Every opinion, both positive and negative, is very important to us. Happy cycling!
Use in the garden
We are part of nature. How harmoniously each of us feels in the garden, dacha or personal plot. An evenly mowed lawn and weeded beds delight our eyes. But it’s very difficult to achieve such a result manually. An aching back and grass-cut fingers can be eliminated from your life if you use ingenuity and, using the most primitive tools, construct a garden trimmer, or a lawn mower, as we are more accustomed to calling this tool.
Making such a trimmer is very easy. To do this you need:
- Screwdriver with battery;
- Body polishing disc;
- Two stationery blades;
- Two screws.
Creating a tool literally takes a couple of minutes. Two office blades are screwed onto the body polishing disc. Only they are not screwed tightly, but so that they “dangle” easily. This connection option allows the blades not to break, but to fold when they come into contact with an obstacle. The disk itself with the blades already attached is installed in the screwdriver, naturally with the cutting tool facing down. The tool is ready to use!
This amateur trimmer will allow you to mow grass in hard-to-reach, narrow places, between rows or where there are partitions. Of course, an undoubted “plus” is the saving of time and effort that you spend on weeding by hand. There seem to be only two disadvantages - you still have to bend down and cut the grass in this position, and then collect it manually.
It also has its own specifics. With such a tool you need to “fight” tall grass in a special way. Cut the top first and then the base, as long grass can get tangled at the base of the disc. Then it needs to be removed manually.
I'm assembling a machine
- I cut 2 pieces 30 cm long and 2 pieces 28 cm long from the board.
- I screw them together to the vertical boards of the frame located at the top and bottom of the frame. This will be the stops for the screwdriver guides.
- I cut 2 pieces 25cm long and attached them to the back of the drill box.
- I screw the guides to the frame through the stops.
- I check how the screwdriver moves up and down.
- I install the return spring - I attach one end to the screwdriver box, the other to the machine frame.
A return spring is needed to ensure that the drilling machine returns to its original position on its own without outside help.
Assembling an electric bicycle from an old screwdriver
When all the parts are prepared, you can proceed directly to assembly. But first you need to prepare the bike itself.
Some details are removed from it, namely:
- pedals (they are no longer needed);
- trunk (will be moved forward);
- chain (you still have to work with it).
Now the bike is ready, and you can get started. The bracket is fastened to the “ears” on which the trunk was fixed. In this case, the foot should rest against the frame.
PHOTO: YouTube.com The bracket is already in place, all that remains is to install the engine
Installing the electric motor on the bracket
Everything is simple here. Through the slot, using a suitable bolt, the electric motor is mounted on the platform. There is no need to tighten the connection at this stage.
PHOTO: YouTube.comThe engine is in place, but the connection has not been pulled yet
Adjusting the chain length
The chain removed from the bicycle will have to be adjusted to length by removing excess links. Ultimately, it should sag a little to allow for modifications.
PHOTO: YouTube.com The chain needs to be adjusted to length by removing excess links
Adjusting chain tension
The bracket is movable, so you need to lift it up, move the stop tab and fix all the connections in the desired position.
PHOTO: YouTube.com The chain is tensioned, the connections are fixed, now comes the fun part
Installation of electrical equipment
The electric motor activation button must be installed on the steering wheel, which means you will have to extend the wires. To do this, you can use a regular soldering iron. The cores themselves should be corrugated for protection.
PHOTO: YouTube.com The wires need to be extended to be able to install the button on the bicycle handlebars
PHOTO: YouTube.com The button is conveniently fixed on the steering wheel
At the same time, a power wire is also output, which will go to the battery.
Battery installation and connection
It's time to install the trunk. It is necessary to accommodate the battery. It is easy to install it above the front wheel; just screw in the 4 fixing screws. Almost all bicycles provide such reinstallation.
PHOTO: YouTube.com The trunk, removed from the rear, is installed above the front wheel
A car battery is placed on the installed trunk, to which the wires from the button are connected. The battery itself is securely fixed with brackets so that it does not slip while driving.
PHOTO: YouTube.com The battery is in place, assembly is complete, it’s time to hit the road
Screwdriver as a generator
A screwdriver can be used as a generator. It's very easy to do. You need to remove the battery, attach wires to the terminals using alligator clips and connect them to the consumer. Be sure to first check the polarity with a multimeter. You need to insert and clamp a hex key into the chuck to assemble the furniture. By rotating the spindle, a current will be generated that will be supplied to the consumer. However, it is worth noting that the voltage generated by this electric machine is only enough to charge a mobile phone or operate a small LED lamp.
Preparing tools and materials
The following tools were used in working on the drilling machine:
- Cordless drill and bits.
- Miter saw.
- Hand saw.
- Electric jigsaw.
- Boards 2.5x8.0 cm, length 48 cm.
- Boards 5.0x8.0 cm, length 42 cm.
- Boards 2.0x10.0 cm, length 15 cm.
- Plywood 0.9 cm thick.
- Wood glue.
- Self-tapping screws 80 mm.
- Screws 60 mm.
- Screws 50 mm.
- Hex bolt 60 mm.
- Steel spring.
Bracket for attaching an electric motor to a bicycle
To make this part you will need a metal plate and a section of channel. It is not difficult to find such parts in a garage or at any metal receiving site.
PHOTO: YouTube.com These are the steel parts needed to make the bracket
These parts need to be welded together, and then a slot is made in the plate using a grinder. It will serve to secure the electric motor with a bolt. A regular hole will not work here; the mount must be movable so that the alignment of the drive and driven sprockets can be adjusted. If you don’t set it, the chain will fly off without allowing you to travel even a meter.
PHOTO: YouTube.com The parts are welded, the groove is cut, a couple of little things remain
Pressure foot, and what is it for?
Making a bracket support tab is a purely individual process for each model and brand of bicycle. A photographic example will show a similar detail so that the reader can understand what it looks like. And it will serve to adjust the chain tension. The thrust tab is attached to the bolt and nut, the connection remains movable until fully tightened.
PHOTO: YouTube.com A curved steel strip serves as a stop tab for adjusting chain tension
Making a lever
To make the machine convenient to use, I decided to equip it with a lever. The lever handles are made of boards in which holes are drilled for the screwdriver box guides.
- I attach the handles to the box and mark their attachment points on the frame.
- I measure the distance between the handles.
- I cut out the cross bracket of the lever from the board.
- I screw the handle to this bracket.
- I connect the bracket itself to the handles using self-tapping screws.