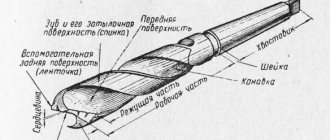
How to place and secure a drill in a hammer drill
A hammer drill is a fairly simple tool, both in operation and maintenance. However, you need to know the nuances of its maintenance. Working with the tool begins with installing a drill, with which you can make holes in various surfaces. The article will describe in detail how to insert a drill into a hammer drill correctly.
Additional purchases for inserting a drill into a hammer drill
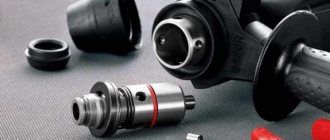
Several types of cartridges can be purchased for modern rotary hammers:
THE DRILL WILL STOP LOLLING OUT if YOU DO THIS
- quick-clamping;
- key.
The second type is a classic design, which is also found on a conventional drill. The attachments in the chuck must be secured with a key. The fixation will be as strong and reliable as possible, but using this unit is not particularly convenient.
To avoid inconvenience, it is allowed to use quick-release chucks, with which you can place the drill in the device without the use of additional devices.
Which cartridge to choose for the job will be decided by the master himself, depending on his experience in carrying out construction work using a rotary hammer (for example, from Makita).
This is interesting! Many Makita rotary hammers have become almost legendary among Russian craftsmen. The HR 2440, 2450, 2470 and 2610 models deserve particular trust.
Methods to help remove the drill (Video)
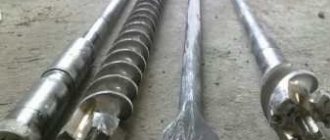
The rotary hammer chuck is designed so that during operation the drilling equipment moves along the shaft. During riveting, the barrel will not allow the drill to simply come out. try to get the drill in the following ways:
- It is necessary to clamp the drill in a vice and then slowly loosen the hammer drill and pull it only towards you.
- The hammer drill itself is clamped in huge clamps, but in such a way as not to cause damage to the body. Later, the drill is clamped with a pipe wrench or in a small vice, and then you need to hit it with a hammer, knocking out the drill here.
In any of these cases, a few drops of WD-40 will not be superfluous. Very occasionally the drill jams due to lack of lubrication or a clogged chuck. The fixation ball, when there is a foreign body under it, will prevent the drill from coming out. To avoid this, it is necessary that the shank on the device is always lubricated.
If the drill bit got stuck
for the reason that it has turned in the cartridge, it is necessary to remove the cartridge itself, at the same time dismantling the cap and the rubber ring, as it is also called, test turning it back 90°. Because of this, most likely, we will have to change what remains for our client to do, the clamping parts on the hammer drill.
However, we should not forget that if, despite all this, the shank is already broken, it will be impossible to rescue the drill. Then you need to completely disassemble the hammer drill
and, later, knock out the stuck device. However, again after such maneuvers it will be necessary to change the barrel.
Chucks used by the tool
It is advisable to talk about the cartridges in more detail so that the user can better understand the principle of their operation - this will make it easier for him in the process of replacing the drill.
The devices first began to be used back in the 30s of the last century. As a result of developments, manufacturers came to the conclusion that the simpler the design, the more reliable the fixation.
The main advantage of the key sample is that it securely secures the gimlet in the hammer drill.
Keyless chucks are tightened using the operator's hands. Depending on the design features, they are divided into samples with one and two couplings. The operating principles of the devices vary.
It is easiest to deal with a single-sleeve clamp, but it is used only in conjunction with drills and rotary hammers that have automatic locking of the working shaft. You can use just one hand to secure the attachment, making work easier.
To use a double clutch clamp, you need to hold the rear clutch with one hand and rotate the front shaft with the other.
Conclusion
Regardless of the model you purchase, the principle of troubleshooting is almost the same and does not require special skills. Do it yourself. more than real!
Owners of power tools who use them quite intensively sooner or later have a question. Why does the drill fly out of the black cartridge&Decker, Bosch, DeWalt or other brand? This phenomenon not only makes it difficult or impossible to continue working, but is also dangerous for the user and others.
Experience shows that in almost 100% of cases, problems associated with incontinence can be quickly eliminated in a professional workshop. The cost of the service depends on the complexity of the problem and the brand of the tool.
Is it possible to insert a drill bit from a conventional drill into a hammer drill?
If you need to place a drill from a conventional drill (for example, the Interskol model) into the hammer drill , you will have to use a special adapter. This is a common chuck that is used on an electric drill. They are also divided into quick-clamping or key. into the cartridge (hereinafter - securely clamped), on one side of which there is a thread, and on the other - a shank like a standard drill.
Chucks can have different types of threads. In most cases, 1/2 inch is used, and the metric type is M12. The adapters must have similar threaded fittings. The adapter must be screwed into the cartridge , and for fixation use a special screw, which is included in the kit. It has a left-hand thread.
The assembled structure can be placed in a hammer drill in the same way as when installing a drill. As a result, the operator receives a standard electric drill, but there is a caveat: the chuck may have a little play. Do not forget to turn off the shock mode, since the assembled adapter may not withstand the load.
For reference! Some models of rotary hammers (for example, Zubr) are supplied with similar adapters. In addition, there are certain devices that have several cartridges that replace each other: one for installing a drill, the second for a drill.
The advantage of this configuration is that there will be no backlash during operation, since the adapter is adapted specifically for a specific type of hammer drill. Of course, you will have to pay extra for such a model.
Possible cartridge malfunctions and their elimination
During operation, the operator may encounter some difficulties that need to be corrected immediately to prevent more serious problems from arising. To repair a rotary hammer (for example, Hammer brand) yourself, you need to know the external manifestations of malfunctions.
The most common problem is that the drill does not fix well and flies out of the socket during operation. This usually happens when the tool is used for a long time.
The only reason that causes such a malfunction is wear of the cartridge. To fix the problem, it must be disassembled. In most cases, the balls that are installed inside are subject to deformation and wear appears on them. The problem may also be a retaining spring that has sagged significantly.
Important! These components cannot be repaired, so you should replace them and install the cartridge back.
Sometimes there is a situation when the cartridge is not attached to the device itself. In this case, it is necessary to check the fastening of the cartridge body, which is most likely worn out due to long-term operation. The unit is located at the end of the raster sleeve and is a locking ring. If it breaks, the fixation will be broken, and if shocks occur, the ring will fly off.
To eliminate the damage, it is necessary to replace the retaining ring. This is done as quickly as possible, and there is no need to use additional devices. The technician will only need a regular flathead screwdriver.
Defects and malfunctions of the hammer drill
To troubleshoot these types of power tools, our team researched several popular brands and identified the causes of the most common failures:
- Increased wear of the working element;
- Cracks on the handle and body;
- For models with batteries, the batteries do not last long;
- Frequent bending of wires in electric models;
- Malfunctions of the impact mechanism and its interaction with the conventional one;
- Short service life of bearings, cartridge, tooth parts, safety clutch.
Why does an impact drill get hot?
The most common reason for this is the length of time and the heavy load on the tool. The motor interacts with the working units, which can cause overheating. When he appears. turn off the instrument and let it cool down. at least half an hour.
If a hammer. it's a hammer, not a drill
- A conical spring holds the clutch; if it is weakened, a problem may arise;
- The locking roller no longer locks the large gear shaft;
- The tool lock in the barrel stops working.
READ How to Install an Attachment on a Screwdriver
In this case, it is enough to replace or tighten the problematic parts to start them in soft mode.
Hammer smell
Foreign odors may occur during overheating or high loads that are not intended for the model. If it is new or has just been refurbished. Most likely, the parts are simply not used, and this process will take time.
Breakdown doesn't work
- A short circuit that caused the rotor or stator to burn;
- Complete wear of carbon electrolayers;
- The brush holders are loose and do not hold them;
- Burnt slats on the manifold;
- The rotor or stator winding is damaged;
- Battery failure;
- The power cord is bent.
The winding can be done at home. If you decide to replace the brushes, buy two at a time, regardless of whether one or both are damaged. In case of a short circuit, replace the burnt parts with serviceable ones. If there are problems with the cable or battery, buy new ones and install them in place of the old ones.
Oil leaks from impact
Leakage is a direct indicator of wear of some parts inside the mechanism. Unwind the model and make a diagnosis, replace the fat if necessary.
Hammer
The reason for this is a weak connection. Just tighten or replace it.
Reverse doesn't work
Cause. mode button failure. Disassemble the back panel and replace the contacts if necessary.
Hammer does not rotate under load
Most likely, the load does not meet the permissible standard, which leads to this defect.
Sequence of removing a drill from a hammer drill
To remove a drill from a hammer drill (Dexter or another company), you need to follow the following guidelines:
- First, look at what cartridge is on the device. If you need to attach a drill to a hammer drill, which is held on a double-coupling element, you simply need to switch the device to reverse mode. You need to hold the lower coupling with one hand and unscrew the upper coupling with the other.
- If a single-socket fastening is used, the nozzle can be unscrewed with one hand. The drill is held by an auto-locking device.
READ What is the difference between a rotary hammer and a drill?
The operation is not complicated and with any type of fastening it will take less than a minute. But problems with jamming may arise, in which case more effort will have to be made.
You don't need instructions on how to secure the drill bit in the hammer drill - you just need to do everything in reverse order.
What is the design of the chuck used in hammer drills
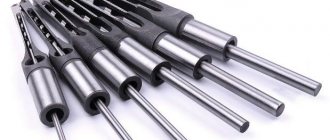
Before disassembling the hammer drill cartridge, you need to understand what types there are, in addition to what their design features are. The main types of cartridges are:
- Key. This chuck is most suitable for large drills;
- Quick-clamping. It is advisable to use it if drills are frequently replaced during operation.
SDS-max cartridges are also distinguished from SDS-plus cartridges. In such chucks, the drill sits deep, so the likelihood of it falling out during operation is practically eliminated. Less powerful hammer drills are used for drilling shallow holes. What is needed here is higher precision, not fixation. Therefore, there are several cartridge options. It is advisable to have an additional one in stock so that the cartridge on the hammer drill can be replaced immediately after a possible breakdown.
How to unscrew a chuck from the shaft of a drill or screwdriver
To remove the chuck from the tool, you need to fix the shaft and, grabbing the chuck by the body, unscrew it, rotating counterclockwise, as viewed from the cams. The main thing is to get the cartridge off the ground; then it usually unscrews easily.
I was lucky, since there were chamfers on the round base of the cartridge, which could easily be caught with an open-end wrench. There were no such gaps in the replacement cartridge purchased.
After grabbing the chuck with an open-end wrench and one sharp blow on the wrench with a hammer, even without fixing the shaft, as in the photo, the chuck moved. But it was difficult to unscrew, and there was a reason for this. I had to continue twisting it by lightly hitting the key with a hammer.
Looking inside the chuck, I did not notice the fixing screw because the hole in the head for the star bit was clogged with dirt, which just needed to be removed. Therefore, while unscrewing the cartridge, I simultaneously tore off the thread of the fixing screw; it is strange that it did not break off.
If there are no chamfers on the base of the cartridge, then you need to clamp a hex rod or an M10-12 bolt with a hex head in its jaws, place a key on it and hit it with a hammer. you cannot the chuck in this way Instead of an open-end wrench, you can use a pipe wrench by grasping the chuck by the outer part of the body.
READ How to disassemble a Makita hr2450 rotary hammer chuck
The problem is this: I have a SKIL 6845 impact drill (in some places it’s called a hammer drill for some reason - 1 J). She is 2.5 years old. I rarely used it - once a quarter, half a dozen 6-8mm holes in the concrete. About a year ago I noticed that after turning on the impact mode, the chuck (with a key, NOT a quick-release key) unwinds itself, and not just loosens, but actually unwinds - sometimes after a 6 mm drill you can insert the next larger one.
GREAT EDUCATION ABOUT CARTRIDGES how to disassemble does not hold the bat prevention
What can we do about it? Change the cartridge ? Outwardly he looks normal. Can I wash it somehow? Like spin it as high as possible, put it in a can of kerosene and turn it with the electric motor of the drill at low speed for a couple of minutes? I noticed that when you unscrew the cartridge yourself, it crunches a little and you have to apply a slightly strange force: you use the key with great force - then the key rotates freely 1/2-2/3 of a turn, but the drill does not come out, then the resistance increases abruptly again - you turn it with force - and the drill comes free...
Tell. I called the service center and they said we'll take a look. But it’s very inconvenient for me to go to them just to “watch”, because... They don’t have the cartridges themselves - buy them yourself, they say.
By the way, what are these designations? 1.5-13 - these seem to be acceptable drill diameters, S2A - the type of key (I bought a new one yesterday - try it), and RoHM (the letter “o” with two dots on top), 1/16-1/2, L - I don’t know what
although 1/2 is similar to the diameter of the shaft on which the cartridge sits in inches...
Over the phone, the service team said that the cartridge is probably not collapsible... —————
Thanks for the advice! If only I knew how to remove this cartridge ... :(((I looked and looked and didn’t find anything that would fix it (prevent it from being removed during work) - but in order to remove it without breaking it, you probably need to do something first. True , when I started reading this conference (I’m interested in cordless screwdrivers) - somewhere I saw a mention that there are cartridges that are held in place by friction...
From not knowing how to remove the cartridge , the idea was born to rotate it with a drill in a can of kerosene (?gasoline?) - maybe it will wash out?
Yes - the warranty has expired, it seems, although I haven’t checked. 2.5 years have passed since the purchase. The warranty workshop is even further away and more inconvenient for me than the paid one.
2 Alex21: I had to drill the ceiling, but only a couple of times, although it now seems to me that the “exacerbation” of this unwinding began precisely after the ceiling, although it was a long time ago - I may be confused.
It's unlikely that I didn't tighten the tie all the way. Of course I won’t give it 100%, but with twisting everything should be fine. Although…
I tighten the cartridge like this: By hand - until it turns by hand, then with the key for the 1st time - until it turns without much effort, then I move the key to the 2nd hole and apply a little more force, then to the third - and tighten it with with great effort.
Now - when this problem has arisen - I add the 4th stage - returning to the first place of tightening with a wrench - and tighten it “as hard as I can.” I don’t seem to be offended by stupidity - a big boy