How to stitch leather? Part 1: punching holes.
Greetings, dear friends!
So I bought some leather
- and
cut
it into the necessary parts for the cardholder. The time has come to start punching and stitching - and then Hell began!
As stated in one of the previous articles, I settled on a budget of 500 rubles, 300 of which were spent on leather - and 200 on a round punch with a diameter of 3 mm ( once again: I don’t know what pulled me to take it. spiritual impulse, mother him like that!
). Accordingly, I had no money left to purchase additional tools and had to work with what I found in the bins. And what’s most offensive: it’s his own fault, there’s no one to blame!
So, having uncompromisingly exposed myself to a senseless and merciless limitation of funds, I decided to examine what I have at the moment here and now - and how all this junk can be used for the purpose of piercing and stitching the skin. So, let's start in order: in the first articles, my choice (it would seem logical) fell on an awl and a hammer
.
As it turned out after some experimentation, hands for this method of punching holes are needed much straighter
.
The breakdown went unevenly, the holes stretched and in some places even tore. However, in order to excuse myself - and partly demonstrate the scale of the tragedy, here is a photo of the “ sew
” from a closer angle:
Yes: it should also be mentioned here that the most simple and accessible tools were also used for marking
. To begin with, I used a compass needle to mark a relatively “straight” line along the ruler at a distance of 5 mm from the edge. Then, using the same ruler, I marked the locations for the holes at a distance of 5 mm from each other.
Conclusion: in my particular case, this method does not work very well
.
I'm thinking about purchasing a ditch cutter
. You know, the kind that rests against the end of the leather so that the groove line is even.
Plus, as far as I understand, the thread can be carefully placed in this groove later.
Leatherworking guru! Tell us how else you can fight crooked hands?
And if anyone has used a similar groove cutter, please share the link!
Desperate to get an even seam using the method described above, I remembered the punch I had purchased
.
“What if it turns out smoother - and without tears or cracks on the skin,” I thought to myself.
Well, it turned out straighter
, but 3 mm is, of course, too much for a seam.
Even the fact that I folded the thread in half and sewed a double seam didn’t help. One thing is good: before sewing something, I thought of testing it on a small unnecessary piece
, so the losses were minimal.
In short, having realized that I didn’t particularly like a three-mm punch and a dull awl like my life, I decided to try punching holes with a needle
- and stitch the skin using pliers (because there is no other way, the hole is too small!)
It turned out smoother - and the seam lay more clearly and in general. But, as it turned out, needles
, to put it mildly,
do not involve hammering
.
As you can see in the photo, the holes went much smoother
along the line - and the breaks in the skin don’t seem to be visible. In short, I liked this method and resulted in a relatively smooth seam.
But you have no idea how long the seam took
due to the need to pull the needle through each hole with pliers!
But more on this in the next article, but for now here is the result of the work, which took a total of several hours:
I will write about the stitching process itself - and the hemorrhoids directly associated with it - in the next article. In the meantime, a few questions:
How do you achieve an even seam?
Does it make sense to purchase a ditch cutter?
Who knows where you can buy line punches - so that they are not expensive, but also do not break from the first blow?
I will be glad to hear any of your comments, especially from professionals in this field and from would-be amateurs like me!
Source
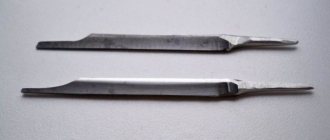
Sharpening round punches for leather and cardboard
Actually, such punches need to be sharpened after all procedures.
I want to make a narrow-profile device for these purposes.
The diameter of the punches is 5-30mm.
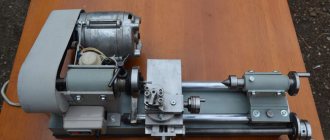
I bought this engine:
DP60-90-4-24-R11-D0940 Technical characteristics: Voltage – 24 V Power – 90,000 W Rated rotation speed – 4000 rpm Rated torque – 216.00 mN*m Current consumption in rated mode no more than 5.50 A Initial starting torque at rated supply voltage – 1770.00 mN*m Electromechanical time constant no more than 15.0 ms Weight no more than 2.600 kg Housing diameter – 60.0 mm Housing length – 187.0 mm Motor shaft diameter – 7.0 mm Shaft extension length – 16.0 mm Note: With DC tachogenerator: slope – 0.01 V/min–1; error - 0.5–10%; pulsation coefficient - 2–10%; outer diameter of the case - 40 mm; length - 51 mm.
My brain doesn’t yet understand why I need a Tahoe, but I think it will be useful.
I think that we need to make an “extension”, like on straight grinders.
I have a sketch in my head, but it’s still a mess.
At first I thought about making a device for a lathe, but after reading about the harmful effects of abrasives, I’ll probably refuse.
A few questions for now.
What bearings to use?
Do-it-yourself leather processing tool: master class for beginners
Working with genuine leather is a fascinating and interesting activity that requires the purchase of many expensive special tools. However, some of these devices can be made independently. Let's look at how a tool that is suitable for leather processing can be made, using the example of a stepper punch, marking wheel, hole punching tool and stamps.
How to make a leather processing tool with your own hands: a step punch
A step punch is one of the main tools for working with leather, which is used to form holes for stitching workpieces. As a basis for its manufacture, you can use an ordinary table fork.
Required materials and equipment:
- unnecessary dinner fork;
- hacksaw and metal saw;
- file;
- pliers;
- flat file;
- hammer;
- clamp or vise.
It is advisable to use a stainless steel fork (not aluminum) with a flat handle. The shape of the teeth should be triangular or rectangular.
Bent tines of the fork must first be straightened. To do this, you need to heat the working part of the fork over the fire, after holding its handle in a vice and tap the teeth with a hammer. After this, part of the teeth should be carefully cut using a hacksaw saw and broken off with pliers.
Using a metal saw, you need to saw off the excess part of the handle, give it an even shape and remove the sharp edge along the contour. Next, you need to equalize the width of the fork tines, since very often the outer elements are slightly wider than the central ones.
Lastly, you should sharpen the working part of the tool with a file, making sure that the length of the teeth is the same, otherwise the shape and size of the holes in the leather will differ. Before use, be sure to check the quality of the resulting holes on scraps of unnecessary leather. If necessary, adjust the size and shape of the teeth of the stepper punch.
In order to improve the quality of the stitch and the evenness of the stitching, a marking wheel is used. To make the working part of the tool, you can use unnecessary gears. For a set of tools, you can select gears with different pitches or, for convenience, carefully remove every second tooth. You should select only smooth, flat parts, if necessary, giving them the correct shape with a hammer.
DIY metal hole puncher
Hello to all DIY lovers. In this article I will tell you how to make a metal hole punch with your own hands, which will be useful in creating holes in sheet metal, as well as other materials.
The assembly of this homemade product does not require any hard-to-find parts; car parts are sufficient.
Before you start reading the article, I suggest watching a video that shows in detail the assembly process and testing of a homemade tool.
In order to make a hole punch for metal with your own hands, you will need:
* Automotive tie rod * Valve * Cuttings from turning cutters * Disc cutter * Metal lathe * Welding machine * Welding mask, gauntlets * Hammer * Metal plate 2 mm thick * Two M6 bolts * Spring, washer * Gloves, safety glasses, headphones * Angle grinder, cutting disc
You also need to cut a 2 mm thick plate from sheet metal, and then drill two holes in them with a 6 mm drill.
Step five.
It's time for welding work. We weld two cuts of the cutter to the steering rod with a small gap relative to each other, and one should be about 15 mm longer than the other.
When working with a welding machine, be careful and use a welding helmet and gloves.
This hole punch is useful when working with sheet materials in which you need to quickly and evenly make holes of the same diameter. In this case, the diameter of the holes made using a homemade hole punch is 6 mm; if necessary, this parameter can be changed by making a rod of the required diameter.
That's all for me, thank you all for your attention and creative success.
Source
A beginner's leatherworker's tool (part 2)
Hello ! In this article I will talk about the following tools that you need to have if your hobby is leathercraft and you like to do things with your own hands. I’ll jump ahead and say that to be fully equipped with the necessary tools for successfully working with leather, you will need to spend 5,000 rubles, it took me a lot more
Tools necessary for the manufacture of leather goods (line punches)
The more punches you will need, the better.
The photo shows my minimal set of line punches. There are diamond-shaped ones that leave a diamond-shaped hole. There are round ones that do not pierce but cut out a round hole; these are convenient for working on thin leather, since they do not stretch it like a diamond.
Now about each individually round
:
My round punches are domestic, made to order from some kind of super steel. The number of teeth on one punch is usually from 1 to 6, I found 10. A very convenient option for an even seam. But let’s not talk about mine, Ali has good round punches from PGF, a quite good tool that costs about 2000 for two punches for 2 and 5 teeth The holes from such punches are obtained as in the photo below
Lowercase punches (diamond)
I have diamond-shaped line punches from Taiwan and China, both have a place to live. A Taiwanese set of a handle and three nozzles for 1,4 and 6 teeth cost me about 1500, for 2 Chinese ones for 2 and 6 teeth I paid 700 rubles. If you don't beat the very thick skin and use a special backing, it's quite possible to work.
Source
DIY round hole punch
This publication presents three tool options for punching holes in sheet metal . If you want to find out what exact templates and drawings to make a hole punch for your workshop, then watch the video of the “Garage 91 Gomel” channel at the very end of the article.
Another master, Ilya Konakov, made a video on his channel about how to make a hand-held hole punch that can easily handle sheet metal. The idea arose during the work on replacing the bottom on the nine. Those who do body repair know what it means to drill a lot of holes.
Everything is welded through the holes. In order not to do this with a screwdriver or drill, the master decided to improve the technology. The firmware took approximately 3 hours. Available materials were used. The video shows the entire mechanism and what it is made of. How to work with sheet metal. The force is small, although it is advisable to press the hole punch with both hands. The holes are 7 millimeters.
The tip is sharpened like a stationery hole punch. The master took the roller from the bearing and hammered it inside. Sharpened it with a hollow. More than one hundred holes were made using this mechanism. The result is a convenient tool for car repair and not only for that.
Another model of a homemade hole punch for metal. This is a hand tool for making holes in plastic, iron, paper, textolite. No drill required. The master shows how convenient it is to work with this tool; no irregularities, burrs, etc. are formed.
Convenient to use in the workshop or at home for installing plasterboard panels. You can also punch holes and install rivets in the same way. The dragon's honor that pierces the metal is called a sleeve. It can be of different sizes. In the previous video it was 7 millimeters, here it is 5. The sleeve also comes in smaller sizes, for example 2, 3 millimeters. Some copies have a window for working with non-standard sheets and parts.
Cylindrical punches
Serious tools used to make holes in the saddlery or leather industry differ from household tools only in the quality and durability of the materials used.
To punch single holes of sufficiently large diameter, for example, to install rivets or eyelets, punches are used in the form of a metal tube with a sharp sharpening at the end, sometimes with a plastic or rubber handle and a technological opening for removing knocked out circles of leather. These punches are usually sold in sets of several pieces, with tube diameters ranging from 1.5 mm (1/16″) to 16.8 mm (3/8″).
To make a hole in leather or other soft material, place the latter on a hard base (a smooth board is best), mark it, set the punch vertically and hit it with a hammer. But this is a radical solution. Usually it is enough to press the tube with your hand and turn it. The hole is smooth and neat, the material does not jam.
How to make a rectangular leather punch with your own hands
Leather punches are not so easy to find on the open market. And rectangular ones even more so.
I once urgently needed rectangular punches on a day off. There was nowhere to get it from, and there was no time to order via the Internet - watch straps with such holes had to be sent to customers the next day.
An inquisitive mind, innate ingenuity and great internet. In general, I decided to make the punches myself.
I found a couple of long screws and a metal tube of approximately the right internal diameter in the garage.
We immediately need to make a reservation - everything was done practically on the knee, without the use of special tools.
The first thing I did was prepare the future punches by sawing off two pieces of the required length from the found tube. I did everything in a hurry and chose the length of the punches by eye, so that there would be something to hold it on and it would be safe for my fingers to hit with a hammer.
Tips for using the tool
According to their design, metal hole punchers are divided into two types:
To use it, you don’t need to have any special skills, just practice on surfaces that you don’t mind damaging.
The workflow looks like this:
- When using prefabricated devices, it is necessary to install a notch of the required size. To fix the nozzle, turn it clockwise until it stops. Dismantling occurs in reverse order.
- The workpiece must be placed on a non-metallic surface for free passage of the notch. It is best to use wooden blocks. The stand must fit firmly to the surface being cut. It is prohibited to work with a part that is in an unstable position.
When using wooden materials as a substrate, pay attention to the presence of knots and other wood defects. They can change the direction of movement of the notch and disable it.
- The notch is installed on the working plane at a right angle. After this, a strong blow is applied to the protective nozzle with a hammer.
Revolving hole punch
For braiding, a revolver-type leather punch is often used. It is very similar to pliers for cutting metal, only on the head there is a drum with six sharpened cones of different sizes from 1.4 to 5 mm. A piece of leather is clamped between a punch and an anvil, the handles are compressed, and a hole of a given diameter is obtained.
Professional hole punches are made of stainless steel with a brass anvil and are equipped with an opening spring and replaceable steel punches with a lifetime warranty. True, for different models there are restrictions on the thickness of the material being punched.
Characteristics of hand tools and methods of use
We can highlight the most common types of tools that allow you to install grommets. When performing the installation, you can use:
The Fiskars grommet installer includes 3 attachments for installing grommets of different diameters.
- Installer Fiskars.
- Using a 4-in-1 eyelet tool or a collapsible hammer.
- Punch for installing eyelets.
- Pliers for installing Micron NT-2 blocks (manufactured by Gamma).
- Installer "Kangaro".
- Cropodile.
The Fiskars installer kit includes three tools that allow you to install grommets of various diameters. They are used when working with various materials whose density is up to 400 g, for example, among them the following can be distinguished:
- Paper.
- Plastic.
- Thin skin.
- Thin foil.
- Felt.
- Cardboard, etc.
The installer is placed on the surface of the material with its lilac-colored tip where necessary. Be sure to place a special mat to protect the product from damage. When fixing the lilac tip, you should pull up the gray tip with your free hand, which will allow you to stretch the spring by releasing it.
The spring stretches no more than 5 cm upward. After this, the product is laid face down along with the grommet, which should be aligned similarly to the working hole when the product is facing down. Then you should make the installation of the gray tip of the installer, and pull the lilac tip up. If necessary, the work should be repeated.
The pliers for installing blocks are convenient and easy to use.
Using the installation punch, you can install eyelets with a diameter of 4-5 mm. Along with the punch, the kit includes attachments that allow you to nail holes. To install eyelets, twist the punch attachment, screw in the punch attachment and make the required holes. Upon returning the nozzle, the blocks are flattened with tongs.
The general set of Micron NT-2 pliers from Gamma includes 100 blocks, the diameter of which is 4 mm. Durable material is used to make the tongs. They are equipped with an anatomically shaped handle, a ruler that allows you to determine the diameter of the block, and a hole punch, which is used to first punch holes. When installing the eyelets, simply squeeze the handles of the pliers. Installation using a similar principle is carried out using Kangaro pliers.
How to use a collapsible hammer during installation
The process of installing eyelets.
A split hammer is an installation tool that has several attachments. They are screwed into each other, and then into the instrument itself, which is quite heavy and therefore convenient for storage.
Using a collapsible hammer, install eyelets measuring 6 mm or larger, if necessary. During installation, the hammer makes a lot of noise, which is a negative point when using it, especially if it is used late in the evening. A positive effect can be achieved by installing the grommet at any distance from the very edge of the product.
The most important point in the work process is the presence of a hard work surface, since otherwise the grommet will not be installed evenly. The collapsible hammer should be used strictly according to the instructions:
A manual eyelet press is used when installing eyelets into leather or felt.
- First, mark the places where the blocks will be installed.
- Having prepared a hard, flat surface, place the paper or other material with the mark on it.
- After this, the punch is placed in a perpendicular position, and a series of blows are applied to it with a hammer.
- Putting the punch aside, check for the presence of a hole.
- If it is not there, then use a spherical tip to squeeze out the installer or punch it again.
- Having turned the product, insert the grommet from its front side, and then lay it down.
At the last stage, the installer's mandrel must be inserted into the grommet leg, which is flattened by tapping it with a hammer.
What tools are needed when working with leather?
There are dozens of types of tools used to process leather products.
How to cut leather
When working with leather, you have to make a lot of cuts and remove excess material. To easily cope with these tasks, it is necessary to use special cutting tools. These include the following:
- Knife with removable blade. It is small in size and perfect for cutting thick materials. Thanks to the presence of removable blades, the knife will always be sharp and ready for use. Such a product is relatively expensive, so many novice craftsmen prefer to use an ordinary stationery knife. He is also capable of doing a good job. Its only drawback is the need to sharpen frequently.
- Leather scissors. Experts recommend using a tailor's tool that has a self-sharpening function. Do not use office scissors for this work. They will quickly become dull and make crooked cuts.
- Chamfering tool. This metal device has a forked blade at the end, which easily processes the edges of a leather product. Any bevel cutter is equipped with a wooden handle that does not slip out of your hands and does not rub the skin.
What surface to cut leather on?
Leather cutting should be done on a special board. It must have a standard set of characteristics to ensure efficient and safe operation.
Surface Requirement:
- the presence of roughness that prevents the material from sliding;
- high hardness of the product, capable of withstanding strong pressure with a sharp knife;
- the board should not be fibrous.
Plastic (for example, a kitchen board) meets all of the above requirements. This material is able to perform its functions for a long time and not lose efficiency. Other options you can choose from:
- plexiglass;
- linoleum;
- hardboard
How to thin the skin
Thinning (skin roughening) is cutting off the edges of the material in order to create a minimum thickness of the manufactured product. To do this job, you need to use different types of knives and other similar devices. The most popular among them are the following:
- German (shoe) knife. It has a triangular shape and a slightly rounded end. The main feature of the product is one-sided sharpening. The knife thins the material well without tearing it in other places.
- French knife. Unlike German, it has a semicircular shape. Its blade must always be sharp, so the craftsman has to sharpen the product often.
- Planer for leather. It has a sharp blade that is extended relative to the head of the tool. Thanks to this, the plane removes a thin layer of the processed material after each scraper.
How to cut shoelaces
To obtain thin and long laces, craftsmen use a beveller. This device sharpens sharply and easily cuts through even the densest material. If it is not possible to purchase it, then you can do the work using a knife and a (metal) ruler.
Leather embossing tools
Embossing is the extrusion of various patterns and images. During this operation, you need to use special stamps. They are metal tools that can be easily pressed into a product and leave visible marks.
What other tools are needed?
In the process of making an item, you may need different tools for working with leather. Most of them can be purchased in special stores or made with your own hands.
Necessary equipment:
- Punch. It consists of a metal base to which needles of different sizes can be attached. With this tool it is easy to make a hole in the skin.
- Saddler (wooden or metal vice). They are used to fix leather products in the desired position.
- Clamps. These devices will become indispensable when gluing 2 workpieces. Clamps will firmly fasten them together and eliminate the possibility of shifting.
- Marker. It is a tool with a rotating circle with needles at the end. As the wheel spins, each needle lightly pierces the material, leaving a visible mark on it.
Where to buy leather working tools
Most tools are sold in specialized or construction stores. Some accessories can be purchased in departments with sewing supplies.
Stepper punches
To hand stitch thick leather, holes are first punched using a leather stepper. This tool resembles a fork, the teeth of which are sharpened in a special way, most often with a diamond shape. Sets usually sell punches with a certain pitch and the same width of teeth, of which there are from one to ten.
The teeth in certain models of punches are located at an angle of 45° to the line of holes. Using such a tool, you can not only sew a straight seam, but also overcast the product over the edge.
To prepare holes for braiding or Mexican braiding, use a stepper punch with diagonal teeth.
Whatever the shape of the teeth and their location, such a tool is used to pierce suede and leather up to five millimeters thick.
How to use hand tools when installing grommets
First you need to make a hole and thread the grommet into it, leaving its cap on the front side. Turning the product over, install the support ring on the wrong side. Taking a metal ball, the diameter of which is slightly larger than the diameter of the part of the eyelet, which has a cylindrical protruding shape, it should be placed on this part and hit with a hammer. The rivet will be flattened by the ball and the block will be fixed.
Device for sealing eyelets: a - matrix b - punch c - piston d - upper washer of the piston 1 - matrix groove 2 - guide part of the punch 3 - impact part of the punch 4 - clip groove.
For maximum strength, you should lightly tap the installed rivet with a hammer, but you should not apply too much force, otherwise it will ruin the appearance of the fittings. To use this method, you should have experience with all the tools listed above, which will allow you to correctly calculate the impact on the ball.
If you use improvised means during installation, the work process itself will proceed very slowly. In this case, you will need many additional tools that should be available on the farm. It is best to install the fittings using special pliers that allow you to flatten the rivet-like cylindrical part of the grommet.
Line punches
This tool is not much different from a stepper; they are often combined into one category. A line punch for leather is usually made with round pins of small diameter, from one and a half millimeters, and a pitch between them of 5-6 mm. It is used for punching not only leather, but also cardboard, fabric and other materials. The strikers are screwed into the base and can be replaced with spare ones if they break.
When working, be sure to use a backing made of soft wood or rubber.
There are pruning-type punches for making holes in thick or glued leather, in which the teeth are located with their tips facing each other. The holes are smooth on both the front and back sides of the material being punched. Overlays with teeth are installed on threaded connections.
Hole punches - what is the difference from a countersink?
A countersink is a multi-blade cutting tool that is used to machine cylindrical and conical holes in parts. The purpose of this work is to increase the diameter, improve not only the surface quality, but also the accuracy of the hole dimensions. Any actions performed by this tool are called countersinking, or rather, it is semi-clean processing of a hole by cutting off small defects. A countersink punch is a tool that combines two functions at once. The sharp tip allows you to immediately punch holes, and the built-in blades expand them to the desired diameter .
The countersinking process is a precision machining operation that requires high power. Often such work can only be performed using special machines. Drilling machines of all types are suitable for this (these are the most common jobs), turning machines, boring machines (as secondary operations), milling machines (both horizontal and vertical, but they are rarely used, only as one part of the program), modular machines (this may be one of the operations in the automatic line).
Features of metal punches
Devices for round holes in metal have a number of features. The main difference from other models is the use of a special tool alloy, which extends the service life of the tool in difficult conditions.
Special treatment of the contact part of the tool allows achieving high Rockwell hardness. For some models this figure reaches 60 HRC.
Inexperienced craftsmen avoid working with the tools in question, preferring to use a drill. However, its use is impossible when performing particularly precise work: the reverse motion of the drill will certainly damage the inside of the drilled element. In addition, surface deformation can lead to jamming of the drill and failure of the drilling apparatus. Chips and burrs generated during the drilling process can cause injury to the worker.
In addition to hand tools, the use of which is not characterized by high productivity, the following mechanisms are actively used at metalworking enterprises:
- combined press shears;
- presses with CNC system;
- installations for coordinate punching of metal.
Homemade leather punches
Making a leather punch with your own hands is easy. You just need to select a thin tube of the desired diameter and sharpen its edge. It is also possible to make decorative holes by giving the working part the shape of a semicircle, oval, or crescent, if there is no desire or opportunity to purchase such a tool.
Craftsmen use small Chinese screwdrivers, removing the tip, sharpening the edge and cutting a groove to push out the scraps. Telescopic antennas from old radios are processed in much the same way. Some people use IV needles and micromotors with a collet clamp.
An ordinary table fork can be a handy tool for making a stepper tool. True, the holder must be thick and the teeth must be square in cross-section (or triangular, if you come across one). The fork is warmed up, aligned in the same plane with the holder, the handle and excess teeth are cut off with a hacksaw (fifteen millimeters of length remains, or even less). Then the workpiece is brought to working condition: the cut of the handle, the width of the teeth and their height are leveled, and the teeth are sharpened with a needle file.
It is better to pierce soft and thin leather with leather sewing needles. It is clear that, using one needle, it is difficult to make an even seam with identical stitches, and the process takes quite a long time. There are craftsmen who, using improvised materials and thick sewing machine needles, can assemble a leather punch with their own hands. Such a tool can simultaneously punch five holes, but sewing needles, even the thickest ones, break easily, so you need to use a punching hammer very carefully.
Leather is a rewarding material to work with. Using even simple tools, you can make unusually beautiful and functional things from it. These can be wallets, purses, bags, belts, sheaths and much more. And so that the creative process is not too labor-intensive, the seams are smooth and of high quality, and punches are needed.
Punch manufacturing options
To make a simple hole punch, you can also use a thin tube with the desired diameter, sharpening its edge. If you need to make not just a round, but a decorative hole in the shape of an oval, crescent or semicircle, you can initially give this shape to the end of your hole punch. Such a tool can be made from an ordinary small screwdriver, an IV needle, or a table fork.
The main thing when making a hole punch for leather with your own hands is to remember that leather is a noble material, but with the necessary skill and accuracy you can make useful, comfortable and beautiful things and accessories from it.
What should a hole punch kit include?
A good master is always armed with a whole set of hole punches, but what types should be present there, let’s analyze the classification. There are several criteria by which types of such instruments are distinguished. According to the installation methods on the machines, they are either tail-mounted or attachment-mounted. According to the design solution of the working part - solid and prefabricated. By type of drive, we can distinguish manual, hydraulic and pneumatic. According to their intended purpose, there are punches for holes or notches, for metal, concrete, rubber, panels, etc.
The notch punch for snapping panels and the tool for adjusting or widening holes can be one-piece or prefabricated. For their manufacture, tool or carbide steels are used. They usually have a cylindrical shape and a large number of teeth, and the core diameter is comparatively large. But if you need to enlarge or make holes in structures made of metal or concrete, then use a cylindrical metal punch with an expanded core. This type of tool does not have a transverse edge, and the main cutting edges are small and located on the periphery. Metal, concrete and other hard materials are processed faster with just such countersinks, due to the prefabricated structure.
The concrete punch makes it possible to change the guide pin. It can be easily removed in case of problems or damage. We are used to the fact that holes in any materials can be made with a drill, changing only the drill bits, but this technique is not suitable for rubber, but a solution was found when a punch for rubber was invented. Just a tube sharpened at the end can easily make holes in this elastic material. And the profile punch is similar to a stationery hole punch, that is, we are already familiar with its use, in fact, as is its appearance.
Source
Hole punches - what is the difference from a countersink?
A countersink is a multi-blade cutting tool that is used to machine cylindrical and conical holes in parts. The purpose of this work is to increase the diameter, improve not only the surface quality, but also the accuracy of the hole dimensions. Any actions performed by this tool are called countersinking, or rather, it is semi-clean processing of a hole by cutting off small defects. A countersink punch is a tool that combines two functions at once. The sharp tip allows you to immediately punch holes, and the built-in blades expand them to the desired diameter .
The countersinking process is a precision machining operation that requires high power. Often such work can only be performed using special machines. Drilling machines of all types are suitable for this (these are the most common jobs), turning machines, boring machines (as secondary operations), milling machines (both horizontal and vertical, but they are rarely used, only as one part of the program), modular machines (this may be one of the operations in the automatic line).
A standard tool consists of a cutting part, working and calibrating parts, a neck and a shank. The cutting part is made in such a way that the main cutting edges are located on it. They are always located at a certain angle. The size of the angle depends on the purpose and type of countersink punch. Typically, if they are used for ductile metals, the angle should be about 15 degrees, and if for brittle metals - about 5 degrees.
The calibrating part has a cylindrical shape. There are always auxiliary cutting edges located on it. Their purpose is to clean and calibrate holes. To prevent damage to the ends of the teeth, a small reverse cone is made at the end of the calibrating part, where the value of the reduction is from 0.04 to 0.07 mm. The sharpening of teeth on all tools of this type is different, it all depends on the purpose. To improve the cleanliness of processing, all teeth are spaced unevenly, this design solution helps to increase productivity and improve work quality.