Working tools and materials
The raw material for creating a handicraft knife can be any used or new cutting component made of hardened steel. As a semi-finished product, it is advisable to use saw wheels for metal, concrete, saw wheels for pendulum end saws and hand saws. A decent material would be a used gasoline saw. From its chain it is possible to forge and make a blade, which in its properties and appearance will be no worse than the legendary Damascus blades.
To create a knife from a circular disk with your own hands, you will need the following equipment and materials:
- angle grinder;
- emery machine;
- electric drill;
- ruler;
- hammer;
- sandpaper;
- whetstones for sharpening;
- files;
- center punch;
- epoxy;
- copper wire;
- felt-tip pen;
- container with water.
To create a handle, it is preferable to use:
- non-ferrous alloys (silver, brass, bronze, copper);
- wood (birch, alder, oak);
- plexiglass (polycarbonate, plexiglass).
The material for the handle must be solid, without cracking, rottenness or other defects.
How to determine wear?
Checking the saw blade for wear is an important issue that should be given special attention. Deep damage makes it impossible to sharpen the wheel.
There are three main signs by which you can understand that the saw needs to be sharpened or replaced:
- The protective casing becomes very hot and produces smoke. The circular saw has a special casing that indicates that the saw has become dull due to heat. In particularly difficult situations, smoke may appear from it.
- Sometimes the saw design involves a mechanical feed (if you need to manually adjust the pressure force). In such a situation, wear can be noticed if the pressure has to be increased.
- If, when sawing wood, carbon deposits and a strong unpleasant odor are formed on the workpiece.
All the situations described above tell the user that it is time to sharpen the device.
Other part processing methods
If for some reason you can’t make a knife out of it, because you don’t have the necessary material, replace it. A car spring, the metal of which is softer than that of a saw, is well suited for making a blade. To process such a workpiece, you do not have to use a sharpener, but you will need a metal saw to cut out the shape of the blade. Since metal is easier to process, the edges of the workpiece can be adjusted with a file. It will take longer to make a knife this way, because each stage of processing involves manual work.
Making a knife from a saw is a labor-intensive process, but the result is worth it. By making a knife from a saw with your own hands, you will receive a high-quality and unique blade.
My friend and I decided to make knives from the same steel and the same shape, but I make them by hand and he uses power tools.
I was wondering how long it would take me to make a knife for concrete or metal using just files and a drill and my hands. I was very pleased with the result.
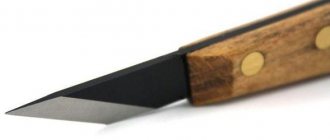
DIY circular saw knife
But forging requires certain tools and skills. What should you do if you want to make your own unique blade, but only have a minimal set of tools at hand? In this case, you should pay attention to a circular saw as a blank for the blade. The metal from which the circular saw blade is made lends itself well to hardening and has the necessary elasticity, so the saw will be the optimal workpiece for making a knife with your own hands. A homemade knife made from a circular saw holds an edge well, does not break, and can easily compete with industrial knives.
DIY circular saw knife
Rules for working with metal
In order for the blade to be strong and elastic, during its manufacture it is necessary to follow the rules of working with metal. They are as follows:
- The workpieces must not have visible or hidden damage. Before making a knife, the workpieces must be inspected and tapped. A solid part sounds loud, but a defective part sounds dull.
- When designing the shape of the blade, angles must be avoided. In such places the steel can break. All transitions must be smooth, without kinks. The cuts of the butt, handle and fuse must be ground at right angles.
- When sawing and sharpening, do not overheat the steel. This leads to a decrease in its strength. An overheated blade becomes brittle or soft. During processing, the workpiece must be constantly cooled by completely immersing it in a bucket of cold water.
- When making a knife from a saw blade, you need to remember that this product has already gone through a hardening cycle. Factory saws are designed to work with the hardest alloys. If you do not overheat the canvas during the turning and finishing process, then you will not have to harden it.
The blade shank should not be made too thin. It is this part of the product that will bear the heaviest load.
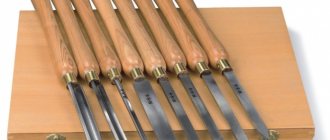
A step-by-step guide to creating a wood cutter
Creation of semi-finished products for a cutter blade
The elements for the cutter blade are made from a used circular disk. To do this, the disk is cut according to the markings using an angle grinder into several rectangular strips measuring approximately 20x80 millimeters. Each stripe is a cutter in the future.
We give an outline to the main incisors
Each cutter must be machined to the required configuration. The process can be implemented in 2 ways: by sharpening on a machine and by forging. Forging is necessary to form a deflection, and turning is necessary to form a single blade configuration.
Sharpening
To sharpen the blade, you need an emery machine with a small-grain stone. Sharpening is performed at an angle of approximately 45 degrees, and the length of the pointed part is somewhere around 20-35 millimeters, taking into account the total length of the cutter. The blade itself can be sharpened either by hand or using a tool.
Creating a handle for comfortable carving
To make using the tool extremely comfortable, you will need to make a wooden handle. The handle is made using special equipment or by hand, by planing and subsequent grinding using sandpaper.
Joining the blade with the handle
The steel blade is inserted inside the wood handle. To do this, a hole is drilled inside the handle up to 20-30 millimeters deep. The blade of the cutter will be located outside, and the base itself will be hammered into the cavity of the handle.
Mounting the crown
A steel retaining ring is installed to secure the blade. A specialized contour is cut into the wooden handle exactly to the size of the ring. Then the thread is cut and the crown ring itself is fixed onto the already made thread. As a result, the wooden handle should be compressed on all sides, and the blade should be tightly fixed in the “body” of the product.
Blade grinding
In order for wood carving to be of the highest quality, the blade needs to be fine-tuned. To do this, use a small sharpening stone or ordinary ceramics. A little oil is poured onto the plane of the blade (you can use motor oil), and then the cutter is sharpened at an angle of 90 degrees.
To learn how to make a knife from a circular disk with your own hands, see the following video.
Knife from a chainsaw chain
Saw chains are made of high-quality alloy, which perfectly withstands prolonged friction and high temperature. The blade manufacturing process is long and labor-intensive, but the result is a beautiful, unique and very durable knife. To work you will need a heavy anvil, barbecue and charcoal. To make it easier to handle a hot workpiece, you need to purchase blacksmith tongs.
Making a blade from a chainsaw chain should be carried out in the following sequence:
- Prepare clothes and gloves made of thick fabric and a protective mask. Pour charcoal into the fireplace and light it with a special liquid.
- Fold the workpiece from a single piece of chain. In the place where the handle will be, you can add several pieces of chain. It should be remembered that the result of the work should be a single monolithic product. The handle for the knife is not made separately.
- Place the workpiece on the coals. Provide air flow to raise temperature. Wait until the steel turns dark red. In this state, it becomes forgeable without losing its quality characteristics.
- Remove the hot chain from the fire and place it on the anvil. Flatten it with several strong blows so that the links melt together, turning into a single monolithic part.
- Step by step, by heating the workpiece in the oven and giving it the desired shape with a hammer, forge a knife with a designated handle and blade. After the workpiece has cooled, sharpen and polish it.
- Harden the product. To do this, you need to heat it red-hot again and put it in cold water. After this, you can finish the knife. For this purpose, acid and an engraving machine are used. The finished blade is polished again and washed in a warm soapy solution.
When making a blade yourself, you must adhere to certain parameters so that the finished product does not fall under the category of edged weapons.
Making a knife from canvas
If the blade is large and does not have much wear, then several blades for different purposes can be made from it. The effort and time spent are worth it.
A knife is made from a circular saw with your own hands in the following sequence:
- A pattern is applied to the canvas, and the contours of the blade are outlined. Scratches or dotted lines are applied over the marker with a core. This way, the design will not be erased when cutting out the workpiece and adjusting it to the desired shape.
- Workpieces are cut from a circular saw blade. To do this, it is better to use a grinder with a metal disc. You should leave a margin of 2 mm from the contour. This is necessary in order to remove the material burned by the grinder. If you don’t have a grinder at hand, you can sharpen the workpiece using a vice, a hammer and a chisel or a hacksaw.
- Any excess is ground off on the grinding machine. You will have to spend a lot of time on this process so as not to overheat the steel. To prevent this, the workpiece must be regularly immersed in water until it cools completely.
- The blade is outlined. Here you need to be careful to maintain the contour of the knife, not burn it and maintain an angle of 20º.
- All straight sections are leveled. This is conveniently done by placing the workpiece on the side of the grinding wheel. The transitions are given a rounded shape.
- The part is cleared of burrs. The blade is ground and polished. To do this, several interchangeable wheels are used on a grinding machine.
Separately, we should dwell on how the handle is made. If wood is used, then a monolithic fragment is taken, in which a longitudinal cut and through holes are made. After this, the blank is placed on the blade, and holes for fastening are marked in it. The handle is fixed to the blade using rivets or bolts with nuts. In the case of a bolted connection, the heads of the hardware are recessed into the wood and filled with epoxy glue.
When the handle is assembled from plastic, 2 overlays are used, which must be symmetrical. To give the knife originality, the plastic linings are painted on the inside. You can make cavities in the overlays that can be filled with jewelry, items made of non-ferrous and precious metals, small compasses and photographs.
This is interesting: How to sharpen a knife with a whetstone
After fastening to the blade, the handles are ground until they acquire the required shape and smoothness.
Creating a knife layout
The first step is to create a model of the future knife from a saw. At this stage of work, you can decide on the shape of the blade of the future blade and the shape of the handle. The layout is best made from thick cardboard or thin plywood. You can also use thick plastic. A rigid pattern will allow you to understand how a knife from a circular saw will lie in your hand and how convenient it will be to use.
When making a layout, it is important to adhere to the following rules:
- Right angles must be avoided. A right angle is a place of stress concentration. The blade of the knife most often breaks or cracks in this place.
- The shape of the blade must be chosen based on the purpose of the future knife. The most versatile forms are with straight or descending butt. Such a blade can cut and stab equally well.
- The dimensions of the layout must correspond to the size of the circular saw blade.
Knife preparation
When making a model, you should also remember that a knife can be classified as a bladed weapon. It all depends on the shape and size. Manufacturing and possession of bladed weapons is criminally punishable. Therefore, in order not to fall under the article of the criminal code, it is necessary to create a layout that complies with the following rules:
- The length of the blade or cutting part should not exceed 9 centimeters. Exceeding this length even by 1 mm will allow you to classify a homemade blade as a bladed weapon.
- A knife with a blade thickness of more than 2.6 mm is also a bladed weapon. This parameter can be neglected, since the thickness of the saw blade is usually 2 mm.
- Hardness should not be more than 42 units. This parameter relates to hardening, so we also skip it at the stage of making the pattern.
- The handle should have a limiter that protrudes beyond its limits by no more than half a centimeter. If there is no limiter, then the sub-finger recess should be less than 4 mm deep.
Once a layout that satisfies the letter of the law and personal preferences has been drawn, you can proceed to transfer the layout to the saw blade. The pattern is applied to the saw blade and outlined with a marker. It's best to use a fine marker. A thin line will allow you to cut the workpiece more accurately and avoid unnecessary filing of the workpiece.
Forming the cutting edge
Before you begin shaping the cutting edge, it is necessary to carry out preparatory work. It consists of applying markings on the edge of the workpiece. The markings are placed exactly in the center and serve as a guide for making a symmetrical descent.
To do this, paint over the edge that will be cutting with a marker and, using a drill equal in thickness to the workpiece, scratch the markings. The drill has a conical sharpening. Therefore, if you place the drill and the workpiece on the same plane, the tip of the drill will be exactly in the middle.
Edge cutting device
Then, using a coarse file, you can begin shaping the cutting edge. If you do not have the proper skills to create a smooth edge, you can use a simple device. It consists of a base, an angle and a guide with a platform for sandpaper. 180-grit sandpaper is glued onto the platform with the guide. Several holes must be pre-drilled vertically one above the other in the corner. The knife is fixed flat on the base and the guide is inserted into the hole at a height so that the angle between the plane of the base and the platform with sandpaper is the same as that chosen for forming the slopes. A universal angle is from 22 to 30 degrees.
Having made an even descent to the middle of the thickness of the workpiece, turn the knife over, then make the same descent on the reverse side. Using such a simple device, you can easily form an even blade.
How to make a knife handle
The easiest way is to glue a handle from two cut and prepared pieces of wood or plexiglass. It is much easier to make than attaching it to the tail of a knife. Naturally, you can choose a simple option and wrap the handle with electrical tape, but why try so hard to end up ruining the aesthetic appearance of the knife?
And now comes the most crucial stage of work. Since you will have to drill in the shank of the knife, the blade can easily burst. Therefore, be vigilant and careful.
Steel is a hard, but at the same time brittle material. If the pressure is evenly distributed when the saw is in operation, it is almost impossible to break it. But with spot drilling, the pressure increases and the metal can easily crack. Therefore, it is better to drill a hole at low machine speeds and do not forget to add oil to the drilling site. In this case, a screwdriver is an ideal tool for accomplishing this goal, since it has fewer revolutions and the possibility of breaking the part is not so high.
After completing the previous step and making holes in the handle, drill the same holes in the halves of the handle. Make a copper or aluminum rivet. For insurance, you can glue the area where the rivet will be located with glue, but it is better if you have epoxy resin.
Forming the upper part of the handle
The upper part of the handle is prepared in advance for the reason that after gluing the handle to the shank, processing the upper part will be difficult. Also, during the processing process, you can scratch the blade, which is extremely undesirable. Holes for rivets are drilled according to the markings made during the preparation process. A rod of suitable diameter is inserted into them. It allows you to firmly connect both parts of the workpiece and will not allow them to move during processing.
Finished knife handle
Forming occurs using files and sandpaper
At this stage, it is important to remember the permissible dimensions of the limiter and finger recess
The final processing is carried out using 800-grit sandpaper. Before gluing, all parts must be thoroughly degreased. This can be done with acetone or solvent. Once the degreaser has dried, glue or epoxy can be applied.
Cutting and primary processing of the workpiece
The fastest way to saw a workpiece is with a grinder with a thin metal cutting disc. If it is not possible to use a grinder, you can use a hand hacksaw for metal. It is important to correctly install the file into the hacksaw. The teeth of the saw should be directed forward and the hacksaw should cut while moving away from you.
Cutting and preparing the workpiece
First, the approximate shape of the knife is cut out using straight cuts. Then the bends are cut out. The easiest way to cut them is with several oblique cuts converging at one point. It is important to leave an allowance of 2-3 millimeters to the drawn outline. This is due to the fact that when using a grinder, the metal at the cutting site overheats. By grinding off 2–3 mm using a file and sandpaper, you can remove the overheated edge of the metal.
Sanding and varnishing a knife handle
Final sanding is done using sandpaper. Gradually increasing the grain size, it is necessary to remove all rough marks from paper of a larger grain size. It is enough to complete the process of sanding the knife handle with 600 grit paper. The last step in making the handle will be its impregnation.
There are several ways to impregnate a handle to better preserve it. This is oil impregnation, wax impregnation or varnish coating.
Each method has its own advantages and disadvantages. For example, wax must first be melted by heating it, and heating has a detrimental effect on the strength of the glue that glues the handle. Oils must be updated periodically. And the varnish serves only the function of surface protection.
Sawing out the handle blank and preparing for gluing
To finish working with the knife, you need to make a handle. There may be different variations of materials used as a handle. The most popular material is wood. The wooden handle is impregnated with linseed oil to prevent the harmful effects of moisture on it.
Select a flat plank from the wood of your favorite species. The thickness of the board should be at least half a centimeter for convenience. A thick board can be sawn lengthwise. Using the knife blank as a template, markings are applied to the board, including holes for rivets. For a good fit of the future handle to the shank, it is necessary to create a plane of contact using sandpaper.