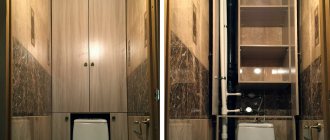
Any sewer system does not look very nice. If it comes to an apartment or house, then the issue of aesthetics when organizing water supply is very important.
To ensure that the pipeline in any place of the home, be it the bathroom, toilet, kitchen and other rooms, does not spoil the appearance, it must be properly hidden. It is important not only to ensure an aesthetically pleasing appearance of the room, but also to leave the opportunity to get to the sewer network in case of breakdowns or leaks. Let's look at the main ways to hide a plumbing system in a room.
What you need to know before installation
Each part in any mechanism has its own purpose. In this regard, pipes can also be perceived as elements of a single and well-functioning system. A system that sooner or later may fail, which means that prompt access to pipes is not a wish, but a necessity. There are a number of comments from specialists that you should listen to carefully if you want to handle the operation correctly:
- if there are any threaded connections, taps, etc. on the pipes, then with any chosen type of masking of communications, quick access to them should be provided;
- when installing a mandatory decorative box or covering pipes with plastic panels, provide for the creation of an inspection hatch;
- communications made of metal-plastic have connections - so-called fittings - that are regulated by keys; these areas require constant monitoring on your part and the possibility of prompt intervention in case of leakage;
- do not place pipe inspection hatches in places where there are no connections - the chance of a leak in these areas is so minimal that it should not even be taken into account;
- immediately before installation, you should carefully check all communications - and correct any noticed defects before installing a false wall or box;
- To prevent condensation, it is recommended to insulate water and sewer pipes.
Remember that the functionality of well-established engineering communications in the bathroom should not be sacrificed for decorativeness. A reasonable balance is always somewhere in the middle, and following the simple rules outlined above will help you not only deal with the problem of visible pipes beautifully, but also maintain confidence in their reliable functioning.
Fastening with clamps
When securing polymer pipes, clamps are used that are softened with a rubber liner. This helps to fix the pipe well and get rid of unnecessary noise and vibrations. The width of the clamp is close to the width of the outer diameter of the pipe. However, if the clamps do not have a rubber insert, you can use clamps with a smooth ring inside.
Nowadays, special clamps called plumbing clamps are used to secure pipes. These are universal clamps that are suitable for different pipe diameters. The peculiarity is that they have a semicircular shape, which when connecting two clamps gives a round clamp. They can also be used to change the diameter.
Features of installing a plasterboard box
The bathroom is a room in which there is constantly high air humidity. This means that the drywall for creating the box should be selected as moisture-resistant. It is generally available commercially in green sheet format. Drywall itself has many advantages as a reliable and environmentally friendly finishing material:
- easy to cut;
- forms an aesthetically attractive and durable surface;
- allows you to create a reliable and safe false wall or partition;
- goes well with plaster or ceramic tiles.
What will you need?
- profiles;
- moisture-resistant drywall;
- silicone sealant;
- screws;
- dowels;
- knife;
- hammer drill
What is the secret to successfully installing a plasterboard masking box in the bathroom? Strictly following the detailed installation diagram presented below will help you quickly and efficiently hide pipes in the bathroom without installing them into the wall:
- think in advance about how the box will look, make sketches on paper, give your notes the appearance of a clear and well-thought-out diagram;
- take the necessary measurements to find out how much material you will need;
- calculations are made to determine the required amount of materials;
- in the places where the pipes come into contact with the wall, use a hammer drill and dowels with screws to secure the guide profiles - this way you will establish the boundaries of the frame of your future structure;
- attach the same profiles to the floor and ceiling - for perfect fixation of the upper and lower parts of the box;
- install the corner outer profile and secure it with stiffening ribs for stability, they can be made from the same guide profiles, connecting the corner profile with the resulting fragments to what is fixed on the wall;
- cover the frame with plasterboard, cutting out the necessary fragments with a knife and inserting them between the profiles;
- After covering, treat all joints with sealant;
- All that remains is to finish the surface of the box - paint, plaster, cover with ceramic tiles.
By the way, plasterboard sheets in the bathroom can be successfully replaced with plastic panels
. True, the strength of the material speaks in favor of the former. Plastic, for all its advantages, is still a much more fragile material.
It seems that this method of hiding pipes in the bathroom is the most difficult, but if you look into it, there is nothing complicated about it:
sequential implementation of all installation points will lead you to a good result
.
For better clarity, here are several videos from professionals.
And a small selection of photos with drywall boxes in the bathroom.
How to hide pipes in the kitchen: photos and examples of interesting methods of disguise
In addition to the sink, in many kitchens you can find gas stoves, washing machines, dishwashers, hoods and heating equipment. All this functions due to communication systems, so many apartment owners are wondering how to hide so many pipes in the kitchen. The method of masking depends on the purpose of these pipes, as well as their location.
How to hide a gas pipe in the kitchen: popular methods
On the Internet you can find many examples that clearly show through photos how to hide a gas pipe in the kitchen without disturbing the beauty of the interior. The most common option is staining. The color of the pipe can be made to match the wall or, conversely, contrast against its background. In addition, you can use decoupage and painting techniques, as well as decoration using magnets, ropes, plastic plants, mosaics and other improvised means.
With the help of railing you can create an illusion, thanks to which communications will seem to be part of the overall picture
Note! Gas service workers do not always welcome hanging decor, so you need to think through the design very carefully before hiding a gas pipe using this method.
Shelves, hooks and all kinds of holders are an integral part of the kitchen, allowing you to make its interior more functional. According to safety requirements, nothing should be hung on the gas pipe. However, with the help of railing you can create an illusion, thanks to which communications will seem to be part of the overall picture. To do this, the pipe is painted in a color that is as close as possible to the shade of the railing. Most often, copper, bronze colors are used for this, as well as shades that imitate a chrome surface.
The railing is fixed to the wall directly below the pipe. Thanks to the similar design and close proximity, these elements look like one whole, and safety rules are not violated.
Features of laying sewerage in a private house
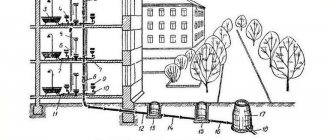
Depending on the number of floors of the building and its layout, the pipeline in houses is laid openly or hidden, with or without a riser.
The principles of wiring from a riser are no different from those for an apartment. The more important part of the system is the horizontal sections running under the floors and in the ground.
Pipes are laid before the foundation is poured
It is necessary to accurately correlate the position of the highways relative to the house design.
To simplify the task, you can initially provide only the input at the required depth, and then, after completing the construction of the box, carry out the internal wiring.
We recommend reading: depth of sewer installation in a private house.
In private homes there is a unique opportunity to lay pipes of any diameter under the floors. Even if there is a basement, they can be thrown along its ceiling.
Pipes are also laid inside wooden floors. This way, you can connect the sewer system to all devices from below, which means that any level for drains can be set.
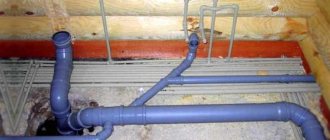
Laying horizontal sewerage before building a house
If the system does not have a riser, a check valve must be installed in one of the rooms. Otherwise, the vent pipe is brought to the roof. The installed check valve is shown in the following photo.