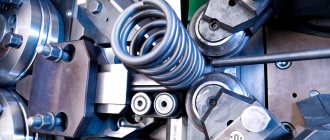
There are many different tools for sawing workpieces - these are hand saws, circular saws, cutting saws, jigsaws, etc. But a band saw occupies a special place among them. This article will focus on making a homemade bandsaw.
Introduction
In the workshop, everything should be at hand and the abundance of tools makes the master truly free to choose methods and techniques of work. One of the most basic operations in any workshop is sawing workpieces. Moreover, sawing can be different - somewhere you need to saw off quickly and the quality of the cut is not important, somewhere you need a blind saw and a circular saw or jigsaw with a special file can handle it, somewhere you need an extremely even saw, and so on.
A DIY wood band saw deserves pride of place in the workshop. Not everyone has it, however, the ease of its use is undeniable. Its advantages include the following features:
- High cutting quality, as there is no return movement of the cutting blade.
- High sawing speed, as the cutting band moves at high speed.
- High maneuverability when sawing due to the small thickness of the cutting blade.
- High versatility and flexibility of tool use.
- High operational safety.
However, the band saw also has disadvantages. Let's list them:
- This is a stationary saw, so there is no possibility of its mobile movement.
- Limited sawing area due to design features.
- Large dimensions.
What materials are needed for manufacturing?
It should be noted that not the entire structure can be built from available materials. Therefore, before making a band saw, you should collect the necessary parts:
1. Wooden panels, chipboard, MDF or plywood. The saw frame and stand, as well as pulleys, are made from these materials.
2. Sheet steel for the production of a cutting blade or a ready-made part that can be purchased in a store.
3. Channel and steel rod. These parts are used to make the support frame and the axle on which the pulleys will be installed.
4. Sheet rubber. It is used to protect wood.
5. A durable belt that will ensure the rotation of the wheels on the machine.
6. Polyurethane glue for joining some parts.
7. Fastening elements: screws, brackets, bolts, washers and rubber gaskets.
8. Bushings.
9. Electric motor. You should not buy a very expensive model. Just decide how much power the machine should have.
Thus, a band saw can be built with your own hands. Drawings of this design should be made, calculating each step as accurately as possible. Naturally, you can find all the schemes ready-made.
Making a band saw
Preparing for work
When starting work, you need to prepare all the tools and materials, as well as a place where it will be comfortable and safe to make a homemade band saw.
Tools:
| Basic tool | Descriptionoperation | Alternative tool |
| A circular saw | Performing longitudinal cutting of workpieces |
|
| Jigsaw | Sawing out a niche, groove and top bolt. Making pulleys. |
|
| Clamps | Fixation of workpieces during gluing, as well as during other operations | There are no worthy alternatives, but you can adapt and try using a carpenter's vice or some heavy object as a press. |
| Drilling machine (+ drills) | Drilling holes |
|
| Grinding machine | Sanding the surface of workpieces and edges |
|
Materials, fittings, fasteners
- Plywood 15 mm thick;
- Solid wood block;
- Bolts for horizontal and vertical adjustment;
- PVA carpentry glue;
- Wing for adjustment bolts;
- Insulating tape;
- Bearings for the upper axle;
- Two bearings for the drive axle;
- Two shafts;
- Cutting blade;
- Two bushings with internal thread;
- Self-tapping screws, nuts, washers, fittings, studs;
- Belts or attachments for a sander or screwdriver.
Main structural elements
The band saw drawing will include the following components:
- Base;
- Tape tension mechanism;
- Sawing table;
- Pulleys;
- Saw blade (cutting tape).
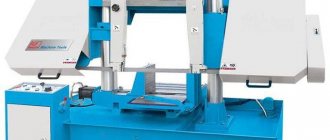
Band sawmill at home
Wood is the most popular material in construction, which was used by our ancestors. And, it should be noted that he still remains in demand. There are many people who want to build houses from wood rather than from concrete.
Even a non-specialist understands that the construction of such facilities takes a lot of time and is quite expensive. It was in order to achieve savings on these operations that woodworking machines were invented.
Although companies today offer different types of sawmills, each of them is designed to solve one task - logging processing. But everyone does it in their own way.
If you have at your disposal a band sawmill that you can make yourself, then you can not only process wood for personal purposes, but also get additional income from it.
You can agree with interested parties on the production of the required volume of products and easily cope with this task. You will be able to fulfill any order, regardless of whether it is a gazebo or a bathhouse. All you need to do for this is take the workpiece and process it, after which you can use it for its intended purpose.
What can be made on a band sawmill
This question is asked by many craftsmen who have heard well about the popularity of band saws. Let us remind you once again that today such devices are presented in large quantities, but it is no coincidence that the band sawmill is the most popular.
The current situation can be explained by the presence of many advantages of this equipment that are relevant for craftsmen. First of all, a sawmill of this design can process workpieces made from any type of wood, including hardwood and high-resin.
Another feature of the band sawmill is that it can produce a fairly wide range of products:
- Edged and unedged boards.
- Bars.
- Veneer.
- Lafet et al.
If you wish, you can create blanks for their subsequent use in the manufacture of furniture, laminated veneer lumber, panels and other products. Having a band sawmill in your workshop will greatly simplify the wood processing process.
A design of this type is valued by many, including because it allows to minimize the loss of logs to sawdust. Therefore, if you can make a band sawmill with your own hands in compliance with all the rules, you can be sure that after processing the workpieces, no unpleasant waves or stubble will appear on them.
DIY band sawmill: drawings and design
There is no need to rush and immediately move on to the practical part of making a band sawmill with your own hands. First you need to study the design and make a simple drawing. This must also be done if you want to make a disk or tire sawmill.
The design of this equipment is quite clear and simple. Therefore, you can easily add to it the components you need to perform additional operations that you will encounter during your work.
In other words, you have the opportunity to make the simplest version of a sawmill, which provides the ability to manually feed the workpiece. Or you can opt for a more complex version, creating a high-performance device based on an individual drawing, equipped with automation and special sensors that simplify the work of processing workpieces.
The main element of a sawmill, both disk and tire, is a frame with guides. For its manufacture, welded soles are used, in which movable rollers are placed. With any version of the band sawmill, the frame is always U-shaped, and it is made by welding two channels together.
In this case, the drive pulley is welded on one side of the frame in a stationary state, and the second is attached to the other end in a movable position. The installation of the guides is carried out strictly in the center and they themselves are collapsible.
This is definitely something to think about if you plan to transport equipment in the future. In general, making this ribbon structure with your own hands is a rather time-consuming process. However, if you manage to do everything correctly, you will get a very useful assistant in your workshop.
Manufacturing of structural elements
The manufacturing instructions will be divided into 5 points and include steps to produce a homemade bandsaw. The article provides photo and video materials that will help you not make mistakes during production.
Base
- Since the band saw must be strong, it is necessary to prepare plywood with a thickness of at least 15 mm. We cut four blanks 550 mm long and 23 mm wide.
- Next, we make the markings using a pre-created stencil, or you can make the markings directly on the workpiece. The two plates located inside must have a niche for the adjustable mechanism. For external parts it is necessary to draw a through groove. The amount of vertical adjustment will depend on the size of this groove. Next, you need to mark a through hole for the lower drive shaft. In addition, we will need a surface for a saw table, the dimensions of which in terms of the width of the table will not exceed 150 mm. In all workpieces, it is necessary to cut a square between the circles in height equal to 15-20 cm, and not exceeding 15 cm in width.
- Using a jigsaw, you need to cut out the necessary parts, as well as the adjustment groove for the upper pulley, then drill a hole for the lower drive shaft.
- Next, you need to assemble the future foundation. For assembly, use PVA glue or any other wood glue. We apply it in an even layer on all the surfaces to be glued, then we apply the parts to each other, avoiding inaccuracy. Fixing the products must be done with clamps, since high-quality gluing requires a tight fit of the workpieces. It is necessary to wait a day until the glue dries completely.
- We install bearings for the lower drive shaft.
Saw blade (band) tension mechanism
- To make a tensioning mechanism for a band saw, you need to make a block, the dimensions of which will correspond to the niche in the saw body. A hole is drilled at the end of the block for the pin and fitting. Sockets for bearings are cut out on both sides.
- We insert the pin and secure it in the block. It should stay firmly in the hole. To increase the strength of the fastening, before inserting the pin, apply PVA glue to its surface, and you also need to additionally secure the pin with a self-tapping screw or screw.
- Next, the shaft bearings and fixing sleeve are installed.
- Using a screw in the foot, the saw blade tensioning mechanism will be rigidly fixed.
- It is necessary to install a handle on the pin, the rotation of which will allow you to change the depth of immersion of the bar into the base, thereby changing the distance between the pulleys - this is how the belt is tensioned.
Pulleys
While the base glue dries, we begin to manufacture the moving elements, namely the pulleys. The entire process of their manufacture is reflected in the photographs provided.
- On a sheet of plywood 15 mm thick, you need to mark the contours - a circle with a diameter of 150 mm.
- Cut the blanks with a jigsaw along the outlined contours and drill a hole in the center of the circle.
- Even the most precise and careful sawing will not give the workpiece perfectly correct shapes, so it is necessary to grind the ends. For this, a grinding machine with a table at 90 degrees relative to the plane being processed will be used. If you do not have a suitable tool, you can grind the edge using a hand-held grinder or a homemade screwdriver with a grinding attachment. The workpiece is fixed with a bolt or self-tapping screw to some base. Thus, when it is fed to the grinding wheel and rotated around its axis, a perfectly smooth circle is obtained.
- After processing the pulley on a grinder, you need to wrap its ends with insulating tape in several layers, and you can also use rubber from bicycle inner tubes.
Sawing table
The saw table will be 15 cm wide. It will be installed on a special end face of the base of the machine between the pulleys. You need to make a cut in the table for free movement of the saw blade. The dimensions of the table being manufactured depend on the needs and preferences of the craftsman. You can make a small table that only slightly protrudes beyond the machine and saves space, or you can make the upper surface area larger for ease of work. As always, in life you need to choose the “golden mean”, so the final decision is up to the master.
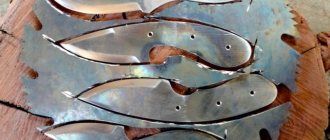
Saw blade (cutting band)
It is best not to make the cutting blade yourself, but to buy a ready-made one. In stores you can find a wide variety of options, which differ in type, size, type of steel used, hardening of the material, shape of the teeth, their setting, etc.
Below is a table with some parameters of saw blades.
| International marking | Decoding | Body hardness | Teeth hardness | Application Feature |
| Constant hardness | with equal hardness over the entire area | 45 – 48 units. HRc | 45-48 units HRc | This type is used on small diameter pulleys. |
| Flex back – Hard Edge | with high levels of tooth hardness, but a flexible body | 30-33 units HRc | 63-65 units. HRc | The upper part of the tooth is hardened, while the rest of the product is flexible. Able to withstand larger feeds compared to the previous type. |
| Hard Back | blades hardened over the entire area | 48-53 units HRc | 63-68 units. HRc | The saw band production technology is the most modern and is used in industry. Capable of performing a larger volume of work, but the price is significantly higher. The canvas is used in professional machines. |
In addition, band saws differ in tooth size:
- with small tooth
- with middle tooth
- with large teeth
The greater the hardness of the tape, the greater its resistance to dulling. The rigid blade allows you to cut material at high feed rates without compromising the performance characteristics of the work.
In this case, for our band saw, the best option was to choose a blade 1065 mm long made of carbon steel, marked Constant Hardness.
Preparatory activities
Before starting assembly activities, based on the drawing, you should prepare the necessary materials and tools. This will allow you, first of all, to determine whether you have everything you need for the job (you will need to buy what’s missing), and also not to be distracted by little things during the process.
Required materials and tools
To make a band saw, you will need the following materials and parts:
- boards or sheets of plywood (or chipboard) from which the frame, table, and pulleys will be made;
- sheet steel (for saw);
- channel used to create a support frame, or metal corners, or wooden blocks and slats;
- bearings;
- steel rod - for making pulley axles;
- electric motor;
- self-tapping screws, bolts with nuts and washers;
- polyurethane glue;
- rubber from a bicycle inner tube;
- textolite;
- bushings;
- V-belt;
- varnish or paint.
To work you will need the following tools:
- screwdriver (with drills);
- hammer;
- wrenches (the size of bolts);
- screwdrivers;
- pliers;
- Sander;
- Bulgarian;
- grinder;
- jigsaw
Power tools can be easily replaced with their hand-held counterparts. But in this case, assembly will require more time and labor. When using metal corners or channels instead of wooden blocks, you will also need a welding machine and electrodes. The use of bolted connections creates additional problems with the tight fit of parts.
Recommendations for choosing tape fabric
Making a cutting blade with your own hands is quite difficult. For these purposes, tool steel grades U8 or U10 are needed. The saw must be flexible. Its thickness for relatively soft wood is from 0.2 to 0.4 mm, and for hard wood - from 0.4 to 0.8 mm. The blade length of the assembled version of the machine will be about 1.7 m. You will need to cut the teeth yourself, set them correctly and sharpen them. To solder the tape into a continuous ring (end-to-end), you will need to use a gas torch and solder. The connecting seam must be sanded afterwards.
It is much easier and more convenient to purchase a ready-made cutting blade of good quality in a store, so as not to waste time on its manufacture. The width of the products ranges from 18 to 88 mm. In this case, you need to focus on the material that is to be sawed. Manufacturers offer the following types of saws according to this criterion:
- bimetallic, intended for performing work on metal (stainless steel and relatively strong alloys);
- diamond, with which you can saw marble, quartz, granite and other hard materials;
- carbide, allowing the processing of high-strength alloys;
- made from strips of tool steel used for sawing wood.
The last variety is quite often equipped with machines assembled in domestic conditions. This is due to its affordability and practicality. But if you have to work with hard materials, then it is better to purchase a more durable, wear-resistant and expensive saw to reduce the likelihood of the tape breaking to a minimum.
If you plan to make a figured cut using a band saw, then you need to select the width of the blade taking into account the radius of curvature. Some relationships between these quantities are shown in the following photograph.
Advice! For even longitudinal sawing of lumber, wide cutting blades should be used. They allow you to make a more even cut.
When choosing a saw for wood, you also need to take into account the pitch of its teeth (the distance between their centers). The hardness of the wood that can be sawed depends on this. The following are the most common tooth profiles, their markings and areas of application.
You also need to pay attention to the quality of sharpening of the teeth. The cutting edge must be sharp and smooth
You should also ask your sales consultant about the possibility of re-sharpening it and how many times this can be done. For your own safety, it is recommended to give preference to higher quality canvases.
Assembly
- Processing the base. After the glue has completely dried, you need to remove the clamps and treat the gluing area, ends and other surfaces.
- Installation of the saw blade tension mechanism. It is installed in the mounting groove, and a thrust element must be placed on top. During operation, the mechanism must be firmly fixed.
- Installation of pulleys. It is necessary to pay attention to the fact that the installed pulleys must be parallel to each other and rotate easily around their axis, while the axis must be absolutely static. Strong beating of the wheels is not allowed, as this can lead to the saw blade slipping off the pulley and injuring the operator. The lower drive shaft must go all the way through the housing and have a sufficient end on the reverse side so that it can be clamped into the drill chuck. The upper pulley is installed in the saw blade tension mechanism.
- Installation of the cutting blade. The saw blade should be installed over the ends of the pulleys. First, it should fit freely onto this structure, and by rotating the adjustment knob, the block with the axis of the upper pulley moves upward, thus increasing the distance between the centers of the pulleys. In this case, the tape is tensioned. After tensioning, you need to tighten the screw in the fitting to firmly fix the tension mechanism.
- Installation of the saw table. The saw table is located on the horizontal surface of the base, as shown in the photo. Its area should be sufficient for a comfortable process of sawing the workpiece. It should be noted that the perpendicularity of the table to the saw blade is very important, and in two dimensions - longitudinal and transverse. The table is fastened with self-tapping screws. Although there is an option to “plant” it with glue, and install dowels for strength.
- Installation of power tools. At the very last stage you need to make this design come to life. To do this, you need to clamp the shank of the drive shaft of the lower pulley into the drill chuck. Alternatively, you can use a hammer drill or screwdriver. But the power of a screwdriver will clearly be insufficient, so use a drill or hammer drill.
- Setting up and commissioning. Before starting work, run the band saw at idle speed. Make sure that the tape does not slip and runs smoothly. Check its tension and fixation of the saw blade tension mechanism.
How to make a saw?
If you need a saw, but the price quoted by the seller is prohibitive, then it’s time to think about making a tool with your own hands.
A saw designed for metal work will require a more powerful electric motor, such as the Makita models, which will also be useful if you plan to cut thick trees.
In cases where a more powerful tool is required, it is best to make a pendulum frame. Pendulum variations are not only more powerful, but also very effective.
In order for the frame of the device to be stable, it is necessary to use steel rather than wooden corners for its manufacture.
The frame is the base on which all cutting and rotating mechanisms are installed, so make sure that it is strong.
Before you start assembling the saw with your own hands, look at the diagrams with its structure: you can focus, for example, on a machine from Makita, because it is a high-quality and functional device for metal processing.
Each homemade cutting saw must be mounted on some stable surface, usually a table.
It is necessary that it be properly fixed, because if it wobbles, it can not only ruin your workpiece, but also be dangerous for the master.
The tool table must be special, and it is also better to make it yourself. For the bed, you can use an old table from the kitchen, or metal or wooden sawhorses.
The tabletop can be made from metal plates 4 mm wide. You will need two of them to work. Or you can use thick beams that need to be connected with a plywood jumper.
When connecting materials, be sure to leave a gap of at least 10 mm between them.
The most important thing when working is that the edges of the plate are set parallel to each other, otherwise the miter saw will not be able to function correctly.
When attaching the tool to the tabletop, the saw should be in the center of the gap, and sheets should be located on its two sides. You need to make holes in the table into which the saw will be fixed.
After installing it, you need to secure the motor so that the miter saw can operate. If you have made a small saw, the easiest way is to attach it to the motor axle.
Video:
However, the tool is not suitable for cutting thick metal, so if you understand that low power will not be enough for your work, then immediately make a more powerful tool.
You can use a bicycle spindle as a transmission mechanism for a homemade saw. It includes bearings and a shaft, which you will also need in your work.
You can cut the spindle off the bike using a hacksaw. You need to install a sprocket on the bicycle shaft. The best part for this is a part belonging to the D6 or D8 motor.
The circular saw must be attached to the spindle, however, before you do this, you need to decide on the diameter of the device.
The diameter of the bushing must also match the diameter of the other parts so that they all fit tightly together.
A plate with a thickness of at least 5 mm must also be installed on the spindle housing. The sprocket is attached to the shaft, which has a homemade saw.
The sprocket should be 2.5 times the size of the spindle.
The saw chain is put on the body last, after all other parts are correctly installed and secured.
The price of the parts that a cutting saw requires will be much lower than the price of a finished saw, for example, from Makita.
The tools you will need are:
- table;
- several plates;
- several beams and lintels;
- old bicycle spindle;
- bushing for transition;
- star;
- chain;
- shaft.
Some of these tools you probably already have in your garage, while others can be obtained very cheaply.
If you are not confident in your abilities, then it is better to purchase a ready-made tool.
Moreover, the price of some Makita models is quite reasonable, and at the same time they have wide functionality.
Before purchasing a metal cutting saw, research what's on the market and read about the different models of tools.
It is better to choose an already proven device, for example, a Makita saw, which has long proven itself on the market. The price of both circular and pendulum saws is quite affordable for a person with an average income.
Rules for working on a band saw
A large volume of processed materials requires the installation of a blade with large teeth on the machine. The best option is to use universal band saws.
- if the workpiece is large in size, it is worth installing on a band saw with large teeth; It is better to use universal type cutting belts. This way there will be no need to change the blade when processing different materials;
- Decide on the installation location of the machine and securely mount it on a static surface, avoiding vibrations during operation. The room in which the band saw will be installed must be well ventilated.
- After finishing work, remove the sawing band and, accordingly, tighten it only before work. This will extend the useful life of the canvas
- Every two hours of operation, turn off the band saw and give the motor, in this example the drill, a rest, and at the same time check for malfunctions. Compliance with this rule will protect the worker from injury and the tool from overheating.
- Check the set of cutting teeth from time to time.
Tips for using a sawing machine
In order to assemble even the simplest band unit for a mini sawmill, for example, the one described in the article, you will have to spend a certain amount of money on a variety of parts. Even if you have an electric motor on your farm with suitable parameters from old equipment, you still need to buy steel profiles, lumber, pulleys, belts and canvas, and this will also cost a lot. But if you follow all the operating rules, you can very quickly recoup all costs, as well as earn some capital.
Checking the cutting blade tension with a strain gauge
Here's what experts recommend:
First of all, you should tension the saw blade correctly - this depends on its thickness and width, as well as the grade of steel. But in order to make the tension most optimal, you need to use a special device called a “tensometer” (see photo above). Most likely, you won’t have one, but you can borrow or rent a device to conduct at least one-time testing, and then you can do it “by eye.” Do not hope that the blade can be sawed continuously, for example, from morning until lunch or even until evening - this is not the case. It is best to stop the machine after two to three hours of operation, and then, after removing the saw, hang it in a free state (without tension) for 10-12 hours. This suggests that it doesn't hurt to have several canvases, especially if you have a lot of work to do. If you work with dry workpieces, this does not imply any problems, but when sawing (dissolving) fresh wood, resins are released that clog the teeth, the tape quickly overheats and may even burst. In order to somehow mitigate such a negative factor, they use an improvised lubricant: at positive temperatures it is ordinary water with detergent, and in cold weather it is diesel fuel with oil. At the end of the work, it is necessary to loosen the tension of the canvas to protect against the effects of thermal deformation
Steel expands when heated, therefore, when it cools (read narrows), fingerprints will remain in the places of contact with the pulleys, which will significantly reduce the wear resistance of the saw. Follow the sharpening standards, that is, the teeth should always be sharp and have the same set. Do not forget that any sawing machine is potentially hazardous to health, since careless movement or loss of vigilance due to fatigue can lead to serious injury and there are many examples of this. Therefore, it will be much safer if all moving parts (pulleys, blade) are covered with a protective casing. The installation location of the machine is of great importance for safety reasons.
There should be no obstruction when working with long workpieces, as this could cause the cutting band to break and even cause serious injury. After an injury, the phrase “I didn’t notice” is often heard as a result of insufficient lighting in the work area. Sometimes machines are installed outdoors under a canopy without the proper power of lighting fixtures (they get by with one 60-80 W light bulb), therefore, in this case, they can only work during daylight hours. But it is best to install some kind of reflector, pointing it at the desktop (if it is possible to adjust, then this is even better). Take care to ground the electric motor and connect it through an RCD (residual current device) or at least through a differential circuit breaker - this can protect against injury. The fact is that when an electric shock occurs, a person loses control over the body and the likelihood of limbs getting into the zone of action of the saw blade increases. The platform for the workplace must be dry and hard (concrete screed, asphalt), and if the unit is located on the street, then this platform should be raised at least 3 cm above the ground level so that it is not flooded by streams during heavy rain; When working, place a dielectric rubber mat under your feet.
Homemade band saw - the master explains the structure of the machine
Features of using the saw
Even after you can make the presented design, you should learn how to use it correctly. For example, try to follow all necessary safety rules. Please note that in some cases the blade may burst, so if you are not sure of the strength of its fastening, then do not be too close to the machine.
Observe the following rules for operating the device:
— The larger the workpiece that needs to be processed, the larger the teeth should be on the saw.
— It is better to use universal cutting belts. In this case, you will not have to change the blade every time you need to process some other material.
— Before making the device, you must choose the place where it will stand. This takes into account the size of the room and the presence of electrical wiring. Naturally, this place should be well ventilated.
— Before work, try to tighten the cutting tape as much as possible. Otherwise, the machine will not only not perform its functions, but will also become hazardous to health.
— The unit should not operate for more than two hours at a time. After this, the tape is removed and left alone for at least a day.
— After long-term operation, the machine must be lubricated. Choose the right substance for your car.
— Correct tooth alignment is required.
That's all the features of making and using a band saw. Please note that this device requires proper care. If you see that it is not working correctly, then it is better to wait until you start using it. Be careful and careful.
Stages of welding work
cutting
First, the saw blade must be cut to a given length. You can use different tools for cutting. We recommend guillotine shears as they give the most even cut. The cut itself should be located at the top of the teeth. Don't forget to leave about 1-2 millimeters on the cut side for settling.
To achieve an accurate cut, you can use the technique shown in the picture below. After such cutting, the ends of the saw will be smooth and fit perfectly together. And this directly affects the quality of the weld.
Stripping
After cutting, the ends of the saw need to be cleaned. This is standard preparation of metal for welding. Clean the metal from dirt and traces of corrosion. Then degrease with any solvent. For example, acetone. Then clean the edges with an abrasive material. We use sandpaper. Make sure there are no burrs on the edges. Ideally, they should be smooth and even.
Installing the saw into the clamps
Above, we could already familiarize ourselves with the components that make up a machine for welding band saws. We said that there is a clamping mechanism. This is where the saw blade needs to be installed. The clamp has a movable and a stationary part. Place one end of the blade in the movable one and the other end in the fixed one. There is free space between the clamps. You need to install the canvas so that its joints are exactly in the middle of this space. Naturally, the joint must be smooth and precise.
Welding mode selection
Next you need to select the welding mode. If you have a simple welding machine, then all parameters need to be configured manually. The welding mode is selected based on the size of the saw and its cross-section. The larger the cross-section, the greater the welding current. These are general recommendations.
Typically, the welding machine comes with instructions that describe all welding modes depending on the size of the saw blade.
Also pay attention to the setting of the speed of current pulses. For budget models, it needs to be controlled manually, otherwise the metal will heat up too much
The recommended current supply time is 1-2 seconds. In more expensive devices, this parameter is adjusted automatically.
Welding
Welding for band saws begins with turning on the machine. The machine for welding band saws is launched depending on the model. This can be a separate button or a special handle. After starting, a welding current will be supplied to the ends of the saw, which will melt the metal in the area of the future seam. Current is supplied to the saw through the clamps. After heating the joint, the movable clamp must be moved slightly to form a weld bead. The seam is ready!
Make sure the electrode surface is clean before welding. It is not necessary to clean all the electrodes, just the part that is in contact with the saw blade is enough. If you ignore this rule, the connection will be of poor quality. Contamination will affect the circuit resistance.
Annealing
Next comes annealing. It is necessary because as a result of welding, the metal becomes too hard, which increases its fragility. Annealing helps return the canvas to its original condition. After pressing, the metal becomes plastic again, and its performance characteristics improve.
To perform annealing, you do not need to remove the blade from the clamp. Just set a different current mode. The main thing is to achieve a heating temperature of about 600 degrees. Expensive devices have a separate annealing function. But if you have a simple budget model, then you need to perform a few additional steps.
First of all, keep in mind that in addition to heating, you also need to cool the metal. And it is advisable to perform these operations one by one. Press the current supply button and hold it until the heating temperature appears on the display. Then release and let the metal cool. To ensure that the sheet cools evenly, you can periodically press the button again, preventing the metal from cooling quickly. Cooling time takes on average 5 minutes.
If your device does not have a display indicating the heating temperature, then you can focus on the color of the metal. Typically, the canvas takes on a cherry tint when the required heating temperature is reached. Do not allow the metal to become orange or yellow. Sometimes it is necessary to anneal twice.
Re-stripping
During annealing, visible sagging may form on the canvas. They need to be removed by re-cleaning. Now it is needed not for technical, but for aesthetic purposes. At the same time, you can correct the depressions between the teeth, giving them the correct geometric shape. Repeated cleaning can be done with any abrasive tool. Process the metal so that the joint is practically invisible.
DIY garage press options
Homemade garage presses allow you to process various products and materials under pressure. Structurally, the equipment consists of cylinders. In the garage, such a machine is useful for straightening or fastening various elements, as well as for bending sheets of metal or pressing cardboard.
An example of a homemade press
For private use, a capacity of 10-15 tons is sufficient. Most often, a bottle jack is used with a provided hand pump, which acts as the main structural element.
Here are some interesting options for homemade garage presses:
Option from scrap materials Rails will also come in handy Ready-made purchased model Convenient homemade press
Circular saw from scratch
Another common method for making a circular sawmill is based on the use of a used AC brushed motor, cutting blade, table top, profile pipe, etc.
This design is similar to the one given earlier (see “Making a circular saw”). But there is one “BUT” - it is necessary to provide a shaft and a belt to transmit rotation from the motor to the disk.
The question is, how to make a circular saw if its power plant is quite powerful, and the rotation transmission mechanism contributes to the instability of the structure?
The answer to this question will be the use of heavy materials as a supporting base, fastening of a profile pipe for smooth feeding of workpieces, reliable fastening of all components of one home-made machine.