Circular saws are often used to work with wood. These tools are indispensable on the farm and allow you to cut wood of any thickness. People who want to work on wood materials should make a special table for a circular saw in advance. It makes using the tool much easier.
Features of a circular saw
A circular saw is a tool that allows you to cut various materials using a saw blade with teeth. Most often, such equipment is used for carpentry or carpentry work. There are different models of such devices. However, stationary tabletop instruments are popular. They are suitable for the following types of work:
- sawing plywood and boards;
- cutting timber or slats;
- cutting out mortise tenon joints;
- chamfering.
Some models of circular saws allow you to cut sheets of metal.
Recommendations from professionals
Now you know how to make a machine from a hand-held circular saw, so let’s consider the advice of the masters:
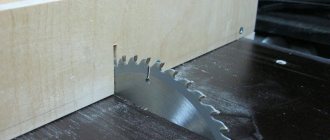
- Before using an electric saw on a machine, check the saw blade with a square, because some unscrupulous manufacturers do not place the blade exactly at a 90-degree angle, which causes the cuts to be beveled.
- If during work you plan to use a table to store tools on it, then the size of the tabletop should be larger than 1 m2.
- To create the machine, use durable and high-quality materials, because otherwise it will not last long.
- The table can be supplemented, for example, craftsmen sometimes manage to attach a special vacuum cleaner or a riving knife with protection for disks to it so that the remains from cutting wood and shavings do not fly all over the place.
- You should choose a place to mount the table in advance, and also make sure that the floor where the table will stand is perfectly level.
- If you have the skills and desire, you can make a folding tabletop, but this will require spending more effort, time and materials.
- If the table vibrates or sways during operation, you should adjust the height of the legs using rubber.
Since the circular saw is an electrical device, it should be operated by specialists. Moving the switch to another location should also be trusted only to specialists.
Advantages of making a table for a circular table
It is not necessary to buy a table for a circular table. The fact is that such a design can be made independently. Creating a table with your own hands has a number of advantages:
- ease of manufacture;
- the ability to create a table that is ideal for the model of circular saw being used;
- you can adjust the dimensions of the structure to make it more compact or, conversely, large.
Before creating a table, you will have to familiarize yourself in advance with how to make it correctly.
Stationary machine
Those who plan to get serious about woodworking should think about making a full-fledged stationary circular saw. This should be a separate unit installed on a workbench, equipped with a powerful motor, with the ability to quickly replace the disk. Making such a circular with your own hands will take time, but it will definitely pay for itself.
Despite the apparent simplicity of this device, before starting work it is worth creating a drawing of the machine. This will allow you to clearly see the future unit and choose its optimal configuration.
bed
The basis of any machine is the bed, the frame on which all the main parts are mounted. The frame of the circular saw must be stable and reliable, which is why it is made of metal. It is preferable to use a profile pipe or a thick-walled angle. Welding is used to connect parts. If a collapsible structure is planned, a bolted connection is suitable.
Buying a suitable material will not be difficult; in any specialized metal store you can pick up both pipes and an angle. Those who want to save money can be advised to contact scrap metal buyers. You can buy the same thing from them, only cheaper.
Tabletop
The best material for making the tabletop of a professional circular table is metal. Steel and aluminum-based alloys are excellent. For a budget option, you can limit yourself to thick multi-layer plywood covered with sheet iron. In any case, the surface of the tabletop must be smooth, resistant to friction and not bend under a weight of up to 50 kg.
A groove is made in the tabletop for the disk. It can be done in two ways. You can make a cut in a single sheet, or you can assemble a tabletop from two halves. The second method is preferable for a metal tabletop, which is difficult to cut into at home.
A parallel stop is attached to the tabletop. The best material for this, regardless of the table material, is angle steel. To secure it, grooves are made or powerful clamps are used.
Motor
The engine of the future circular machine is selected depending on the existing disk. If you plan to work with small disks with a diameter of 150-170 mm, you can limit yourself to an electric motor with a power of about 0.5 kW. For disks with a diameter of 350 mm or more, you need to look for a unit of 1 kW or more.
If desired, you can make a sawing machine for work outside the workshop; for this it is enough to provide the possibility of installing a low-power gasoline engine; it can be removable.
Rotation transmission
The optimal drive for a circular saw is a V-belt drive. Two pulleys are used, one on the engine and one on the drive shaft. It's convenient and safe. There is no direct connection between the motor rotor and the disk; if the tool jams, the belt will begin to slip, signaling the need to turn off the power. In addition, using pulleys with several grooves of different diameters, you can adjust the speed of the saw, choosing the optimal mode for different types of wood.
Rotation from the motor rotor is transmitted to the shaft. This is one of the most important parts of the circular. It is unlikely that you will be able to make a shaft yourself; it is better to buy a ready-made one or order it from a turner.
Read also: Defects during heat treatment of steel
The shaft is mounted on bearings. They must be of a closed type: a circular saw is a sawing place and open ones will not last long.
Design requirements
A homemade table for a circular saw must meet a number of requirements. These include the following:
- sustainability;
- perfectly smooth table surface, without roughness or unevenness;
- reliable fastening of the sawing disc;
- Convenient placement of start and stop buttons.
It is also recommended to attach metal legs to the structure. This will make the table more stable.
Design Features
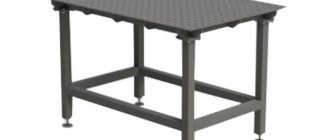
Structurally, a homemade sawing table looks quite simple. The machine consists of a supporting frame for mounting the motor, a transmission unit and a work table with a slot for the cutting disk. The design is equipped with stops for guiding the workpiece and a protective screen that prevents chips from entering and also increases work safety.
Mandatory requirements for a sawing table:
- rigid, stable design;
- smooth surface of the tabletop;
- secure disk mounting;
- fencing protecting the operator of the machine (table);
- easy access to the control device (start and stop buttons).
The equipment must be installed on a frame supported not on solid sheets, but on legs. This improves ease of use, although it makes the saw table less stable. To increase durability, the frame can be made of metal or reinforced with metal elements. Safety is ensured not only by the protective screen, but also by securing the disk from the bottom (inner) side. Additional requirements depend on the specifics of the work - auxiliary elements help to process parts more accurately, saw longer boards, as well as thick logs.
By making a saw table with your own hands, you can get a number of advantages - from reduced costs to the ability to change the design as the master needs it. If desired, you can replace some of the parts with more economical ones, or use materials left over from repairs or construction. The only disadvantage of a circular saw independently fixed to the machine is a decrease in the accuracy of workpiece positioning. But this moment still largely depends on the skill of the performer himself.
Rigid, stable construction
Smooth countertop surface
Secure disk mounting
Guard protecting the operator of the machine (table)
Desktop device
Before you make a table for a circular saw with your own hands, you need to familiarize yourself with the structure of the structure.
Frame
The frame is the basis of the structure. It is recommended to make it from a metal profile. Steel or aluminum are ideal. The dimensions of the frame can be different, it all depends on the amount of free space in the room and the dimensions of the saw used.
If you have to frequently saw large sheets of wood, it is better to make a larger table.
Side extensions
Sometimes people are faced with situations where they need to expand their work surface. Most often, this may be needed when working with large products that do not fit on the table. In this case, you will have to attach special side extensions to the structure. They can be made of wood, plastic or iron.
It is recommended to use side extensions that can be detached or rolled up at any time. For example, you can make them fall down the sides of the table.
Side stops
Some people experience the problem that the table wobbles a lot while the saw is running. To make it last longer, you will have to build in additional side supports. With their help, it will be possible to make the structure stable so that it stops wobbling.
Pressure plates
There must be pressure plates on the table. They are made from a metal profile. Such clamps are additionally equipped with a mechanism for more durable fixation. The plates are fixed on both sides of the working surface. This way you can attach them more securely to the table.
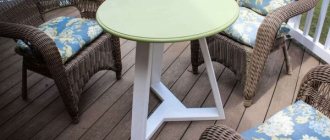
Master class on creating a round table made of wood
Making and assembling a round table with your own hands should be done in a well-ventilated area on a flat and clean surface. You should prepare a bucket, broom, and dustpan ahead of time to keep your work area clean throughout the assembly process. If you plan to use strong-smelling and toxic substances, then it is necessary to warn family members about this and isolate pets.
You should also take care of fire safety measures. To extinguish a fire, you need to prepare a container of water and a powder fire extinguisher to eliminate possible fires of electrical appliances and tools. We should not forget about our own health. It is possible to get injured during work. To provide first aid, you need to have a first aid kit with a set of necessary supplies and medications on hand. The emergency telephone number must be in a visible place.
Manufacturing and assembly
The manufacturing process of a round table consists of the following stages:
- Impregnation of the material with an antiseptic. After this, the wood should dry completely.
- Treatment of workpieces with a hydrophobic agent. Drying oil is well suited for this.
- Sawing boards into fragments of the required length. Lubricate the grooves with glue, attach new sections one by one. Fixing the made shield with clamps. To increase strength, several slats can be screwed on the bottom side.
- Cutting out the table top. The outline of a circle or oval table is made using a compass or string with a pencil. Then all excess is cut off.
- Attaching the legs to the center of the shield with metal corners.
- Production of jumpers in the amount of 8 pieces. Sawing is carried out at an angle of 45 degrees.
- Assembling a cross with sides equal to the diameter of the table top.
- Attaching the cross to the leg with steel angles.
- Screwing the jumpers to the bottom of the tabletop, the crosspiece.
This completes the assembly stage. You can begin the final processing of the finished product. If desired, the table can be decorated to your own taste.
Cut the boards to the required length Lubricate the grooves with glue, attach new sections one by one Secure the made shield with clamps Cut the table top Insert the table top into the frame Cut the frame along the contour Cut the jumpers Assemble the crosses Attach the cross to the leg Screw the jumpers
Finishing
Finishing processing includes the following actions:
- The made parts are processed with a grinding machine. Final polishing is carried out with zero sandpaper. The quality of work is checked visually and tactilely. The finished surface should be smooth, without protruding parts.
- Putty. During or before processing, holes, chips and cracks may form on the countertop. They need to be sealed with special wood putty, silicone or putty.
- The product is cleaned of dust. Depending on the chosen design, the wood is covered with stain or burnt with a blowtorch.
- The table is finished with paint or varnish. To achieve an even, durable layer, apply 2-3 layers.
- The end tape is glued. For fixation, use glue that is resistant to changes in temperature and humidity.
Clean the product, cover it with stain Paint the product Apply varnish Finished table
Related Posts
- Making a hand-held or stationary circular saw with your own hands
- Do-it-yourself stone tabletop: step-by-step master class with photos! preparatory work, drawing creation, materials and tools
- A simple way to make a good-quality kitchen table with your own hands, like on the covers of expensive magazines
- Workplace in home bedroom
- What sizes can the countertops have? standards for chipboard and other materials
- Do-it-yourself vibrating table: design drawing for the production of paving slabs, step-by-step assembly
- Schoolchild's workplace: how to organize it for your child
- How to embed a sink into a kitchen countertop: the correct DIY installation process
- 11 simple homemade machines needed in any workshop
- Rating of miter saws with broaching for wood: the best models of 2019–2020 (top 10)
- DIY garage accessories: all the most useful things
- Children's design (50+ photos)
- How to update old furniture in the kitchen with your own hands: painting, decor, rattan, pasting, video instructions, replacing facades, photos, designer tips
- Bar counters for the kitchen: photos 50 examples
- Creative ideas for the interior of a 12 sq.m. kitchen. meters
- Options for making shelves for the garage with your own hands
- Technology of painting wallpaper with water-based paint
- Children's room interior: 111 photos and 7 ideas
- How to build a children's sandbox with your own hands
- DIY foam cutting
- 8 features of kitchen renovation in a panel house
- Crafts secrets: DIY rug made from old things
- How to make markings with your own hands for the foundation: rules
- Do-it-yourself tabletop made from furniture board
- Epoxy resin table: types, instructions for making with video (50 photos)
Read with this
- Making a hand-held or stationary circular saw with your own hands
- Do-it-yourself stone tabletop: step-by-step master class with photos! preparatory work, drawing creation, materials and tools
- A simple way to make a good-quality kitchen table with your own hands, like on the covers of expensive magazines
- Workplace in home bedroom
- What sizes can the countertops have? standards for chipboard and other materials
- Do-it-yourself vibrating table: design drawing for the production of paving slabs, step-by-step assembly
- Schoolchild's workplace: how to organize it for your child
- How to embed a sink into a kitchen countertop: the correct DIY installation process
- 11 simple homemade machines needed in any workshop
- Rating of miter saws with broaching for wood: the best models of 2019–2020 (top 10)
Blueprints
Before creating a table for a circular table, a drawing is made with your own hands. Thanks to this, it will be possible to greatly simplify the process of creating a design. It is necessary to mark all dimensions on the diagram in order to determine the exact dimensions of the structure.
In addition to the drawing, you also need to make a sketch of the table for the circular saw. It will help you understand what the finished product will roughly look like.
Without a drawing, you cannot start creating a table.
Preparatory stage of work
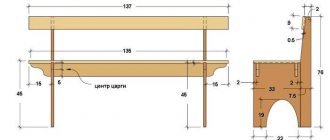
Figure 1. Machine drawing.
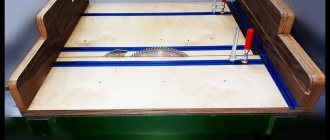
The simplest version of a table for a circular saw is a structure assembled from boards and fairly thick plywood from which the tabletop is made. In this case, the tool itself is fixed at the bottom of a stationary (non-rising) tabletop. There is a special slot in the frame cover for the disk. A drawing of such a machine is shown in Fig. 1.
The dimensions for the bed can be changed so that it is convenient for you to work. The average table height is taken as an example. It is 100-115 cm. But much depends on the height of the person who will work with the tool. In addition, the length of the tabletop can also be changed as desired. If you plan to work with boards whose length exceeds 2.5 m, then the table top should be larger. Then it is necessary to make changes to the structure itself and add an additional pair of supports (legs). Otherwise the bed will vibrate too much.
For the countertop, you can take plywood, whose thickness should be at least 50 mm. But you can also use fiberglass slabs and plexiglass. But experts do not recommend using chipboard, since this material is not strong enough.
The table top can be polished and coated with several layers of varnish. This will ensure sufficient sliding of the sawn materials. But it is much wiser to strengthen a sheet of iron on the tabletop. Then the surface of the bed will be much more reliable, and the machine will last you longer.
Required materials and tools
For a woodworking machine, it is necessary to provide guides. They will help you cut the material accurately. This structure is welded from a metal corner and secured to the tabletop with clamps.
It is not recommended to install stationary guides, because in the future you will not be able to change their position.
Checking the circular saw.
To make a table you will need the following materials:
- sheet of plywood (countertop made of another material);
- sheet of iron;
- board with a section of 5*10 cm;
- timber with a section of 5*5 cm;
- clamps - 2 pcs;
- metal corner for guides;
- hand circular saw.
Read also: Brass in the food industry
In addition, it is wiser to prepare in advance all the tools that will be needed to make the table:
- jigsaw or hacksaw;
- electric drill, screwdriver;
- milling machine or hand cutter (you can do without this tool);
- measuring instruments (ruler, square, tape measure).
When everything you need is ready, you can proceed directly to assembling the table. Some craftsmen make frames from old kitchen or dining tables. But such a design is unlikely to last long enough. Therefore, it is much more reasonable to make all the parts yourself. At the same time, you can take into account your individual needs.
Necessary materials
It is necessary to figure out in advance what materials will be needed to make the structure.
Tabletop
One of the main parts of the structure is the tabletop. It is here that the work of sawing materials will be carried out. It is recommended to make the tabletop from a durable wooden sheet. Its surface must be perfectly flat. It must not have any bumps on it, as this will negatively affect the quality of the cut.
bed
The bed is the base that is responsible for the stability of the entire structure. It is recommended to make it from metal sheets or dense wood. If wood is used, it is better to choose only leaf species. They are considered the highest quality and durable.
Deciding on design and construction
The simplest version of a table for a circular table is a design made of fairly thick plywood and boards
The base can be made of wood or metal. Leaf tree species are chosen for the tabletop. A special hole should be made in it for the disk. The key property of the created table should be convenience.
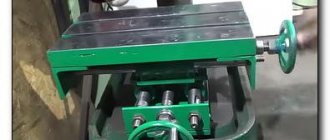
Circular machine bed
Care should be taken to ensure its stability. No loosening is allowed, otherwise it will negatively affect safety. The tabletop should have as smooth a surface as possible. This will reduce the likelihood of injury while working.
A table for a circular saw requires the presence of guides
The structure can be supplemented with a special riving knife. He can be removed. It is equipped with a special disk protection that allows you to get rid of chips flying at the worker.
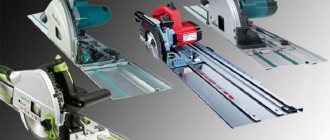
Table guide carriage for circular saw
Some people remove the factory cover and replace the factory platform with a homemade one. If you are not going to cut at an angle, you can remove the parts that adjust the tilt of the blade.
Step-by-step manufacturing instructions
Creating a table for a manual circular saw is carried out in several successive steps:
- Grinding the bars and assembling the frame in accordance with the drawing.
- Attaching dowels to the tabletop. They are pre-treated with glue for better fixation.
- Installing the tabletop on the frame. It can be attached with ordinary screws.
- Cutting a hole in the tabletop for the working circle. The size of the recess should be 3-4 cm larger than the dimensions of the circle used.
After completing the steps described above, you can begin fixing the circular.
Manufacturing stages
Step 1. First, use a plane to trim all sides of the beam. We assemble the table frame from the timber: in each side of the tabletop we drill two 5 mm holes for dowels for each drawer and one hole for each table leg.
Step 2. You need to make two holes (5 mm) in the drawers, and one hole (5 mm) in the legs.
Step 3. Install the dowels into the tabletop, having previously lubricated them with wood glue. Tsars and legs are installed on top.
If you have clamps with ties, you can secure the table with them. After the glue has completely dried, the drawers are fastened to the legs and to each other with special metal fasteners for tables and tightened with self-tapping screws.
Step 5. You can secure the saw with bolts or bars with self-tapping screws. We will fasten with blocks, so we make a cut in small blocks the width of the saw platform. Using blocks with self-tapping screws on both sides, we fasten the circular saw to the table top.
Step 6. When the saw is installed, take another larger block and screw it to the tabletop with self-tapping screws (directly to the previously marked points along which the saw platform was aligned exactly). This block is necessary so that later, when removing the saw from the table, you can quickly return it to its place without resorting to markings.
Step 7. Place the circular saw blade in place and saw through the table top to create a longitudinal hole. Turn the tabletop over.
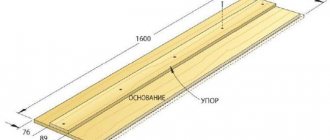
Step 8. We make a parallel stop. To do this, we saw off two strips of plywood with a length equal to the width of the table and a width of about 8–10 cm. We round the corners using a protractor and a pencil.
Step 9. Sand both strips and fasten them using self-tapping screws at an angle. We screw a metal corner inside.
Step 10. If you constantly work with a table for a circular saw and need to secure the stop on the table top, attach a guide perpendicular to the disk. The roller or the second part of the guide is attached to the bottom of the fence so that the fence can move up / away from the circular saw blade.
You can learn how to make a workbench for your garage yourself from this article.
Installing a saw in a homemade table
To install a circular saw from Interskol or any other manufacturer, you must make mounting holes in the tabletop in advance. After this, you need to turn the table over so that you don’t have to lift the saw and attach it by weight. When the structure is turned over, you need to place the saw on the tabletop so that the mounting holes match. Now you can screw the tool to the table.
People who regularly work with wood will sooner or later need tables for circular saws. Some people prefer to make it themselves. However, before doing this, you need to understand the nuances of creating such products.
How to make a table for a manual circular saw?
The manufacture and assembly of a table for a circular saw is divided into certain stages:
First we make the tabletop .
Thick plywood is perfect for these purposes. It is from this that we cut out the workpiece of the required size with a jigsaw. Keep in mind, the larger the dimensions of the working surface, the more convenient it will be for you to work with the equipment.- After cutting out the tabletop with a jigsaw, its edges are processed with a router .
- Now markings are made for installing the circular saw . To do this, we turn the product over and mount the saw without a disk. When installing equipment, we use a drawing. We make markings on the tabletop for the dimensions of the equipment base. Using a router, we make indentations up to 1 cm according to the markings.
- We try on the saw and adjust its position. Next, we make the markings for installing the disk .
- If you plan to make cuts at different angles, then the slot marking will have a cross-section in the form of a trapezoid, located with the top down.
- Next, on the inside of the product we make markings for stiffeners . In the future, the legs of the product will be installed on it.
- The stiffening ribs are made of boards , measuring 5 by 10 cm and installed around the perimeter of the tabletop with indentations of 10 cm from the edges. Next, use a ruler to mark the center line, and along it mark the locations of the screws 5 cm from the edges of the ribs and 15 cm along the entire length.
Through holes are made
according to the marks .- Next, we mark for the longitudinal stiffeners and cut them.
- We attach them to the product with wood glue, pressing with clamps.
- The side ribs are made and attached exactly like this.
- Now, without removing the clamps, we fasten the structure using self-tapping screws along the pre-prepared holes.
- The stiffening ribs are tightened together with two self-tapping screws measuring 5 cm on each side. Only after this do we remove the clamps.
- Now let's start making the legs . To do this, you need a board measuring 5 by 10 cm. Keep in mind that the height of the legs should ensure comfortable work at the table. The optimal height of the legs is considered to be 1 meter. The board is cut along the longitudinal axis, while making a small angle on one side.
- We fasten the legs of the product . To make the table as stable as possible, it is recommended to tie it using bars.
- Let's move on to installing the circulation saw . It is installed in the prepared groove from the inside, its base is secured with bolts, and the disk is inserted into the prepared slot.
- Now you need to think about connecting the equipment to the electrical network . If you have experience in connecting electrical devices, you can install a power key and place the tool control buttons on the outer surface of the front stiffener. If this task is not feasible for you, then you can turn the saw on and off using a power cord. But keep in mind that this method is not safe, since in an emergency the equipment will not turn off automatically.