A little history
The preparation of logs for the winter, or products for everyday life, were widespread not only in Rus'. But time passed and people who had a desire for beauty in their souls and hearts quickly realized.
That wood is an excellent material on which you can depict your feelings or the events surrounding them. Each nation had its own special techniques for processing wood, which was related to the culture, worldview and worldview of the people themselves. The higher the cultural heritage, the better and higher quality the work of the masters.
In Rus', elements of carving were present in everyday life, which carried a ritual component. Household and kitchen utensils were always decorated with carved elements.
The patterns that were applied to the hut had the meaning of elements and natural phenomena. Or to attract light forces that were a symbol of fertility and longevity.
Today this craft continues to live, perhaps the tools have become a little more convenient and modern. Knives for wood carving were and are now quite diverse. Let's try to take a closer look at a modern woodworking workshop of a master.
How to make a blunt knife
Hello dear readers. In this article I will tell you how to make a jamb knife for the workshop.
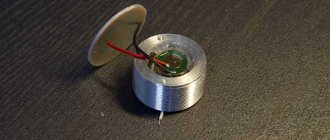
For the blade, I decided to use a plate cut from a saw blade that once stood on a circular saw. This disk is all-metal, without soldering.
I cut the plate in such a way that the cutting part was slightly wider than the handle. I sawed it with a grinder, carefully, trying not to overheat.
Then I used a tile drill bit to drill two 5mm holes.
I cut out two dies from a walnut block, larger in size than the piece of iron. You can also use other materials - plastic, textolite, birch, apple, maple or oak.
I drilled holes in the dies of the same diameter as in the plate.
After that, I connected the dies using two drills in order to process the ends on the blade side, since this would be difficult later.
Now you can rivet the blade covers. I made the rivets on my jig from copper wire. The wire was annealed with a torch in advance for greater plasticity.
Numerous light blows
Use a hammer to rivet the wire until it is filled with patter.
Now you can start sanding. We attach the knife by the blade to the table and use sanding tape to grind and form a round surface. After such sanding, you need to sand it with finer sandpaper along the grain of the wood.
We sharpen the knife, making a bevel on one side, treat the handle with varnish or oil and you're done!
Source: https://zen.yandex.ru/media/id/59fd59e32f578cef49ef51c1/5ac4ff229b403c0429e865bc
What a beginner carver can't do without
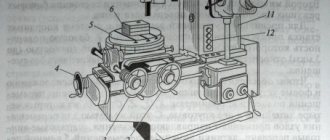
A professional in a workshop will have his eyes wide open at the variety of tools. This endless, incomprehensible equipment throws you off balance, but the master himself can easily tell you in which case which tool is better to use.
For beginners, it is not recommended to buy the entire arsenal of tools. In fact, this is a “profitable business.” Almost like any other craft. At the initial stage, you can get by with the most universal knives. It also wouldn’t hurt to use several types of chisels, and first learn how to use them.
Once you feel your specific style and direction, you can purchase additional tools in the area where your “heart” lies closer. Knives for wood carving have a variety of shapes.
The only thing they have in common is a short blade that can withstand quite heavy loads. Accordingly, the shorter the wedge-shaped part, the less likely it is to break.
I would like to talk about some of the basic and most functional tools.
Knife-jamb
It happens that it is quite difficult to buy a knife and a joint separately. It is usually included in sets. But if you look hard enough, you can find this good helper. Its design is distinguished by an elongated blade with a straight cutting edge. Characterized by a large blade bevel angle. Blade width up to 2.5 cm, butt thickness 1.5-2.2 mm.
Knife-jamb for wood carving.
Many carving techniques involve a wood carving knife. It can be subjected to heavy loads and due to its large cutting surface, its application is quite wide. It is used for flat-relief cutting, as well as for volumetric cutting. They have two types of sharpening: single-bevel and double-bevel. A beginning carver is recommended to have at least 2-3 of these tools, with different widths of the cutting part and methods of sharpening.
Geometric thread cutters
The knife is called universal and for good reason. Structurally, it is similar to a jamb knife, but the blade is longer and there is a curved cutting edge. It is used both for giving the main shape to the canvas and for cutting small parts.
It is also indispensable in relief cutting. They are comfortable working with geometric cutting, roundings and curved parts on the canvas. This knife cutter is often compared to artistic writing on canvas.
Cutter knife for geometric wood carving.
Bogorodsk knife Tatyanka
The Bogorodsk knife for wood carving, popularly called “Tatyanka”, is one of the types of cutters. With this knife you can complete the entire work cycle. From rough material processing to the finest details.
The model is quite simple with a smooth cutting edge and a curved butt. The applied forces are transferred quite well to the cutting part. In any workshop, the Bogorodsk knife is one of the indispensable inhabitants.
Bogorodsk Tatyanka knife for wood carving.
Chisels for wood carving
The design of the chisel is quite simple: a wooden or plastic handle and a sharpened blade of various shapes. But the blades deserve special attention. They can be used for quite a lot of manipulations, chamfering, applying threaded ornaments, etc. In addition to geometric cutting, they can handle all other types of carving. They come in different types:
- for processing workpieces and cutting out simple recesses, a simple straight chisel is suitable;
- the purpose of this tool is the primary processing of the workpiece and for making grooves; an oblique chisel with an angle of 45° is suitable;
- an angle chisel is used to create V-shaped notches; its angle can be different, so the notches can be obtained at different angles;
- The semicircular shape of the tool plays a very important role; various ornaments are cut out with it, serifs are applied and used to prepare the part;
- Cranberry has a very interesting shape, it resembles a semicircular one. But its main difference is that the working surface is rounded along the end of the blade and along the rod;
- gravers are used for cutting grooves that have a mushroom-shaped handle and an oblique cutter, and so on.
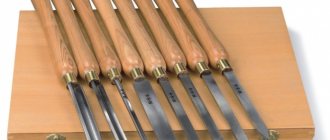
Set of chisels for wood carving.
Perhaps it’s worth stopping at this point, since in fact there are still quite a lot of their varieties. We must not forget that each chisel still has its own different variations. The ones listed above can be called basic and any beginning master should have them in stock.
Other necessary tools
There may still be quite a lot of auxiliary tools. A mandatory attribute, a vice for holding a large workpiece, clamps are necessary when gluing. It all depends on the professionalism of the master, but such things as:
- a plane or rasp is needed; they can easily prepare the surface for further work;
- a small hatchet will allow you to prepare rough blanks;
- to cut the workpiece you need at least a hacksaw or electric saw;
- a set of patterns for transferring the image is also quite important;
- electric or hand drill;
- You will need sanding paper of various grain sizes to complete the job.
For a beginner, these tools will be enough. There has already been quite a lot of it, but what to do with it? Let's paraphrase: “Art requires sacrifice,” which is especially suitable for our version. And don’t forget metal gloves with a leather apron, believe me, this is necessary.
Knife-jamb - do it yourself
A woodcarver's tool is everything! The success of all work depends on its quality and sharpening. Therefore, many craftsmen prefer to work exclusively with knives of their own making. Moreover, making a chisel or the same cutter yourself will not be difficult for an experienced person. The main thing is to have suitable materials at hand.
My toolbox contains quite a few chisels, cutters, knives and other wood carving tools. And I must say that most of them are handmade, that is, made by me personally. One feature distinguishes them all - a special shape of the handle. I always do it with finger pads so that it is comfortable to hold the knife in your hand and convenient to work with.
Actually, today I want to share my experience on how you can make a jamb knife at home.
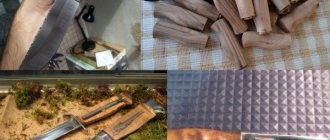
We will need:
- old chair leg for handle
- metal cutter for cutting part
- cardboard for templates
- epoxy resin
Please note: the shape of the leg can be either rectangular (this is what I use) or round.
Tools:
- hacksaw
- straight and semicircular chisels
- Bulgarian
- vice
- drill
Making a template
Before I start working with the material, I always prepare a template. I advise you to follow my example.
We will make it from thick cardboard. The shape of both the handle and the cutting part can be chosen arbitrarily. The main thing is that it is comfortable for you.
For the handle, I personally am going to make this option, as shown in photo No.2. As for the cutting part, I intend to make the “heel” of the future knife with an oblique, so that in the future it can be used for cutting recesses and slits.
We transfer the templates to wood and metal and cut them out.
If you have already noticed, I make two tools at the same time.
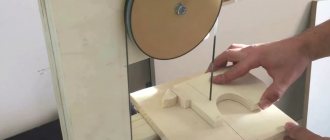
Cutting out the cutting part
We place the cutter in a vice and use a grinder to cut out the part we need. We work carefully, not forgetting about safety rules.
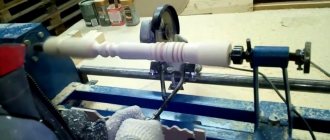
Preparing the handle
Using a hacksaw, we cut out the shape of the handle and process the wood. We make cutting movements in a circle and under the arm.
When the handle is almost ready, we begin sanding. We carry out this process with sandpaper until the surface of the wood becomes smooth.
Then you need to drill a hole into which the metal part of the knife will be inserted. We use a drill for this. Moreover, the resulting hole should be slightly larger in size than the tail of the knife.
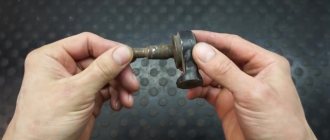
Assembling a knife
Now you need to secure the cutting part and the handle. We insert the metal blank into the hole of the handle and fill it with epoxy resin (photo No. 4).
You can buy it in the store and easily prepare it yourself (detailed instructions are included with the kit). After 1-3 hours, the mixture will set and the joint knife will actually be ready. If you want to shorten this wait time, add a little hardener to the resin.
And the last steps - before use, the handle of the knife must be varnished (I choose nitro varnish for these purposes), and the cutting edge must be sharpened. That's it: our tool is ready to go.
Alexander Tsaregorodtsev, Tomsk. Photo by the author
Source: https://www.samsmasteril.ru/anons/26-03-2013-nozh-kosyak-svoimi-rukami
Criterias of choice
Today, purchasing a tool is quite simple. Many stores provide a wide selection. But how can you avoid running into Chinese disposable products? This is a more complicated question.
It’s best to start by studying specialized forums and listening to the opinions of professionals. And it will be even better if you can find a real master and chat with him “live”.
But this is rare, so when purchasing a set or tool separately, do not hesitate to ask what grade of steel the product is and who the manufacturer is. Take a block of wood with you to the store and try on the spot how the tool will fit in your hand and what its cut will be like.
Price categories vary, but it is clear that a set of 10 items costing 300-400 rubles will not be normal. This means that saving is not worth it here.
Yes, the tool can be quite expensive, but again, a few items are enough for a novice master. And the rest can be purchased as your skill improves.
K2 power knife for wood carving, 38mm cutting part, Tatyanka
The K2 “Tatyanka” jamb knife is designed for a medium-sized hand, fits comfortably in both a man’s, woman’s or child’s palm, so it is suitable for almost everyone.
The knife is sharpened and completely ready for use. It can be used to carve linden, alder, poplar, pine, spruce, and aspen. For harder materials, the sharpening angle changes to a larger one.
The knife handle is reliable, has high strength characteristics, is made of solid beech wood, varnished, the metal blade is firmly fixed in it with two copper rivets. The handle is wide and thin, beveled at the front, making the knife easy to operate, even for children 8-10 years old.
For example, it can be held not only in your hand, but also with your fingers, almost like a pencil. These dimensions of the knife make it easy and accurate to feel its position even without visual control.
The index and middle fingers are placed on the blade at the same time, which greatly facilitates the work and manipulation of the tool.
The metal and hardening of the knife allow the blade to bend within the required limits. Thanks to this, cuts can be made smoother and deeper. In this case, the radius of curvature of the cut lines is arbitrary.
It is with this knife that we cut elements along the contour, for example, in the techno “Ivushka” and many others.
The thickness of the handle is sufficient to transfer the force of the hand to the blade and, most importantly, bring the knife as close as possible to the plane of the wood, so it can be used to level the surface of a board, background, flat elements, such as a butterfly wing.
Using this knife, you can easily cut out geometric patterns and elements of various shapes, depths and sizes. It also allows you to perform all sorts of operations, from cutting thin lines to depict hairs on the body of an animal or veins on the surface of a leaf, to cutting a large volume of wood.
If you need a small block of wood for making small plastic or jewelry, simply cut off part of the board with a knife. The cut edge of the board can be immediately trimmed with a knife, preparing it for further work.
Using a knife, you can give the initial, rough shape to a sculpture, spoon, pendant or other workpiece, and then detail it using chisels or cranberries.
Recommendations for use
How to cut? Tatyanka knives of this series are designed for manual wood carving without the use of a hammer or mallet. Tree cutting is done only by applying manual force.
For what wood? The sharpening, special and special, is intended for cutting linden, aspen, willow, spruce, poplar and alder wood. Hardening the metal allows you to cut wood and harder species: oak, sandalwood, apple tree, birch, etc.
, but this is not recommended due to the thinness of the metal of the chisels and the blade itself at such a small sharpening angle.
For work on denser and harder wood, the sharpening angle must be different, and impact carving techniques (using a mallet, hammer or other impact tools) are not allowed.
Working with other materials The tool is not intended for working with other materials, but many craftsmen use it at their discretion to process leather and other materials. In this case, servicing of the tool (sharpening, replacement, resharpening, etc.) in case of contacting the service center will be carried out at the expense of the buyer.
Care To maintain the instrument in sharp working condition, it is necessary to periodically polish it on leather or a felt wheel using GOI polishing paste or other pastes. You can learn more about editing the instrument from the free videos on our website.
We do not recommend sharpening the tool yourself, as there is a risk of damaging it (in this case, service will be carried out at the expense of the buyer).
Store the tool in special wooden boxes or rolls to prevent the tool blades from colliding, as well as the blade hitting walls or other surfaces, which could result in damage to the tool.
Service Tools are accepted for service. Can be re-sharpened or replaced in case of a manufacturing defect.
Included in the kits
- This knife can be purchased individually or as part of the following wood carving kits:
Source: https://www.tatianka.ru/goods/tatianka-tools/?id=487
Tool sharpening
A lot depends on quality and correct sharpening. And the main thing is the quality of the work performed.
Sharpening a knife for wood carving.
As soon as the resistance of the material is felt during carving, the tool should be sharpened immediately:
- On a block with a large abrasive, at an angle of 15-24 degrees, using movements away from you, we create the correct cutting edge. As soon as you can feel the sharpness with your finger, you should switch to medium grain.
- And with the same movements, smoothly from ourselves, we continue sharpening. It is very important not to spoil the sharpening angle, keep the blade at one degree.
- Then we moisten the diamond block with plenty of water and continue to form the blade.
- It is better to perform editing on a leather belt using GOI Pata or a similar material.
That's all, you have a sharp knife in your hands, you can continue working.
Such manipulations must be performed regularly, starting from the first point. But do not lose the sharpening angle of the knife or other tool being sharpened.
What is a marking tool?
A marking knife for wood is necessary for drawing lines along which the cut will be made with another tool, including an electric one. And therefore it is a tool with the following parameters:
- long straight handle;
- a beveled or arrow-shaped blade measuring 3.2-3.5 cm, width 1.4-1.5 cm;
- total size about 20 cm;
- double-sided or single-sided blade sharpening;
- tip at 40-45 degrees.
The tools are more precise than pencils in marking due to the thinness of the blades and narrow point. The cost of this is 800-1100 rubles.
Wood
To get the job done efficiently and simplify the carving process, you should initially choose the right wood. Each type of wood has special properties that may become relevant when making a specific pattern:
- Hardwood trees are chosen for processing by professionals with extensive experience. Creating patterns on such a basis is difficult, but the result justifies the effort.
- The hardest rocks are difficult to process even for specialists. This option is usually chosen in extreme cases, if the product must have high aesthetic properties.
- Soft wood from linden, pine or alder will be an excellent springboard for a novice craftsman. The material is easy to work with. The carving elements turn out smooth and neat even without much effort.
Linden is the most popular type of wood among professionals. Wood fibers form a beautiful pattern on the base, the base does not split during operation. Working with pine can become more difficult if the grain begins to splinter under the chisel. The best option would be aspen.