How to inexpensively and simply make a guide for a circular saw with your own hands
Every person who has worked with a circular saw at least once in his life knows how difficult it is to achieve an even and precise cut using such an electric tool.
Most people solve this problem with the help of the simplest devices, for example, strips of plastic or plywood, which are attached to the surface of the clamp. But it will be much more convenient to use a special guide rail for such purposes. It is precisely such a device that can extremely rarely be found in the basic configuration of a manual circular saw, and in construction markets such a device separately will cost the same as the saw itself. But this is even strange, because the device is not complicated.
If you have all the necessary materials, making a guide for a circular saw with your own hands is not so difficult, and this is what will be discussed in our article.
Types of tires
They fall into two broad categories:
- double-sided and one-sided;
- symmetrical, asymmetrical tires.
The main characteristics of the classification are:
- design features of the saw;
- geometric dimensions;
- the material used;
- availability of replaceable and complex tires.
Variety of guides
Based on the first feature, tires for electric and gasoline tools are distinguished. Dimensions indicate the processing capabilities of wooden products (depending on the length and cross-section of the block). The materials can be used: wood, wood boards, metal guides. The presence of tires of complex shape makes it possible to process wooden workpieces of complex geometric shape.
Based on the nature of their application, they are divided into three main categories:
- Universal tires. The design allows them to be used for almost most types of circular saws.
- Specialized guide rail. These are guide bars that are designed for use with a circular saw.
- Homemade. This type has great variety and is determined by the imagination and skill of the developer.
Universal guide rail
Useful tips
Blank templates make the work much easier.
There are several useful recommendations that will help beginners use a circular saw with a guide:
- It is necessary to use special blank templates. With their help you can quickly make identical parts.
- Before starting work, you need to adjust and configure everything in advance. Only with a properly configured tool will it be possible to cut wood efficiently.
- Do not work at the circular saw for too long. The tool must be turned off periodically to prevent it from overheating.
- The tire must be securely attached. It must not slide on the work surface. Bolts or screws can be used as fastenings.
- If, during sawing, the circular saw begins to sharply slow down, it must be turned off. This often happens when a tool works continuously for a long time and begins to overheat.
Important! If you need to cut an even cut, you must use a guide. Without it, it is quite difficult to do this.
A circular saw is an indispensable tool that allows you to quickly cut wood products. People who want to do quality work should use special guides. Such designs can be purchased or made independently.
How to use a circular saw guide?
To perform the functions assigned to the bus, the following rules must be followed.
- Prepare the tool for work (remove any debris or sawdust from the surface).
- Check the reliability of the existing fastening system.
- Check that the selected tire and the prepared material for cutting comply with the characteristics of the circular saw.
- The guide for the circular saw is installed in a previously prepared place.
- Attach to the base or workpiece.
- Press the saw firmly against the surface of the bar.
Using a tire for a circular saw
Further actions must be carried out in accordance with the rules for working with a specific saw.
What is a circular saw?
In everyday life and in production, a circular saw is necessary for sawing various materials (wood, slate, plasterboard, soft metal, plywood, etc.). This hand-held electric tool (as standard) is designed to perform straight cuts with a depth of 40 to 140 mm (most models produced by manufacturers allow you to make right angle cuts up to 85 mm, but there is a line of more powerful equipment for construction sites). During the operation, the operator holds the device firmly in his hands and carries out sawing, moving along the workpiece. At the same time, there are no restrictions on the size of the workpieces in terms of length and width. It is possible to cut at an angle to the surface of the part.
Circular saw device
Saw models vary in power. The most budget devices have a power of up to 1.2 kW and are designed for sawing workpieces up to 4.5 cm thick. They are excellent for household needs, carrying out periodic work for short periods of time and are simple and unpretentious. If you need to make a cut up to 6.5 cm, and this needs to be done often and for a long time, you will need a semi-professional tool with a power of up to 1.8 kW. To carry out production tasks, professional equipment with a power of up to 2.2 kW is produced, withstanding long-term loads and capable of cutting parts up to 8.5 cm thick. In addition, tools are produced intended for use in woodworking enterprises, capable of sawing workpieces up to 14 cm thick. 1 cm. Its power reaches 5.5 kW, and its weight reaches 100 kg.
A circular saw
Prices for the popular range of circular saws
A circular saw
Choosing a modification based on purpose
When choosing disks for a tool, you need to pay attention to their technical parameters
- Tooth sharpening angle. Soft materials are sawed with discs that have teeth inclined in the direction of rotation of the disc. To work with metal, models with a negative sharpening angle are required.
- Number of teeth. For sawing different materials, you should select discs with different numbers of teeth: for soft ones - models with a large number of teeth, for hard ones - with a small number. For example, for wood, the minimum number of teeth is 24.
Disc marking includes data on its diameter and seat size
To use a circular saw for a long period of time, it is important that it does not weigh too much, is ergonomic, and has well-sharpened blades. Holding the unit in your hand for a long time is not at all easy
Operator fatigue can lead to poor sawing quality. Therefore, many craftsmen who work with saws practice placing them on a table.
Circular saws are often mounted on a table
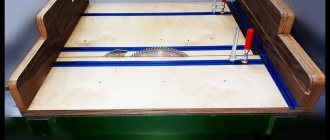
The point of such a device is to secure the saw body under the tabletop so that only one sawing disc is above the table. The workpiece moves along the tabletop and is sawed by a rotating disk. Such a stationary device greatly facilitates work and allows continuous work without loss of quality and quickly. Manufacturers offer a large number of models of saws placed on tables. The cost of structures varies from 8 (equipped with the most primitive saws) to 140 thousand rubles. Self-manufacturing of the structure allows you not only to save money, but also to have a unit at your disposal in accordance with your own requirements.
Making a table for a circular saw is easy
Design features of tires for circular saws
A circular saw guide has several basic design elements. The main element is always the guide (regardless of the selected material). Installed stops that determine the length of the permissible cut. Set of fastening elements. Ordinary bolts and nuts, clamps or wing fastenings can be used. The differences between the various guides are: the selected material (wood or metal), geometric dimensions.
Scheme for making a guide bar
Guide rail functions
Any guide rail: factory-produced or manufactured independently performs a number of important functions;
- Provides high accuracy and good cutting quality;
- Allows you to perform not only straight cuts, but also cuts of a given configuration;
- Allows longitudinal and cross cuts;
- Adjust the length of the cut piece.
- Carry out precise trimming of one or several workpieces at the same time.
- Ensures compliance with the rules for safe handling of such a complex instrument.
Materials and tools for making jigs for a circular saw
The implementation of your ideas will require a simple set of tools and a small number of non-scarce components:
- wooden blanks (usually 10mm thick bars or wood materials are used: plywood, wood boards, laminate);
- hardwood bars with a thickness of more than 10 millimeters (thick plywood, various types of wood boards, such as laminate, can be used);
- hardware (screws, self-tapping screws, bolts, nuts);
- an electric jigsaw or a circular saw itself;
- electric or hand drill with a chuck up to 10mm;
- electric screwdriver or screwdriver with a set of bits (mostly flat and Phillips);
- clamps.
Making a guide bar
Making at home
The main thing is to accurately maintain the geometry. The basis could be:
- channel;
- pipe with a rectangular cross-section;
- corner;
- laminate.
A serious disadvantage of wooden and pressed tires is their sensitivity to moisture.
Option 1. Laminate tire.
- Using a ruler, cut two pieces of material of the same length.
- We mill one edge at a time.
- We attach it to the base (also made of laminate) with self-tapping screws.
- We check the width of the groove using an A4 sheet of paper with a thickness of about 0.11 mm: the paper is inserted into the device and screwed.
- The tire is fixed to the sole of the circular saw with a mount for a side stop. You can drill a hole in the housing if the warranty period has expired.
- The bar extends as far as possible in front of the hand-held circular saw. The toe of the sole should extend a few centimeters onto the guide. Using a laminate sawing disc, we saw off the edges of the guides so that they align with the markings.
This will absorb the depth of the cut (approximately 1.5 cm), but such a device is convenient and easy to manufacture.
Option 2. The basis is the building rule. A model with handles that move along a groove is suitable.
- The handles are removed, and softly fixed clamps with spring handles are selected instead. Models with a removable top are suitable. Having removed the upper part, the clamp is fixed to the rule using an adapter.
- Adapters are made from polypropylene on a milling machine. The result should be parts that, in cross-section, resemble the letter “T”. They are inserted tightly into the groove for the handles.
- Holes are made in the “leg” of the adapters and screwed onto the screws with clamps.
- The tire is laid on the sheet with the groove down and pressed firmly from below with clamps. There are no parts on top that slow down the operation of the circular saw. The only limitation in work is the length of the rule.
Option 3. To obtain an accurate cut, the edge of the tool base adjacent to the guide must be perfectly smooth. Professional tools with cast soles are distinguished by this, but inexpensive stamped bases do not have this property. Therefore, we offer the rail option. The tool moves along it without resting against the guide rail. At the same time, the force required to push the saw is significantly reduced. The rail can be made of aluminum U-shaped profile. You need two segments with different sections. The smaller profile is inserted into the larger profile without any gap, but free movement must be ensured.
https://youtube.com/watch?v=uD-EzQFupAg
Now the guide rail can be made by hand:
- A larger diameter guide is attached to plywood No. 3 with screws. The heads of screws and self-tapping screws are ground off so that they can be hidden flush.
- We tightly place strips of plywood No. 10 on both sides of the guide and also fasten them with self-tapping screws. Plywood can be replaced with chipboard.
The excess width pieces are sawed off, and the rail is ready.
Preparing the hand saw:
- A small profile is inserted into the rail, the height of the “legs” is removed so that the profile fits flush.
- The cut profile parallel to the saw blade is attached to the sole. For this purpose, a pair of M 4 wing screws are used. If the circular saw platform is smooth and of high quality, its edges can be adhered to.
- The hand saw is placed on the guide by inserting the profile into the guide rail. Turn on the tool and saw off the excess strip in width.
For a perfect cut, the edge of the tire is placed on the marking and the guide is attached with clamps. With a guide rail, the saw moves smoothly and does not wobble, cuts accurately and feeds easily.
Stop ruler is a simple and clear element
This type of tire as a thrust ruler is the simplest, easiest to manufacture and use. When manufacturing it, it is necessary to remember that no matter how simple the design is, it must ensure reliability and safety. A high-quality stop ruler can be used for an electric jigsaw, a hand-held circular saw, or a simple hand saw. Manufacturing is carried out according to the following sequence.
- Prepare a wooden or plywood strip. The width should exceed the width of the platform of the circular saw used by 20 centimeters.
- A ruler is made from this strip. The remaining sheet of plywood is used to make the base.
- The finished structure is screwed to the base. For this purpose, wood screws are used.
- The protruding part of the ruler is carefully trimmed. The edges should be milled.
Stop ruler
When starting to work with a finished tool, it is advisable to carry out several test cuts on secondary wooden products. You need to get used to the fact that when moving the saw along the length of the ruler, you need to apply different forces. Therefore, you should gain some experience. Then proceed to the finishing cut.
What are miter saw stops for?
All kinds of additional devices: stops, clamps, fasteners are used to securely fix the workpieces. The miter saw guide helps you make precise cuts across the grain of the wood. The factory stop has one drawback, which significantly reduces the scope of application. The cut cannot be made larger than the width specified by the manufacturer. This parameter is individual. Cutting boards of greater width requires rigid fastening of the stop.
Making your own guide from plywood is the most popular option.
For a craftsman who constantly performs work on sawing wood, for example, for a furniture maker, the constant use of a tire is strictly necessary. The quality and speed of production depends on this. Experienced users and craftsmen rarely use factory-made products for cutting; more often they make them themselves.
The prerequisites for making a tire yourself are:
- Desire to save money.
- The need to introduce additions to the design that allow more efficient and multifunctional wood processing.
Necessary materials
To produce a tire from wood you will need the following materials:
- Plywood blanks with a thickness of at least 10 millimeters, the length is chosen arbitrarily according to the length of the future cut, the recommended length is 1.2 meters;
- Wooden blocks 30 x 30 mm.
- Metal strips 3-4 mm high, 8-12 mm wide, the length should be equal to the length of the sole on the circular - 2 pcs.
- Fastening elements – hardware, self-tapping screws.
- Fraser.
- Jigsaw.
- Drill with a drill bit with a diameter of 10 mm.
- Screwdriver with a bit for self-tapping screws.
- Clamps.
How to make a guide for a circular saw
Step-by-step instructions for making a plywood guide
It is very important to be careful in manufacturing and adhere to dimensions, since any inaccuracy or violation of the straightness of the structure will lead to a serious deterioration in the final result, and consequently to a deterioration in the quality of the cut.
Step-by-step instruction:
- We transfer the size of the saw to the plywood and mark it.
- In order for everything to turn out smooth and beautiful, you need to use something hard and smooth; a piece of profile pipe, a square, or a guide for gypsum boards is suitable for this purpose. We fasten it with clamps at the received mark.
- We retreat 5 cm and make a cut with a router. The height and width of the cut should be the same as those of previously prepared metal plates.
- We retreat another 5 cm, mark and make another cut with a router. To obtain a straight line, we also set the metal profile as a stop.
- We attach the metal guides to the circular saw. The main thing is to do it very smoothly. The protruding parts, beyond the edges of the sole, should be sawed off. It is recommended to grind and polish the working surface, this will make it slide better. And lubricate the grooves in the plywood with wax, this will also give better glide.
- We attach wooden blocks along the edges with glue, and then also tighten them with self-tapping screws.
- For better gliding, cover the working surface of the tire with metal tape. It is very resistant to abrasion.
- That's all, the parallel stop is ready for work.
Another popular material with which you can quickly and easily make a guide for a circular saw is laminate. To do this, we suggest watching a video, the author of which tells and shows in a few minutes how to make a parallel stop from 2 laminate boards in detail, it is very interesting and useful. We recommend.
Adjusting a homemade device
Before starting work, it is necessary to make an adjustment, which consists of selecting the cutting location, as well as the depth of the cut and its length.
There are several useful tips during the adjustment process:
- The device must be positioned evenly in relation to the edges of the material. Distortions are not allowed. To check the straightness of the disk, it is lowered into the cut of the guide.
- After adjusting the tire and disk for straightness, the entire structure is secured with clamps. In some cases, it can be secured to hardware, for which special holes are made in the corners of the tire.
The tire allows you to make cuts at 45 degrees and chamfer edges, but to do this you need to adjust the angle of the circular saw blade.
Work and safety precautions
Since the circular saw itself is considered a very dangerous tool, the improper use of which can lead to serious injury, it is necessary to follow the following safety recommendations:
- When working, you must use PPE - goggles and gloves. It is also prohibited to start working with hanging items of clothing, for example, with unbuttoned sleeves.
- The circular saw starts only after the blade is placed in the guide, but without touching the surface to be processed.
- The tire must be firmly fixed with clamps, since otherwise the kinetic energy of rotation of the saw blade will be transferred to the tire, and it will “fly out”.
- All cuts must be done away from you, and the master himself must stand somewhat to the side, and not in front of the saw.
DIY remote guide bar for a circular saw
It is made independently. It has the following implementation options.
- In the form of a rail miter box.
- Using building rules, clamps, a piece of propylene.
- Using aluminum profile.
- Using flat wooden blocks.
- Use of wood boards (fibreboard, OSB).
- Using laminate.
DIY remote guide bar for a circular saw
Ruler from a building code
The next type of guide structure is the ruler from the building code.
For the product you will need:
- aluminum building code;
- clamps with a removable upper part - two pieces;
- two adapters made of polypropylene.
The aluminum rule can be purchased at any hardware store. It must have a longitudinal groove with movable handles. The handles need to be removed and clamps installed in their place. It is better to select clamps with a removable upper part. If you remove it, the clamps are easily attached to the rule gutter. To do this, you will need homemade adapters, which are best made from polypropylene. The adapters should be shaped like the letter T, they can be turned on a milling machine, but if you don’t have one, cut them with any available tool. Holes are drilled in the legs of the adapters to attach them to the clamps with screws. The adapters are then secured in the gutter.
The guide is laid with the groove down on the material being processed and fixed to it with clamps. As a result, all protruding elements of the device are located below and do not interfere with the saw’s operation.
Rail miter box for manual circular saw
This device allows you to cut boards of a given length, bars, small workpieces in large quantities quickly enough and with high quality.
To make such a guide you must have:
- Metal corners of the same shelf size and length.
- The base is made of any available material: boards, plywood, chipboard. Its thickness must be more than 15 millimeters.
- Set of fasteners (bolts, nuts, wood screws).
Before cutting the workpieces, markings are made. Mark the length of the future tire and attachment points. The main conditions when choosing sizes are:
- the board should move freely under the guides;
- The selected circular saw blade should not be too high.
Rail miter box for manual circular saw
Bolted connections are used to secure the structure. The parallelism of the fixed corners should be carefully checked. Ensure that the circular saw blade slides freely. To do this, fluoroplastic strips are glued. They significantly reduce the coefficient of friction and reduce the load on the circular saw.
Another option is to install small wheels. Small-diameter bearings can be used as a finished product. Additional time and tools will be required. The created design will significantly simplify the cutting operation and ensure proper safety.
Details
From plywood
This option is one of the simplest and most versatile among all types of guides for a hand-made circular saw. For this reason, it is more common in home workshops. We propose to consider the workflow, manufacturing algorithm and principle of operation.
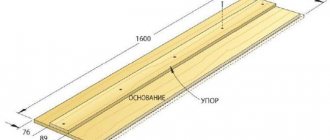
Materials and devices. To make such a tire, you will need three pieces of plywood, each 10 cm thick. Their length must be the same and is usually equal to the length of the workbench where the work will be performed. One segment should be from 25 to 35 cm wide (this will be the base), and the width of the other two will be calculated when making the tire. In addition, it is worth preparing wood screws in advance, and their size must be 1.6 cm. We also present to your attention drawings with segments.
Manufacturing instructions. When making a guide for a circular saw, you will need to adhere to all dimensions very accurately. Even minor deviations can lead to a sharp deterioration in results. If desired, you can use laminate instead of plywood.
A plywood tire is made in several stages:
- First, you need to measure the distance from the inside of the circular disk to the longitudinal cut, which is placed on the tool’s support platform.
- Next, we cut one of the plywood strips so that the width is 0.02-0.05 cm less than the distance obtained in the first step. The fibers on the top layer of plywood veneer must be directed longitudinally.
- Using self-tapping screws, screw the resulting strip to a wide piece of plywood (that is, to the base), and then accurately align the ends. This will create the working edge of the guide bar.
- After this, using a caliper, measure the width of the longitudinal cut groove.
- Screw the last strip to the base parallel to the first. There must be a gap between them, the size of which will be 0.02-0.05 cm smaller than the width of the groove that was measured in the previous paragraph.
- To prevent the material being cut from being damaged, a layer of soft cloth should be glued to the guide from below.
Please note that before starting to measure the base of a circular saw, it is imperative to disconnect this tool from the electrical network!
Now the homemade guide bar is ready, and all that remains is to prepare the hand saw. To do this, you should saw down a narrow strip of thick plywood or other sufficiently durable material. The height of such a strip must be 0.8-0.9 cm greater than the depth of the guide groove, which is located at the base of the saw. But the width will correspond to the width of the groove. The length must be several centimeters longer than the length of the sole. The resulting limiter strip should be secured to the guide groove so that it sticks out from behind the two edges of the sole.
How to use plywood tire. To create a cut, you will definitely need two clamps and a pair of flat wooden blocks, the thickness of which will be slightly greater than the parts being processed. The guide rail will be installed with its ends on such bars so that the working edge protrudes slightly beyond the edge of the workbench table top. In places where the tire will rest on wooden blocks, it should be secured more tightly with clamps to the workbench. The workpiece to be cut with a line for cutting, which is previously marked with a pencil, should lie under the tire, and the cutting line will be aligned with its working edge. Next, when the circular with the restriction strip attached to it must be installed on the tire so that the restriction on the sole fits exactly into the preparation gap. Next, you can saw and hold the workpiece with your free hand, and also slightly press the saw towards the workbench.
Other varieties
If for some reason the plywood rail cannot meet your requirements, then you can make a guide of a more complex design. Below are a couple more examples of what guide rails can be made, and you can repeat such designs with your own hands.
Aluminum profile guide. This type of tire differs from simple plywood in that a U-shaped aluminum profile is installed in the guide gap. Its advantage is that the rigidity of aluminum slightly improves cutting accuracy. It is not difficult to make a guide for a circular saw with your own hands, especially from an aluminum profile.
For ideal sliding of the saw along the bar, not thick plywood, but 2 cylinders of fluoroplastic or other material that has a low coefficient of friction can be attached as limiters to the guide groove of the lower part.
Tire from building regulations. Among the construction tools and devices, there are long aluminum rules that finishers use to level walls. To make a guide ruler yourself, the rules are suitable, the design of which has a groove for convenient and free movement of the handles.
The main advantage of this line is the absence of elements that protrude above the surface of the workbench. To do this, you need to take two collapsible type clamps and improve them a little. Remove the handles from the rule, and the upper parts from the clamps, which should be replaced with polypropylene or even fluoroplastic inserts. The profile of such inserts should be T-shaped so that they can be installed with their wide part into the rule groove and held there.
As a result, you will get a ruler that can be attached to the workbench only on the lower part. This will make it possible to move the saw freely around the work area and not be afraid of getting caught on something. But keep in mind that such a tool cannot be called a full-fledged tire, because it is just a ruler that will need to be adjusted every time before cutting.
Rail miter box. This device is often used for cross-cutting (that is, trimming) material. As a rule, it is made of two metal corners, which are parallel to each other, and their ends are rigidly fixed to a metal or plywood base. The corners should be strengthened with studs or bolts, which are also used to adjust the height of the “rails” relative to the base. The height should be such that the cutting material passes freely under the corners.
To make the tire move more smoothly, the corners on the inside can be glued with a material that has a high slip coefficient. For even smoother movements, you can install the saw sole on the surface of the platform, which is equipped with metal wheels.
External type carriage on bearings. A circular saw on an external carriage is most similar in appearance to a stationary format-cutting machine. This design has an excellent level of stability, which means it will provide high cutting accuracy. The remote type of carriage is made of a metal I-beam, which can be firmly attached with its lower plane to the workbench.
The carriage itself will move along the upper surface - this is a platform, the lower edges of which are bent inside the I-beam and are equipped with bearings that allow it to slide freely. The same bearings, when pressed tightly against the I-beam axis, eliminate lateral play of the carriage.
Parallel to the carriage, attach the saw sole to the extension guide. It can be made of two parallel pipes or angles - so that when you move the saw blade, you can adjust the size of the cut of the material. This design is good because the support platform of the saw will be adjacent to the workpiece itself, and it turns out that the cutting depth will not become smaller.
A guide made from a rule, clamps and a piece of polypropylene
Implementation of this design will require:
- construction rule (used for finishing work);
- fastening clamps (the number is determined by the number of attachment points);
- pieces of propylene (thickness is selected depending on the thickness of the entire structure).
A guide made from a rule, clamps and a piece of polypropylene
The manufacturing procedure is as follows:
- If the selected rule has handles, they must be removed. Clamps will be fixed in their place.
- Adapters are cut from a piece of dense propylene. The thickness of the adapters must be greater than the depth of the rule groove.
- The holes remaining from the handles are drilled through along with polypropylene adapters.
- The resulting structure is fixed to the processed bar.
- The finished tire is glued with soft tapes. This allows you to avoid the formation of chips in the workpiece at the time of completion of the cut.
It will ensure quality work. The use of a ready-made building rule requires periodic adjustments to its location. Fastening should be done at a close distance from the cutting line. This allows you to guide the circular saw blade exactly along the intended line.
What should a saw table be like?
When setting up a stationary area for processing materials, several nuances must be taken into account.
- The structure must be stable and rigid.
- The material from which the table is made must be strong and durable.
- It is important that the table surface is perfectly flat.
- Grounding must be provided.
Circular saw table design
- The table must be equipped with devices that ensure the safety of the operator.
- The saw start button should be located within easy reach.
- A place should be provided for collecting sawdust, which should be easily accessible.
- The work area around the table should not be cluttered, as this increases the risk of injury.
Taking into account the above, you can be confident in the reliability of the installed structure and the good quality of the workpieces being processed, regardless of the amount of work.
Table for circular saw - photo
The main components of the table: frame and smooth surface for placing workpieces.
The material from which structures are made varies depending on the purpose, installation location and frequency of use. For domestic needs, you can make a structure from boards and plywood and install it, for example, in a garage. Working with large volumes of materials implies increased requirements for the strength and reliability of the structure. The best solution in this case would be a frame made of a metal profile. To reduce vibrations and provide greater stability, many even concrete the legs into the floor.
Some tips for setting up a table:
- the saw blade must be positioned strictly perpendicular to the table surface;
The saw blade must be positioned strictly perpendicular to
- the standard and optimal size of the tabletop is 1.2 x 1.2 m, but it can vary depending on individual requirements (if the tabletop is long, additional support legs may be needed);
- the height of the table depends on the height of the master, usually it varies between 0.8...1.2 m;
- it is more convenient for the operator if the table is installed on legs rather than on solid sheets, for example, plywood;
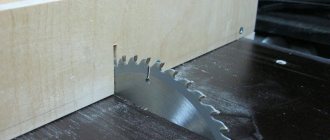
- the width of the slot into which the disk attached to the bottom is inserted should not exceed the thickness of the disk by more than 2 mm, otherwise the tool may quickly fail due to clogging with chips;
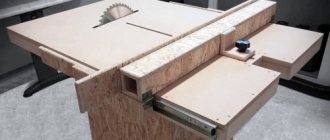
DIY circular table from a hand-held circular saw
- the circular saw should be placed in the center of the table so that there is no strong shift in the center of gravity;
- It is recommended to place the saw control buttons on the table top or the top of the table leg.
Important! In many models of saws, holes for attaching the sole to the table are already provided by the manufacturers.
Example of a reinforced workbench for a circular saw
Aluminum profile guide rail
The finished aluminum profile is one of the ideal materials for implementing the future design of the guide rail. Using metal instead of wood will create a more durable structure. In addition, the metal structure reliably prevents the entire structure from distortion. To assemble such a tire you will need:
- ready-made aluminum profile (better if it is U-shaped);
- fastening elements (bolts, screws, washers);
- sheet of plywood, you can use the remaining pieces from previous work (the main thing is that they match the design of the future tire).
Aluminum profile guide rail
The tools you will need are: an electric drill with a metal drill, a wrench of the required size, and a measuring tool. The manufacturing sequence is as follows:
- In manufacturing, two profiles of different sizes are used. First, a larger profile is attached to a thin piece of plywood.
- Sheets of plywood are rigidly attached to both sides of the aluminum profile. It is permissible to use particle board or oriented strand board. These blanks are attached to wood screws.
- Measure out excess pieces of workpieces. Use a circular saw to carefully cut them off. The resulting structure is called a rail.
After the work has been done, they begin to prepare the circular saw. The following preparatory operations are carried out:
- a profile with a smaller cross-section is placed in the rail;
- in height it should not exceed the height of the main profile;
- The profile prepared in this way is attached to the base of the circular saw. The fastening must be strictly parallel to the saw blade. It is produced using special wing screws with M4 threads;
- the circular saw is placed on the surface of the guide bar;
- To obtain an even cut, the edge of the guide bar is oriented along the previously made markings and fixed with clamps.
The use of such a guide allows for smooth movement of the saw. As a result, it is possible to achieve sawing accuracy, simplicity and ease of feeding of a circular saw.
Other types
If for some reason the plywood rail does not meet your requirements, you can make the guide of a more complex design. Below are a few more examples of guides for a manual circular saw that anyone can make with their own hands.
Aluminum profile tire
This type of tire differs from a simple plywood tire in that a U-shaped aluminum profile is installed in the guide gap. Its advantage is that the rigidity of aluminum slightly increases the cutting accuracy.
For better sliding of the saw along the bar, as limiters, you can attach not thick plywood to the guide groove of the sole, but a pair of cylinders of suitable height made of fluoroplastic or other material with a low coefficient of friction.
Ruler from a building code
There are long aluminum rules that are used by finishers to level walls. To make a guide ruler with your own hands, rules are suitable, the design of which provides a groove for the free movement of the handles.
The main advantage of such a line is the absence of elements protruding above the surface of the workbench. To do this, you need to take two collapsible clamps and slightly modernize them.
The handles are removed from the rule, and their upper parts from the clamps, which are replaced with polypropylene or fluoroplastic inserts. The profile of these inserts must be T-shaped so that they can be installed with the wide part into the rule groove and be held there.
The result is a ruler that is attached to the workbench only at the bottom. This will allow you to move the saw freely in the work area without fear of getting caught on something.
However, such a tool cannot be called a full-fledged tire. This is the ruler that needs to be adjusted before each cut.
Rail miter box
This device is most often used for cross cutting (trimming) of material.
Usually it consists of two parallel metal corners, the ends of which are rigidly fixed to a plywood or metal base.
The saw platform moves freely along the corners, as if on rails.
The corners are secured with bolts or studs, which are also used to adjust the height of the “rails” relative to the base. The height should be such that the material to be cut fits freely under the corners.
To make the saw movement smoother, the corners on the inside can be glued with a material with a high slip coefficient. For even smoother movement, you can install the saw sole on a platform with metal wheels.
External carriage on bearings
A circular saw on an external carriage is more like a stationary format-cutting machine. This design is highly stable and, accordingly, provides high cutting accuracy.
The remote carriage is made of a metal I-beam, which is firmly attached with its lower plane to the workbench. The carriage itself moves along the upper plane - a platform, the lower edges of which are bent inside the I-beam and are equipped with bearings that allow it to slide freely. These same bearings, tightly pressed to the I-beam axis, eliminate lateral play of the carriage.
Laminate guide rail
The use of this material is determined by its availability and ease of processing. The sequence of manufacturing a guide bar for a circular saw is as follows:
- Mark the laminate into two strips of equal length (one will be the guide, the other will be the base). The length is selected based on the tasks assigned. Then they are carefully cut out.
- All edges should be carefully milled. This will result in machined, safe edges of the tool.
- Using wood screws, screw the guide to the base.
Laminate guide rail
To ensure ease of use and safety, the bar should be moved forward as far as possible on the hand-held circular saw. Using a disk designed for sawing laminate, saw off the edges of the guides. This action is necessary for accurate alignment with the applied markings. This will somewhat reduce the depth of the possible cut, but provides additional ease of operation.
What it is?
Essentially, a guide bar is a rail that allows a hand-held circular saw to slide forward and backward while preventing the tool from deviating from the cutting line. But a properly designed guide not only ensures an even cut, it also reduces the number of chips where the saw and the material come into contact.
Homemade guides have different designs and are made from different materials. Eg:
- plywood guide;
- rail miter box from a corner;
- aluminum profile tire;
- ruler from the building code;
- external carriage on bearings.
The miter box and remote carriage are the most difficult to manufacture. A plywood guide or profile rail is much simpler in design, but this does not mean that the cut made with their help will not be of such high quality. The difference between these varieties largely lies in ease of use.