How to provide hot water to a home where hot water supply is not provided or is regularly turned off? Using a heater. On sale you can find convenient devices of various designs and performance.
They are relatively easy to install and manage. The most important stage of installing the device is connecting it to the water supply system of the house. If the connection diagram of the water heater to the water supply is strictly followed, the unit will faithfully serve for many years.
When installing such a complex electrical appliance yourself, you should take into account a number of important nuances.
Types of electric water heaters
Two types of devices are most popular among buyers: storage-type devices, also called boilers, and instantaneous water heaters.
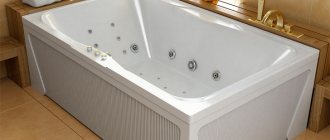
Water boilers: a necessary modern attribute in the bathroom
The first ones function as follows: cold water enters a special tank equipped with a heating element.
There it is heated to the required temperature and then supplied to the water supply system. In a flow-through heater, there is no storage tank; the water is heated as it passes through a special flask in which the heating element is located.
Therefore, the procedure for connecting different types of devices to the water supply system varies significantly.
Boilers are easier to install, they are usually cheaper than flow-through heaters and are less demanding on the quality of the electrical network than flow-through devices.
Therefore, storage units are much more popular. Flow-through heaters are installed as close as possible to the point of hot water collection, for example, directly on the water tap.
The device allows you to get hot water almost instantly, but heating costs will be quite high.
Installation of instantaneous water heater
How to install a instantaneous water heater depends on how many water intake points the unit is intended to be used at. Depending on this, the power and performance of the water heater are also selected.
The easiest way is to mount the model on one crane. Thus, there is often a need to find out how to install a flow-through heater in the bathroom of residents of city houses with central hot water supply with frequent hot water outages. In this case, a low-power and cheaper device may be sufficient.
In private homes, where a heater is the only heating method, more complex circuits with branches are often implemented (at least for a kitchen faucet and a bath or shower). Such schemes require more powerful and expensive equipment. Installation in this case has its own characteristics. For example, the location for installing the heater should be chosen so that it is located approximately at an equal distance from all points of water consumption.
Connecting an instantaneous water heater
Installation is performed in the following sequence:
- Installation of tees on hot and cold water pipelines for tapping equipment.
- Installation of ball valves on tees to be able to shut off the water supply if necessary. In particular, when using a heater as an alternative, turning off the tap on the hot line makes it possible to use hot water from a centralized line.
- The tees on the pipelines are connected to the corresponding nozzles of the water heater using flexible hoses. If the equipment is located far from the tie-in points, pipes (polypropylene, metal-plastic, steel - depending on the type of pipeline available) can also be used.
Important: Since the power of such models is high, it is recommended to use a reinforced three-core cable as wiring and lead it from the panel; an RCD and grounding are also required. This will all be relevant for powerful storage boilers.
Plus, when installing a flow-through electric heater with your own hands, it is recommended to use an ion exchange filter, and, if necessary, a mechanical one to protect the ion exchanger from rapid contamination. This is due to the intense deposition of salts on the equipment during rapid heating of water in a flow-through heater.
What should you consider before starting installation?
Good preparation is the key to successful heater installation. First, it is recommended that you carefully study the manufacturer's instructions, paying particular attention to safety issues.
The next important point is the choice of location for installing the heater. Here are some useful points:
- The device must be accessible for servicing at all times.
- To install a wall-mounted model, you should choose a wall that can support double the weight of the device when fully loaded.
- It is necessary to diagnose the condition of the wiring, correct any identified deficiencies and compare the characteristics with the manufacturer’s requirements.
- Study the condition of the water supply system: pipes and risers, since the operation of the heater depends not only on the quantity, but also on the quality of the incoming water.
If the location for the heater is chosen correctly, it will be easier to install and maintain.
Installation procedure
The boiler installation process includes the following steps:
- hanging on the wall;
- connection to water supply;
- power connection.
Floor-standing boilers are also produced, but in everyday life you most often have to deal with wall-mounted ones. When filled, the device is heavy, so it can only be attached to a solid wall. It is important to choose the correct diameter and length of fasteners:
Table for selecting the size of anchor bolts taking into account the volume of the water heater and the wall material
| Water heater volume, l | Pull-out load, kg | Base (wall) material | Recommended bolt diameter, M | Recommended bolt length, mm |
| 30-50 | 15-25 | Cinder block, brick | 8-10 | 80-100 |
| Concrete | 6-8 | 60-80 | ||
| 80-100 | 25-35 | Cinder block, brick | 10-12 | 100-120 |
| Concrete | 8-10 | 80-100 | ||
| 150-200 | 45-60 | Cinder block, brick | 12-14 | 120-150 |
| Concrete | 10-12 | 80-120 |
The most convenient are anchor bolts with hooks - you just need to hang the boiler on them after screwing it into the wall. But some devices do not have hooks for hanging on such bolts - they will require anchor bolts with heads for a Phillips screwdriver or hexagon.
Water heater connection diagram
On a thin wall made of brick (half or even a quarter of a brick thick) or made of foam blocks, gypsum blocks, reinforced gypsum, the water heater must be mounted using ordinary bolts, which must penetrate right through the wall. A washer 1.5 - 3 mm thick is installed under the nut, the diameter of which should be larger, the heavier the boiler is and the thinner the wall.
When fixing devices with a volume of more than 100 liters, sections of corners are placed under the nuts, with the help of which the load is distributed over a sufficiently large area.
Anchor bolts located at the same height must lie on a strictly horizontal straight line, so markings for them should be made using a building level.
The distance between the boiler pipes and the water pipes must be sufficient to accommodate all the necessary fittings (they are listed below). Usually 30 - 50 cm is enough.
Tools and materials
The set of tools and materials required to connect the water heater to the water supply system may vary depending on the features of the device.
A novice master can focus on the following approximate list:
- hammer drill with a set of attachments;
- wrench and adjustable wrench;
- straight and Phillips screwdriver;
- roulette;
- wire cutters;
- pliers, etc.
You will also need pipes and fittings to connect the heater to the plumbing system. Means of sealing joints are required: flax thread, FUM tape, special paste.
It doesn’t hurt to stock up on a pair of connecting hoses, two or three shut-off valves and the same number of tees in advance.
To connect the boiler to the water supply, you can use special flexible hoses of a suitable size, but not too long
Only fastening elements are usually supplied with the heater, and they are not always suitable for a particular situation.
For example, if you plan to install the device on a wall with a thick finishing layer, you should stock up with sufficiently long fasteners.
What is better - a boiler or a gas water heater in a private house?
The answer to this question depends on the volume of water consumed, maintenance costs, skills in operating and maintaining the equipment, as well as calculating the approximate amount for electricity and gas consumed. It is worth not forgetting the fact that installing a boiler in a private house is easier than connecting a gas water heater. Difficulties may arise with the latter unit, and installation cannot be done with your own hands. It is necessary to install a gas pipeline, ensure excellent ventilation of the room, take care of the chimney and strictly follow safety rules. Experts recommend that when building a private house, you should decide on a water heater or a boiler, and if the cottage has already been built, in 87% of cases it is easier and cheaper to organize the installation of a water heater.
Various boiler connection diagrams
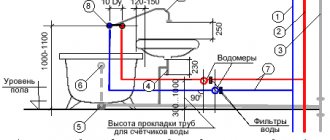
To connect the boiler to the water supply, the diagram shown below is usually used:
The diagram shows the procedure for connecting a storage water heater to a conventional water supply system. The location of taps, shut-off valve, drain, etc. is indicated.
The figure shows the conventional location of the risers, which are designated by the words “cold water” and “hot water”. The numbers “1” and “2” indicate conventional shut-off valves.
One of them is opened so that cold water enters the tank; through the other, liquid heated to the required temperature is supplied to the hot part of the water supply.
During periods when the storage water heater is not working, it is recommended to turn off these taps.
Under the numbers “3” and “4” there is another pair of taps. These devices are responsible for the flow of water into the apartment from a common riser.
Usually they are available in every apartment, regardless of whether the apartment has a boiler or not. And if tap “3”, through which cold water flows, is turned off only if it is necessary to stop the water supply to the apartment, then tap “4” should be completely turned off while the heater is operating.
If this is not done, the hot water from the boiler will go into the house riser.
Number “5” is the installation location of the check valve. This is a very important element of the water heater connection system, since it protects the equipment from damage.
If the cold water is turned off (which does not happen as rarely as we would like), it is the check valve that will prevent the liquid from leaving the boiler storage tank.
If there is no check valve, water will flow out of the device back into the riser. As a result, the heating elements will run idle, which will lead to their rapid breakdown.
It should be remembered that boiler manufacturers usually include a check valve in the delivery package, so it is necessary to check its availability during the process of purchasing the device.
When connecting a storage heater to the water supply system, shut-off valves are used, with which you can control the flow of water into the tank
The tap, which is marked with the number “6”, is designed to drain water from the water heater tank. This tap is used extremely rarely, for example, if the device needs repairs or is to be dismantled.
In this case, according to technology, the water from the tank must be drained. You should not neglect the installation of this element, since emptying a large tank by other means can be quite labor-intensive.
The drain valve must always be located slightly higher than the check valve, otherwise it will not be possible to remove water from the tank.
Thus, if the storage water heater is working, then taps “1”, “2” and “3” should be open, and tap “4” should be closed. If the boiler is turned off, it is necessary to close taps “1” and “2”, and taps “3” and “4” should be opened.
Detailed information about connecting a storage water heater to the water supply is presented in the following video:
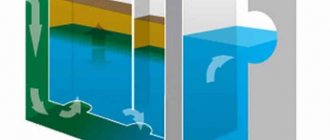
Storage-type equipment: device and principle of operation
The device is a thermally insulated tank of arbitrary shape. A heating element is built into it, which heats the water to the temperature set by the owner.
Electric water heaters are a practical solution for uninterrupted hot water. It is only important to correctly determine the volume of the device
It varies from 35 to 85C. In a thermally insulated container, the heated liquid maintains its temperature for 2-3 hours. After the water has cooled by 0.5C, the automation is triggered and the heater is turned on to heat the liquid.
When the set temperature is reached, the device turns off. This mode of operation allows the device to save energy.
Heaters built into the tank can be tubular or spiral. The first option is more reliable, it is not afraid of air locks, but over time it will definitely become covered with scale.
Spiral devices are not afraid of scale and they heat up an order of magnitude faster. The tank can be steel or plastic. Its internal surface is covered with enamel or glass ceramics.
To prevent the welds of the steel container from rusting, special anode rods are inserted into the tank to prevent the iron from oxidizing. They need to be changed every 5-8 years.
The standard design of the water heater includes a thermostat, which is responsible for maintaining the set temperature. The device control system can be either manual or automated.
The device can be equipped with an additional function for quickly heating water. Storage water heaters differ in volume, which, in turn, affects the rate of water heating.
The larger the volume, the longer the equipment will warm up the liquid. It is advisable to accurately calculate the need for hot water so as not to force the device to run idle and at the same time not experience a shortage of it.
The diagram shows the general structure of an electric storage water heater
If there is no running water
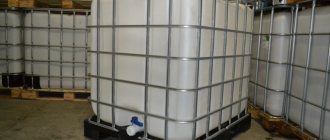
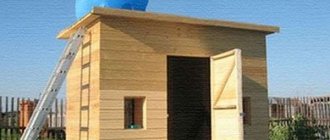
In many private houses, and even in large cottages, a storage tank is part of the water supply system.
Sometimes this is the only way to ensure normal water pressure in the pipes in the house. You can also connect a storage water heater to such a system, but a number of nuances should be taken into account: the distance from the tank to the boiler, as well as the pressure in the water supply.
If the space between the water heater and the tank is less than two meters, you can use the following connection diagram to the water supply:
But it also happens that the distance between these devices is more than two meters. In this case, a special safety valve should be installed between the tank and the tap, as shown in the diagram:
If the distance between the tank and the storage water heater exceeds two meters, a safety valve must be included in the connection diagram
If the pressure in the water supply system of the house exceeds 6 bar, experts recommend installing a reducer in front of the water heater, which will reduce the pressure of the water entering the heating tank.
Security
To connect powerful models of storage-type water heaters to the electrical network, craftsmen use a reinforced cable with three cores, which is laid directly from the distribution board. Installation of a double circuit breaker or RCD and grounding are required.
Connection to the electrical network Source otopleniesam.ru
Technical features of connecting the boiler
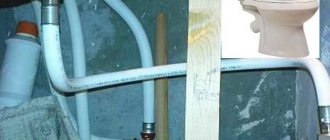
If a diagram of the correct connection of the boiler to the water supply has been drawn up, it’s time to start implementing it. In this matter, much depends on what pipes were used to create the water supply system.
In older houses you can often find steel pipes, although they are often replaced with more fashionable polypropylene or metal-plastic. When installing a boiler, you should take into account the peculiarities of working with pipes of various types.
There are no special requirements for the material of structures connecting the boiler and water supply system. They can even be connected with a fairly strong hose of suitable diameter and length.
Regardless of the type of pipes, before starting any work on connecting equipment to the water supply, be sure to turn off the water supply in the risers.
How to connect a heater to steel pipes
To do this, it is not necessary to use a welding machine, since the connection can be made using special tees, the so-called “vampires”.
The design of such a tee resembles a regular tightening clamp, on the sides of which there are pipes. Their ends are already threaded.
To install a vampire tee, first install it in a suitable location and tighten it with screws.
Between the metal part of the tee and the pipe, place the gasket that comes with the device. It is important that the gaps in the gasket and the tee intended for mounting the hole match exactly.
Then you need to use a metal drill to make a hole in the pipe through a special gap in the pipe and rubber gasket. After this, a pipe or hose is screwed onto the opening of the pipe, with the help of which water will be supplied to the heater.
To connect a storage water heater to a steel water supply, use a metal coupling with special pipes equipped with threads onto which you can screw a stopcock, hose or piece of pipe
The most important point when connecting a water heater is to seal all connections. To seal the thread, use FUM tape, linen thread or another similar sealant. There should be enough such material, but not too much.
It is believed that if the seal protrudes slightly from under the thread, this will provide a sufficiently tight connection.
Working with polypropylene pipes
If the boiler is supposed to be connected to a polypropylene water supply, you should immediately stock up on stopcocks, tees and couplings designed for them.
In addition, you will need special equipment: a device for cutting such pipes, as well as a device for soldering them.
To connect a boiler to a polypropylene water supply, the following procedure is usually followed:
- Shut off the water in the riser (sometimes you need to contact the housing office for this).
- Use a cutter to make cuts on polypropylene pipes.
- Solder tees at the outlet points.
- Connect the pipes intended to connect the boiler to the water supply.
- Install couplings and taps.
- Connect the boiler to the tap using a hose.
If the water pipes are hidden in the wall, you will have to dismantle the finish to gain free access to them.
It happens that access to pipes laid in grooves is still significantly limited. In this case, you can use a special split-type repair coupling.
The polypropylene side of such a device is soldered onto a tee, and the threaded part is connected to the water supply. After this, the removable part of the coupling is removed from the structure.
To connect a water supply from PVC pipes to a storage water heater, you can use a special adapter, part of which is soldered to the pipe, and a hose can be screwed onto the other part
Connection to metal-plastic structures
Working with metal-plastic pipes is not as difficult as working with products made of polypropylene. Such pipes are very rarely laid in grooves, but are connected with very convenient fittings.
To connect the boiler to such a water supply, you can use the following procedure:
- Shut off the water supply to the pipes in the house.
- Make a cut at the installation site of the pipe using a special pipe cutter.
- Install a tee in the section.
- Attach a piece of new metal-plastic pipe or hose to the branches of the tee, depending on the situation.
After this, all connections should be checked for leaks. To do this, water is supplied to the system and observed to see if a leak appears.
If the connection is not tight enough, the gap must be sealed or the work must be done again.
Norms and rules for installing a boiler in an apartment
After the owner has made a decision and purchased an electric water heater, he must install it. Before installing a boiler in an apartment, you need to decide who will perform the installation work.
For this purpose, many owners invite specialists who have the necessary tools and experience, and are ready to install a water heating device efficiently and reliably in a couple of hours. The cost of installing a boiler will depend on the power and location.
Home craftsmen can easily handle this on their own. Before connecting the boiler, so that the installed equipment lasts a long time and does not become a source of dangerous situations, you will need to follow a number of rules:
- The wall for placing the device must be solid; installation of the water heater on partitions made of plasterboard or wood is prohibited.
- The location area is as close as possible to the intra-house distribution of utilities: water, sewerage and electricity.
- The electrical outlet for turning on the boiler must be located near the device and used only for it, with a direct connection without an extension cord.
- Free space is left in front of the water heater for maintenance and repair, and it is also placed as high as possible so that it does not obstruct the passage of people.
- For emergency drainage of water, the device must have access to a sewerage system.
- You will also need to first ground the boiler and install RCD protection on the power line.
- The boiler installation diagram must be carried out in accordance with the manufacturer's recommendations. To turn off the water heater for repair or maintenance, install shut-off valves and a safety relief valve, according to the standard sizes indicated in the documentation for the heater.
- If the boiler design does not provide a drainage line with a valve, it is installed on the cold water supply pipes at the lowest point in front of the storage tank.
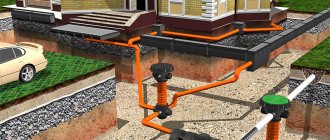
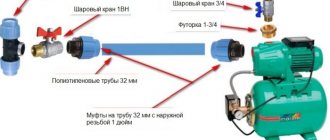
Water heater and autonomous water supply
Autonomous water supply is often gravity-based, that is, the water source is a tank installed in the attic, into which water is pumped using a pump.
What matters is the height difference between the outlet fitting of this tank and the water heater:
- If less than 2 m: a tee is screwed directly to the outlet fitting of the tank, the branches of which are connected by pipes to the mixer and the inlet pipe of the water heater.
- More than 2 m: a tee for distributing water to the boiler and mixer is installed below the level of the boiler, laying a pipe to it (the tee) from the tank.
The first scheme differs from the second in the presence of a safety valve, which is installed on the outlet (hot) pipe of the water heater.