Using a high-quality tripod will help ensure maximum accuracy of the data provided by the laser level. It is for this reason that many are interested in the types and brands of these devices. No less relevant topics are the competent choice of devices and the possibility of making them yourself.
Purpose and design features
First of all, it should be noted that the operation of the measuring instruments in question provides for the complete elimination of vibrations. A high-quality laser level tripod will provide maximum stability. In this case, there will be no even minimal deviations that could negatively affect the marks.
Tripods for levels are a special support or holder for securely fixing equipment. It is in this position that it is possible to achieve appropriate accuracy of readings. Many experts call the described devices tripods because of their design features and appearance.
In practice, geodetic tripods equipped with special screws are often used to install laser levels. This type of device can be classified as universal. They are used when:
- monitoring the implementation of construction work of varying complexity;
- determining the parameters of objects under construction;
- construction of linear structures (power lines, pipelines);
- identifying and determining the extent of deformation of various structures.
Structurally, the stand for a laser level consists of a base and a tripod head. At the same time, budget models are non-separable. At the same time, professional devices allow you to install different types of measuring instruments. An integral part of the device is the screw with which the device itself is attached to the bracket.
Different models of stands can be equipped with rectangular, triangular and spherical bases.
Universal tripods have a more complex design. We are talking about a tripod, in the center of which there is a telescopic tripod with a worm gear. Thanks to such features, the specialist has the ability to change the position and direction of the central pillar. The retractable part allows you to adjust the height of the entire structure.
As demand for measurement equipment and additional devices grew, manufacturers tried to expand their product lines as much as possible. As a result, the market now offers a whole range of tripods for laser levels and levels.
It includes many varieties.
- The above-mentioned geodetic tripod , which is a specialized device equipped with a thread for installing instruments. The main advantages in this case include a wide working surface, versatility and maximum reliability of equipment fixation. These tripods are effectively used for work both indoors and outdoors.
- An elevation tripod is a device that is characterized by reliability and allows you to operate levels with large weights. Its main feature is the presence of a crank strut. Using the handle of this mechanism, you can adjust the working height with maximum precision.
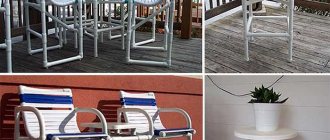
- Photo tripods , which are extremely lightweight devices. Their advantages include mobility, as well as the ability to quickly change not only the location of the device, but also the angle of inclination. The main disadvantage is the presence of rubber pads on the legs, which complicates use outside the premises. An equally important point will be the inability to operate in strong winds due to its low weight.
In addition to all of the above, there are wall holders (brackets).
Another type of device for fixing levels deserves special attention. We are talking about so-called spacer structures, which are an alternative to classic tripods. The operating principle of this device is to move the equipment up and down the bar. The latter is installed directly between the floor and the ceiling.
These telescopic stands are usually brightly colored with alternating stripes of orange and black. This solution allows you to use the rods both during the day and in the evening. The height of some structures can reach 3 meters or more. The racks are made of aluminum and have minimal weight, which simplifies their transportation and installation.
It is important to consider that spacer rods are used primarily indoors.
DIY laser level: proper use
It’s not enough to make a laser level at home, you also need to know how to use it. You need to fix the stick with the sharp end down on the desired surface, then using a bubble level, level the angle of the bar to achieve the most accurate horizontal position. You need to turn on the laser pointer and carefully point it at the desired surface.
Before using the laser level, you should watch the training video and study the instructions for use
After the pointer appears, you need to make a small mark, then move the pointer a little to the side to accurately check whether the level mark has gone astray.
Once there are two points, you need to draw a horizontal line connecting them. If the result is a perfectly straight line, the level is working and installed correctly. The dots indicate whether the stand and stand are installed perfectly. When working with such a device, it is better to have safety glasses to relieve eye strain. Adjustment will be even faster if you use a plumb bob to help with the work. A homemade laser level has a bit of a primitive design, but the ability to save a decent amount of money mitigates this problem.
Experts highlight a number of advantages that a home level has
:
- The beam length is sufficiently long, allowing it to be used in almost all work related to repair and construction;
- A small level of error, which is an insignificant drawback;
- High speed of marking and convenience, which a regular bubble level does not have;
- But builders highlight the main and most significant feature - the ability to project rays in a horizontal plane.
The homemade device can be used in further work; it will serve faithfully during the construction of a fence, if necessary, mark the boundaries on a personal plot, during the cladding of any structure. Professional workers will need purchased levels, they come in these types. Bubble - it is a plastic or wooden case with three flasks inside. Each of them is filled with alcohol and has a bubble, it should be located in the middle, indicating the exact location.
Water - they are a hose of small diameter and up to 25 meters long, with two flasks, all elements are connected to each other. Each flask has a printed scale; such a device has both advantages, in the form of low cost, and disadvantages - you need to be careful when pouring liquid, and it only works on horizontal surfaces. Magnetic - their advantage is ease of mounting - it is quickly and firmly installed on any metal surface and gives accurate readings. Tubular - it is made in the form of a rectangle and is equipped with a magnet and a cord. Laser - it is characterized by high accuracy and range, but has one significant drawback - high cost.
Review of manufacturers
Nowadays, many manufacturing companies present their products on the market of tools, measuring equipment and additional devices. Naturally, the leaders of the segment are such giants as Bosch . And in this case we are talking about the largest developer of power tools and electronic devices. For many, this brand is associated with traditional German quality.
On the market, the company offers high-quality tripods of various types, as well as rods and holders for laser levels.
In addition to the German giant, other manufacturers also present their developments.
- ADA Instruments is a company that started its activities more than 10 years ago. Initially, it was positioned as a brand of diagnostic and measurement equipment developed for a variety of industries. By the way, ADA stands for ADditional Accuracy, which means “additional accuracy.” The manufacturer offers potential buyers models of geodetic and telescopic tripods and rods.
Equipment and appearance
- Rack
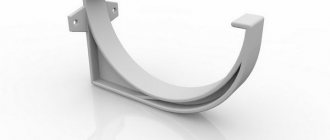
- Bracket for mounting a laser axle builder
- Adapter from 1/4″ to 5/8″ thread
The tool is supplied in a cardboard box, inside of which the stand itself is located in a plastic bag. Since the parcel contained several goods, they were all wrapped in several layers of black shipping film.
Tips for choosing
The higher the class of measurements performed, the stricter the requirements for the sets of equipment used. Based on this, special attention should be paid to the main selection criteria, including tripods for laser levels. One of the key points will be the material from which the device is made. Most often used:
- metal (in the vast majority of cases it is aluminum, one of the main characteristics of which is lightness);
- tree;
- fiberglass (fiberglass).
Each of these materials has its own characteristics that should be taken into account when choosing a specific tripod model. First of all, you should pay attention to deformation under temperature influence. By the way, metal has the highest coefficient of expansion, and therefore it will deform when exposed to sunlight.
The result of this phenomenon can be significant deviations of the sighting axis of the level from the horizon.
Wooden and fiberglass fixtures have almost identical coefficients of thermal expansion. Based on this, it is difficult to give one of the options a clear advantage. In this case, they most often rely on personal preferences.
When choosing tripods, their weight plays an important role. Heavier structures provide maximum stability. But at the same time, transportation becomes significantly more difficult and the mobility of the equipment is greatly reduced. Another important criterion is the features of the “legs” fixation mechanism. Currently available models are equipped with:
- clamping screws;
- fastening elements in the form of special clips;
- combined elements.
The use of models with fastening clips allows you to maximize the speed of work. In situations where rigid fixation of a level or level is paramount, preference should be given to tripods with screws or combined mechanisms.
Taking into account all the existing nuances, the following basic rules for selecting the most suitable device can be identified:
- with increased requirements for accuracy, priority will be given to heavy models made of fiberglass or wood;
- if maximum mobility of the entire structure is required, then it would be wiser to choose aluminum tripods equipped with clips;
- If you have a level with a compensator, you can be guided solely by preferences, taking into account financial capabilities.
How to do it?
As noted above, high-quality devices from famous brands will not be affordable for everyone. You can reduce costs by purchasing Chinese models, which are significantly inferior in quality and basic characteristics. But do not forget about the possibility of making the necessary structure with your own hands. A homemade tripod can be assembled in several ways, namely:
- equipped with fastening elements in the form of magnets;
- using so-called cross tripods;
- using belts to secure devices.
One of the simplest options, involving minimal costs, is to use a regular tripod for a camera or camera. If you have such a device, all that remains is to adapt it to install a laser level. An equally simple way would be to make your own tripod with a platform for a level from any materials. The main requirement will be the stability of the entire structure.
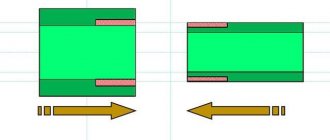
You can make a telescopic rod yourself and at relatively low cost. To do this, you will need two tubes, the diameters of which are selected so that one fits into the other. One of them should be twice as long as the other. The manufacturing process includes the following steps:
- cut the larger tube in half;
- We put a larger one on both ends of the smaller pipe to achieve a telescopic effect;
- holes are drilled in the tubes onto which nuts are welded;
- To fix the components, wings with appropriate threads are used.
It is important to remember that the total length of the rod must be commensurate with the height of the room. In addition, it is necessary to take into account a small margin so that you can install the stand apart between the ceiling and the floor.
The most budget option would be to build any stable stand. It could even be a shovel handle with a stand made of plywood or OSB board. It is important to set this structure strictly vertically, using a regular level or plumb line.
Determining device quality
Using a laser level, created with your own efforts from a pointer, you can mark any room, but it is best to take into account low-light conditions so that the light beam is well defined. At the beginning of work, the device must be attached with a rope to the middle of the room in which construction work is being carried out. The level, made with your own hands, is turned in a certain direction, after which the total distance of the beam length is marked on it, then a stick is attached, on which it is very easy to mark.
After completing such procedures, the spacer plumb can be directed in any direction desired by the user, where the corresponding marks are made (it will self-level). Moreover, if the position of the main support is fixed, then all marks on the surface will be located at the same level. After marking the main points, they can be combined with a construction cord, along which the necessary marks can be set with a construction meter.
Operating rules
The main requirement when using a laser level is its correct installation. That is why at the preparatory stage it is necessary to pay appropriate attention to fixing the device on a tripod. More expensive models of levels have a self-leveling function. In other cases, the desired position of the entire structure is selected by changing the length of the “legs” of the support.
Regardless of the design features of the device and the adapters used, first of all you need to decide on the installation location. We can talk about classic tripods, elevation models and spacer rods. The location must be such that there is no interference with the beams during measurements.
It is advisable to take into account the distance to all objects, which should be approximately the same if possible.
When using sliding models, make sure that the legs are securely fastened with screws. If work is carried out outdoors, then, if possible, the legs should be buried in the ground. In this case, you should try to give the platform for installing the measuring device as horizontal a position as possible.
When choosing a location for a tripod, it is important to consider the risk of the device tipping over and possible vibrations.
If the equipment is operated on a hard surface, then it is recommended that its supporting elements be securely fixed in any available way. Some models are equipped with special accessories.
The following video provides an overview of telescopic tripods for laser levels KACKAD T1.2 and KACKAD T1.5.
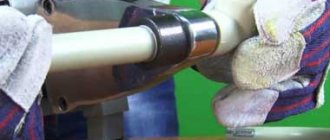
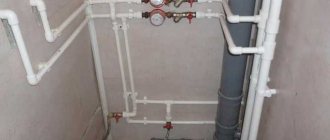
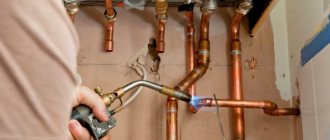
To use an optical level comfortably, it requires a tripod; sometimes you need to mark a horizontal line somewhere on the wall, while the level stands on the floor; you have to come up with stands for it. Of course, tripods are sold, their cost depends on the height and type of construction, and starts from 1500 rubles (the smallest one), and given the fact that you will use the tripod very rarely (trust me), there is no point in spending money on it, or not at all So, it’s a pity to buy an expensive tripod, so I decided to make it with my own hands from polypropylene pipes, and at the same time try out a welding machine for these pipes.
Homemade laser level: instructions for creating
Following the advice of experts, you can make a homemade laser pointer-level in a short period of time.
A homemade laser level is not inferior in functionality to those produced at the factory
5 important points in preparation
:
- When starting work, you must first remove the area of the pointer where the insert with the pattern is missing, this hole is sealed with cardboard, where a small hole is made, then the cap is carefully installed in its place.
- These procedures are necessary to achieve a clearer point while pointing.
- An ordinary stick needs to be sharpened at the end to form a stake; it will serve as a leg for the level, and plywood is fixed on top of the flat base. This must be done accurately enough so that the angle corresponds to 90°.
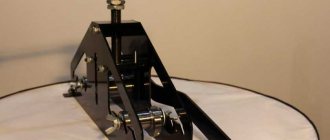
- On top, on the surface of the board, a strip is attached, having the same length as the bubble level. It must be installed using a screw so that it can be rotated in different directions.
- The final step is to attach the laser pointer to the bubble level, using a clamp and porous rubber; if there is a need for a cut, then make a recess.
Having completed all the necessary instructions, you need to get to work.