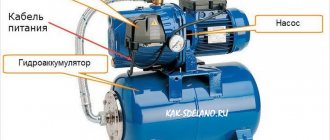
Today, quite often, owners of country houses choose an autonomous water supply system, which allows them to satisfy the family’s water needs, as well as provide watering for the garden. To build such a system, it is not enough to dig a well or equip a well; you need to buy a pumping station, connect it correctly and start it up for the first time. In addition, for efficient and durable operation of the system, the operation of pumping stations must be carried out in compliance with all rules. In our article we will tell you how to properly connect and start the station, as well as use it throughout its entire service life.
Assembly and connection
In order for the first start-up and further operation of the water supply system to go smoothly, it is necessary to correctly install and connect the pumping station.
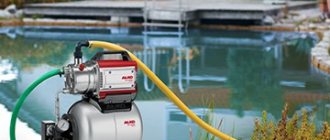
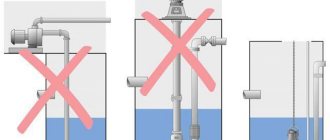
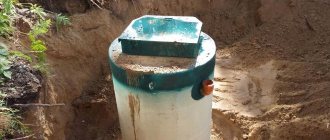
First of all, you need to choose a suitable location for the station. This could be the basement of a country house, an extension to a house or a separate structure, as well as a caisson. If you are installing a station in the basement, then the room must be well insulated and soundproofed. An extension or a separate building should also be well insulated. The caisson is installed so that its bottom is located 2 m below the ground surface. The best mobile application for experienced players has appeared and you can have a phone with all the latest updates and discover sports betting in a new way.
After this, you can connect to a well or well. In this case, depending on the depth of the hydraulic structure, a two-pipe or one-pipe connection scheme can be implemented. We will consider a more complex two-pipe connection option:
- On the ejector, which should be equipped with a station that pumps water from a well or well more than 10 m deep, we find one of three pipes. It should be on the bottom of the part. We attach a coarse filtration mesh to it.
- On the socket located in the upper part of the ejector, we put a squeegee with a diameter of 3.2 cm.
- After this, it is necessary to select a bend for the diameter of the pipeline. Sometimes this requires using several parts with adapters.
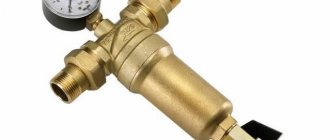
- We install a bronze coupling at the outlet of the drive. This will allow you to make the transition to a polyethylene water pipe. In this case, we seal all connections using tow or a special paste.
- Now you need to dig a trench from the well to the house, the bottom of which will be below the freezing point of the soil. We lay the pipeline in the trench.
Advice: the length of the pipeline should be taken with a reserve, since it will not be possible to accurately take into account all the turns and bends; in addition, you need to take into account the thickness of the foundation of the house.
- At the exit of the casing from the well, we install the head. Instead, you can use a knee with a smooth bend.
- To connect the ejector to the water supply pipes you will need a coupling.
- Before lowering it into the well, we pass the second end of the pipe through the elbow at an angle of 90 degrees.
- After this, we seal the space using polyurethane foam. We connect the pipe to the corner adapter and the outer part of the water supply.
- We secure the head to the outlet of the column using reinforced adhesive tape.
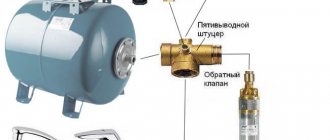
Preparing the hydraulic accumulator
The hydraulic tank can be installed in the basement of the house, since this unit builds up pressure in the system; water can be supplied even from water intake points located above the installation level of the hydraulic accumulator itself.
Important: in order for the entire water supply system to function optimally, it is necessary to correctly select the pressure in the hydraulic tank.
If the pressure is very high, this can cause the pump to start and stop very often, which will subsequently lead to its rapid wear. The reduced pressure in the air chamber will cause the bulb with water to overstretch, which will cause it to quickly fail.
Repair and causes of breakdowns of pumping stations
Rules for preparing the hydraulic tank:
- Before pumping air into the air chamber of the accumulator, you must make sure that the rubber bulb is empty. If there is water in it, drain it by opening the bottom tap.
- After this, air is pumped into the chamber using a car pump. Pressure is also measured with a car pressure gauge. As a rule, the pressure in the hydraulic tank should be 10% less than the lower value. But since we have not yet set up the system and did not make the first start, we adjust the pressure like this:
- for a hydraulic accumulator with a capacity of 20 to 25 liters, the pressure should be in the range from 1.4 to 1.7 bar;
- for a storage tank with a volume of 50-100 l, the pressure is set in the range from 1.7 to 1.9 bar.
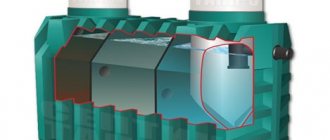
Pump design and design diagram of a water pumping station for water supply at home
MBFT-75 Membrane for 75GPD
SF-mix Clack up to 0.8 m3/h
SF-mix Runxin up to 0.8 m3/h
The presented system is on average designed for a pressure of 1.5 atmospheres (maximum - up to 4.5), which is usually sufficient for a two-story cottage with permanent residence of 4-5 people and the use of all household appliances that consume resources.
During installation, it is important to note that the device is compact and does not require concreting or any other foundation. The heaviest element is the hydraulic accumulator; its weight directly depends on the maximum volume of accumulated fluid. When installing, it is necessary to prepare a separate room or use a room for domestic purposes, remote from residential ones, for example, a basement or storage room on the ground floor. This is necessary because the station makes a hum.
Sometimes a reasonable solution is to install a caisson, that is, a separate chamber. This allows you to create sound insulation, protect equipment from precipitation and other environmental influences, and also make access for maintenance and repair easy.
Let's give a diagram of the pump for installation:
First start
Before starting the pumping station, it is necessary to fill the pump with water. To do this you need to do the following:
- We unscrew the plug from the hole for filling water on the pump body. Sometimes a valve may be installed instead; open it.
- After this, you need to fill the pump unit and suction pipeline with water. It is necessary to fill the liquid until water begins to pour out through the filler hole.
Before starting an automatic water supply station for a country house or cottage, you need to check the pressure in the accumulator. We described how to do this above. If the pressure is not normal, it can be increased by pumping air with a car pump, or decreased by releasing air through a special nipple on the hydraulic tank.
Rules for the first start of pumping equipment:
Spare parts and frequent breakdowns of pumping stations
- After filling the suction line and the pump unit with water, you must tighten the plug tightly or close the valve.
- Connect the pump to the power supply.
- Open the valve on the unit body slightly to ensure that any remaining air is removed from the pumping equipment.
- The pump should run for 2-3 minutes. During this period of time, water should flow from the outlet of the pipeline or open tap.
- If the liquid does not flow out of the pipe, you need to turn off the pumping equipment and add water again into the filler hole on the body.
- After this, the startup attempt is repeated.
Water pumping station: malfunctions
1. The engine rotates, but the pump does not pump water. Most often this occurs due to a leak in the suction pipeline. Check the tightness of all joints. If the check valve does not work, it must be repaired or replaced. The cause of the malfunction may be a blockage or failure of the spring. In order for the pump to pump, the water supply is filled with water. The end of the suction hose must always be immersed in liquid. In this case, the lifting height must always be less than the permissible value specified in the technical data sheet.
Automation check
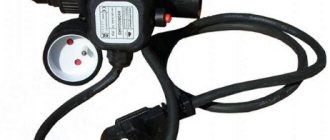
After starting the pumping station, you need to check whether the automation is working correctly. If you purchased a pressure switch with factory settings, it should turn off the pumping equipment when the upper pressure threshold in the system set on the relay is reached. After opening the tap and water flowing out of the hydraulic tank, the pressure switch should start the pump again when the pressure in the system drops to the set minimum. If necessary, the factory settings can be changed by setting the relay to the on and off pressure you need. This is done like this:
- We turn off the pumping equipment and drain the water from the hydraulic tank by unscrewing the bottom valve in the system. Open the cover on the pressure switch using a screwdriver or wrench.
- We start the pumping equipment, which will begin to pump water into the hydraulic tank.
- We detect and record the pressure gauge readings at the moment the pump is turned off. This will be the top pressure.
- Now open the tap farthest from the pump or the tap that is located at the highest mark. As water flows out of it, the pressure will drop and the pump will start again. It is necessary to record and record the pressure gauge readings at the moment the pump starts. This will be the lower pressure. We find their difference.
- During testing, you need to pay attention to the pressure of water flowing from the farthest or highest tap in the system. If you are not satisfied with it, then the pressure needs to be increased. To do this correctly, you need to turn off the pump and tighten the nut on the large spring in the relay. To reduce the pressure, on the contrary, we loosen this nut.
- Now let's set the pressure difference. You have already found it by taking the recorded pressure gauge readings. If this number is 1.4 bar, then you do not need to adjust anything. If the value found is lower, this may lead to more frequent pump starts and uneven pressure, which will cause premature wear of the equipment. If the value is higher, then the station’s operating mode will be more gentle, but the difference between the maximum and minimum pressure will become noticeable. To adjust this parameter, you need to tighten or loosen the nut on the small spring in the relay. To increase the pressure difference, tighten the nut more, and to decrease it, loosen it.
- When you have adjusted the pressure, you need to check the operation of the system again by repeating the previous steps. If necessary, the adjustment can be repeated.
If your pressure switch has no settings at all, that is, all the springs are completely weakened, then the adjustment is done as follows:
- We start the pump and build up pressure in the pipeline so that the water pressure from the farthest or highest tap in the system is satisfactory. We note the pressure gauge readings and turn off the pump. Let us assume that the device showed at this moment a pressure of 1.3 bar.
- Turn off the power to the station and open the cover on the pressure switch. We begin to tighten the nut on the large spring. When you hear a click of the contacts closing, we stop rotating.
- Replace the cover and turn on the pump. We bring the pressure in the system to 2.7 bar. We obtained this value by adding our indicator of 1.3 bar with the recommended difference in values equal to 1.4 bar.
- Disconnect the pump from the network, remove the cover and tighten the nut on the smaller spring. When the contacts open, you will hear a click. At this moment the rotation must stop.
- After our settings, the pressure switch will start the pumping equipment when the pressure in the system drops to 1.3 bar, and turn off the pump when the pressure rises to 2.7 bar. Now all settings are completed. We install the relay cover in place, and connect the pump unit to the power supply.
Attention: the upper pressure setting on the relay should not exceed the limits for this pumping equipment under specific conditions of use.