In any apartment or house, a drainage system is important. Thanks to it, unpleasant odors and various impurities are eliminated. Although it is quite difficult to install a sewer system yourself, it is quite possible to do this after first familiarizing yourself with the work processes. First, the hot water pipe is laid, and then the rest of the technical work is carried out. How to make a sewer system so that it lasts for a long time? Complete instructions for installing a do-it-yourself sewer system in the bathroom will help.
Sewer design
At the initial stage of creating a sewer system, marking work is carried out. A diagram of the location of all the plumbing that is connected to the sewer is drawn on paper. The location of the pipes is determined and the need for material is calculated.
When performing measurements and calculations, the following features must be taken into account:
- The pipes are connected using tees with different outlets or funnel-shaped adapters.
- Laying pipes under the bathroom will be especially difficult. In order not to waste time removing the bathtub, the pipes are connected from several elements.
- If you plan to simultaneously connect a sink and a bathtub, then the sewer wiring is performed using a tee. The third outlet can be tilted 45º or 90º from the axis of the pipes.
- To connect the siphon to the sewer pipe, a branch pipe with a rotation angle of 90º is used.
If the installation of some kind of plumbing that requires drainage is planned in the future, then a drain for it must be created. It is easier to close the pipe with a temporary plug (although this is not attractive) than to re-install the sewer system.
Bath connection technology
The procedure for connecting the bathtub to the sewer system
The connection procedure is as follows:
Assemble the siphon in accordance with the instructions attached to it, paying special attention to all the necessary sealing gaskets. The plastic fasteners are tightened by hand, acting very carefully. Tools are not used, as using them can break the part. After the device has been installed, one end of the pipe is connected to it, and its other end is brought to the sewer drain hole and a connection is made. Connecting the bathtub drain must be accompanied by careful control over the density of the assembled joints to ensure a high degree of their tightness.
Pro tip:
Pro tip:
If the slightest malfunction is detected, it is necessary to eliminate them immediately, otherwise during operation it will be necessary to replace defective elements of the system.
- If the sides of the bathtub are tightly adjacent to the walls, the joints must be carefully sealed so that water does not have the opportunity to penetrate under the bathtub.
Connecting the bathtub to the water supply
Just like connecting a bathtub to the sewer with your own hands, it is also possible to connect to the water supply and install a mixer yourself. You don't have to call a plumber to do this.
Let's consider this technology:
- A shut-off valve is installed on the pipe in front of the fittings, the presence of which is necessary to shut off the water when replacing the mixer or in case of repair.
- Eccentrics are attached to the fittings located on the mixer (first by hand, and then tightened with a key). In this case, FUM tape or a specialized thread is used, intended for connecting elements of the plumbing system.
- Decorative attachments are put on the eccentrics.
- On the mixer, rubber or silicone gaskets are inserted inside the threads, and then the mixer is screwed to the eccentrics (in this case there is no need to use FUM tape or thread).
Pro tip:
The bathtub connection diagram must necessarily include a check of the quality of the work performed - if leaks are detected in the mixer, the gasket is replaced - it is possible that the leak occurred due to a defective gasket.
- The mixer is screwed on both sides at the same time. In this case, the gaskets are evenly sealed.
- If the bathtub comes with a mixer when purchasing:
- then the permissible level of pipe height is below the level of the bathroom, since in this case the connection is made using reinforced hoses;
- it is not necessary to align the ends of the pipes - such hoses are very flexible;
- The basic rule in such a situation is to ensure that the length of the reinforced hose is slightly longer than the distance from the bathroom to the end of the pipe.
After completing all operations to connect the bath to the water supply and sewerage, turn on the water and observe for leaks. If there are leaks, then you need to make sure how well the gaskets are secured, and also make sure the quality of the gaskets themselves (if they are of poor quality, you will have to replace them).
Following these simple rules will allow you to efficiently connect the bathroom to the sewer and correctly install the mixer. With this approach, the bathtub will last for many years!
Types of bath siphons
A siphon is a plumbing device designed to drain water into the sewer system and block the unpleasant odor entering the building from the sewer.
There are 3 types of drains, differing in their operating mechanism:
- manual (mechanical);
- semi-automatic;
- auto.
To use a manual (mechanical) device, additional methods of influence are not required. The drain hole is opened and closed manually using a stopper. This type of drain is quite simple, reliable, has a long service life, and is therefore the most popular.
The semi-automatic siphon is activated by a cable or lever mechanism. The drain is closed with a special shut-off valve. Most often, this design is used on the drain and overflow holes of water above the level. Since the assembly of this installation contains moving components and assemblies, its reliability is somewhat reduced.
The automatic drain is a single mechanism with the filling system. It runs on a built-in processor.
This type of siphon is equipped with a controlled click-clack valve. It is driven by the pressure of the water column. The automatic design allows you to fill the bath with water to the required level. In addition, it is possible to set the desired water temperature and maintain it. If the temperature drops, the shutter valve is automatically activated and the water is drained, and the filling device replenishes the amount of liquid.
To make siphons, materials such as plastic, stainless steel, brass, cast iron, and copper are used. The most commonly used are plastic drains. They are durable, easy to install and operate.
Pipe selection criteria
The main technical characteristic of plastic pipes is their diameter. It’s worth mentioning right away that in most cases, manufacturers mark pipes based on the size of the outer diameter.
For sewage drains, the main parameter is the internal diameter. The purchase of pipes of a certain diameter is carried out depending on the type of plumbing. In particular, the minimum pipe diameter is:
- for washing machine and dishwasher – 25 mm;
- for bidet and sink – 32 mm;
- for a shower stall or bath – 50 mm;
- for several devices connected to one outlet - 70 mm;
- for the toilet and the main riser in the apartment - 100 mm.
The second parameter that is taken into account when purchasing sewer pipes for the bathroom is the length of the products. Pipes with lengths from 1 to 6 m are available for sale. It is most convenient to work with material that is 2 or 3 m long.
When calculating the required footage of plastic pipes, you also need to take into account that they are equipped with sockets with sealing rubber bands, which are designed to tightly connect adjacent elements.
Device Features
Before that, the installation of sewer networks and replacement of the sewer system in the apartment is carried out, and the sewerage system is considered. The main purpose of water supply and sewerage networks is the natural flow of sewage into the pipes. Therefore, it is worth remembering the important features of the design of the sewer system at home:
- When installing a pipeline, it is worth considering the main condition - the presence of a slight slope of 2 to 15 percent to the collector and tank. The slope level is always calculated individually. For this matter, tabular forms are used that display the average parameters used to connect different plumbing elements with pipes of the required dimensions. The smallest slope value is intended for the general drainage of the shower, bathtub, and sink, and the highest slope value is for the sink drainage. Pipes with a length of 170-230 cm and a diameter of 5 cm are intended for draining a shower, bathtub, and sink, and for draining a sink - with a length of 80 cm and a diameter of 4 cm;
- An important part of sewerage is ventilation. The presence of a ventilation system ensures regulation of pressure changes in the sewer system during the flow of waste;
- material - when installing water supply and sewerage systems, you should prepare pipes from different compositions. Plastic products are often installed. You can use products made from different plastic compositions - polyvinyl chloride, polypropylene, polyethylene. They differ from products made of cast iron - they do not crack, are not subject to corrosion, and are lightweight. In addition, they do not need to be lubricated, and installation of sewerage in bathrooms with your own hands is carried out in a short period;
- color - the color of pipes for cold and hot water supply can be chosen differently. For example, for hot water supply, plastic pipes can be painted red, and for cold water, blue;
- As for the connection diagram of plumbing fixtures with the sewer system, there are some nuances. This is due to the fact that some products can be installed on the ground floor, in the basement, or other similar rooms. In these situations, it is almost impossible to make a slope;
- additional equipment - often special pumping equipment is installed. In addition, a shredder for toilet paper and fecal waste is additionally included. This design complements other plumbing fixtures for hot water supply or cold water supply. It can be automatic, so during use it does not cause any particular difficulties for the owners.
For cold and hot water supply, many people choose pipes of different colors
Simple sewer wiring diagram
Checking the tightness of the system
After installation is completed, the drainage system in the bathroom and toilet must be tested for leaks. First, close the drain hole and fill the bathtub with water to about 2/3 of its volume. For 15 minutes we observe the lower drain hole of the siphon to detect a leak. If there are no leaks, then fill the bathtub full to check the tightness of the overflow hole. At this stage, the bathroom drainage system is checked for leaks with a small volume of liquid.
At the final stage, open the lower hole of the siphon and check the operation of the sewer with a large amount of liquid under pressure. The diameter of the bathroom sewer pipe must be no less than the diameter of the drain hole.
Before installing sewerage in the bathroom, it is necessary to check the quality of the plastic from which the siphon is made for tolerance to high temperatures. Sometimes there are low-quality products on the market that, when hot liquid passes through them, begin to deform and in this case the drain pipe in the bathroom needs to be replaced with a new one. You can check the quality of the pipes by pouring hot water from a kettle into the siphon.
Comments:
Preparatory stage
Many people are interested in the question of how to properly make a sewer? It is worth paying increased attention to the preparatory stage. If you neglect this stage and do not prepare the necessary tools, then laying out pipes in the bathroom and installing the sewer system will take quite a lot of time.
The preparatory stage consists of important rules:
- First you need to decide on the devices and their location. You can draw a diagram on a blank sheet of paper. Be sure to consider what fittings and additional pipes will be needed for the full operation of the sewage system;
- if suddenly there is an installation of some additional device, the working process of which will require a sewer drain, then it is better to provide a closable type outlet with an additional plug;
- Once all the dimensions have been calculated, the products can be cut. Be sure to consider the fitting parameters;
- many experts advise cutting the pipes before starting installation, because they can be easily tried on when assembling the networks;
- It is better to cut plastic pipes with a hacksaw for metal products;
- To easily cut the pipe, it can be outlined in a circle in the desired area. The cut will be even and tight;
- products are cut only at right angles;
- cut edges of products are cleaned with sandpaper or a knife;
- Be sure to remember that replacing a sewer pipe in an apartment should be done on a slope, because the working process of almost any sewer system occurs under the influence of “gravity.” The tilt of the products is fixed using brackets that are attached to the wall.
Special tool for manual pipe cutting
The workflow will require the following equipment:
- grinder or hacksaw for cutting metal materials;
- impact drill or hammer drill;
- mounting gun;
- chisel;
- screwdriver;
- hammer;
- adjustable wrench.
Required Tools
Connecting the bathtub to the sewer yourself
Many of us believe that the most difficult process is installing a purchased bathtub. But in fact, the main difficulties are caused by connecting the bathtub to the sewer, since the safety of the room from leaks depends on the quality of the work.
Indeed, a dripping faucet will not cause as much harm as a leaking siphon under the bathtub or a fistula on the sewer riser. And the situation that causes particular trouble for residents is when the bathroom smells like sewage. Let's deal with these and other problems together.
Bath connection process
Most often, new bathtubs are purchased with a set consisting of:
- Siphon and connecting pipes;
- Drain-overflow systems.
In most cases, this is a single unit, which has its own installation features:
- On acrylic bathtubs, thanks to the preliminary assembly of the load-bearing frame, the siphon is installed immediately (on an inverted bathtub);
- The siphon is connected to cast iron and steel bathtubs after installation.
For reference: Installing steel bathtubs on a brick base narrows the work space. Therefore, experienced plumbers pre-install individual components on the bathtub.
Tip: Your main task is to make all connections airtight. When installing a bottle siphon, the kit always includes special gaskets that are required to be used.
We arm ourselves with the assembly diagram and get started:
- First, we install a drain and overflow on the bathtub, because... after installing it close to the wall, this will be problematic;
- After installing the bathtub in place and fixing it, we assemble the receiving unit (socket with pipe and protective mesh). We put a gasket on the edge of the socket, insert it into the drain hole of the bathtub and from below, also with a gasket and a nut, we connect the parts into a single unit. Depending on the design, the mesh can either be screwed on or be removable;
- The time has come to assemble the siphon. We assemble the glass according to the attached diagram and attach it to the protruding pipe of the receiving unit. We fix it with a plastic nut, tightening it by hand;
- Don’t forget to connect the drain hose of the overflow drainage system - we put its end on a special branch;
- We insert a corrugated or plastic pipe from the siphon into the sewer tee using rubber adapters.
Tip: adapters play the role of a seal, allowing you to reliably seal the entire structure.
Conclusions: we are sure that now you know almost everything about sewerage and how to connect a bathtub. All that remains is to put the acquired knowledge into practice, and spend the money saved on work on purchasing stylish accessories for the bathroom.
Arrangement of a bathroom implies the obligatory connection of the bath to the sewerage system and water supply. These plumbing jobs can be easily done with your own hands, even without prior experience.
Bath installation
Before connecting the bathtub to the sewer, you need to install it on the floor in the sanitary unit. Step-by-step instructions on how to do this:
- The required width and length of the container is determined. Overall dimensions must correspond to the size of the bathroom. You can buy a standard bathroom (length 170, 160, 150, 140 and 120; width 700 and 710) and non-standard. The first option is suitable for apartments of a new layout, with the exception of small-sized 120 and 140 - they are perfectly installed in Khrushchev. Non-standard ones are used for arranging a small bathroom or a combined bathroom. For example, in a small room it is difficult to place a full-fledged bathtub and toilet, and triangular models are best suited;
Standard bath sizes in the form of a diagram and table - Bathtubs are mounted on the floor using special legs. These stands may be included in the fixture mounting kit or purchased separately. On the bottom of the bath there are small protrusions with which the legs are attached. The supports are put on the fastenings and are tightened together with a clamp to increase rigidity. Of course, many homeowners place the bathtub not on legs, but on bricks or other foundations, but such methods are not durable or safe;
Installing a bathtub on bricks
Example of bath legs - If the bathroom is being renovated, experts recommend finishing it before installing sanitary outlets;
- The bathtub is placed on legs and transported to the desired location. It happens that when measuring the required length, a mistake is made, and a small gap remains between the wall and the end of the bathtub. To avoid leaks when swimming and flooding, you need to attach a wooden or plasterboard block of the appropriate size to the wall in place of this gap. To do this, a board is screwed onto the problem area. Please note that the cladding will be installed on top of this false panel, so a gap of 5–7 mm should be left between it and the nearest top line of the tile;
Treated gap between bathtub and wall - After completing the installation of the false panel and installing the bathtub, the geometric evenness of the device is checked with a level. If necessary, the height can be adjusted with legs.
Checking the level of the structure
To treat the gap between the side wall of the bathtub and the wall covering of the room, you can buy plastic skirting boards or corners, or simply seal the gap with sealant. If this is not done immediately, various inconveniences are possible during operation - dampness and mold on the walls, puddles under the bathtub.
Video: Installing a bathtub, 2 important points
Operating principle
First, let's look at how the sewage system works in the bathroom:
- A bathtub filled to the brim discharges part of the water through the drain-overflow system;
- When the drain hole is opened, water from the bath enters the siphon;
- Bypassing the water seal, wastewater passes through a sewer pipe (hose) connected to a tee;
- Through the sewer tee, wastewater enters the riser.
Materials from previous years
A couple of decades ago, when there was no heyday for PVC products, all sewage systems were assembled from cast iron. In particular:
- Siphons and receiving pipes;
- Washbasin elbow;
- Apartment sewer pipe tee;
- Inspection window on the riser;
- The riser itself is in the apartment.
And to seal the connection, in addition to traditional tow, the following were used:
- Cement mortar;
- Liquid glass
- Epoxy adhesive
- Rubber, etc.
Modern materials
But with the advent of the era of plastic, everything has changed. Today, almost any adult man can assemble and connect a sewer siphon.
Rules and principles for laying sewer systems
The discharge system in an apartment building and a private building are two different types of schemes.
In the case of a city apartment, half of the work has already been done. There is a plan for the passage of the riser and installation is already underway from there. The installation of sewerage in a bathroom in a private house begins “from scratch”, that is, from the drain riser.
In a private house, the layout of all pipes from the sewer pipe or septic tank to the supply of mains to each element in the bathroom is thought out at the design stage. This is not an easy matter. It is necessary to take into account all the nuances of construction, correctly lay the connections through the foundation and sketch out the layout inside the house and calculate the slope of the sewer pipe.
Even with initial experience and basic knowledge, not everyone can independently design the wiring in the bathroom. Often, many resort to the services of engineering companies. It is a person who specializes in this area who can, without delay, remove all the drains in the house in accordance with GOST and direct them along the right path.
The principle of location of sewer outlets.
The impossibility of independent design is justified by the presence of a large number of components present in the system. To install a full-fledged sewerage system in the bathroom and in a private house, you need to purchase the following elements:
- pipes of various diameters for laying branches; sewer well; two types of risers: sewer and ventilation; a chain of node systems for water purification, if closed-type wiring is installed; pressure manifold; inspection elements; plumbing equipment.
The main rule that must be remembered when installing sewerage wiring in the bathroom is the principle of two points. Top and bottom. The first is the supply of wastewater to the common collector, and the second is the output unit to the central pipeline.
Important! Often in the bathroom of a private house, or even in an apartment in a multi-storey building, you can hear various “sobs”, groans, and extraneous noises in the sewer.
There are frequent cases of water seal failures. All these are consequences of improper sewer installation. Therefore, the main thing is to adhere to construction recommendations.
To ensure that the installation of sewer pipes does not cause any complaints from specialists, follow the basic tips. The highest point is located above any water extraction unit in the supply system.
From this level, wiring is not carried out in principle. A ventilation mechanism (valve) is mounted at the highest point of the fan pipe. It is needed to prevent unpleasant odors resulting from the activity of bacteria from entering the house.
During the process of water release, short-term pressure drops occur. At this time, the supply mechanism is activated, taking air from outside. Additionally, the valve protects the water seal from possible damage.
It happens that the installation of sewerage in a bathroom cannot be done without several risers.
Such situations are not uncommon and this is acceptable if you need to connect several consumers in the premises. An example would be a multi-story building with a separate bathroom in each bedroom. In this case, the principle of the lowest point is observed: all discharge points are combined into one collector at this level.
Installation of sewer pipe.
To make a private connection to the riser in the bathroom, circulation pumps are installed.
This need is due to the large length of the line or the specific terrain. Circulating sediments are more often used in ready-made mains when waste disposal does not function properly. If the sewer riser is being replaced, the equipment is installed in accordance with the developed scheme.
Connection to sewerage
Any bathroom already has a sewer outlet, but in private self-buildings this may not be the case. If this is your case, then before installing the bathtub you need to drill three holes in the floor - for sewerage, hot and cold water. Next, the corresponding pipes are connected to them. Only after this should the plumbing fixture be installed.
Step-by-step instructions on how to connect a bathtub to the sewer:
To connect the sewer outlet and the bathtub, a corrugation and a siphon are used
Before installing them, it is important to check the level of the bath, the location of the drain pipe and its diameter. Only after this the necessary plumbing parts are selected; Overflows are installed first
There are two of them - a pass-through (through, central) and a locking one. The through one is mounted in the bathtub drain, and the shut-off one is installed in the side end. Before installing a through overflow, you need to assemble a siphon;
Assembling a siphon with your own hands is very simple. A black rubber gasket is inserted into the structure itself. A nut is installed in the central overflow; it must be pushed into the hole 3–4 mm. Then you need to press the gasket in the siphon. To do this, an overflow is screwed into it. Please note that the plastic thread does not need sealing, so FUM tape is not used. Next, the outlet is installed on the corrugation. It is mounted in the upper part of the siphon, above the water lock; a cone gasket must be installed on this pipe. It is pressed with a plastic nut;
There are two corrugations in the bath: drain and sewer. The drain has a small diameter and is installed on the side overflow. This corrugation is also connected to the siphon using a gasket and a nut. The sewer corrugation is also connected in a threaded manner using a nut, and the overflow is attached in the same way;
Each siphon has a hole for cleaning, which is closed with a solid nut. The connection must be sealed with a rubber gasket (white or yellowish). This is necessary for urgent repairs when the drain is clogged; If you have a plastic pipe for drainage, then most likely it already has a gasket. If it is not there, you need to additionally seal the mount. To connect a plastic sewer corrugation from a bathtub to a cast iron or other pipe, you will need a special adapter;
After completing the assembly of the siphon constructor, you need to check how it will be installed. Overflows are installed in the designated places. To do this, place a double elastic band in the central hole of the bathtub, and a single thin one in the side hole. Next, a siphon is installed and tins are attached to the holes. Using a bolt, the mesh is attached. A transition overflow is also attached;
To connect the sewer and corrugation, the side surfaces are lubricated with silicone sealant or soap. This will make it easier to connect the pipes. Afterwards they are additionally treated with sealant. It is advisable to stretch the corrugations without kinks, otherwise water will have difficulty passing through them.
This completes the process of connecting the bathtub to the sewer. Check the connection points of the siphon and overflows - water should not drip from them. The described method is the simplest and most accessible. Connecting brass structures is done in a similar way, but such siphons are 3 times more expensive than plastic ones.
Video: How to connect a bathtub to the sewer
Recommendations for sewer installation
How to properly lay a sewer? A few important tips will help:
- during the installation of sewer system networks, it is necessary to use as few joints and turns as possible;
- for sinks, bathtubs, toilets, showers, it is better to use pipes with a diameter of 50-100 mm;
- the size of the angle of inclination varies from 1 to 2 cm;
- when installing sewerage systems with plastic pipes, you need to use a special lubricant;
- turning the pipe must consist of revision. Otherwise, waste will accumulate in the place where there is a turn;
- for strong fixation of plumbing fixtures with the material, it is necessary to use transition-type cuffs made of rubber material;
- the risers must be fixed from top to bottom using clamps;
- the color of pipes for cold and hot water supply should be different;
- the presence of a siphon in the sink or bathtub. Using a siphon, the drain works normally. And also the presence of a siphon eliminates all kinds of unpleasant odors from the sewer;
- cutting polypropylene pipes should be done using a hacksaw or grinder;
- If sockets are used when joining polypropylene pipes, then there is no need to use sealing.
The sewer system in the house has a special place and everyone chooses their own option as to how to choose a connection and outlet. Thanks to it, the normal operation of hot and cold water supply to sinks, showers and other plumbing fixtures and sewerage is ensured. Therefore, the installation of water supply and sewerage must consist of various nuances - material, color, quality of pipes, and there must also be a drain, couplings, connections, good sealing against leaks and the presence of a siphon. These are, of course, not all the technical characteristics of the sewer system. The main thing is that you do the sewerage yourself according to the rules, then the sewerage installation rules for which are described and the hot and cold water supply system will last a long time and will always delight you with its full-fledged work.
Problems with the installation of a sewer system
Old pipes
During sewer installation work, you may encounter a number of problems. For example, at the stage of dismantling work, you may encounter old pipes “tightly” fixed to the wall. This is especially true for residents of old apartment buildings. In this case, you need to carefully remove the old finish so as not to damage the elements of the general sewer system.
Correct slope
When laying new pipes, the slope that we have already mentioned must be observed. But the fact is that during installation work, the created structure is subject to slight displacement. To prevent this process, you should use hanger clamps with latches.
Leaks
Another problem is the presence of continuous leakage as a result of testing and reconnecting the pipe to the fitting. In this case, an adhesive-based sealant is used. It is applied to the joints. The pipe with the rubber band is inserted into the fitting. After drying, the sewer system is tested again.
Smell
A fairly common problem in the bathroom is an unpleasant odor. It can be caused by various reasons:
- lack of water in the water seal;
- damage to the sewer pipe;
- deterioration of the tightness of pipe and drain connections;
- accumulation of debris at the bottom of the siphon.
Lack of water in the water seal
The first reason for the lack of water in the water seal may be a poorly installed pipe in the siphon. The pipe simply does not reach the water, and the smell passes by it. This problem is solved by lowering the pipe 2-3 cm into the water.
Sagging corrugated pipe.
This defect could occur if the pipe is not secured with spacers or tape.
Prolonged non-use of the bathroom is also one of the factors causing unpleasant odors. The water in the siphon simply evaporated. To remove the unpleasant odor, turn on the water and ventilate the room.
Damage, deterioration of tightness and blockage.
When a crack forms in a pipe, dirty water flows onto the floor and wall. This results in stains and mold, which lead to an unpleasant odor. The crack is sealed with sealant, and the pipe is wrapped with tape. The sealant is also used to restore the tightness of drain and pipe connections.
Cleaning the siphon from debris accumulated at the bottom is done by unscrewing the bottom of the siphon and washing it. For preventive purposes, chemicals designed to clean sewers are periodically used.
Materials for internal and external laying
Before starting to lay internal networks for water supply and sewerage, the necessary materials are prepared. It is best that the color of the pipes is orange. So, replacement of sewer pipes should be made from the following products:
- pipes made of polypropylene material;
- pipes made of polyethylene material;
- PVC pipes;
- adapters;
- couplings;
- bends.
Pipes and elements
Fitting
Elements of the sewer system
For internal drainage, devices made of polypropylene material are used. This is due to the advantages of this material. The main characteristics are softness, resistance to temperature changes, and long service life.
Installation of sewer pipes is most often made from polymer-type products, the diameter of which is 110 mm. Painting pipes orange or gray is done to mark their purpose.
The nuances of laying plastic pipes
The connection of two adjacent pipes occurs using a fitting. More precisely, the pipe is hermetically sealed in the elastic band of the fitting. The pipe must be inserted all the way
It is very important that the fitting and pipes are clean. Otherwise, over time, the sealing of the connection will be broken.
To improve the tightness of the connections, the ends of the pipes are treated with a soap solution.
The most difficult process is installing the riser. Therefore, it is from this site that the installation of the sewer system begins. First, the tee is installed. To do this, a rubber cuff, which is pre-lubricated with sealant, is placed in the lower socket and connected to the tee. Clamps are used to secure the pipes and riser to the wall.
After assembling the riser, the pipes are led to the places where the plumbing fixtures will be located. Immediately you need to provide for the presence of a slope towards the riser. It should be within 2 cm per 1 m of pipe. If sewer pipes are laid in wall grooves, then clamps are used to securely fasten them.
After installation work, all connections are carefully checked. The plumbing drain elements are connected to the pipes. This procedure is not complicated. The only problem that can arise is connecting the bathtub to the sewer.
Prices for pipe installation in the bathroom
No. Name of work Unit. unit Price per unit 1 Laying cold / hot water at points (water outlets) point 750 2 Laying sewerage at points point 650 3 Laying hot and cold water pipes P/m P/m steel P/m from 200 copper P/m from 350 metal plastic P/m from 150 polypropylene P/m from 200 4 Laying an element (fitting) of a hot water pipe (up to 50 mm) pcs. 288 5 Laying sewer pipes (p/m/element/section) of all diameters pcs.
from 69 6 Installation of rubber cuff (sealing ring) pcs. 270 7 Installation of sewer drain pcs. 780 8 Installation of plugs on the pipeline pcs.
70 9 Installation of fine filter pcs. from 670 10 Installation of coarse filter pcs. 250 11 Installation of a self-cleaning water purification filter with connection to the sewer pcs.
1593 12 Installation of ball valve pcs. 315 13 Installation of a ball valve on a riser pcs. 835 14 Installation of pressure regulator pcs.
930 15 Installation of a comb (collector) per 1 outlet output 360 16 Installation of a collector cabinet pcs. 1735 17 Installation of a leakage protection system of the Neptune type pcs. 4230 18 Installation of apartment water meter (meter, filter, ball valve) pcs.
990 19 Replacement of apartment water meter (meter only) pcs. 450 20 Replacement of flexible liner pcs. 250 21 Removing pipe blockages pcs.
1350 22 Dismantling of water pipes m. p. 150 23 Dismantling of a fan bed m.
p. 200 24 Dismantling the fan tee pcs. 1500 25 Removal of shut-off valve pcs.
250 26 Manufacturing of grooves up to 50 mm Concrete, slate P/m 550 Brick P/m 500 Plaster, plaster P/m 350 Monolith, reinforced wall P/m 1180 27 Drilling holes for pipes hole from 350 28 Drawing up instructions for the installed system pcs. 3921 29 Consultation of a foreman free of charge30 Departure of a foreman to the site (without further order) from 500 31 Departure of a foreman to an emergency site from 1700 32 Selection and purchase of materials Dog. 33 Coefficient for work over 3 meters surcharge 1.5% 34 Provide work in cramped conditions surcharge 20%
Connecting the bath to the sewer
To connect the bathtub to the pipes, it is better to use a siphon with an overflow. Its installation requires compliance with two requirements:
- Creating an optimal difference in height between the outlet and drain pipe. The specific size of the drop depends on the height of the siphon outlet.
- Providing access to the siphon, which is necessary for periodic cleaning of the drainage unit.
As for the pipe that will connect the bathtub to the sewer, the best option is hard plastic products. They should have two elbows that will ensure optimal rotation of the elements. If it is not possible to connect the drainage units using rigid pipes, then corrugated pipes are used. When joining pipes of different diameters, adapters are used.
Connecting a bathtub to the sewer consists of the following sequential steps:
- all rubber gaskets are put in place;
- the siphon is assembled and the overflow pipe is connected to the bathtub;
- fastening elements are screwed in;
- using a pipe and a pipe, the siphon is connected to the drain hole;
- The joints are sealed where the bathtub comes into contact with the wall.
All plastic elements are connected without the use of open-end or gas wrenches. The work is done manually. Otherwise, there is a risk of damage to the plastic thread.
After completion of installation work, preliminary testing of the sewer system is carried out. It is necessary to turn on all plumbing fixtures and stock up on 2-3 buckets of water. When the plumbing begins to drain waste water into the system, buckets of water are poured into the sink, bathtub and toilet. If there are leaks, you will have to redo the fastening of the sewerage elements in such places.
Types of sewerage
Usually, do-it-yourself sewerage in bathrooms in an apartment or house is installed in several stages. Each stage should be carried out taking into account certain technical features that need to be taken into account:
- installation of internal sewerage - this stage includes the laying of all sewerage elements that are located indoors, namely the connection of siphons to the sewerage system, sinks, cold and hot water supply:
- external sewage system - this stage includes laying pipes that connect the internal sewer system, drain, septic tank or central sewer system.
External
Internal
Preparing to connect
Before laying a sewer system in the bathroom, you need to prepare all the structural elements in advance, following the expert advice described below. The main element for ensuring drainage is a siphon, which makes it possible to clean the system if the drain in the bathroom is clogged. In order not to get confused in the terms when purchasing this product, you need to remember that this device has two more names, “piping” or “drain-overflow system” for the bathroom.
How to choose a siphon
The bathroom drain pipe can be made of materials such as:
- copper;
- brass;
- cast iron;
- plastic;
- textolite
When installing sewerage in the bathroom yourself, it is recommended to buy plastic products that do not have corrugated pipes and the structure is rigid. Plastic is chosen because this type of material is easy to work with and does not require special tools, while installing sewerage in a bathroom made of metal or copper requires certain work experience.
When buying a siphon model for your bathroom, you need to consider a number of features:
Installation of drain pipes in the bathroom can be carried out using siphons of two types. The universal type is suitable for all bathtubs where the distance between the drain and the overflow does not exceed 57 cm
In bathrooms with other designs, it is necessary to purchase special siphons or they can come complete with the bathtub itself from the manufacturer; Before making a sewer system in the bathroom and buying a siphon, pay attention to the thickness of the bathroom itself. There are products on sale that are designed for different bathroom wall thicknesses, but there are also universal models; installation of sewerage in a bathroom almost always involves the presence of additional consumers in the form of a washing machine
For these purposes, there are special siphons with several outlets for connecting drains of third-party household appliances.
It is worth remembering that a siphon of any model and design needs regular maintenance, so before hiding the sewer in the bathroom or when covering the bathroom with decorative panels, you need to provide an inspection hole of sufficient size so that the sewer line in the bathroom is provided with free access. Typically, in such cases, a removable panel or opening door is provided in the place where the bathtub is connected to the sewer.
When installing a new bathroom, the required height should be maintained to ensure free drainage. The sewerage system in the bathroom provides for a difference between the lowest point of the sewer pipe and the siphon connection point. This difference should be 10-20 cm for normal functioning of the system. In the absence of such a difference, the sewerage wiring in the bathroom will fill with water or the liquid will drain very slowly.
Connecting the bathroom to the sewer
Before assembling the sewer system in the bathroom yourself, for ease of understanding, we break down the entire process into main points in the form of step-by-step instructions. The installation procedure is as follows:
- laying sewer pipes in the bathroom begins with checking the configuration of all the elements involved;
- then all the elements of the siphon are assembled into one structure and a liquid sealant is used to ensure better sealing of the connections. Typically, a diagram for connecting the bathroom to the sewer and detailed assembly instructions are contained in the attached documents for the bathroom and siphon, so that you can carry out the installation yourself;
after the siphon is completely assembled, a sewer system is installed in the bathroom, where one end of the siphon pipe is connected to the drain hole of the bathroom, and the other to the inlet pipe of the waste system; at the last stage the overflow pipe is connected
In this case, it is important to monitor the tight fit of all rubber gaskets at the joints. The sewer pipe in the bathroom should not have stressed areas, this will lead to deformation and cracking of the plastic.
You can watch the video accompanying this article to learn how to properly assemble and connect the siphon.
Plastic siphon device
Siphon device
There are several types of siphons, which differ in the material from which they are made. Plastic siphons are more popular. To install them correctly, it is important to understand their structure. The siphon kit looks like this:
- Drain plug. In some cases, its production is made of rubber or plastic. The top of the plug is covered with stainless steel. Some siphon kits may have a chain that attaches to the overflow and plug. Thanks to it, you can lift the cork without putting your hands in dirty water.
- Metal overflow and drain grate. Thanks to this element, no object will fall into the drain. In expensive siphon models, this element is made of stainless steel, and in cheap siphon models, it is made of plastic.
- Rubber gasket. The color of the gasket that is installed on the reverse side does not matter. It prevents water from entering between the outlet pipe and the bathtub drain.
- Exhaust pipe. Used to drain water.
- Exhaust pipe nut. It is made of both plastic and metal.
- Removable knee. It is necessary to clean the siphon from possible blockages. Thanks to the removable elbow, cleaning can be carried out without complete dismantling.
- Cone gaskets.
- Coupling nuts.
- Sewer outlet.
- Overflow outlet.
Mechanical system
Some siphons are equipped with automatic systems for opening the drain hole. You can find three types of siphons:
- Mechanical system. A simple rubber or plastic stopper is used here. Water is drained manually. The system is simple and at the same time reliable.
- Semi-automatic system. The drain mechanism is controlled by a special cable/lever element. This mechanism is installed above the level of water that is usually drawn into the bath.
- Automatic system. In this case, the siphon is combined with the filling equipment into one structure. Control is carried out thanks to a built-in/remote microprocessor.
Automatic system
Preparation for connection, selection of materials and installation of the bathtub
Before connecting the bathtub to the water supply and sewerage pipes, you need to prepare the materials and choose a place to fix the bowl. The main problem is to determine the correct installation height in order to correctly connect the siphon, and to guess the location of the mixer if you choose a model with wall mounting above the side of the bathtub.
Installation and connection diagram of plumbing in the bathroom
Simultaneously with the connection to the sewer, installation of mixers is carried out
Bathtub installation: important points
Basic conditions that should be met during installation to properly connect the bathtub:
- Correctly determine the height from the bottom to the floor.
- Level and fix the bowl using a level.
- Properly install the decorative screen.
Selecting a location and adjusting the mounting height
Determining the distance from the floor to the lowest point of the bottom must be carried out taking into account the height of the sewer pipe outlet. The second criterion is the type and depth of the siphon tank, the distance from the outlet pipe to the floor. The higher the bathtub is installed, the fewer problems there will be during installation.
Installation height is the most important condition for successful connection
The height distance between the pipe and the sewer drain should be at least 4 - 6 cm. The slope of the pipe from the outlet of the siphon to the insertion into the riser will ensure rapid drainage of water, and a sufficient depth of the siphon will ensure the absence of an unpleasant odor from the drain. Under standard conditions, it is enough to leave 15–25 cm in height from the bottom point of the bowl to the sewer outlet.
Leveling the bathtub with a laser level
After installation, you need to level the bathtub, determining the level of deviation along the horizontal upper edge. The angle lowered below the level must be raised.
Types of siphons: which one is better to choose
The choice of model and material of manufacture depends on the initial data: when installing on a new bathtub, you can choose almost any siphon, if it is possible to adjust the mounting height of the bowl. When replacing an old siphon, you will have to focus on the type and height of the bowl and select the product based on measurements.
Even inexpensive models are equipped with corrugation for connection
The main materials for the manufacture of budget siphons are polypropylene and PVC. Completely identical in appearance, the materials differ radically in performance characteristics.
Part sizes and pipe diameters
A polypropylene kit is more expensive, but will last a couple of years longer than a PVC siphon. The structure of the material is smooth, without roughness and pores: plaque is not deposited on the smooth walls, narrowing the internal lumen of the pipes. Propylene threaded connection parts are stronger than PVC threads: there is less risk of breaking fragile parts when screwing.
Classification by functionality:
- Classic siphons. They are equipped with a plastic or flexible tube connecting the outlet from the overflow to the drain. The simple design has the advantage of durability and the absence of mechanisms that often fail. The disadvantage is the need to close the drain with a lid before adding water.
- Semi-automatic products. In addition to the tube from the overflow to the bottom of the siphon, siphons are equipped with a mechanism with a cable. The lever is located on the inside of the overflow. When you turn the handle, the drain closes - there is no need to use the lid on a chain and bend over to install the plug.
Automatic models - convenient, but expensive and unreliable
- Click-clack or automatic. To fill or drain water, just press a button or turn the lever - the bottom drain will automatically close.
What you will need for assembly: pipes and adapters
In addition to the siphon, to connect the bathtub to the sewer you will need:
Sewer pipe and, if necessary, turn. It is better to buy plastic rigid pipes. If there is no space to install rigid wiring, you will have to install a corrugated flexible pipe. The diameter of pipes for local sewerage is standard - 40 mm.
Flexible adapter for plastic
If the diameter of the sewer pipe differs from the diameter of the bathtub drain pipe, you need to prepare adapters. For plastic pipe connections - rubber corrugated coupling 50 mm x 40 mm. In an apartment with an old cast iron riser, you will need to install an adapter 73 mm (standard diameter of cast iron pipes) x 40 mm.
- FUM tape, silicone for lubricating rubber seals (gaskets), moisture-resistant sealant for processing joints and bathtub edges, gasket repair kit.
- A knife for cutting plastic, if you need to cut off a corrugated hose or pipe.
Sewage mains layout
Having understood the general principles, let's talk about the technical side. First you need to sketch out a sketch of the gasket, taking into account all connection and discharge points. Next, we select the diameter of the pipes that we will use, taking into account the total load equal to the number of consumers and the length of the main line.
Advice. When designing sewerage wiring in a private house or apartment, keep in mind that all pipes have different lengths, and only one socket. It is necessary to compare the dimensions of the spans, and try to use ready-made elements in the work without soldering or building up.
The diagram must take into account all bend turns, the number of fittings and clamps for fastening to the wall. A rigid connection is required. If you do not use it, plastic pipes will quickly lose their tightness.
There is no need to say too much about the use of materials in work. Cast iron pipes are not affected initially because today it is better to install sewerage in the bathroom and throughout the house using polymer materials. They are easy to use and will last at least 50 years.
How to connect a bathtub to the water supply
After installing the sewer connection, the mixer is installed. With its help, the bath will be connected to the water supply. Water outlets are holes in the wall to which outlets from the central riser are connected.
The best way to check is to turn on the water and run half a bath. With such pressure, all weak connections will immediately show themselves. Detected leaky fasteners are tightened and treated with sealants.
After completing the main stage of renovation work in the bathroom and purchasing plumbing fixtures, all that remains is to connect the bathroom to the sewer and connect to the water supply.
Choosing a location, installing a bowl.
Siphon assembly.
Connection to the sewer pipe outlet.
Connection to water supply.
Checking correct installation and tightness.
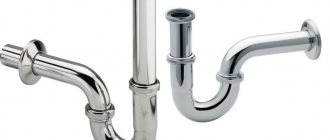
Classification of siphons according to drain design
Depending on the structure, there are 4 types of siphons:
- Corrugated. It is a continuous corrugated pipe. This type of mechanism is the simplest, can take any shape, and is easy to install (in any plane). The water seal is formed independently by bending the corrugation. The only negative is the mandatory dismantling and manual cleaning if clogged.
- Knee. A smooth tube, in a horizontal position, resembling a curved letter S. Most often metal. It oxidizes over long periods of use. A special plug is provided for clearing blockages. The water that is constantly inside the drain acts as a water seal.
- Bottle (with flask). A design consisting of a smooth coil with a water seal in the form of a bottle (flask). More in demand in the kitchen. Clearing the blockage is simple (just unscrew the flask).
- Flat. Consists of horizontal and vertical pipes of various diameters. There is no water seal in this form. The advantages of this siphon are quick installation and ease of cleaning. It is considered most suitable for installation under a bathroom.
When choosing a drainage device, you should pay attention to the quality of the raw materials used. It is also recommended to keep the installation location in mind.
What are the dangers of incorrect installation and connection?
The bathroom smells like sewage - why is this happening? Residents of apartments in which the bathtub or washbasin has recently been replaced often turn to plumbers with this question. And the answer is simple - errors when installing the siphon.
If the bathroom stinks, it only means one thing:
- Either the hydraulic valve does not cope with its duties;
- Or there is a leaky connection between the siphon and the receiving tee, through which sewer odors penetrate into the room.
According to experienced plumbers, the bathroom often stinks due to the reduced radius of the drain pipe made from the corrugated hose from which the siphon is formed.
For reference: The volume of water contained in it is not enough to withstand the atmospheric pressure of the public sewer system. And it “presses through” the water plug, and unpleasant odors penetrate the room.
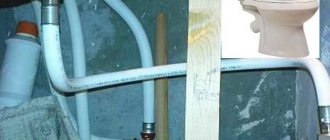
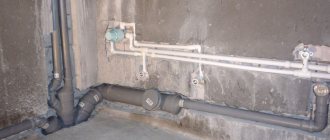
What does piping look like in a bathroom?
Another important advantage of such pipes is their resistance to the formation of growths on the walls inside. We advise you not to save money when replacing pipes, because they will serve you for many years.
Pipes can be removed into the floor or walls during repairs. For sewerage installations, the best option would be PVC or polypropylene pipes. But it should be taken into account that such pipes have a low operating temperature and therefore should not be used where hot drains may appear for a long time.
Metal-plastic pipes can be installed without unnecessary connections where there is one solid piece of pipe from the plumbing to the collector.
Stainless steel heated towel rails are much more durable than brass ones; it is better to install a plastic drain on the bathtub.
Hidden pipe routing, of course, looks better, but when performing such work, you must remember that it must be possible to access the desired piece of equipment at any time.
Professional pipe installation in the bathroom begins with a project in which specialists take into account all the nuances of the room and the plumbing located there, as well as the wishes of the customers. Properly selected pipes, fittings and other components from high-quality manufacturers of plumbing equipment by specialists, and professional installation of pipes in the bathroom will help you in the future to avoid such troubles as leaks or clogged pipes.
�