It goes without saying that before starting construction, you will need to make drawings of a warm shower in your dacha with your own hands in order to calculate all the materials, and in addition, the technical capabilities that you plan to provide this structure with.
Since usually heated water is not uncommon in such buildings only in hot weather, in other words, it is heated naturally depending on weather conditions, but forced heating is also possible.
It is precisely this forced method of heating water, and the insulation of the architectural structure itself, that we would like to tell you about and give you a video in this article.
Warm shower at the dacha with your own hands - design
At the design stage, the following questions should be considered:
- Tank volume: depends on the number of users. For a quick rinse, 1 person will need at least 15 liters of water.
- Volume of the drainage pit: the pit should be at least two and a half times larger than the tank.
- Frame and cladding material: the frame can be assembled from polypropylene pipes, rolled metal or wooden boards and beams. For cladding, any moisture-resistant sheet material is used: plastic panels, polycarbonate, special plywood. When choosing a material for the first layer of sheathing, there is no need to pursue aesthetics: for the purpose of insulation, the heated shower will be covered with foam plastic.
- Shower dimensions.
As experience has shown, the most comfortable are structures with dimensions of 1.9x1.6 m in plan (shower + changing room) and a height of slightly more than 2 m.
Sequence of work
In general, the sequence of work when building a shower with water heating in a country house with your own hands includes the following steps:
- Creating a sketch and marking on the ground.
Shower diagram for a heated cottage using a plastic tank - Installation of the foundation (for a poured foundation you will need to dig a mini-pit, and for a pile foundation you will need to drill holes in the ground).
- Installation of the frame (vertical and horizontal supports) and the upper ceiling for installing the tank.
- Hanging the door on one of the vertical supports.
- Covering the frame with the selected wall material.
- If necessary, insulate the structure and install a roof over the space for the tank (only for forced heating).
- Installation of the tank and installation of heating equipment, reflectors, protective film (depending on the selected type of heating).
- Installation of hangers, hooks and shelves.
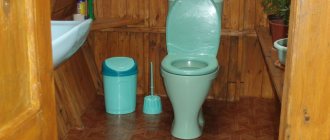
Speaking about ready-made options, we can mention a plastic heated shower for a summer house, which already includes a water heater. You can see what it looks like in the photo.
Ready-made plastic heated country shower
Choosing a location on the site
The following requirements apply to the shower area:
- the terrain should facilitate the drainage of wastewater (choose a location on a hill);
- the cabin should be well lit by the sun;
- The location of the bath should be protected from wind or draft.
Often a shower cabin is made as an extension to the south side of the house. A frame attached to the wall will be more durable, and the bath will be completely protected from the wind on at least one side.
Preparing the base
At the site of construction of the cabin, it is necessary to select all the fertile soil, reaching the underlying layer of soil - sandy loam or loam.
Next, a cushion is built in the resulting recess, consisting of a 15-centimeter layer of gravel and a layer of sand of the same thickness.
Next comes laying the foundation.
Laying the foundation
The building being erected will rest on a foundation of bored piles. Such supports are very easy to construct:
- Using a garden auger, you need to drill a well, the bottom of which is located 30 cm below the freezing depth of the soil. The diameter of the well should be 100 - 150 mm.
- At the bottom of the well, a 30-centimeter sand or gravel-sand cushion is made. It needs to be compacted, pouring generously with water.
- We lower a plastic pipe of the appropriate diameter into the well. It will simultaneously play the role of formwork and waterproofing for the concrete pile.
- Inside the pipe, it is necessary to secure a reinforcing frame made of 3 vertical rods with a diameter of 8 - 12 mm, equally spaced from each other, connected by crossbars made of rods with a diameter of 6 mm. All frame elements must be connected with annealed wire - welding is not allowed.
- All that remains is to fill the pile with concrete. At the final stage of pouring into concrete, you need to monolith the anchor bolt (in the center), on which the grillage beam will be placed.
Shower foundation
In soft soil, instead of bored piles, you can use driven piles made from a steel pipe with a diameter of 60 - 150 mm with a flattened end. In this case, the anchor bolt for fastening the grillage beam should be welded to the pile.
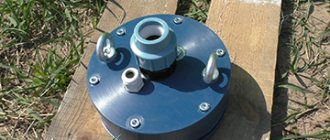
Types of heating elements for shower tanks
In this case, “wet” type models are used. This means that it must come into direct contact with water, otherwise the device will burn.
Open heating element for a country shower
The abbreviation “TEN” means “tubular electric heater”; it can be of the following types:
| Open | Structurally, a heating element for a shower barrel looks like this:
|
| Closed | Unlike the previous model, the heating element for the summer shower tank is insulated with a ceramic flask that has increased strength. It is made from magnesium silicate, steatite, but not from metal. In this case, the liquid is heated from its contact with the casing. |
Closed heating element for shower tank
Drain arrangement
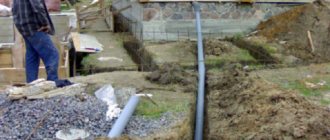
At a distance of no less than 3 m from the shower, you should dig a drainage hole about 2 m deep. It should be taken into account that the distance between it and the house or other building should be at least 5 m.
If the soil at the construction site does not absorb water well, you need to drill a well at the bottom of the drainage hole, whose base would reach a layer with good water absorption.
You need to install a polymer pipe into the finished well, so that about a meter section of it is outside.
Several holes should be drilled in the walls of the pipe at the upper end.
After which, the entire perforation, together with the end hole, is wrapped with geotextile.
There is a type of geotextile that resembles black isospan. In this case, it should not be used, since this material does not allow water to pass through well.
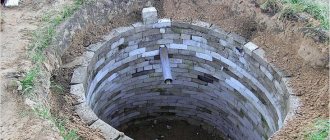
At the bottom of the pit and well, a backfill of crushed stone is made. Then a plastic barrel without a bottom or several used tires is placed in it. A hole should be made in the wall of this tank to which the pipe coming from the shower will be connected.
Next, you need to backfill the excavation, after which the pit is covered with boards or a plastic shield. The “lid” should have a vent with a short pipe and a cone-shaped guard.
Dacha owners still use their plots to a greater extent for growing vegetables and fruits rather than for recreation. On hot days after hard work you really want to freshen up, so a shower is a must. Do-it-yourself outdoor shower - let's look at how to build a frame structure.
Read how to organize a drainage pit from tires here. How durable is this system, what are its pros and cons.
On hot summer days at the dacha, it’s quite possible to take a cool shower, but if the weather suddenly turns bad or just gets cold in the evening, it’s not so pleasant to swim under ice-cold water. In this article https://aquacomm.ru/vodosnabzenie/zagorodnyie-doma-v/bak-dlya-letnego-dusha-s-podogrevom.html how to equip your shower with warm water using a heating tank.
Warm shower box
How to supply warm water
- The main problem for a shower separate from the house is warm or at least warm water - if it is possible to organize this in a building from a common system, then autonomy is needed . In this case, the most ergonomic option is a flow-through electric heater, since virtually any country house is connected to the electrical network, therefore, installing the device is a small technical problem, where safety instructions against electric shock must be followed.
- Let's say right away that this is not a super option - the device does not heat the water to a high temperature, especially if it is cold, but given the very specifics of a country shower, warm water will be enough for you . As a rule, in addition, if the price of the device is high, it does not heat water above 40? C, but it is unlikely that you will need more.
- Another option is to supply warm water from the house - the pipes are laid underground and insulated, but during transportation excessive heat losses occur and if this does not bother you, then this option is better than the first.
How to heat a shower stall
It goes without saying that in the summer you won’t have a question about how to heat the shower stall - it will already be warm or even hot there, but in the spring or autumn, when you start planting a garden or harvesting crops, In your soul, you will most likely feel too cold. But it is possible to make such a box with heating here too; infrared heaters are ideal for heating and there are compelling reasons for this.
Firstly, the IR panel will very quickly heat up a small room, since there is a special principle of heat-calorie transfer - the panel will heat not the air space, but nearby objects, which will become the source of heat.
Secondly, such devices can be installed in any place that is ergonomic for you - on the floor, on the ceiling and on the wall and, thirdly, they can be easily disconnected and removed. This very “thirdly”, perhaps, is the main reason in favor of IR systems - they will not be stolen, since you will have the opportunity to bring them into the house for the winter, or, by and large, take them to the city.
Note. Infrared heaters come not only in different capacities, but also in different configurations. In other words, this may be a device in the form of a panel, but it is also possible of a film type - the latest models can be installed under the cladding of walls and ceilings.
How to keep warm in a country shower
So, we need an insulated shower at the dacha, in other words, given that our design is quite simple, most likely made of boards or OSB, this will not be enough to prevent frost from getting inside from the street. Two materials are best suited for thermal insulation here: mineral wool (glass or stone (basalt), but not slag) and polystyrene foam (in extreme cases, extruded polystyrene foam, but it is much more expensive).
The process of laying such insulation is actually no different from installation in other rooms - the same frame and fastenings are most suitable for the material used.
But there is one very important nuance that appears in connection with the specifics of the shower box - it is invariably humid there, therefore, the thermal insulation must be protected from water splashes. If you are installing from the street side, then this question disappears by itself, but this is very important, otherwise you risk developing fungus and mold there.
So, it is optimal to cover the insulation with a simple thick cellophane film, and later cover this entire structure with foil or any narrow foil insulation, as shown in the photo above. Here you will immediately “kill two birds with one stone” - protect the insulation from liquid penetration and create an infrared reflector.
The fact is that foil has an excellent property - it reflects infrared rays, therefore, the excessive consumption of heat calories in the box will be minimal.
Note. It is extremely important that you insulate not only the walls, but also the ceiling, since according to the laws of physics, heated air space rises and if there is not strong thermal insulation there, the warm air space will evaporate very quickly. The same applies to ceiling waterproofing - steam, rising upward, will be reflected by foil insulation.
Plumbing nuances
Since we are insulating the shower box on the street, it is completely natural that we will not make a drain (grid) floor there, since cold air will flow from below and the entire heating will be unnecessary. In such cases, it goes without saying that it is optimal to fill the floor with a cement screed with insulation, which is much more often used as an expanded clay cushion laid on a layer of sand.
In other words, the screed here is poured according to all the rules - the soil is planned, after that a waterproofing film is laid with a fold on the walls, then a layer of sand of 2-3 cm is poured and then an expanded clay cushion, the thickness of which depends on the coldness of the soil, but not less than 4-5 cm.
Do not think that we made a reservation about waterproofing the shower floor - the film is needed here not to prevent water from getting into the ground, but to keep the pillow dry - thereby reducing the thermal conductivity of the materials.
You will need to install a drain into the floor and take it to a non-specialized sewer, a septic tank, or dig a cesspool nearby, just use it only for soapy water. But everything is equal, the best option would be a septic tank - not only will you not pollute the soil, but you will also not release the unpleasant odors that stagnant water gives off.
Construction of the frame
Grillage beams should be laid on the foundation piles, which will simultaneously play the role of the lower frame. Next, using corners and self-tapping screws, racks are attached to them, the upper ends of which are connected by beams of the upper frame.
If the frame is assembled from wood, all elements must be treated twice with a water-polymer composition, then with biocides. The last stage of preparation is treating the wood with hot bitumen.
Wood frame
It should be borne in mind that even with such precautions, increased humidity will soon lead to the appearance of fungus on the wood. To delay this moment, the wooden shower should be raised above the ground by 200 - 250 mm.
The frame is sheathed with moisture-resistant plywood or plastic, then the walls are covered with foam plastic, on top of which colored polycarbonate is fixed. At the top of one of the walls in the locker room and shower there should be an opening covered with transparent material.
It will be better if such a window in the shower stall is opening - this will make it possible to quickly dry it after water procedures.
Features of the construction of the heating system, floor
To heat the washing room, you need to install an old thin-walled radiator connected to a closed circuit with heated water circulating through it.
The movement of water in the circuit is ensured by a circulation pump.
In the washing room, instead of the floor, you should install a commercial shower tray (low version).
It is installed inside a frame made of wooden beams.
The floor in the locker room is made in the form of a grid, which is assembled from beams with a cross-section of 40x40 mm or polypropylene pipes. In the latter option, the holes in the pipes should be filled with foam so that moisture does not accumulate in their cavities.
Design and features of a summer shower
Summer shower for the cottage
One of the simplest designs of a summer shower consists of a square or rectangular cabin, the length of the sides of which is selected taking into account the size of the people living at the dacha. If we talk about water heaters, then such cabins are common, in which the water is heated by the sun. The water tank itself is a plastic or metal container. A pipe is built into its bottom, to which a faucet and a shower head are attached. Opening the valve allows water to flow out of the tank, providing enough pressure for comfortable bathing.
The outer surfaces of a tank of this design are painted with black paint, which allows it to more efficiently absorb the infrared radiation emitted by the celestial body. Usually by lunchtime the water becomes warm, and in the evening it is sometimes just hot.
- There is a more advanced heating option - a tank with a built-in heating element connected to electricity.
- There are also options for heating water with titans, and sometimes craftsmen install a certain structure in which a blowtorch heats a coil with water flowing inside.
These are interesting, but not very effective methods of heating, although in the cold season you cannot do without them.
Installation of the barrel
A tank with an electric heater and thermostat can be installed on top of the cabin.
Such products are sold today in a wide range. But this option has significant disadvantages:
- A significant part of the heat is spent on “street heating”.
- All household members, regardless of preferences, will have to wash with water at the same temperature or wait until the water reaches a comfortable temperature after the previous user.
A more practical option is to attach an inexpensive boiler to the wall outside the shower, protecting it with a canopy. An ordinary barrel is placed on top, from which water is supplied through a tee to the mixer and to the boiler. The outlet from the boiler is connected to the second pipe of the mixer.
Before you start building a shower room in a country house, you need to study a lot of nuances, because when dealing with water, you need to be able to prevent possible leaks and damage to the foundation in advance. Do-it-yourself shower in a private house - recommendations on the order of construction work.
You will find tips on making a shower tray with your own hands in this article.
Tank selection
A heated tank for a country shower, as well as one without heating, can be purchased ready-made in specialized stores.
But you can make such a tank with your own hands from scrap materials. Alternatively, you can use a 200 liter barrel. Ready-made containers can be made from different materials: metal, plastic or galvanized steel. There may be containers for country showers of different designs on sale. For example, there are models equipped only with space for installing a heating element, while some already have it built-in.
When choosing a tank or container for water, you need to consider several points:
- material from which it is made;
- water storage tank capacity.
For a small family of 2 people, a 100-liter tank is enough, and for three or more people, a 200-liter tank is enough.
This is enough for full water procedures for the whole day. You can make a heated tank yourself. You need to find a suitable container and buy a heating element on a specialized market. You can also buy it from cheaper options. It is not of fundamental importance.
Such elements can be found in various modifications on sale. For example, some have the ability to regulate voltage from 0.3 to 2.5 kW. The only drawback of such designs is the inability to constantly maintain water temperature.