Handling old lamps
Old blowtorches that have not been used for a long time should first be inspected from the outside.
During inspection, you need to check how easily all the valves and the tank lid open. The adjustment valve should turn easily. After this, you need to check the housing for leaks. To do this, use a pump to pump air into a lamp that is not filled with fuel. Then, using a brush, apply a thick soap solution to all threaded connections and the faucet. You need to check it closed and open.
If all connections are tight and the pump is properly creating pressure in the housing, the tap performs its functions by opening and closing the burner, the lamp can be refilled and started.
Furnaces and boilers running on waste oil have long taken their rightful place among heating appliances. Exhaust is a cheap and sometimes free type of fuel; it is often used for this purpose in car repair shops and garages. Many craftsmen, when choosing a design, ask the question: is it possible to convert a gasoline blowtorch into a burner for mining?
What is a blowtorch used for?
If you have purchased a blowtorch and working with it is now clear and simple, then the question inevitably arises: what else can you do with it? We list only the main areas of application of this useful tool:
- processing of wooden products to give them decorative and protective properties;
- tarring of poultry and animal carcasses;
- heating the old paint coating on metal parts for the purpose of removal;
- disinfection of non-flammable surfaces;
- soldering metal products, heating the soldering iron and solder;
- warming up internal combustion engines;
- heating food and shelter outside populated areas for hunters, fishermen and tourists;
- heating frozen water pipes and sewers;
- welding of metals with low melting point.
The essence of a blowtorch is that it burns high-energy fuel - gasoline. In this case, the fuel is supplied under pressure, which increases the flame temperature many times over.
Gas horn
A DIY gas forge should be practical. Its walls are made of fireclay bricks.
The manufacturing procedure is as follows:
- Refractory bricks are being prepared.
- The walls of the forge are folded. The amount of material varies depending on the complexity and size of the case.
- Surfaces are processed using a hacksaw.
- All elements fit tightly. The presence of cracks is not allowed.
- A threshold is installed in the front part.
- A rectangular hole is cut at the back. It serves both for ventilation and for working with long workpieces.
- A hole of the appropriate diameter is cut out on the side for the gas burner.
- The gas burner is made of stainless steel. This is a pipe welded at one end and with a metal mesh at the other.
Such a forge has its advantages:
- The furnace is structurally simpler than a coal forge.
- Simple fuel supply and simple temperature adjustment.
- Light weight.
- Low cost.
There are other types of gas forges made of metal. There are no fundamental differences between them.
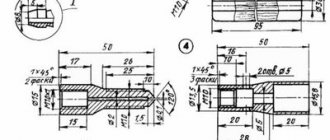
Figure 3: Burner drawing for a gas forge
Recommendations
To make a burner with your own hands, you can refer to videos, of which there are many on the Internet. The masters tell in detail, show, give useful tips and recommendations.
In every case you may encounter various surprises, so you should carefully review them and pay attention, for example:
To make a burner, use refractory metals, because during combustion a flame of more than 1000o C can form. Use a reliable tap that shuts off the gas supply. Pay special attention to the location of the cylinder connection. for the burner, improvised and unexpected materials can be nozzles from: gas burners, a household stove or stove, a car pump, a construction foam gun, and even medical needles. They are made of durable steel and coated with chrome, which gives them sufficient rigidity. The faucet is an ordinary plumbing faucet, and ordinary plumbing pipes with threads are suitable for connecting to the entire structure
There are no high temperatures in this place.
Learning to solder with a gas torch
A professional gas torch is best suited for soldering work. For soldering small-sized parts, it is advisable to use devices operating on lamp gas or acetylene.
The results obtained when operating burners using lamp gas are of better quality. This type of fuel is also cheaper.
When soldering parts in small quantities, it is advisable to preheat the parts. This will save time and ensure uniform heating of all elements of the assembly. As a result, warping and other defects will be avoided.
Before starting work, the parts must be fixed in such a way that they do not have to be moved during soldering. This can be done on a workbench or a special device.
Before soldering, a layer of flux is applied to the joints. If it is necessary to add flux during operation, the hot end of the solder rod is immersed in it.
When soldering parts made of different materials, the flame must be directed to the one that has higher thermal conductivity. You need to be careful when working with elements of different sizes.
It is important that all components are heated to the same temperature. Because of this, thick parts need to be heated longer.
Do not melt solder in a tool flame. In this case, it may drip down. Melting occurs directly when the wire comes into contact with the parts being soldered.
Solder will flow into hotter solder areas. Based on this, the flame must be directed before soldering. If it does not flow into the seam, this means that the part has not warmed up to the required temperature.
You should not heat the solder joints for too long, as this can lead to a change in the composition of the solder, that is, to its burnout, and a decrease in the effectiveness of the flux.
Manufacturing recommendations
Due to its popularity and simplicity, the burner for the waste boiler is made by craftsmen in different variations, but we will undertake to describe the simplest design, which will be available for repetition at home. First you need to select the necessary materials, here is their list:
- Steel tee with internal threads with a diameter of 50 mm - for the body.
- Squeegee with external thread with a diameter of 50 mm - for the nozzle. Its length is optional, but not less than 100 mm for the nozzle.
- Metal elbow DN10 with external threads - for connecting the fuel line.
- Copper tube DU10 of the required length, but not less than 1 m - to the fuel line.
- A metal ball or hemisphere that fits freely into the tee is for the working part.
- A steel tube of at least DN10 is used to connect the air duct.
To make a burner for testing with your own hands, you need to perform one precise operation - make a hole in the center of the sphere. The hole diameter is from 0.1 to 0.4 mm, ideally 0.25 mm. It can be done in 2 ways: drill with a tool of the appropriate diameter or install a ready-made jet at 0.25 mm.
It is not easy to accurately make such a small hole; thin drills easily break. Instructions on how to do this correctly are shown below:
Another way to make a calibrated hole in the spherical part of an autonomous burner is to insert a nozzle of the required diameter there. To do this, a hole is drilled, the diameter of which is slightly less than the outer diameter of the nozzle, and processed with a reamer. The jet is pressed inside and polished, as described in the video:
When this operation is completed, we assemble the burner based on the drawing:
A hole must be made on the side of the nozzle wide enough to ignite the unit. A large fuel heating spiral is not needed, 2-3 turns are enough. The finished product can be mounted on a mounting plate and built into any boiler, including a homemade one. At the end of the work, you need to connect the air and fuel lines, and then organize the supply of oil and air. The simplest method of fuel supply is by gravity; for this purpose, the waste container is suspended from the wall above the burner device and a tube is laid from it.
If you use a pump to pump oil, you can subsequently use control sensors and a control unit, then you will have an automatic burner that will be safer to operate. Detailed instructions for selecting materials and assembling the device are shown in the video:
If everything is done correctly and the diameter of the air hole is 0.25 mm, then the fuel consumption of the burner should not exceed 1 liter per hour. There should be no black soot during combustion; you need to achieve even burning of the torch. The adjustment is carried out by moving the sphere back and forth or changing the air pressure. Any compressor can cope with its injection, even from a refrigerator, since the operating pressure does not exceed 4 Bar.
How to make a burner for mining yourself
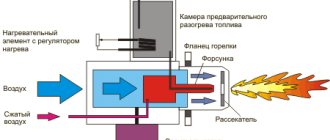
For successful combustion of oil, you must either preheat it to the evaporation temperature - approximately 300 degrees Celsius, or finely spray and enrich the oil vapors with air. You can heat the oil to such temperatures using powerful heating elements, but this will increase energy costs. An oil aerosol can be created by applying a stream of compressed air through a layer of oil. This effect is realized in the Babington burner - a device, an analogue of which you can assemble with your own hands from available components.
Babington burner - an alternative to a blowtorch
The Babington burner was originally patented to run on diesel fuel. Later, having made minor changes to the design, the craftsmen changed the design with their own hands and adapted the burner for burning waste machine and food oils. The degree of oil contamination does not matter much, since the fuel channels of the unit are free of bottlenecks prone to blockages.
Unlike a blowtorch, where the fuel-air mixture is sprayed under pressure through nozzles, in a Babington burner oil is pumped from a reservoir using a low-power pump and flows in a thin film along an inclined or spherical surface, and the oil-air mixture is formed by blowing a thin jet of compressed air air through this film.
The spraying effect is clearly presented in the video:
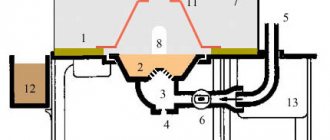
- The Babington burner consists of several functional blocks:
- Fuel - reservoir, pump and pipes for supplying fuel.
- Air, it consists of a compressor and an air tube.
- A hemisphere with a small diameter hole where the air stream mixes with oil.
- A nozzle that directs the flame in the desired direction.
The standard design can be modified with your own hands, increasing its efficiency.
To do this, the fuel tank is equipped with a heater that heats the oil before the burner starts operating, which makes it possible to increase its fluidity. In addition, a fuel channel made of a metal tube can be wrapped around the nozzle - this way the oil will heat up while the burner is operating. The burner nozzle is directed into the boiler, where the fuel chamber and water jacket are heated. You can also use the device to melt and heat metals.
Advantages of a DIY Babington burner:
- wide choice of fuel - used machine oils, lubricants of any viscosity, diesel fuel, fuel oil, any vegetable oils, including food waste;
- the presence of impurities in the fuel;
- simplicity of design - you can do it yourself.
Flaws:
- difficulty setting up the burner, especially often when changing the type of fuel;
- smell and dirt - the burner cannot be installed in residential premises, a boiler room is required;
- The use of the burner involves an open flame, so fire safety precautions must be observed.
There must be a powder or salt chemical fire extinguisher in the boiler room!
DIY Babington burner
You can assemble the burner yourself from simple components; for this you will need:
- A hollow ball or hemisphere with such a wall thickness that you can drill a hole with a diameter of no more than 0.3 mm. You can use any metal objects of a similar configuration, for example, a spherical brass door handle, nuts with plugs. The main condition is the possibility of reliable fastening of the air duct.
- Metal tube for supplying compressed air from a compressor, diameter - 10-15 mm.
- A compressor, for example, from a refrigerator, with an operating pressure of 2 atm, a maximum pressure of 4 atm.
- Fuel tank with a built-in heating element of 0.5-1 kW made of non-corrosion metal.
- Fuel sump and pipe to drain excess oil back into the tank.
- Copper tube, diameter - 10 mm, wall thickness - 1-1.5 mm for the fuel channel.
- Oil pump from a car or motorcycle with an electric motor to drive the pump. It is advisable to equip the pump with a filter with a large mesh at the inlet.
- The nozzle is a 200-400 mm long nozzle with an external thread of 2 inches.
- Crosspiece for two-inch metal pipe with internal threads.
- A 1" threaded drain and a 2/1" adapter to drain excess fuel into the sump.
- Adapters and fittings for connecting the fuel line, air duct and nozzle.
Preparing burner components for assembly
- The main and most important task is to make a hole of a given diameter in the spherical nozzle. The power of the burner depends on its size. For example, a boiler with a thermal power of 10-15 kW requires a burning torch obtained by operating a burner with one hole with a diameter of 0.2-0.25 mm. To obtain more power, there is no need to expand the hole - this will lead to larger droplets. It is better to make 2-4 holes with a diameter of 0.1-0.3 mm with a distance between them of 8-10 mm, otherwise the torches will be mutually extinguished. Fuel consumption can be calculated as follows: through one hole of 0.25 mm, 2 liters of waste are sprayed per hour.
Video about how you can make small diameter holes in a metal hemisphere:
- The tank is made of corrosion-resistant metal. A heating element is built into it with a thermostat set to turn off the heating element at a temperature of 70 degrees Celsius.
- It is necessary to make a fuel sump from the same material, equipped with a pipe with an overflow. Through this pipe, oil from the sump will flow back into the tank. To drain dirt from the sump, you can provide a plug in its bottom.
- Assemble the burner body: connect the nozzle from the squeegee to the 2-inch cross in the front part, then adapters: from the top for oil supply, from the back side for air. From below, a 2/1-inch adapter and a squeegee are connected to the crosspiece, through which excess oil will drain into the sump. The adapters are made of plugs with drilled holes into which the fuel and air channel tubes are inserted.
The housing can also be made from a tee, in which the air duct is inserted into the upper part, having previously drilled a hole of the required diameter.
- The fuel path is made of a copper tube, one end of which is wound around the nozzle three times, and then led through a plug adapter into the housing at the top. The fuel pipe is connected to the pump, a coarse strainer is installed and the other end of the pipe is inserted into the tank. The fuel path can be equipped with a valve. The pump is connected to an electric motor operating from a 220 V network.
- An air duct made of a metal tube is attached at one end to a hemisphere with a hole, having previously installed a plug adapter at the required distance. The hemisphere should be positioned so that the oil from the fuel tube evenly flows onto the rounded part of the nozzle, and then into the lower part of the housing and into the sump. The other part of the air duct is connected to a compressor, which is also connected to a 220 V network.
- Since the installation will have as many as three consumers of electricity, which are not turned on simultaneously, it is advisable to equip the burner with a control panel: install a separate toggle switch or button to turn on the heating element and a separate toggle switch to turn on the compressor and pump. If desired, you can equip the remote control with a light signaling system made of diode lamps.
- You can equip the burner with a controller that automatically turns on the units in accordance with the selected mode. Electric ignition is realized using spark plugs, and to extinguish the burner it is enough to turn off the oil supply.
Video - burner assembly diagram:
Preparing fuel for the burner
Almost any waste oil can be used in a Babington burner. Automotive waste with a large number of foreign inclusions is filtered before being poured into the tank through a mesh and mixed with cleaner oil. Oils with a small amount of impurities can be poured without preparation.
When using edible vegetable oils, such as deep frying, it is recommended to let it sit for several hours and carefully drain off the residue. These oils are sufficiently fluid at normal temperatures, so they can be heated in the tank only when the burner is started. When using fuel oil and other thick materials, they must be heated to a temperature of 70 to 90 degrees, otherwise the pump will work with overload.
In this article we consider in detail the entire process of making a long-burning potbelly stove: from arranging the foundation to making a chimney. The technology for safely disassembling a gas cylinder and then making a wood-burning potbelly stove from it can be found here. About the pros and cons of a long-burning wood-burning stove made by yourself, read:
How to make a gasoline torch for soldering with your own hands: drawings
A gasoline burner is a very useful device that can be used both in industry and at home or in camping conditions. Its main purpose is soldering various metal products under high temperature.
Unlike welding machines, the connection is made using a fuel-air mixture, the combustion of which is accompanied by the release of a large amount of energy. The design of the device is not highly technologically complex, so you can make a gasoline burner yourself.
What is better: buy or do it yourself?
There is no clear answer to this question. Naturally, it is much easier to purchase a gasoline torch for soldering in a specialized store - modern manufacturers offer many models for various purposes.
Please note that some units are significant in weight, which reduces their mobility; moving such devices requires personal transport. The main disadvantages of industrial gasoline burners are:
The main disadvantages of industrial gasoline burners are:
- High price.
- High requirements for fuel characteristics.
When manufacturing independently, the master has the opportunity to independently select the dimensions and weight of the future device. It is noteworthy that handicraft inventions work on any gasoline, even the lowest quality.
Step-by-step manufacturing process
The assembly sequence of a homemade device is as follows:
- Manufacturing of the body. A familiar turner can best handle this task. There are no requirements for the type of material. One side should be open, and the other should be closed with a cork. I drill a hole in it for the tube.
- Installing the ring into the body. It should be made of metal mesh.
- We cut out a sleeve with a hook from a steel sheet.
- We make a holder from hardwood.
- We bring the end of the tube to the level of the burner, passing it through the body.
- We solder the tube output.
- Drill a hole and insert a fuel nozzle of the appropriate size.
To solder the tube, you should not use soft copper solder, since its main requirement is refractoriness. With certain skills, you can make solder yourself.
Preventing clogging
The operation process is inevitably accompanied by clogging of the fuel channels and nozzle. This is due to the use of low quality fuel. Impaired cross-country ability leads to the fact that gasoline and air are mixed in the wrong proportions, which affects the quality of work. To prevent this from happening, experts recommend using the following prevention methods:
- Use gasoline with a low octane number.
- Clean the device after each use.
- Add injector additives to the fuel.
- Periodically clean the system with affinity carburetor flush. It deals with deposits most effectively.
Features of jewelry
Gasoline burners for repairing and making jewelry are separate from other devices. They are used for smelting precious metals. The devices are characterized by miniature sizes and a large heating area. Currently, most factories use high-precision laser systems, which improve the quality of the finished product.
Despite the fact that jewelry burners are practically not produced, their use is relevant for jewelry repair. That is why modern goldsmiths very often ask the question: “How to make jewelry burners with your own hands?” On specialized forums you can always find descriptions and drawings of high-quality models.
Manufacturing Features
The design features are that it is very easy to operate; there are no traces of soot or repulsive odors when using the gas burner. This device is compact and can be used virtually anywhere. The main component of the burner is the industrial valve. You can purchase a new part, however, and used ones that are in working order are quite suitable. The process of making a burner with your own hands begins with the handle, then the body and nozzle are made.
In order to obtain a burner that is safe to operate and does not waste fuel, you need to make it a rule to avoid scaling and adjusting the example circuits.
To be fair, it is worth noting that not all gas appliances are calculated according to the laws of gas dynamics. But if the manufacturer changes the dimensions of the design parts, then the Reynolds number of the fuel (or intake air) will go beyond the limits indicated in the original product. The burner with such “improvisation”, if we give an optimistic forecast, will begin to smoke and will be “gluttonous”, or even be completely dangerous in operation.
And one more important note regarding the manufacturing features of the burners: it is impossible to increase its power above 10 kW. And that's why
With a burner efficiency of 95% (which is an excellent indicator for an amateur invention), with a device power of 1 kW, it will take 50 W to self-heat. It is theoretically possible to get burned on the structure, but it is not fraught with explosion. But if you build a burner with a capacity of 20 kW, 1 kW will be superfluous. Threshold manifestation is expressed by the structure being hot or bursting into flames. Therefore, those burner drawings that are oriented at 7-8 kW should not be considered.
This is interesting: Requirements for laying a gas pipeline in populated areas: laying depth, rules for above-ground and underground pipe laying
Principle of operation
The essence of the working principle of the device is simple: prepare a mixture of gas and oxygen for combustion, ensure a stable supply of the mixture and its combustion.
The gas burner is also equipped with additional capabilities aimed primarily at automation and maintaining the safe operation of the equipment. These functions are provided through the use of such nodes as:
- Automation. Through its use, gas supply to the burners is stopped in the event of an emergency. For example, such a shutdown may occur if the igniter temperature drops below a set level.
- Ignition. The device runs on electricity or a piezoelectric element. The ignition operation scheme looks like this: natural gas is supplied to the igniter, where it is ignited by a spark (mechanically or automatically), after which the ignition heats up to a certain level, opens the valve and allows the gas to flow into the burner.
The device can be powered by electricity or a piezoelectric element
The equipment used in boiler rooms is not much different in operating principle from household appliances. However, such devices tend to withstand high gas pressure. In addition, industrial equipment is equipped with filters to filter out all kinds of resins and small dust particles. Filtration allows you to increase the cost-effectiveness and technological efficiency of equipment operation.
Nozzle for gas burner
Craftsmen solve this problem in the following way:
- A hole of as small a diameter as possible is drilled in the housing tube. Today, drills with a diameter of 0.2 - 0.3 mm and special chucks for them are available for sale. An example is Dremel brand products.
- Next, the burner is clamped in a vice with soft jaws and with careful blows of a chasing hammer, it is slightly deformed so that the hole narrows to the required size - 0.1 mm.
Gas regulator and nozzle/jet
All that remains is to treat the nozzle with fine-grained sandpaper, eliminating burrs and irregularities. This must be done to ensure that the gas flow, and therefore the torch, is smooth.
When you first start up the burner, you need to see if this was achieved, and if not, clean it more thoroughly.
Making a gasoline burner yourself
If you purchase a gasoline tourist burner in Moscow for various reasons, the device does not work out, you can make it yourself. The simplicity of the BG design creates undeniable advantages for users. Light weight and compactness make it accessible for home use.
Making a gasoline torch with your own hands ensures high-temperature conditions and good welding results.
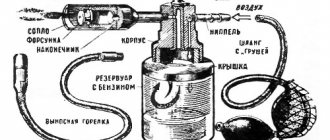
In its simplest form, the device is made of a gasoline fuel vessel, an air pump, connecting hoses and a burner unit.
A similar device melts hard solder and performs various heat treatments.
Tools and materials
Many parts for BG are not required to be made, since they can be adapted from unnecessary things, for example, a pear, borrowed from a spray gun.
The body is machined from steel of any grade. It has a composite structure, one part is open and the other is closed with a plug with a hole 0.1 mm larger than the size of the pipe, so the base moves while maintaining the tightness of the connection. A steel mesh and slag wool are installed inside the housing. Next, a metal sleeve with a steel hook and stop is made.
The BG handle is machined from a wooden blank. The holes are drilled carefully, their axes running parallel. The handle is sanded and varnished several times. Next, install the end of the tube, forming a nozzle. Solder PMC-54 to solder its end and drill 0.15 mm along the axis.
Do-it-yourself solder for a gasoline burner is made independently from copper and zinc shavings. To obtain zinc, take the body of an unnecessary battery, empty it, calcinate it, wash it with tap water, and then treat it with an HCl solution. Next, the glass is crushed into zinc pieces. To make copper shavings, take wire, anneal it over a fire and grind it. Sawdust of two metals is poured into the crucible in equal proportions and covered with borax, fusing the composition over the fire. Cool a piece of the alloy, file metal shavings and mix them with borax.
Manufacturing stages
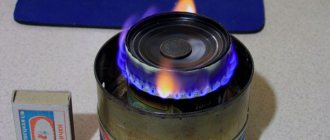
A simple homemade camping burner can be made from a flat metal tin can and pumice. The design of such a device is incredibly simple and does not require any effort. For the device to work, you will need to pack pumice tightly in the body and carefully add a small amount of fuel so that the contents are absorbed into the filler and do not spill out of the vessel. Due to the porous structure of the filler, the torch will burn for 10 - 15 minutes. A similar design is used for heating food, for which you will also need to additionally make a stand from reinforcement to stabilize the dishes.
Despite its apparent simplicity, the burner design poses a fire hazard. Therefore, experts do not recommend using homemade devices, especially if the user does not have the necessary plumbing experience.
The principle of operation of the spark generator, spark block
The operating principle of the ignition transformer is simple. A voltage doubler is assembled using diode VD1 and capacitor C. With one half-cycle of the mains voltage, the diode is open, the capacitor is charged to the amplitude value of the mains voltage (310 V). During the other half-cycle, the diode is closed. The voltage on it, and therefore on the thyristor, gradually increases until the moment when the current through resistor R1 becomes sufficient to open the thyristor. The thyristor opens. A current pulse occurs, which is transmitted through an isolation transformer to the ignition coil. A high voltage and a spark are formed on the high-voltage wire. The capacitor is recharged to a voltage of reverse polarity. Once this happens, the current drops below the thyristor's turn-off current and it closes. The circuit is ready for the next supply voltage cycle.
What it is?
A gas burner is a device for mixing oxygen and fuel in the gaseous fraction in order to move the mixture to the outlet and directly burn it in the same place. As a result of the burner operation, a stable flame is formed. The burner makes it possible to obtain a controlled type of flame, which can be used in the process of welding, soldering, repairs and household procedures, while cooking food in the field. In order for a gas device to perform its functions efficiently and also be safe for humans, its production is strictly regulated by GOST 21204-97. The main advantages of such devices are the following:
- no need for preheating;
- simplicity of design;
- high power indicator;
- ease of flame adjustment;
- no unpleasant odor;
- low noise;
- compact sizes of portable models;
- small amount of soot;
- no need for frequent cleaning.
A simple version of a gas burner consists of the following elements:
- gearbox;
- valve;
- metal housings;
- jet;
- heads;
- attachment point.
For the device to function properly, there must be high-quality mixing of fuel and air. If the design provides additional elements, then ignition can be automated. The operating principle of a simplified burner is as follows:
- preparation - gas and air receive a certain speed, temperature, and direction;
- combining air and the required volume of gas to result in a combustible mixture;
- combustion - an oxidation process occurs in the firebox, and heat and light are released from the nozzle at the outlet.
Precautions required when working with a blowtorch
When working with a lamp, strict adherence to safety regulations is required. The fact is that violations of the rules for working with this device can provoke an explosion of the device. A blowtorch is a fire hazard. The fuel storage tank is located very close to the open flame of the torch.
When operating the device, the following rules must be observed:
- It is prohibited to operate the tool if fuel leaks or fuel vapors are detected in the structure;
- It is prohibited to use fuel during operation of a blowtorch that does not comply with the manufacturer’s recommendations;
- It is prohibited to operate the device for a long time, since the close location of the burner provokes heating of the fuel cylinder above 50 degrees Celsius;
- It is prohibited to use the device if a malfunction of the safety valve is detected;
- Do not fill the tank with fuel while the burner is burning;
- It is not recommended to use the device in enclosed spaces.
In addition, it should be said that failure to comply with almost any of the safety rules when working with a blowtorch can provoke an explosion and unpleasant consequences.
Following simple safety rules allows you to achieve the most efficient operation of the device during operation.
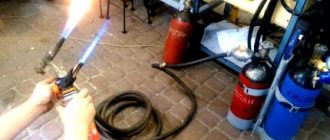
How to make a gas burner from a blowtorch
In this review, the author decided to make a gas burner from an old gasoline-powered blowtorch. This procedure is simple and does not take much time.
The first step is to remove the burner from the blowtorch - it will serve as the main element of our homemade product.
By and large, this is a full-fledged burner: connect the hose from a propane gas cylinder and use it. But in order to use it conveniently, you will also need to make a handle and an adapter for the hose.
We also recommend reading the article: how to make a soldering bath from an old iron with your own hands .
The first step is to cut a piece of metal tube of a suitable diameter and cut a thread at the end.
We weld the other end of the tube (without thread) to the bottom of the burner. We clean the weld seam with a flap disc for an angle grinder.
Conclusions and useful video on the topic
The video will talk about how to make a propane gas burner yourself:
Having at hand a small supply of tools, a gas burner diagram and the necessary materials, every home craftsman can assemble a propane burner
It is important to follow fire safety rules and use only high-quality materials approved for use in the domestic gas supply system. But if you are not confident in your own abilities, it is better to purchase such a device in a store
If you had to assemble a propane burner yourself, please share your knowledge with our readers and tell us which option you chose. Why was he chosen and were there any difficulties during the work process? Perhaps you have a diagram of the device and a photo of the finished homemade product - include visual information in the discussion of the material.
Main stages of work
Next, you will need a wooden handle from a regular file, in which you should drill a hole to match the diameter of the welded tube. We put the handle on the metal tube until it stops.
At the next stage, we take a brass fitting and screw it onto a metal tube. To ensure the reliability of the threaded connection, we use a thread locker. After this, we put a hose on the fitting and securely fix it with a wire clamp.
A similar operation with the fitting will need to be performed on the back side of the hose. All that remains is to connect the hose to the propane cylinder and test the homemade gas burner in operation.
As a result, with a minimum of effort, you can make a light and compact gas burner with adjustable flame power. For safety, it is better to install a reducer between the hose and the propane tank.
For details on how to make a convenient gas burner with your own hands from an old blowtorch, watch the video on the website.
Useful tips for car owners in winter
Next post
How to make lighting for home photography and video shooting
Information and entertainment online magazine
Copying materials
The use of any materials posted on the Labuda.blog website is permitted only if you provide a direct indexed link (hyperlink) to the copied page of the Labuda.blog website. A link is required regardless of the full or partial use of materials.
ATTENTION! We do not allow third-party resources to embed links to image files hosted on our hosting. All images are protected from hotlinking. Regular copying (saving) of images to third-party resources is permitted!
legal information
Dear authors, remember that the publications you post must not violate the laws of the Russian Federation and the copyrights of third-party resources.
* Extremist and terrorist organizations banned in the Russian Federation and the Republics of Novorossiya: “Right Sector”, “Ukrainian Insurgent Army” (UPA), “ISIS”, “Jabhat Fatah al-Sham” (formerly “Jabhat al-Nusra”, “Jabhat al-Nusra"), National Bolshevik Party (NBP), Al-Qaeda, UNA-UNSO, Taliban, Majlis of the Crimean Tatar People, Jehovah's Witnesses, Misanthropic Division, Brotherhood "Korchinsky, "Art preparation", "Trident named after. Stepan Bandera", "NSO", "Slavic Union", "Format-18", "Hizb ut-Tahrir".