Fence logs are transverse fastenings (crossbars). They are called differently: veins, jumpers. Logs are attached to fence support posts in different ways. Together with the pillars, the logs make up the so-called fence skeleton. They serve as a support for fastening the fence material itself - be it a wooden/metal picket fence, corrugated sheet, or any other material that forms the fence. At the same time, the logs perform the function of giving the fence frame additional strength. We discussed how to choose fence posts in a separate article; an equally important question arises when choosing transverse veins for a fence.
Which corrugated sheeting is suitable for a fence?
In the marking of profiled flooring you can see different letter designations that indicate its load-bearing capacity and purpose. What types of corrugated sheets exist:
- "N". The load-bearing profiled sheet is one of the strongest, with a groove in the middle of each wave, which increases the rigidity of the material. Purpose – construction of interfloor ceilings.
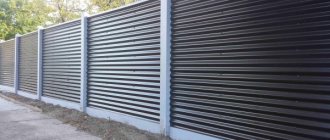
- "WITH". Wall, made of thin sheet steel, with a small width and height of waves. Purpose – installation of a fence made of corrugated sheets and wall cladding.
- "NS". Load-bearing wall, in comparison with load-bearing, is less rigid and cheaper. Also called roofing. Purpose – installation of roofing. Acts as an alternative to metal tiles.
We advise you to study in more detail: “Is it worth putting metal tiles on the roof: an overview of the material, for which roofs and buildings it is best suited.”
The fence is made of wall corrugated sheets. These can be brands, C10, C20, C21, C44. In some cases, HC35 is also used. The numerical designation after the letter indicates the profile height. It affects the final stiffness of the canvas.
Modifications of corrugated sheets recommended by experts for fencing
Please note: the C20 sheet, contrary to the markings, has a wave height of 18 mm, not 20 mm.
C8 sheets are suitable for the fence , but in regions with strong winds it is better to take sheets from C10.
They can have a thickness of 0.45-0.5 mm. Since the fencing also has a decorative function, it makes sense to buy painted corrugated sheeting. It is more aesthetically pleasing than galvanized and even more durable.
Stage 1. Development of a fence made from corrugated sheets: sketch and drawing
A corrugated fence is an extended structure that includes:
- Pillars (2) installed in a hole in the ground (1), which is concreted and filled with sand and gravel backfill (4).
- Joists (5) connecting the pillars. For a height of up to 1.5 m, 2 joists are sufficient, top and bottom. If the fence is higher than 1.5 m, an additional log in the center is required.
- Profiled sheets (6), which are attached to the transverse joists with self-tapping screws. To hang a gate or wicket, the support posts are equipped with hinges.
What elements does the fence consist of?
To calculate the required number of materials and install a durable fence made of corrugated sheets, you should first develop a sketch of it. This is a preliminary sketch depicting:
- Where will the fence be located, taking into account the entrances, the location of the gate, green spaces on the site, topography, etc.
- Changes in ground heights are noted to determine where shorter or longer sheets will be needed.
- Dimensions of individual straight sections, their height and length.
- Pole installation points: basic and intermediate.
- The length of the sections is for a sectional fence. It is taken as a multiple of 1, 1.5 or 2 sheets of corrugated board.
When installing a fence made of corrugated sheets, it is necessary to take into account that the distance from the ground to the bottom edge of the sheet can be 0-150 mm. With a terrain slope of up to 3%, the difference between the sheets is 150 m. For steeper terrain changes, the height difference is taken individually.
An example of a drawing of a fence made of profiled sheets
Sketch of a fence made of corrugated board
A little about gate posts
Despite the fact that corrugated sheeting of the same type and brand is used for the construction of fences and gates, we should not forget that this movable structure has to endure more significant loads associated with regular opening/closing.
Based on this, the size of the pillars is chosen larger than for fence spans, especially if the gate leaves are planned to be wide.
Various materials can serve as support pillars, the choice of the type of which determines the cross-section. Gates made of corrugated sheets can be mounted on a wooden beam with a transverse dimension of 150 by 150 mm, round solid logs with a diameter of at least 200 mm, or a channel beam with a thickness of 14-16 mm.
The most reliable solution can be considered to be the use of profile pipes with a section of 100x100 or 100x80 mm with a wall thickness of 7 mm as supports. The stability of the gate is determined by the strength of the pillars, so it is recommended to choose rolled steel for its construction.
Stage 2. Preparation of materials
Corrugated sheeting . For fencing, flooring marked “C” is used, sometimes “NS”. It is important that there is no capillary groove on the sheets - it is only needed on the roof.
Corrugated sheeting for building a fence
Support posts (pillars). Can be made of any materials: wood, stone, metal. But the simplest and most affordable are metal racks in the form of pipes with a round or rectangular cross-section. It is more convenient to use special ready-made support pillars. They have a “heel” for support on the sand cushion, holes for fixing the flooring and an upper plug.
Support racks (pillars) with special fastenings for corrugated sheets
Cross joists. The best option is pipes measuring 40x40x2 mm or 40x20x2 mm. Wooden logs are not suitable due to rotting at the attachment point.
Square cross-section joists
Holder plate for decking (bracket). Necessary for assembling the fencing frame using the non-welding method. Used in combination with hardware.
Holder plate for mounting logs on poles
Plugs for pillars (supports). Cover the end of the racks, preventing moisture and precipitation from entering them.
Plastic plugs for poles
Hardware: M6 bolts or screws (20 or 30 mm), self-tapping screws for corrugated sheets or rivets.
Hardware for attaching corrugated sheets to the frame
Decorative end strip. A fence or covering U-shaped strip that is attached to the upper end of the deck. Eliminates injury to people and protects the sheet from rust.
Fence strip to protect the upper end of the corrugated sheet
Paint for corrugated sheets. It can be used to mask defects that may appear during installation and paint over the cut of the sheet.
Additionally you will need:
- cement, sand and gravel (for making a cushion and pouring the foundation);
- screwdriver;
- solution container;
- drill or shovel;
- welding machine;
- primer and anti-corrosion compound;
- level and plumb;
- grinder for cutting sheets.
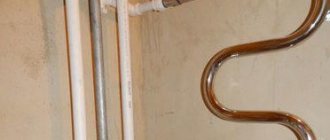
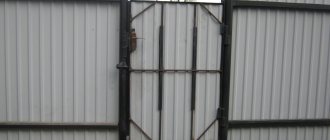
Fastening without welding
There are two ways to fasten veins without welding: with bolts and nuts and with the help of special brackets.
Bolted connections must be prepared: marked, holes drilled. Then sometimes you have to hide the head of the bolt. Yes, and this is not always possible.
Fastening with X-brackets is very convenient.
Fastening fence veins using X bracket
They are produced in several variants, but they differ only in the accuracy of execution. This is a cross-shaped structure with edges curved in different planes and with holes for fastening. The vertical part “hugs” a 60x60 mm fence post, and a vein is placed in the horizontal part. After checking the correct level of installation through the mounting holes, the bracket is screwed to the post, then the vein is fixed. The connection is ready. The next vein is inserted, set horizontally, and the process is repeated on the adjacent post. All fence logs are secured in the same way.
Ease of mounting with brackets
Brackets are produced for external and internal fastening to posts, for connecting profiles along the length; with their help you can “rotate” the fence. The main size is for posts 60x60 and veins 40x20, but X-brackets are also produced for other sizes of profile pipe. Assembly is done quickly using roofing screws. You can just as quickly remove it and correct the error or use it in another place. 2 mm steel and protective coating guarantee a long service life, and replacement during repair is very easy.
Stage 3. Calculation of the amount of materials for a corrugated fence
In order not to overpay for extra materials and not face a shortage, you need to correctly calculate the quantity.
How to determine the number of profiled sheets:
- For a continuous fence, divide the total length of the fence by the usable width of the sheet.
- For a sectional fence, divide the total length of the fence by the entire width of the sheet, if it is equal to the length of the section, or by the useful width of the sheet, if the section is 1.5-2 sheets.
Solid and sectional fences made of corrugated sheets
How to calculate the number of support posts
- For a continuous fence, divide the total length of the fence by the distance (span) between adjacent posts (2-3 m).
- For sectional fence. The distance between the supports is equal to the total (if the section is one sheet) or useful (if the section is 1.5-2 sheets) width of the corrugated sheet.
Racks must be provided:
- at the corners of the fence;
- at the gate installation site;
- at the place where the gate is installed.
The resulting number of racks can be rounded down. The lack of 1-2 pillars is compensated by a slight increase in the span. The height of the rack should be equal to the height of the fence plus another 30% for penetration into the ground. For example, for a fence of 2,000 mm, posts with a height of 2,000 · 1.3 (130%) = 2,600 mm are required. Intermediate posts can be buried 25% into the ground.
How to calculate the number of transverse joists
It is necessary to multiply the total length of the fence by the required number of crossbars. If the fence height is less than 1.5 m, 2 logs are required, more than 1.5 m - 3 logs. For example, for a fence 50 m long you will need 50 · 2 = 100 logs for a fence height of up to 1.5 m and 50 · 3 = 150 logs for a height of more than 1.5 m.
Corrugated fence with two and three joists
How to determine the amount of remaining materials
Holder plate: multiply the number of posts by the number of rows of crossbars (2 or 3).
Plugs: add 2-3 plugs to the number of support posts as a reserve.
Hardware. The corrugated sheet is fastened:
- in 2 extreme waves;
- through 2 waves in the center of the sheet into each of the lags.
For two crossbars per sheet, 6 hardware is required, for three - 9 pieces. Next, 6 or 9 is multiplied by the number of sheets. The resulting value is rounded up by a multiple of the packaging.
Paint: one can or 50 g can is enough.
Decorative end strip: divide the total length of the fence by the working length of the strip itself. Round the resulting number up. Most often, the planks reach 2,000 mm in length. The working length is then 1,850-1,950 mm.
Stage 4. Installation of a fence made of corrugated sheets
Installation of a fence made of corrugated board consists of several stages, including:
- Preparing the site for installation.
- Marking the site according to the sketch.
- Pouring the foundation and installing racks.
- Installation of cross beams.
- Decorative design of racks.
- Fastening the corrugated sheet to the frame.
- Installation of decorative and protective elements.
Preparation
It consists of cleaning the soil surface from anything that could interfere with the independent installation of the fence. Experts also recommend leveling out the most pronounced unevenness in the terrain, which can cause problems with installation.
Marking
To mark the site you need:
- Find the extreme points of the fence. These are the corners of the fence where support posts will definitely be installed.
- Hammer the pegs at the extreme points and stretch the cord between them - it will show the line of the future fence.
- Place pegs in the places where other supports are installed - they are determined again from the sketch.
- Attach a plumb line to a stretched cord at the location where the posts are installed - it will indicate the exact location for drilling a hole for the post.
Construction of the foundation and/or installation of support pillars
A corrugated fence is installed:
- On the foundation. In this case, the main support of the fence is not the pillars, but the foundation on which the posts already rest.
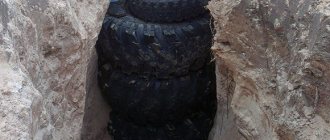
- Only on poles. Under each of them they dig out a hole with a bayonet shovel or drill a hole with a drill. The depth is chosen taking into account the penetration of the columns into the ground plus 100-200 mm for the installation of a sand and gravel cushion. The pillars are installed in dug holes and then concreted. Next, check again how straight the racks are and, if necessary, adjust their position.
Options for installing fence support posts
Which foundation to choose for a fence made of corrugated sheets
A fence made of corrugated board is a lightweight structure that does not require a serious foundation. For such structures, a strip shallow foundation is considered optimal. Its width is selected taking into account the width of the support posts. The depth is about 300-400 mm. But when installing a fence made of corrugated sheets, it is important to take into account a couple of nuances:
- In the place where the base pillars are installed (in the corners, where gates and gates are installed), the depth of the foundation pit should be at least 1/3 of the height of the posts plus 100-150 mm for the sand and gravel bed.
- For intermediate pillars, a pit with a depth of at least 1/4 of the height of the posts plus the height of the cushion is required.
This is an important condition, the observance of which will minimize the impact of groundwater and frost heaving of the soil on the structure.
Construction of a foundation for a fence made of corrugated sheets
The strip foundation for the fence is mounted using the same technology as in the case of a gazebo, bathhouse or house:
- A pit of the required depth and width is dug along the perimeter of the fence.
- According to the fence drawing, base and intermediate posts are installed: at the place of their installation, the soil is removed with a drill, a sand and gravel cushion is poured, and the supports are concreted to a depth of 100-150 mm.
- The foundation formwork is being arranged. It can be temporary or permanent (for example, from simple galvanized corrugated sheeting).
- The trench is reinforced and filled with concrete mixture.
We advise you to study in more detail: “What you need to know about galvanized corrugated sheeting: characteristics, types, advantages, areas of application.”
Installation of logs
After the support pillars are securely concreted, the installation of transverse joists begins. As a rule, you will have to wait at least 5-7 days for the solution to harden. The connection of the lags with the racks can be:
- welded (one-piece, non-separable)
- collapsible, i.e. using fastening elements.
In the latter case, holder plates are used. They are screwed to the support post, and the logs themselves are attached to them. This type of fastening is considered more reliable.
For a welded joint, the fixation area is first cleaned of paint using sandpaper or a grinding machine. To perform welding, you will need the help of another person who will hold the joist in the desired position. Welding is carried out along the entire length of contact between the crossbar and the post.
When the ground slopes on the site, logs and sheets must be mounted with a height offset
In the case of a pronounced relief of the site, the logs are mounted with a slight offset in height. The amount of displacement can be determined from a right triangle in which:
- The vertical leg (VC) is precisely the amount of displacement (height difference).
- Horizontal leg (AC) – the length of one profiled sheet. This is a segment parallel to the horizon, i.e. without a slope with an angle of 0°.
- The acute angle (A) between the horizontal leg and the hypotenuse (AB) is equal to the angle of inclination of the earth's surface, for example, 5°.
The tangent of angle A is equal to: tan A = BC/AC. Hence BC = tan A · AC. The tangent for an angle of 5° is 0.0875. If we take the length of the profiled sheet (AC) as 2,000 mm, then BC will be equal to 2,000 · 0.0875 = 175 mm. It turns out that each subsequent profiled sheet needs to be shifted in height by 175 mm. For this purpose, the logs are fixed 175 mm higher than in the previous span.
Using this scheme, you can find the displacement value (BC) of corrugated sheets, taking into account the slope of the ground surface on the site
Methods for attaching joists to support posts
- Front butt. Suitable for solid fences.
- Behind. Requires the use of a bracket, the optimal method for sectional fences.
- On the side. With this ability to fasten the crossbars, the corrugated sheet can be fixed not only to the joists, but also directly to the posts themselves. In this case, the consumption of self-tapping screws increases, but the structure itself becomes more stable.
Options for attaching the lag to the pole: butt in the front, using a holder in the back, from the side
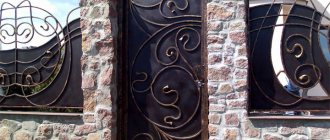
Decorative design of racks
Installing a fence made of corrugated sheets is not just a dry installation technology. There is room here to show your imagination and sense of style. When choosing a sectional fence, you will have to decorate the support pillars. The most popular design option is to cover metal pillars with brick or stone. It is important to think through this stage at the sketching stage, since finishing reduces the distance between the pillars and, accordingly, the length of the required corrugated sheeting.
You can, of course, decide on such a design already during the installation process, but then you should be prepared for cutting sheets and increasing installation time. Important conditions for laying bricks:
- Use high-quality decorative bricks without chips or efflorescence.
- Maintain uniform seam thickness.
- Reinforce every third row of masonry with masonry mesh.
- Fill the void between the support column and the completed masonry with concrete mortar.
- The top of the post must be covered with a cap to protect it from moisture and precipitation.
We advise you to study in more detail: “Masonry mesh: what it is and what it is used for (+ technology and laying rules).”
We advise you to study in more detail: “A cap on a fence post – decoration or necessity? Varieties of products by shape and materials, advice on selection, installation instructions.”
Installation of corrugated sheets on the frame
To fasten corrugated sheets, rivets or metal screws are used. The most important thing is to install the first sheet correctly:
- Having determined the permissible height of the extension along the upper edge above the vein, the sheet is secured with one self-tapping screw at the top point.
- Then, using a level, set the second edge to the desired position and also grab it with a self-tapping screw.
- After this, you can screw on the remaining hardware.
- Subsequent sheets are mounted in the same way, overlapping the last covering wave of the previous sheet.
How to properly attach a corrugated sheet
In order for a fence made of corrugated sheets to maintain its spatial rigidity, it is necessary to follow the rules for fastening with self-tapping screws:
- The sheet is fixed along the edges to each of the transverse logs: one fastening is in the center of the sheet, the rest - through 2 waves.
- Fastening is carried out only through the lower wave.
- The sheets are fixed to each other through the upper wave.
- The screws are not fully tightened to maintain the integrity of the sealing rubber.
Self-tapping screws should not be tightened too tightly
Installing additional items
Almost the last stage in the construction of a fence made of corrugated sheets is the installation of decorative strips on the upper cut of all sheets. They are fixed with rivets to match the color of the flooring. The width of the strip is selected according to the wave height of the corrugated sheet. For a sheet with a profile height of 8 mm, you need a strip 8 mm wide without rolling or 10 mm including rolling. It is also important not to forget to install caps on the ends of the support posts.
Technique for making horizontal welding seams at the post-beam connection
- Welding horizontal fillet welds is distinguished by the peculiarity that liquid metal from the vertical plane of the column tends to flow onto the joist (lower plane). Therefore, it is recommended to weld such a seam “in a boat”, positioning the parts to be welded in such a way that the slag does not have the opportunity to flow onto the plane in front of the arc (Fig. a).
- However, in our case, it will not be possible to install the parts to be welded in the desired position, therefore, when welding the corner seam of a post and a log, the lower plane, which is located horizontally, may not be welded through one of the edges or the top of the corner. Lack of penetration can form on the plane of the log if welding is started from the vertical plane of the column, since the liquid metal in this case will flow onto the insufficiently heated surface of the log. Therefore, welding of the log should begin by igniting the arc on the lower plane of the log at point A, and the movement of the electrode should be carried out in accordance with Fig., b.
- The electrode must be held at an angle of 45° to the horizontal surface of the log, slightly tilting it alternately to one and the other plane during the welding process (Fig., c). The seam is made in a single layer; for a stronger connection, it can be welded in two layers or more. When welding a multilayer seam, you first need to apply a narrow bead with an electrode with a diameter of 3-4 mm to ensure penetration of the root.