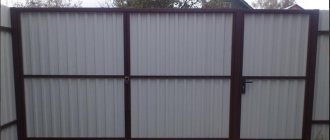
Every owner of a personal plot wants to make their yard aesthetically pleasing, safe and reliable. To do this, it is important to take a responsible approach to the choice of fencing. The fence should not only be beautiful in appearance, but also practical and functional. And most importantly, it must prevent strangers from entering private territory.
When choosing a fence for your site, you should pay attention to gabion structures. What is this, how to properly build a fence from gabions with your own hands, whether it is worth laying gabions under the foundation and a lot of other useful information we will consider in this article.
Advantages and features of a gabion fence
The main advantages of a fence include:
- low cost. You just need to buy a strong metal mesh and filler;
- lack of foundation. The structure itself is quite heavy and massive, stands on the ground firmly and reliably (if it is properly arranged);
- possibility of self-installation. To build a fence from gabions on a site, you do not need to have special equipment or skills in the construction field;
- environmental friendliness. Metal and stones are natural materials that do not emit any harmful substances;
- strength and durability. Such a structure will last for many years without losing its attractiveness and original technical characteristics.
A gabion fence will harmoniously fit into any landscape design. It can be combined from any materials. Stone and wooden structures look especially attractive.
Important : landscape designers recommend using the same types of stones as in gabion structures as site decor. This will make the yard more stylish and original.
Preparing for work
After selecting the material and mesh, begin preparing equipment for future construction. In fact, the only thing you need: hands, mesh, stones or other filler. Otherwise, the fence installation technology is simple.
Useful How to make a fence from flat and wave slate with your own hands - installation features
There are no regulations regarding the attachment of the mesh. For each case, check the box installation standards with the frame manufacturer. Perhaps, if your choice fell on stones and a welded lattice, you will need a welding machine to give the fence a finished look.
Simply mark the area taking into account the choice of pergone geometry. You will do without a foundation and strengthening the gabions relative to the ground. Since the elements inside the lattice will be mobile, the stones will align themselves as they settle. You will not notice the difference, and the fence will remain in good original condition.
Decor options for a gabion fence at the dacha
To add elegance and nobility to a gabion fence, you can plant climbing plants between the stones. You can also plant beautiful ornamental shrubs next to the fence.
Important : plants should be planted next to the foundation with caution. Especially when it comes to a foundation made of gabions, which are part of the structure. Since moisture from the roots of plants will gradually destroy the base.
Gabion fences with evergreen shrubs and hedges also look original. Gabions filled not with stones, but with saw cuts, look very beautiful.
In conclusion, it is worth noting that in order to build a gabion fence you do not need to have certain skills, expensive materials or professional tools. The main thing is that they are not afraid to show their imagination and spend a little effort. As a result, you will get a stylish, reliable and durable fence that emphasizes the architectural style of your home.
Gabions in landscape design
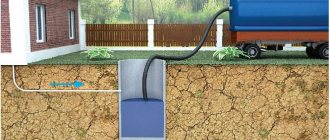
The peculiarity of gabion fencing is its ability to withstand water flows. You can enclose a site with a fence, even if its border passes through a body of water. It’s not for nothing that gabions are used for lining bridge piers. To strengthen the bank of a river, stream or create your own pond, boxes filled with stones are often used.
The flexibility of the design allows you to reproduce any shape and plan the site according to your own taste. Protective walls for fruit trees or shading of delicate flowers are quickly erected. Unevenness and instability of the soil will not interfere with planning the garden, creating paths, steps, fountains.
Sloping areas can be easily converted into terraces using a time-tested method and modern materials. Gabions prevent soil from shedding and secure flower beds, creating a unique atmosphere of well-groomed and sophistication. The mesh for the boxes is easy to cut and, using your imagination, you can create garden sculptures filled with multi-colored stones, glass, and any available materials.
By shaping the canvas, making slots and niches in it, an ordinary fence is turned into a cozy architectural ensemble, which can be complemented with garden furniture made in the same technique and style. Benches, tables, barbecues are installed on supports made of mesh boxes. And with the help of internal partitions, barbecue areas are created. Simple materials and technology, which previously had only utilitarian uses, today inspire designers, architects and builders to create ever new forms that are easy to build and very difficult to destroy.
Foundation for the fence
If it was decided to make such a fence, then you must first carefully study all the stages. First of all, you should take care of the strength of the base - the foundation. Everyone who has been involved in construction knows how to make it. For beginners in this matter, you need to follow simple instructions.
At the preparatory stage, the necessary tools and materials are selected:
- shovels;
- roulette;
- concrete mixer;
- hammer;
- nails;
- boards;
- reinforcing metal;
- sand;
- cement;
- film.
In this case, strip foundation manufacturing technology is used. Its depth should be no more than 25 cm and its width 30 cm.
At the second stage, formwork from boards is installed. Film is used for waterproofing. Reinforcement is used for strengthening. It is placed on the bottom of the formwork and filled with cement mortar. The foundation must harden, for this you will need to wait at least a week. In order not to damage the evenness of the surface, the formwork is covered with film. If necessary, water with water.
When forming the foundation, it is important to release excess air. After pouring each layer of solution, it is necessary to mix it. This way, air bubbles will come out.
Installation
Due to the design features, a gabion fence requires more free space than an ordinary garden fence. As mentioned above, such a fence does not need to be strengthened with a solid foundation, but you should securely concrete the support pillars, since they will have to withstand a significant load.
The installation instructions for this type of fence are very simple and consist of several steps:
Preparatory stage
At this stage, you should prepare the area for work, that is, mark it. This will also help you decide on the amount of materials needed.
Marking the territory is one of the main stages of installation.
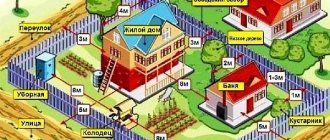
Determine the location of the posts using a construction tape. Professionals recommend maintaining a distance of 2.5 meters.
Advice! You should not increase the distance between the supports, since stone fences of this type are quite massive structures in which a lot of stress is placed on both the supports and the mesh fabric itself.
Installation of pillars
- Dig holes relative to the markings made. It is recommended to calculate the depth of the holes as follows: the post should go into the ground approximately a third of its length. The standard width should be 20 by 20 cm.
Thus, for a fence of standard height, a depth of 70 cm is sufficient. If you want a 2-meter fence, then the depth of the holes for the supports should reach at least 115 cm.
- Place a post in the hole. It is advisable to use square or rectangular supports, to which it is easier to fix the mesh. But a round pole is not a problem either. The support must be installed strictly vertically, for which a level is used.
- Having aligned the pole (as in the photo below), securely fix it with wooden spacers.
Installation of support.
- Pour cement solution into the hole , compacting it tightly.
- Do the same actions with the remaining pillars.
Installation of mesh fabric
In order to proceed directly to installing the mesh, you need to let the cement set, waiting 3 days. Next, we mount a wire frame into which the stones will subsequently be laid.
Attaching the mesh to the supports can be done in various ways, using bolts, washers, nuts or galvanized clamps. Mesh fabrics should be fastened together using tie rods.
Advice! When installing the mesh, treat the ends of the cut wire with zinc paste or any other anti-corrosion compound.
Laying stones
Now we have come to the final stage of installation. And here everything is very simple: at this stage you need to lay out the stones manually, in such a way as to ensure a continuous and uniform filling. Don't worry, even after the stones have already been laid, you will be able to change their position thanks to the flexibility of the mesh fabric.
The appearance of your fence will largely depend on the size, color and texture of the stones, as well as the shape and area of the cells. Naturally, stones that are too small will not have a very presentable appearance, requiring, moreover, very small cells, just like too large ones, since it will be problematic to lay out a relatively even canvas from them.
A fence using different types of stones.
Step-by-step installation of a fence made of mesh and stones
When creating gabions yourself, you should prepare the following tools and materials:
- geofabric (oilcloth);
- filler (broken brick, crushed stone, cobblestones or other);
- metal mesh or gratings;
- wire staples, cables;
- metal spirals;
- nails;
- pins (preferably made of steel);
- boards;
- sand;
- cement;
- concrete mixer;
- hammer;
- shovel;
- roulette;
- a welding machine with electrodes, a protective mask (if the grille is made by hand from reinforcement bars).
Photo: dimensional characteristics of the frame and the principle of gabion installation
It is better to draw up a diagram of the future structure in advance, since a visual image will allow you to avoid possible mistakes at the design stage. calculate the amount of materials, make a cost estimate.
Marking
To carry it out, it is necessary to clear the construction area of debris and weeds. Remove 15 cm of the top layer of soil. Every 2-2.5 m, drive pegs into the ground, pull a cord tightly between them to outline the perimeter of the future fence.
Foundation
Construction of the foundation is not a mandatory stage of construction. But in order for the fence to last as long as possible, we recommend pouring a reinforced tape base under the gabion.
For this:
- We dig a trench of appropriate width. The depth is selected based on the type of soil.
- We cover the bottom and sides with geofabric, which prevents weeds from sprouting and destroying the structure.
- Pour a small layer of sand and crushed stone and tamp it down.
- We reinforce the tape with reinforcement rods.
- We assemble formwork from boards.
- Fill the trench with concrete. Drying time up to 2 weeks.
Photo: using a strip foundation as a base
An alternative is to simply bury the gabions into the soil by 20-30 cm, covering the bottom with geotextile without arranging the base.
It is better to take profile rectangular sections as supports. They need to be installed in prepared holes with a step of 2-2.5 m from each other. Fill the bottom with crushed stone. For clear vertical fixation of the pillars, use spacers made of boards or timber. Fill the holes with concrete. The racks will gain strength in 3-5 days.
Frame installation
Suitable for making a box:
- Twisted wire mesh with hexagonal cells. The coating is polymer or zinc.
- Galvanized welded cards.
- Thick wire, from which you can weld the frame yourself and cover it with paint so that it does not start to rust.
The size of the cells is selected individually depending on the size of the filler used.
Main details of the gabion:
- side walls (2 pcs.);
- bottom;
- end walls (2 pcs.);
- reinforcing jumpers (the number varies depending on the size of the product - from 2 to 6 pcs.);
- lid.
The jumpers are metal ties in the shape of the letter P. They ensure evenness of the corners and distribute the load evenly throughout the structure.
Making a box looks like this:
- The grid is assembled near the pillars. First, the corners and edges are connected with strong wire. It is better that the rods are made of steel.
- The frame is attached to the posts by welding or by bolting with a stud.
- Two different boxes are connected to each other with staples and wire.
The top of the structure is left open until it is completely filled with material. After which the cover is mounted in a spiral to the frame.
Grid Filling
Photo: laying stones in a grid
This is a creative work and cannot be rushed. We recommend taking into account several important points:
- Each stone is laid separately, and not in bulk, to avoid the formation of voids.
- Having reached half the height of the fence (the fourth or fifth row), the walls of the frame need to be tightened with steel cables - reinforcing jumpers, and then continue filling the box.
- To save money, the outer part of the frame is laid out with large cobblestones, the inner part is covered with geotextiles and broken brick or crushed stone is poured.
- It is not recommended to lay large stones immediately on top of the lintels; it is better to first lay a row of smaller fractions, and then them.
- The top row is filled with medium-sized stones to ensure uniform shrinkage.
- Upon completion of the formation of the gabion, the product is washed with water pressure.
For low fences, you can plant flowers between the stones and create entire compositions.
Classification of gabions
Depending on the materials used, appearance and other factors, these structures are distinguished into several types.
According to the shape of the frame
There are:
- Cylindrical. Suitable for arranging foundations, small hedges for flower beds, and strengthening problem areas of the soil. Can be used as decorative fence posts.
- Flat. Another name is Renault matrices. Horizontal wide structures 15-30 cm high. They are used as a base for box-shaped ones, to strengthen estates on slopes or near water bodies.
- Box-shaped. They are also called Jumbo boxes. They are most often used to build fences. These are vertical rectangular containers with a height of 1 m and a width of 2 m. They are made from pieces of durable mesh, fastened together by welding.
Photo: transportation of welded frames.
All that remains is to install these cells and fill them with stones. If you don’t have experience working with a welding machine, then it’s easier to buy ready-made boxes and fill them yourself.
Many craftsmen do without boxes, but simply stretch the mesh over the support pillars and fill the opening with stones and rubble. This is cheaper, but the reliability of the design is lower.
By grid type
Among the large selection of fabrics for the frame, it is recommended to purchase a chain-link mesh made of stainless or galvanized steel. This way the raw material remains resistant to any environmental influences for a long time.
The cell size must be selected so that they are at least half the size of the filling material.
The shape of the cells is:
- rectangular;
- hexagonal (honeycomb);
- square;
- round.
You can buy frames made of welded reinforcement, twisted mesh, subject to an anti-corrosion coating.
By content
An addition to the metal frame can be:
- granite;
- quartz;
- diorite;
- basalt;
- broken brick;
- pebbles;
- sandstone;
- crushed stone;
- pieces of glass, whole bottles;
- tree cuts.
Photos of stones used to fill gabions
If you have chosen one of the types of stones, you need to take into account that the maximum diameter should not exceed 40 cm. Any shape, except flat.
We must not forget about the strength of the filling, so that the raw material is resistant to temperature changes and frost. Otherwise, the stones will begin to crack and expand, which will lead to partial or complete damage to the fence.
If the gabion is filled with wood cuts, it will be necessary to make a base for it from at least a layer of crushed stone.
By type of design
Divided into 3 types:
- Solid. A tall frame made of metal mesh is filled from top to bottom with stone or other material, forming a solid solid wall. This fence is an excellent protection against intruders and nosy neighbors. The area will not be visible. The design resists wind well and is durable.
- Combined. Often used for suburban fences. A mesh filled with stones is successfully combined with sections made of wood, brick, and metal. In this case, the gabion serves as a plinth or support pillar.
- Waterproof. They are used on estates located near bodies of water that can be flooded during the spring melting of snow. It is better to make such a fence from crushed stone and mesh. The smaller the stone, the tighter it will fit.
The gabions are left open or a lid made of the same mesh is attached on top so that the box can be opened.