A metal gazebo is a durable and reliable structure, which, if properly arranged, designed and planned, will be an excellent addition to a summer cottage. Today, a large number of types and forms of metal gazebo structures have been developed. Therefore, finding an option that suits you will not be problematic. Although the market offers ready-made gazebo designs, remember that a DIY metal gazebo will allow you not only to save your family budget, but also to enjoy the fruits of your own hands. We invite you to study the guide to building a gazebo.
Types and methods of assembly
The gazebo can be built in different shapes - rectangular, square, hexagonal, octagonal, round. In addition, there are two ways to install a metal gazebo:
- The pipes are concreted into the ground. After the concrete has hardened, the entire structure of the gazebo is welded to the posts. At some distance from the ground, a lower frame is made, on which the flooring is laid. You can also lay paving slabs on the base or concrete the area. Such a gazebo does not require a foundation.
- A shallow strip or column foundation is made. The frame of the gazebo itself is made separately. It is installed on a ready-made foundation and secured with anchors.
Which of these technologies is more practical? If we talk about reliability and quality of fastening, then the first option is more practical, since the racks are securely fixed in concrete, and this option is also cheaper. There is no need to make a foundation. But, on the other hand, this option is more suitable only for the summer period. You can’t do without a floor in winter, so the second option is better, since it is possible to build a closed metal gazebo.
How to build a gazebo with your own hands from metal - assembly options
Metal is always joined by welding, practically. This method is in great demand due to the reliability of the design in the future, as well as the speed of work. But if you want a small summer gazebo, then you can consider the option of a collapsible structure. If your site is not guarded, then a large amount of iron may attract the attention of thieves. And rest assured, even though it weighs a lot, they will figure out how to steal it.
You can weld a metal gazebo with your own hands, but it’s better to make additional protection. The design has several modules that need to be welded together. Then connect them with special bolts. This can be done with a collapsible gazebo, which is a metal frame with an awning and a small roof.
How to weld a gazebo of this type? The prefabricated model begins to be created from the frame. First you need to make it for each side, and then assemble it with bolts and secure it.
A do-it-yourself welded gazebo is very easy to assemble. The frame needs to be divided into several faces. If it has a quadrangular shape, then there will be a similar number. Four separate circuits are created, they have jumpers on them. If the shape is hexagonal, then you need the same number of elements.
Connection methods
Mostly metal products are assembled by welding. This installation method is reliable and fast. However, if you need to build a collapsible gazebo, then its individual modules are connected with bolts. Typically, such gazebos are covered with an awning or a light roof is made. All structural elements - railings, roofing and risers are assembled very quickly. The advantage of such a gazebo is that it does not require much space for storage.
Processing metal parts of the gazebo
Before roofing work begins, it is necessary to take care of protecting the metal - we carry out painting work. First, apply a layer of anti-corrosion solution and let it dry completely (this should not take more than 2 hours). Then you can carry out the finishing work - using paint of any shade that optimally matches the existing landscape design and the exterior of all buildings on the site.
Please note: before starting painting work, it is necessary to process/clean all welding seams - this is done using a grinder. It is also necessary to clean the metal pipes from existing rust - this can be done even before work on assembling/installing the frame of the metal gazebo begins. Do not forget - such work is carried out in protective glasses, gloves and a respirator.
What metal to make it from?
In most cases, metal gazebos are made from profile pipes. The thickness of its wall should be at least 2 mm, but not too thick. If you plan to use round pipes, then the wall of the pipe should be similar. Unlike profile pipes, round pipes are cheaper. But when working with them, skills are required, since a welder must be highly qualified to weld round pipes with a beautiful and durable seam.
Although steel pipes are predominantly used, aluminum profiles are often used, especially for collapsible structures of gazebos. As a result, the gazebo will be much lighter, but at a higher cost.
We invite you to familiarize yourself with the process of manufacturing a metal gazebo from a profile pipe.
Roof frame for a metal gazebo
Pay attention immediately to the image - it shows what the result should be:
The procedure is the same as when assembling the gazebo frame:
- First, the lower frame is welded - round metal pipes are connected using a welding machine. Experts recommend using pipe sizes of 20x40 mm for the roof frame.
- Next, we connect the pipes into triangles.
- The last step is to connect all the triangles with a long pipe using a welding machine and attach the resulting “set” to the frame.
All that remains is to lift the finished roof frame onto the top of the exposed “skeleton” of the metal gazebo and weld all the points of contact. For this operation you will need the help of two or three people and several stepladders - you won’t be able to do it yourself even if you want to.
Please note: our article discusses the option of the simplest gable roof made of metal, but both a hipped and a hexagonal roof can be made from the same material.
Calculation of material and size of the gazebo
First of all, it is necessary to purchase materials. For gazebo posts you need the following profile pipes:
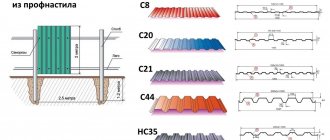
- 50×50 mm if slate, bitumen tiles, metal tiles or corrugated sheets will be laid on the roof;
- 75x75 mm if tiles or slate will be laid on the roof.
For jumpers, a thinner profile can be used: 50×50 mm – maximum, minimum – 20×30 mm. If you plan to build a large gazebo, then accordingly it is better to take a larger profile section and vice versa. Also consider the weight of the material with which the frame of the gazebo will be sheathed.
To make a square metal gazebo with a size of 3000×3000 mm and a post height of 2200 mm, you will need the following set of materials:
- pipes for piping 12 m – 50×50×2 mm;
- profile pipe for jumpers in the following name: 30 m – 40×20×2 mm, 6 m – 20×20×2 mm and 14 m – 40×40×2 mm.
- metal strips 2 m 20×4 mm.
Choosing the appearance of a metal gazebo
You can make a very simple structure and simply cover it with a sheet of metal tiles or ordinary wave slate, or you can make a real masterpiece out of metal - the use of forged parts, the hexagonal shape of the gazebo will make the resting place truly original.
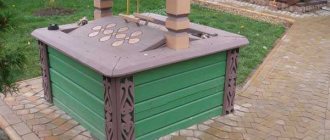
Moreover, you can use ready-made forged parts - they are sold in a large assortment in stores. To ensure that building a metal gazebo with your own hands does not turn into a protracted process and only brings pleasure, you should really evaluate your strengths. If you have never encountered construction work before, much less complex welding work, then abandon the idea of building a complex hexagon. But even for an absolute beginner it will be a simple task to make a metal gazebo on your site, shown in this photo:
Step-by-step instructions: marking and installing poles
Remove the fertile layer of soil from the ground surface at the construction site. If water drains well from the site, then the pit is filled with sand and soil, preferably without vegetation. If the soil is predominantly clayey, then clay is also poured in so that it is removed.
Next, a pit is made for installing pipes up to 90 cm deep. Install a pipe into it and fill it with coarse crushed stone or construction waste. After this, align the support pillars vertically. They should be fixed in equal position and then concreting should begin.
If M400 cement is used for concreting, then sand is added in 3–4 parts. In this case, the concrete must be liquid to fill the entire pit filled with crushed stone.
Gazebo diagram
For working with metal, it is very convenient to use a level or plumb line with a magnet. You install the item to be measured in the right place and level the support post without any problems.
Another option for making a foundation is to install blocks on which the gazebo will be installed. With this design, the structure will be raised from the ground level. The blocks must be installed in the corners and in a checkerboard pattern in the middle. This will prevent the pipe from sagging. With an edge of 50 mm, 3 m of pipe will sag without support. The blocks are placed at the same level horizontally. To do this, you can drive pegs in the corners and stretch a string between them.
All this hassle with installing supports can be avoided if you simply concrete the support pillars into the ground. But in this case, the lower trim will need to be welded level.
Racks and bottom trim
When the blocks are installed, suitable pipes are laid around the perimeter. For the bottom trim, a 50x50 mm pipe is enough, but more is possible. In this case, be sure to check the horizontal level of the pipes. You weld the pipes in the corners. After this, to install the floor from the boards, weld lintels from a pipe with a cross-section of 40x20 mm.
Welding work
All pipes should be coated with primer. Treat welding areas especially carefully.
So that you can safely stand at full height in the gazebo, the racks are made with a height of 2200 mm. In order for the racks to have the necessary rigidity and stand securely, mounting brackets from a metal strip should be welded, as shown in the illustration.
Mounting jibs
Having positioned the stand level, clamp the jibs with clamps and weld them in place. You also scald the pipe at the base.
Railings and top railing
In our gazebo, the height of the railing will be 900 mm. You can make a structure without railings - this is not important, for example, completely sewn up with polycarbonate. For the middle piping (for the railing) and the top, a pipe with a cross-section of 40×20 mm is used. To ensure sufficient rigidity between the bottom trim and the railing, you can weld 950 mm vertical posts from the same pipe.
We make the roof
In our case, the roof of the gazebo will be covered with bitumen shingles. For this purpose, the rafter structure is made of wood. For the frame, timber 75×40 mm is used. For sheathing under the tiles, you can use clapboard. For a more presentable appearance from below, the lining can be replaced with moisture-resistant plywood.
Drive a piece of wood at least 100 mm deep into the open end of the profile pipe on the stand. A length of up to 70 mm should remain sticking out from the top. We will attach the rafters to these plugs. Therefore, the plugs can be cut at the root and at the required angle.
Another option for fastening the rafters is to weld a metal angle to the support posts at a given roof angle. A hole is drilled at the corner through which the beam of the rafter system will be secured.
Rafters are cut in quantities of 4 pieces. 2.5 m each. All rafters are connected at one point at the top. They can be knocked down with nails or screws. At the same time, follow the angle; for this, the ends of the beam are cut at an angle. For better reliability, the rafters can be connected to each other with a stainless steel angle.
Final works
Before installing the rafters, treat them with an antiseptic against rotting. They can also be treated with stain and varnished or painted in any color. This will greatly simplify the work, since you will not need to do all this at height.
Attach a cross beam in the center of the top trim. From it, install the stand perpendicularly towards the top trim of the rafters. This will significantly strengthen the roof structure. After installing and fixing the rafters, you can make the sheathing, and lay plywood or lining on top. The final touch in arranging the roof will be the laying of bitumen shingles. Its installation is carried out from the bottom up, and is nailed with small nails.
Final finishing
At the last stage, the flooring is made from 70x40 mm boards. Small gaps are needed between the boards to allow the wood to swell as humidity changes. Taking this into account, it is not recommended to use floorboards for decking a gazebo. As for the sides of the gazebo, you can use a variety of options for finishing it. For example, weld forging elements, cover the railings with polycarbonate, etc.
So, we learned about how to make a gazebo from metal using a profile pipe. If you have your own experience in performing such work, then leave comments at the end of this article. The provided drawings may also help you. Based on them, you can design your own gazebo made of metal.
Construction of a gazebo
When you have chosen the place where the garden gazebo will stand, the production material and decided what functionality the building will have, proceed to the active part of construction.
Project calculation and territory preparation
If you decide to do everything yourself, the first thing you should do is draw up a detailed drawing of the entire structure. All stages, all details, and even the smallest ones must be described. A schematic representation of the gazebo must be made in different planes and sections. If the assembly is planned to be connected by communications to housing, make a separate drawing of all connection elements. Make a detailed plan if you are doing ventilation. Based on the finished drawings, draw up an approximate estimate, including in the expenses column the payment of labor for hired workers, if they are needed.
Interesting!
A gazebo can be made as an extension to the house. It is allocated as a separate dining area in the summer.
Once you have chosen the location and type of building, begin preparing the area. It needs to be cleared, leveled and fenced. The need to compact the soil on which the assembly will stand depends on the material of the building. Remove the first 20 centimeters of soil and compact this area with tiles or fill with concrete. The support pillars should go deep into the ground, as this will maximally fix and immobilize the structure, especially in winter, when the soil can become mobile. Another method is a strip foundation. If you are making a wooden floor, weld the reinforcement lintels.
It will take up to four days for the concrete to harden. Afterwards, you can begin the construction of the external building. If you don’t have a welding machine at hand, or you have absolutely no welding skills, then you can make the fastening using a standard corner. If the metal is light (for example, aluminum), you can do the deconstruction yourself. Remember that the transverse laying of the material must be done with a certain protrusion beyond the edges, while the strapping does not require this. After tying, you can begin sheathing the walls. When the gazebo is ready, cover it with a protective paint material.
Gazebo design
Making a gazebo beautiful, even without resorting to exclusive design, is quite simple. Exterior decor will make any building unique. If the gazebo is not sheathed with sheets, imitation walls can be made using plants and hedges. This will not protect from strong winds, but it will provide shade and the coolness necessary on a hot day. The design of a gazebo should begin not with the building itself, but with the surrounding area. A well-groomed lawn, gravel paths, and several beautiful trees nearby will distract attention from the ascetic appearance of the gazebo.