The construction of any building, from a private house to a high-rise building, requires careful attention to all elements. One of the biggest risks when developing your own land is groundwater, which can negatively affect the integrity and condition of the structure. Also, melt water and precipitation carry a similar risk every year.
To avoid troubles, it is necessary to ensure high-quality drainage of liquids from the soil around the house. Drainage systems are used for this, however, in order for them to perform their function efficiently, it is necessary to strictly observe the required slope of the drainage pipe (it is not difficult to figure out what this indicator should be).
The need for a drainage system
If you know that groundwater in a site is located too close to the surface, then you need to take care of installing a drainage system. It allows excess moisture to be removed beyond the perimeter of the site, while the health of your loved ones is preserved, and the plants in the garden, as well as the foundation of the house, do not suffer. In order to carry out a drainage system, it is necessary to become more familiar with the technology of the work and ensure the slope of the pipe in accordance with sanitary standards and rules.
Why is drainage needed?
Anyone who has built a house on a waterlogged site experiences problems with landscaping their territory. The presence of excess moisture in the soil can destroy plants and cause uneven shrinkage of the house. In this case, it is necessary to do drainage. This will not only drain the area, but also drain water from the foundation of the house. If you are not sure about the feasibility of creating such a design, you should take into account some nuances.
Laying the drainage system
A drainage system is necessary if:
- the structure will have a basement;
- the construction site is swampy;
- the territory has heavy soils;
- puddles do not dry well after rain;
- a design change in the terrain is planned;
- there are many moisture-loving plants on the site;
- Water periodically appears in the cellars and basements of neighbors.
Although even the absence of all these indicators cannot guarantee that there will be no problems with waterlogging.
Pipe slope
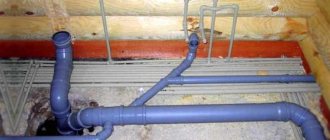
Previously, plastic products for drainage systems were not produced. They were replaced with ceramic, asbestos-cement or steel pipes. For a complete drainage system, holes had to be made by hand. Such work could not be called easy, in addition, the holes became clogged with soil over time, which negated all efforts to construct the system.
Today, a wide variety of pipes are available for sale. It is best to purchase corrugated ones made of plastic. They already have ready-made holes. To prevent them from becoming clogged with soil and silting, it is necessary to use low-density geotextiles, which are quite cheap.
However, it is important not only to select the right materials, but also to ensure the slope of the drainage pipe. It should be directed to a water collection point, such as a well. The technology for laying the system involves installing several drainage layers; they are located at the bottom of the trench and consist of sand and crushed stone. However, first, the bottom and walls must be covered with geotextiles, only then the backfill is made of sand, and only then - from crushed stone.
Which pipes to choose?
It is easier, of course, to make the drainage open, but such a structure will not add an aesthetic appearance to the site. Therefore, most people prefer to build a drainage system that will last for decades and will not be noticeable on the territory. Quality work is done for the long term. When choosing materials for drainage, this must be taken into account.
They have a lot of advantages that will definitely make work and operation easier:
- Availability. This is one of the main points. Since the price of corrugated pipes is much lower than for similar products made from other raw materials.
- Strength. Such works can be laid at a shallow depth. They perfectly withstand soil pressure, subsidence and movement.
- Durability. Such products perform their functions perfectly for at least fifty years.
- Treatment. To cut a plastic pipe, you do not need to use special tools. They are easy to transport and convenient to connect.
Correct drainage slope
What values must be adhered to?
The slope should be maintained within 3° along one branch of the drainage system. Sometimes the installation diagram looks like a herringbone. In this case, branches of perforated pipes should be connected to the main drainage pipe, similar to the branches that extend from the tree trunk.
The inspection wells are located 50 m from each other. They should be at bends in the drainage system or changes in pipe slope. It is important to remember that if the slope has not been provided, then the water will not be able to flow by gravity into the storm drain or drainage well.
If you are constructing a closed system, then the trench is located in the ground with a recess ranging from 70 to 150 cm. The width of the hole can be 25-40 cm. The slope should be directed towards a natural or artificial water intake. It is provided taking into account sanitary standards and regulations.
For each linear meter, the slope should be 3 cm if you have to work in clayey soil. When the area has sandy soils, the slope is 3 cm per linear meter. The slope is ensured by the gravel bed on which the drains are located. The latter are corrugated perforated pipes. They are wrapped in geotextiles, which will protect the system from soil and debris.
After laying the pipe, the slope must be checked again. To do this, you can use a regular cord that is stretched along the pipeline system. When carrying out work, SNiP must be observed. According to them, the slope of the drainage pipe per 1 meter is 3 cm.
Making deep drainage with your own hands
To know how to make drainage on a site, you need to know its construction technology. The drainage system for removing water from the ground surface is usually made of main or main trenches, which are often located along the perimeter of the site. They have a slope towards the sewer. There are also auxiliary trenches that run throughout the entire site from the places where the largest amount of water is formed to the main ones. Accordingly, the auxiliary trenches have a slope towards the main ones. Typically it ranges from 1 to 3 cm per meter.
Before you begin constructing the drainage, be sure to draw a plan of the site and drainage system. Mark trenches and monitor slope while excavating using tools. This will help avoid unpleasant surprises after all work is completed. Remember that the walls of surface drainage are located at an angle of about 30 degrees to the bottom. It is advisable to strengthen them. This can be filling with crushed stone or gravel, as well as finishing with large stones, concreting and planting various plants.
After digging trenches, be sure to check how the water will flow through the drainage system. To do this, run a sufficient amount of water over it and watch how it passes through it. If it stagnates in some area, it is better to eliminate this problem before the work is completed.
It is also worth noting that an open drainage system can become the center of the landscape composition of the site if it is decorated with beautiful combinations of stones of different shapes, sizes and colors.
A network of drainage trenches to remove water deep in the ground is dug according to a plan drawn up in advance and marked on the surface with the required slopes. The width of the trench at the bottom is usually at least 40 cm, and the depth is determined by the project. But usually it ranges from 0.8 to 1.5-2 meters. The slope varies from 2 to 5 cm per 1 linear meter of trench.
Read more: Best plastic windows manufacturer ratings 2019
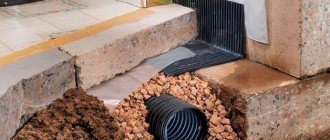
A small layer of clean river sand (coarse-grained) about 10 cm high is poured onto the flat and compacted bottom of the trench, which is also carefully leveled and compacted.
Then the bottom and walls of the trench are covered with non-woven geotextile fabric, the density of which is about 200 grams per square meter. Moreover, the fabric is positioned so that it should completely cover the walls and still extend to its edges by 15-25 cm. A layer of washed crushed stone with a height of 15 to 25 cm is poured onto the fabric, which directly depends on the composition and water permeability of the soil. On lands with a large amount of sand, the layer height is about 15 cm, and where there is a lot of clay in the composition, the crushed stone layer is increased to 25 cm.
Crushed stone must also be compacted and leveled taking into account the required slope. You need to check the slope after each poured layer, its leveling and compaction. A perforated drainage pipe is laid out on it, which is then covered in layers with crushed stone or gravel. Moreover, each layer must be carefully compacted. The layer of crushed stone on top of the pipe is from 10 to 25 cm.
On top of the drainage pipe and the fill around it, the edges of the non-woven geotextile fabric are wrapped over each other with an overlap. Then a layer of sand 10 to 30 cm high is poured, after which the trench is filled with ordinary soil, which was removed during digging. Remember that river sand, crushed stone and gravel used in the construction of a deep drainage system must be free of soil, clay or other small particles. Drainage made in this way will drain water well and will last for many years.
Retaining wall in landscape design When we buy a building plot, the question arises: to choose a flat or sloping site. Frequently offered...
If you have received a building plot, studies of which have shown that groundwater lies very high to the ground surface, this does not mean that construction is canceled or hampered. You will simply have to increase the construction estimate for the installation of drainage and stormwater systems that will drain melt, rain and groundwater from the foundation of the house, ensuring the dryness of the structure and the duration of its operation.
It is more difficult to do site drainage on clay soils with your own hands, since clay does not absorb and allow water to pass through, but that is what the drainage system is for. On the other hand, clay soil keeps groundwater from penetrating into the upper layers of the soil from below, and you only have to protect the structure from moisture entering the soil from above - from rain and snow.
Drainage system on clay soil
Purpose of drainage
It is recommended to arrange drainage for a site on clay soils immediately after acquiring land for construction or development, and the first step to ensuring the safety of your home is geological and geodetic surveys, on the basis of which the project is drawn up. But if you have at least the slightest experience in construction, such research can be carried out independently, relying on information from neighbors and on your own observations.
Water passing close to the ground surface is dangerous in spring and autumn, as it is fed by precipitation, which quickly replenishes underground rivers. The weaker the soil, the faster the groundwater will be replenished by rain and meltwater. Therefore, the need for site drainage depends on the depth of groundwater, and when the water level is 0.5 m below the base of the foundation, it is necessary to drain water. The depth of the drainage pipes is 0.25-0.3 meters below the groundwater level.
Surface water (overwater) manifests itself if the site contains clay and loamy soil layers that practically do not allow water to pass through. In clay areas, immediately after rain, large puddles appear that do not sink into the soil for a long time, and this is the first sign of a large layer of clay in the soil. The remedy in this case is drainage and a storm system, which will immediately drain rain or melt water from the surface of the site.
Drainage and stormwater drainage system
In order to completely protect the house from surface water, in addition to drainage and storm drainage, layer-by-layer backfilling of the base with clay soil is done, with each layer being compacted separately. A blind area wider than the backfill layer is also required.
What and how to drain a site on clay soil? These are, first of all, the following events:
- Construction of a waterproofed blind area;
- Arrangement of storm drainage;
- Digging upland ditches is a depression in the ground on the upland side of the site for the purpose of draining rain and melt water;
- Protecting the foundation from moisture with waterproofing materials.
Storm drain
Drainage can be done general or local. The local drainage system is intended only for draining the basement and foundation; general drainage drains the entire area or its main part, which is at risk of waterlogging.
Existing site drainage schemes:
- The ring circuit is a closed loop of pipes around a residential building or site. The pipes are laid 0.25-0.35 m below the groundwater level. The scheme is quite complex and expensive, so it is used in exceptional cases;
- Wall drainage is used to drain the foundation walls, and is installed 1.5-2.5 m from the building. The depth of the pipes is 10 cm below the basement waterproofing level;
- Systematic drainage includes an extensive network of canals to drain water;
- A radial drainage scheme is a whole system of drainage pipes and drainage channels combined into one structure. It is mainly developed to protect the site from floods and flooding;
- Formative drainage protects against high water, and is installed together with wall drainage to protect the slab base. This scheme consists of several layers of non-metallic materials plus a layer of waterproofing, on which a reinforced slab foundation is built.
Read more: Which pipe is better to use for a chimney - video instructions and photos
Ring drainage
SNiP
When designing, it is necessary to give preference to drainage of water by gravity. Forced pumping requires additional justification. The use of vertical drainage and its water intake part is envisaged in soil with high water permeability. Trenches and open drainage channels are installed in cases where it is necessary to drain a large area. They can also be used to protect ground communications from flooding.
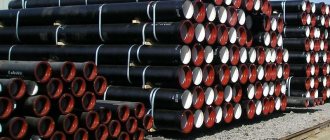
If you study SNiP, the slope of a drainage pipe per 1 meter should be approximately 3 cm. But as a pipe material, you can use not only the above options, but also reinforced concrete products, as well as pipes with a filter made of porous polymer concrete and ordinary concrete. In non-aggressive soils, reinforced concrete, concrete, and asbestos-cement pipes are used.
Having studied SNiP 2.06.15-85, you can understand that the depth of drainage from pipe filters is determined by the load. The size and number of water intake holes on the surface of reinforced concrete, concrete and asbestos-cement products should be determined taking into account the water throughput and drainage flow.
Drainage on a slope
An impeccably designed and well-calculated drainage will collect and drain groundwater from the site. It will protect the foundation from premature destruction and ensure normal growth of cultivated plants. In order to ensure spontaneous drainage of the water collected by the system, it is necessary to ensure the slope of the drainage pipe. And its device requires accurate information, right?
You will learn everything about the angle at which drainage pipes are laid and how to properly organize a drainage system from our article. By following the technical recommendations we provide, you will be able to design and accurately calculate your drainage network. The basis for the given data is building regulations.
To help independent craftsmen, the technology of constructing a water drainage system is described in detail, and the specifics of the calculation and installation of its components are thoroughly analyzed. Photos and videos are attached for visual perception of the information.
There are three types of drainage systems, each of which has its own design features:
- horizontal;
- vertical;
- combined.
The working elements of horizontal drainage can be:
- tubular drains;
- gallery drains;
- trays and trenches.
A system of drainage pipes in combination with a filter coating (multilayer) is a tubular drain.
Multi-layer filter coating, in this case, is done to prevent washed-out soils from entering the system. According to standards, the drainage circuit is always equipped with inspection wells.
To organize the drainage system of a construction site (site), different schemes can be used. The specific choice depends on the geological conditions of the area, the intensity of precipitation and other factors
Unlike tubular drains, gallery drains are made from pipes of a larger cross-section. There are holes on the walls of the pipes for collecting waste. The process of installing gallery drains also involves filling with additional filtration with geotextiles.
Tubular drain in section. It is on this principle that tubular and gallery drains are installed in modern house-building projects. Compliance with standards and accuracy of calculations guarantee high efficiency of drainage systems
A drainage system with trays and trenches is usually made in conditions where the groundwater level is allowed to reach 1.3-1.5 m. On stable soils, trenches are made with slopes; on unstable soils, the trenches are reinforced with reinforced concrete structures.
A vertical drainage system consists of a set of wells (wells) connected by a collector. Sewage is removed through the collector line using a pumping station. Also, drainage of wastewater on vertical drainage can be carried out by discharging into the lower layers of the soil.
The combined drainage system combines horizontal and vertical schemes. It is characterized by specialists as a complex drainage scheme and is usually installed in areas where highly efficient soil drainage is required.
Based on the calculated parameters of drainage depth, surface and deep drainage schemes are distinguished. The purpose of the surface scheme is to collect and drain atmospheric precipitation products, as well as nearby groundwater. The purpose of the deep scheme is to lower the groundwater level, collect it and drain it beyond the boundaries of the site where the construction site is located.
An example of a surface drainage system. Surface drainage is widespread in private housing construction. A system for collecting and discharging atmospheric precipitation products is necessary for every case of construction of residential buildings
The drainage water intake circuit supports point or linear design. In the first case, wastewater is removed from local sources (drains, sidewalk pits, entrance collections). The linear scheme ensures water drainage throughout the entire facility. As a rule, a combined solution with the implementation of both schemes is used on residential construction sites.
Deep drainage is required in almost all cases of private housing construction and landscaping of commercial plots. This is an effective protection of those elements of building structures that are located below the zero level (foundation, basements, plant root systems).
It is permissible to exclude the construction of deep drainage at elevations where the groundwater level does not exceed 1.5 m, where effective soil drainage is observed.
Fragment of the scheme for laying deep drains. Typically, such schemes provide for the placement of drainage wells - at least one for every 30 meters of the main line. On straight sections, installation intervals of 50 meters are allowed
Designing a deep drainage scheme requires high precision calculations. Even a minor error in calculations can cause low system efficiency. The practice of installing such schemes often indicates a common mistake - inaccurate calculation of the depth of drains. The result is uneven drainage of water from the territory of the facility or, even worse, flooding of fertile lands and basements.
The calculated values that will be required for the construction of a drainage system are usually:
- pipeline diameter size;
- pipeline laying level;
- pipe slope values;
- density of the geotextile filter.
And more details about each point.
From areas located on slopes, it is also necessary to drain excess water from the surface and from inside the soil. After all, large amounts of precipitation and water formed as a result of melting snow cause land erosion, contribute to landslides, and also erode the foundations of various buildings, paths, retaining walls and steps. For such areas it is necessary to combine open and deep types of drainage.
Read more: Glue for PVC pipes. Glue installation of PVC pipes. Recommendations for choosing adhesive
Actually, the installation of a deep drainage system in areas on a slope is not much different from that carried out in horizontal areas. But still, there are some points that should definitely be taken into account when performing these rather complex works. With this location of the site, it immediately becomes clear that the well for collecting water or sewerage should be located at the lowest point. The main or main trenches are dug, if possible, next to the fence.
Auxiliary trenches are directed to the main one at a certain angle. It turns out something like a Christmas tree. If the slope of the terrain is not enough for good drainage of water, then trenches are dug, gradually deepening so that the overall slope is from 2 to 4 cm per 1 linear meter of drainage.
If the area on the slope occupies a fairly large area, then it is worth dividing it with a transverse drainage trench, which will collect water from the area located above. The water from it will flow through buried drainage pipes into the lower water intake or sewer system.
It is worth remembering that the construction of a drainage system on a site located on a slope requires preparation, attention, careful execution and, of course, financial costs.
Don't be upset if you get an uneven piece of land. Thoughtful landscape design on a site with a slope and proper drainage will help turn the disadvantages of your garden into advantages.
What you need to know about drain diameter
The minimum slope of the drainage pipe can be 0.5 cm per linear meter. The maximum value is mentioned above. As for the diameter, the most common and recommended type of pipe is a corrugated single-layer product of 100 or 110 mm. Such a pipe is enough to drain water from a medium-sized house.
When ensuring a drainage pipe slope of 110 mm, you must take into account the depth of soil freezing, the level of groundwater and the topography of the site. Quite often, drains are located around the perimeter of the house. The less water permeability of the soil, the greater the slope should be. This applies to clay soils.
What types of drainage are there?
To understand how to properly make drainage in your garden plot, you need to get acquainted with their types. Based on the method of installation, drainages are divided into several types. The first is the open type of drainage. It is a system of trenches with a depth of 20 to 30 cm, the walls of which should be located at a slope of 30 degrees relative to the bottom.
It is used to remove excess water from the surface of the soil in areas during heavy rainfall and spring melting of snow. All trenches are dug at a certain slope, so that water flows towards the general sewer or some kind of drainage basin. To prevent the walls of open drainage from crumbling or collapsing, they are strengthened with stones, concrete or plants with a strong and branched root system.
Open drainage type
The second can be called closed or deep drainage, which can be horizontal or vertical. This species helps to drain water inside the soil in areas with high groundwater levels. Deep horizontal drainage is a network of special pipes with holes connected to a reservoir, sewer, ravine or well. They are located at a depth of 0.8 to 1.5 meters and covered with crushed stone and sand.
Vertical drainage refers to drainage wells where water accumulates from a trench system and which are connected to a sewer system or a reservoir or ravine. If there is no way to connect such wells to the sewer system, then the water is simply pumped out using a submersible pump and transported in tanks.
It is also worth mentioning the backfill type of drainage, which is most often used on heavy and clayey soils. It is a fairly deep trench, half filled with large crushed stone, on which a fine fraction of crushed stone is poured, and on top of a layer of ordinary garden soil (from 15 to 35 cm).
Closed or deep drainage
Backfill type of drainage
For reference
Individual sections of the flexible pipe should not sag, otherwise water will stagnate in these areas. You now know what slope the drainage pipe should have. However, it is also important to know about the features of the technology. For example, at bends the pipe is usually laid in an even semicircle. Bends close to right angles should be avoided, as they may obstruct the flow of water.
Calculations and standards for drainage construction
The calculated values that will be required for the construction of a drainage system are usually:
- pipeline diameter size;
- pipeline laying level;
- pipe slope values;
- density of the geotextile filter.
And more details about each point.
Value #1 – design diameter of pipelines
The required diameter of pipelines is calculated with an emphasis on the design parameters of drainage intensity.
For private housing construction, pipes with a diameter of 100 mm are usually optimal. Their standard capacity is about 7 l/s, which is fully consistent with design standards in most cases.
Meanwhile, increasing the diameter of the drain allows you to cover a larger working area and increase the efficiency of the system.
Value #2 – system laying depth
The laying level of drainage pipelines, according to existing standards, is determined taking into account two criteria:
- Soil freezing level.
- Foundation depth.
The degree of soil freezing is directly related to the climatic properties of the area. Therefore, for each individual territory this parameter may differ.
But in any case, the calculation of the depth of laying drainage pipes is carried out from the end point of soil freezing with the addition of at least 300-500 mm of additional depth to this value.
The same algorithm is used to calculate foundation drainage, but from the end point of the foundation.
Value #3 – slope of drainage pipes
SNiP standards clearly indicate at what slope the drainage system pipes should be installed. According to these standards, the minimum values of the drain slope must be taken taking into account the permissible minimum flow rate of wastewater.
At the same time, it is additionally stipulated that for pipes with a diameter of 150 mm, the minimum permissible slope must be at least 8 mm per meter of length, and for pipes with a diameter of 200 mm - at least 7 mm per meter of length. In certain sections of networks, it is allowed to reduce these parameters to 7 mm and 5 mm, respectively.
The permissible maximum slope of drainage pipes per meter of length is 150 mm. A slope greater than this value is permissible only on branches from plumbing fixtures with a branch length of up to 1.5 m.
Pipe installation: preparatory work
Before you begin laying the pipe, you need to draw up a site plan and create a project. The latter will determine the location, depth and length of the trench, and will also allow you to understand in what places inspection and drainage wells should be located. It is important to consider at this stage what technology will be used to drain the water; it could be a water collection tank or a storm drain.
If you know the slope of the drainage pipe, then in the project you must indicate the level of groundwater, as well as the type of soil on the site and the soil freezing line. Before laying drainage pipes, it is necessary to prepare a trench. It should be 50 cm wider than the diameter of the pipe. If the freezing line is small enough, then the worker can fit in such a trench. With an impressive freezing depth, it will be more convenient to dig a hole when the space allows you to turn around there with a shovel. The main thing is to maintain a slope from the house to the drainage wells or water collection point.
How to calculate the correct angle of inclination
To install a drainage system on a site and at the same time calculate the optimal angle of inclination, you need to take into account the following parameters:
- Drain section It directly depends on the type of soil being drained. The more loose it is, the larger the diameter of the contour should be.
- Type of drains used: with or without geotextile. The first option is optimal for loose soils with plenty of sand. For coarse soils, it is allowed not to use geotextiles.
- Contour depth.
- Relief of the site: differences in its heights.
- Groundwater level in the area - it is advisable to conduct preliminary hydrogeological surveys.
- Soil type - information is taken from the table “Classification of soil types.
Work methodology
The slope of the drainage pipe must be ensured during the excavation stage. Next, you need to prepare a cushion of sand and crushed stone, placing it at the bottom of the trench. However, first, the bottom and walls need to be covered with geofabric, then a backfill of sand is made, the next layer will be crushed stone. A perforated pipe is laid on it, which is backfilled in the reverse order - crushed stone, sand, geotextile and selected soil. Inspection wells will be needed to clear blockages and to monitor the water level in the system. If the drainage of water when installing a drainage system is provided into an open reservoir or storm sewer, then check valves must be provided at the ends of the pipes.
Where to drain water from the drainage system ↑
One of the important, and sometimes difficult, problems when installing drainage systems is where to discharge water from the drainage system. The presence of a central storm drain along the street that you can connect to is very rare and is not always available even to residents of prestigious villages. It’s good if the terrain features allow you to dump water into a nearby ditch, or onto a slope, into a reservoir. If drainage outside the site is not possible, the groundwater level is low, and the soil is permeable, you can build an absorption well. If the area is wet and located in a lowland, and groundwater is close to the surface, there is simply nowhere to drain the water. You can try to dig a pond by raising the ground level with the excavated soil. But it is not a fact that this will pay off and you should think ten times before starting construction on a problem area that cannot be drained.
An underground collector is one of the options for removing water from the drainage system
We have only spoken in general terms about drainage. If you decide to do drainage on your own site, we recommend starting with a project. You can try to do it yourself by studying the topic more deeply. But it is more reliable, especially with a complex system, to turn to specialists.
Start drainage installation with the project
How to avoid mistakes
Even if the drainage pipe has been sloped correctly, the system may not function properly. Sometimes this is caused by a violation of technology or the sequence of work. If you first poured crushed stone and then sand, the result may be clogging of the holes in the pipe. If the backfill was not done at all, then this can also lead to problems.
If you do not provide a slope, then water cannot flow by gravity into a storm drain or well. Even if the work was carried out correctly and the drainage system works flawlessly, it must be remembered that such a device requires periodic maintenance and inspection. These manipulations consist of measuring the water level in the wells and cleaning the system of accumulated dirt and debris. Once the drainage pipes are installed, the system must be inspected four times a year.
Scheme and order of the system
The organization of drainage in an area with a slope level of more than 8% begins with geological surveys. Based on the survey results, aquifers and groundwater levels are determined. Based on the information received, a drainage project for the site on the slope is being developed, and construction work is being carried out.
Ultimately, the problem of eliminating the possibility of soil erosion by chaotic natural drainage due to the steepness of the slope must be solved.
In a simple version, this is done approximately like this:
- The first horizontal surface drain is created at the top elevation of the site.
- A second horizontal surface drain is created at the lower elevation of the site.
- Both drains are connected by perpendicular trenches.
- From the horizontal drain of the lower level, a branch is made into a drainage well.
If the landscape of the site has a stepped, complex shape and the project of the facility provides for the construction of retaining walls, stairs, transition platforms, for each of the project elements it is necessary to construct point drainage systems that turn into a system of linear drainage systems.
Large areas located on slopes, as a rule, are equipped not with single surface drains, but with full-fledged herringbone-type water collection and drainage systems.
A branched drain is installed on the upper horizon and is combined with a collector drainage circuit surrounding the construction site. From the circuit, wastewater is transported to a collection site outside the site or to a storm drain.
This design solution is called ring drainage. Thanks to the construction of a protective contour located around the perimeter of the facility, it is possible to bring the groundwater level under control. In turn, the “herringbone” ensures the collection of water from the surface of the site and its effective drainage.
Installation of ring drains is carried out at some distance from the construction site. This factor makes it possible to construct a ring drainage system directly at the stage of operation of utility structures.
It should be noted that the effectiveness of lowering the groundwater level within the internal part of the contour directly depends on the following parameters:
- pipe depth level;
- depth level of galleries;
- well depth level (if any).
The effectiveness of protection is also influenced by the dimensions of the circuit.
Expert recommendations
When performing excavation work, it must be remembered that the ditch must expand from above. To prevent the system from freezing at low temperatures, it is necessary to lay pipes below the soil freezing line. For proper operation of the system, it is not enough to ensure the correct slope of the drainage pipe. It will also be necessary to make a blind area from the foundation to the drainage at a slight slope. This will allow rainwater to flow into the catchment area.
Afterwards, 15 cm of sand is poured into the ditch, crushed stone is laid on top, its layer will be approximately 20 cm. Pipes are laid on the base, which can be wrapped in construction interlining. It has good water permeability. When the slope of the pipe between the septic tank and the drainage well has been arranged, you need to think about what material to use as a filter. It could also be coconut fiber. For loam and sandy loam, non-woven or needle-punched textiles are usually used to serve as a filter. On sandy soils, fiberglass is an excellent option.
You should not be afraid to increase the cost of work by laying biomaterial between layers of crushed stone and sand. This will eliminate siltation and make system maintenance less of a necessity. In addition, this approach helps to extend operating time.
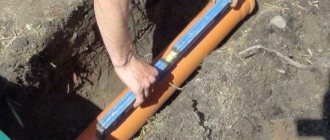
Installation of drainage pipes is necessarily accompanied by trimming of products. To do this, use a mounting knife. The parts are connected to each other with special couplings. To increase strength, you can use a welding machine.
Do-it-yourself site drainage on clay soils - step-by-step instructions for installing various systems
Surface drainage can be organized with your own hands using a diagram and selecting materials. A simple system consisting of trays, a well and other elements will ensure timely removal of moisture. Surface drainage is supplemented with deep or backfill drainage, which enhances the efficiency of drainage.
Deep drainage does not spoil the landscape design of the site
Deep drainage: step-by-step instructions
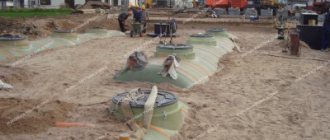
To create deep drainage you will need pipes. For the main line, elements with a diameter of 110 mm are used, and for additional ditches, pipes with a diameter of 60 mm are optimal. The well is constructed from concrete rings or a special polymer container is inserted into the recess. Crushed stone of fraction 20–40, coarse sand, and geotextiles are also necessary to create a drainage complex.
The work package includes the following actions:
For a well, you should dig a hole, the depth of which is 2–3 m. Concrete rings are installed from the very bottom. The finished container is mounted in the same way. Sand is poured at the bottom in a layer of 20 cm, and then crushed stone at a depth of 30 cm. There must be holes in the rings or walls of the finished container for incoming pipes. The height of their location is equal to the depth of the pipes in the ditches, that is, about 100 cm from the top edge.
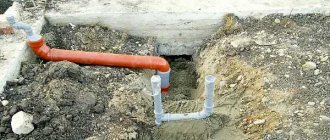
Next you need to dig trenches according to the diagram. Their width is 50 cm, and their depth is 120 cm in the main highway and 100 cm in the side ones. The main channels reach the well, with a slope of 5 cm per 1 linear meter of pipe length. You need to pour sand in a layer of about 20 cm at the bottom of the ditches, and then lay geotextiles. The edges of the canvas should be higher than the edges of the pit. Next, crushed stone is poured in a layer of 20 cm, perforated pipes are laid, observing the slope.
The pipes are connected to each other using coupling or socket joints. In the area of turns and on straight sections, inspection wells must be installed every 25 cm. The height of such elements should ensure their elevation above the soil level. Inspection wells are necessary to monitor the condition and clean the system.
Crushed stone must be poured onto the pipes so that the filter material completely covers them. Next, the geotextile is wrapped. The remaining space in the trench is filled with sand, and a layer of turf or decorative gravel is laid on top.
Methods for laying drains
There are two types of drainage systems - surface and deep. In the first option, drains are laid in small (30-40 cm) ditches. The second installation method is more expensive, since you have to dig deep trenches.
It all depends on the condition of the soil and the level of the foundation of the main building on the site. You need to find out to what depth the ground freezes in a given region. Every local construction organization probably has this information.
The pipeline must not be laid above the freezing level of the soil. Otherwise, the drainage system will freeze and fail in the winter. It is necessary to insulate the drains or bury them deeper into non-freezing soil.
Surface type of drainage system.
Excess moisture harms not only plants, but also buildings, including solid ones. During periods of spring floods, groundwater rises, washing away and destroying the foundations of even permanent buildings. To avoid such troubles, the drainage system should be laid half a meter deeper than the foundation.
Storm gutters.
Requirements for the arrangement of foundation drainage
When carrying out drainage work, certain rules should be followed. Among which stands out the need to perform work in the summer. You should also correctly rely on your own strength, since this process is quite labor-intensive and requires a lot of time, from 2 to 3 months. To ensure that precipitation does not have a negative impact on the prepared trenches, a canopy made of boards or polyethylene should be erected along the perimeter of the building according to the foundation.
In case of weak soil, additional reinforcement should be erected for the walls of the trenches. It is recommended to study the composition of the soil, the level at which groundwater flows and places where moisture often accumulates.
The areas of the foundation most susceptible to moisture accumulation should receive the closest attention.
And finally, before starting work, you need to calculate the required amount of consumables and plan a system for placing wells and pipes.
To prevent possible damage to the prepared trenches during the work, as well as to ensure the required level of safety, experts recommend laying a system of blind areas and paths.