TO
category:
Copper-tinsmith works
Wire folding and rolling
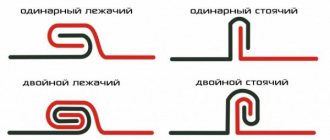
Types of folded seams
A fold is the bending of sheet material for the purpose of connecting it; the connection itself (lock) is a seam seam. Different types of folds and folded seams are shown in Figure 8. Folded seams come with a single and double lock.
Single lock seams are used when there is no need for tightness and high strength.
Double-lock seams provide high strength and tightness, i.e., impermeable to liquid and air.
Depending on their position, seams are divided into longitudinal and transverse. Longitudinal seams are made with a lying seam, and transverse seams are made with a standing seam to give rigidity to the product. When connecting several parts of a product with longitudinal seams using a transverse seam, they are positioned so that the longitudinal seams are at some distance from each other. This ensures a tight connection in the transverse seams.
Rice. 1. Seam seams: a - with a single lock: b - with a double lock; c - bottom seams
The bottoms are connected to the product bodies with bottom seam seams (Fig. 8, e). The rebate lock is made smooth along its entire length; After compacting the seam joint, the surface of the seam should be smooth, without bumps or thickenings.
Securing seam seams with rivets is not permitted.
Making folded seams
Rice. 2. Sequence of manufacturing a single lying seam: a - g - technological operations
Seam seams are made using impact and support tools.
The execution of a single lying seam (Fig. 2) is carried out in the following order: 1. Using a thicknesser outline, mark the bend line at a distance equal to 10 metal thicknesses. On the reverse side, a second bend line is laid at a distance equal to 22 times the thickness of the metal (Fig. 2, a), 2. The workpiece is placed on a beam or on the edge of an iron square with which the workbench is edged so that the first marking line runs exactly along the edge of the support . 3. Supporting the workpiece with your left hand, bend the edge with light blows of a wooden hammer, first at the ends of the workpiece, and then along its entire length by 90° (Fig. 2, b). 4. Turn the workpiece over with the edge up and bend it another 45-60° (Fig. 2, c). 5. The workpiece is placed on the edge of the support with the second marking line (Fig. 2, d). 6. Using a wooden hammer, bend the workpiece material 45° along its entire length (Fig. 2, e), after which the edge is bent to the material so that there remains a gap 0.5-1.0 mm larger than the thickness of the material. 7. Prepare the edge on the second workpiece in the same way. 8. Connect both edges into a lock and seal the seam with blows of a wooden hammer (Fig. 2, f, g). First - the beginning and end of the seam, and then from the middle towards the edges.
When making a seam joint on cylindrical workpieces, it is necessary that the first bend of the material at both ends of the sheet is carried out in different directions, otherwise the lock will not connect.
When manufacturing a cylindrical product of small diameter, the second bend (operations 5-6) is not done. In this case, operations 1-4 are carried out, then the straight folds are joined into a lock and the seam is sealed using a folding machine. If there is no folding meissel, then crimping is carried out using a strip of the same material, folded in three. The strip is placed along the border of the seam and the seam is pressed together with sharp blows of a hammer on the seam and the strip simultaneously.
The production of a single standing seam is clearly shown in Figure 3 and does not require additional description.
Rice. 3. Sequence of manufacturing a single standing seam seam: a - e - technological operations
The procedure for obtaining a double recumbent seam (Fig. 4) is as follows: 1. Mark the workpiece and bend the edge at 90° (Fig. 4, a). 2. Turn the workpiece over and bend the edge to the material so that there remains a gap, the value of which is 0.5-1.0 mm greater than the thickness of the material. 3. Having turned the workpiece, align the second marking line with the edge of the support tool and bend the edge again by 90°, starting from the ends of the workpiece (Fig. 4, c, d), then turn the sheet over again and bend the edge, leaving a gap of 0 in the fold. 5-1.0 mm is more than the thickness of the material (Fig. 4, e, f). 4. In the same way, a fold is obtained on the second sheet. 5. Insert one fold into another from the end of the sheets and compress them with blows of a wooden hammer on the plate (Fig. 4, g).
Rice. 4. Sequence of manufacturing a double recumbent seam: a - g - technological operations
If the fold is located on the outside of the product, and the inside of the seam should be smooth, the seam is treated with a folded seam or a strip of material folded in four.
The production of a double standing seam is shown in Figure 5.
Rice. 5. Sequence of manufacturing a double standing seam: a - g - technological operations
A standing seam seam on cylindrical products is obtained using a metal bar and a hammer with a square head, in the following sequence (Fig. 6): 1. Mark an inflection line at a distance equal to 10 metal thicknesses from the edge of the pipe being connected (Fig. 6, a). 2. Place the pipe at an angle of 45° to the beam and use the pointed toe of the hammer to bead it at 45° with gentle, uniform blows (Fig. 6, b). 3. The pipe, fixed at an angle of 90° to the supporting surface of the beam, is beaded at 90° (6, c), 4. On the second pipe, an inflection line is applied at a distance equal to 22 metal thicknesses from its edge and the pipe is beaded at 90° in 3-4 steps: at 30°, 60°, 90° (6, d). 5. Reverse flanging of the second pipe is carried out at a distance equal to 10 metal thicknesses from its edge (6, d). The flanging is performed on a semicircular mandrel or with the help of a semicircular support. When flanging on a mandrel, the pipe is pressed with a flanged flange against the end of the mandrel and the material is bent by hammer blows from the side and from above. If flanging is carried out with the help of support, then the blows are applied from below. 6. Insert the first pipe into the second and connect (close) the fold (6, f, g, h), starting by securing the flange in four places, and then crimp the entire seam onto the block.
Rice. 6. Sequence of manufacturing a standing seam on cylindrical products: o - h - technological operations
To obtain a lying circular seam, the pipe is placed on a semicircular mandrel and the seam is filled with blows of a mallet. If at the same time the seam begins to diverge, then compress it with the help of support, hitting it with the toe of a hammer.
Rolling wire
Rolling the wire is necessary to increase the rigidity of the edges of the product and is performed with the same tool as folding.
The wire is rolled manually and using a zigging machine. Depending on the shape of the product, seaming can be straight or circular.
Straight-line rolling by hand is carried out as follows: 1. Mark on the edge of the workpiece an allowance for rolling equal to 2.5 times the diameter of the wire (Fig. 7, a). 2. Bend 1/3 of the allowance by 90° (Fig. 7, b). 3. According to the markings, make a second bend for the entire amount of the allowance (Fig. 7, c). 4. The pre-straightened wire is inserted into the bend and secured in several places. 5. Using a mallet, bend the edge towards the material until it stops (Fig. 7, d, e). 6. On the block, use a metal hammer to finally bend the edge (Fig. 7, e). After this, tap the wire with a wooden mallet along its entire length.
Rice. 7. Rolling wire manually: a - e - technological operations
The process of rolling wire on a zig machine is shown in Figure 8.
Rice. 8. Rolling wire on a zig machine
Ring rolling of wire is performed manually on a metal semicircular mandrel. The edge is bent on the workpiece in the same way as with straight seaming. Then a wire ring is put on the workpiece and secured in several places with blows of a metal hammer and the entire edge is bent with a mallet until it stops. After performing this operation, the cylinder is installed vertically and the edge is finally bent with a hammer with a square striker or a pointer.
The use of lock joints increases the speed of assembly and is cost-effective because the required marks are cast directly with the part (which eliminates the need for fasteners. Lock joints can be designed in such a way that they can be used repeatedly. Assembly using lock joints is characterized by simplicity and versatility.
The principle of operation of the locking connection does not depend on its shape: a protruding element of one of the parts, for example, a hook, is deflected for a short time during the assembly process, after which it returns to its original position due to elastic relaxation. The deflection during assembly can be quite large, but when assembly is complete, the tension is released (unlike fixation using a press connection).
One of the serious disadvantages of using locking joints is the possibility of destruction of parts during assembly or disassembly of the product. Assemblies with such fastenings may fail due to fatigue stress. This is especially important for assemblies made from brittle and fiber-reinforced plastics. Repairing locks is very difficult or even impossible. Another disadvantage of locking joints is the need to strictly adhere to tolerances on parts. They control the geometry of the locks and the tension after assembly. Excessive interference or tension can cause the connection to fail, while too little interference can cause parts to misalign or become loose.
Types of lock connections
1) using hooks (Fig. 4);
2) using annular projections and depressions (used to assemble cylindrical products) (Fig. 5);
3) using a ball heel and a spherical recess (Fig. 6);
4) rotary lock connections.
In addition, locking connections are divided into detachable and permanent (Fig. 7). A connection design that allows reassembly and disassembly is called detachable. Detachable connections use installation and reverse angles, which makes it possible to insert one part into another and connect them. The permanent connection is self-locking because its reverse angle is 90 degrees. These angles are used as the sole means to control the forces when applying and removing the cap from a given geometry.
Rice. 4. Hooks used for assembling plastic products:
a – one-piece; b – detachable; c, d – with additional elements to facilitate disassembly of the product
Detachable connections use installation and reverse angles, which makes it possible to insert one part into another and connect them. The permanent connection is self-locking because its reverse angle is 90 degrees. These angles are used as the sole means to control the forces involved in applying and removing a cap of a given geometry.
Fig.7. Detachable and permanent lock connections
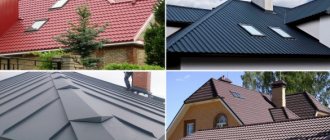
The choice of roofing material takes into account the individual characteristics of the building: the angle of the roof, the solidity of the foundation, and the general architectural style. When choosing a finish, sheet metal is often preferred. This material guarantees the durability of the roof, is light in weight and does not weigh down the structure; processing and installation of metal is not difficult, which speeds up the entire process of installing the roof. In this article we will look at how to cover a roof with iron.
What type of roofing iron should I choose?
Metal sheets intended for roofing work differ in appearance and coating.
- Black iron - sheets or rolled steel without coating, is resistant to mechanical stress, but does not tolerate moisture. This is a budget material, but for long-term operation it requires an anti-corrosion coating.
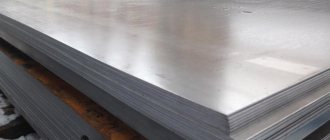
- Galvanized steel – has a smooth surface, is resistant to precipitation due to the protective layer of zinc, and is indispensable when installing a seam roof.
- Profiled metal is galvanized iron that has been profiled to create stiffeners. It has a trapezoidal, wavy or rectangular cross-section. After treatment with a polymer coating, the anti-corrosion and aesthetic properties of the material increase significantly.
Construction of a metal roof using the seam method
One of the main advantages of this type of roofing is that it can be assembled not only on a solid base, but also on a sparse sheathing. However, in this case, it is necessary to make the rafter system very carefully, accurately calculating the pitch of the rafter legs. Ideally, they should be positioned so that under each fold there is a rafter beam. Otherwise, a situation will arise that, under the influence of multidirectional loads from snow in winter, the sheets will separate as a result of deflections. This will lead to corrosion of the metal and moisture penetration into the attic floor and rafter system. Such an ill-conceived roof will not last long enough. Thus, the following rule can be formulated. If you decide to make a seam roof yourself, then pay due attention to calculating the distance between the rafter legs. It should not be larger than the width of the metal sheets, taking into account the seam lock. For continuous sheathing, this rule may not be followed.
Advantages of installing a seam roof made of rolled metal
Since ancient times, seam roofing has been constructed from solid sheet metal of a certain length. The length of the sheets was less than the length of the roof slope. For this reason, it was necessary to make not only longitudinal, but also transverse folds. This approach is becoming less and less popular today. After all, a large number of seams requires precise arrangement of the sheathing and a special approach to vapor barrier. The formation of condensation under metal does not lead to anything good.
A more advanced approach is the construction of a seam roof made of rolled metal. Sheets from the roll are cut to such length as to completely cover the slope along the entire length without the formation of transverse seams. At the same time, the longitudinal seams have very high strength and excellent quality. They almost never disperse even under a very large mass of snow.
Installation of seam roofing made of rolled metal
The advantages of a seam roof made of rolled material are that:
- In this case, not only galvanized steel can be used, but also metal with a polymer coating applied to it. This increases the anti-corrosion qualities of the roof, which makes it possible to operate it for decades without changing not only its consumer qualities, but also its appearance.
- Rolled metal is much more flexible than sheet metal. This circumstance allows for the installation of a double fold. The metal in the roll has high strength and tightness, which prevents moisture from penetrating underneath it.
- With steep roof slopes, using rolled metal is much more convenient and safer. After all, the roll can simply be rolled out without risking life and health each time, as when laying sheets separately
Among other things, working with a folding machine is much more convenient on rolled metal. Indeed, in this case, you only need to tighten the longitudinal folds, and not bother with the horizontal folds after each sheet.
Seam lock diagram
What tools are needed to install a seam roof?
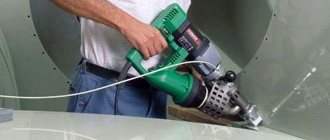
Of particular importance in the production of seam roofing is the correct choice of tools. This especially applies to devices for twisting seams. There are two types of such clamping devices: mechanical and electrical. In the first case, the seams are clamped using two special frames. With the help of the first frame, the main fold is twisted, and with the help of the second frame, the mating sheet of metal is screwed onto it and clamped to form a seam.
Mechanical device for creating folded seams
Using an electric machine greatly simplifies the work. In the first pass, she twists the main single fold, and in the second, she completely finishes the work, creating a completed seam. The second rolling is done in the opposite direction. This speeds up the whole job even more as there is no need to go back to the top of the roof.
Electric folding machine
In addition to the twisting machines, you need to prepare some other tools:
- Several metal hammers with flat and round heads and regular pliers.
- Metal scissors.
- Quite a powerful drill.
- Extension cord for supplying electricity at least 30 meters in length.
- A screwdriver or a corresponding drill attachment. However, the first option is much more convenient due to its light weight.
- Measuring devices.
The entire tool must be safe and non-slippery, since if it breaks out of your hands, it will fall down, which will not only create inconvenience, but can also cause harm to third parties.
Main stages of work production
First of all, when installing a seam roof, you need to decide on the type of sheathing. If you make it continuous, then no special calculations are required. Otherwise, it is necessary to determine the pitch of the rafter legs with great accuracy. The sheathing itself can be made not only from boards. To create it, bars, a metal profile or even a profile pipe are quite suitable. The main thing is that the surface of the resulting sheathing does not have any potholes or depressions. Its maximum evenness is a guarantee of a beautiful appearance and reliability of the roof.
A vapor barrier is placed on top of the sheathing. The material must be chosen so that it is light and durable, but at the same time, protects the metal well from corrosion and is well ventilated. Wooden sheathing requires careful impregnation, which will protect the wood from rotting and make it poorly susceptible to fire. Well-treated sheathing and rafters will ensure a service life of a seam roof of at least 50 years. The distance between adjacent bars should not exceed 40 cm.
Installation of the first sheet begins with the ridge. When using sheet material, the sheets are fed strictly one at a time onto the roof, since a sheet that accidentally slides off the roof is a deadly weapon for those who at that moment may find themselves in the path of its movement. You should also pay attention to the fact that the molding for the cornice must be mounted in advance. The same applies to the support bar on the skate. When installing a hip roof, this plank is laid in place of the stack.
To give a more beautiful and symmetrical look to the roof, first install the outer sheets evenly on both sides of the roof. They can be trimmed very carefully if necessary. When trimming, this edge must be turned outward. Professionals treat these edges with sealant to prevent corrosion, although this is not necessary.
Subsequent sheets are laid with an overlap, which should be at least 40 mm. In this case, they are oriented along the lower overhang of the sheet. When working with a cornice or ridge, each sheet is attached to both the top and bottom bars of the sheathing. The tightness of closing the cavities along the ridges and at the ends is ensured by the use of flashings, which are secured using self-tapping screws equipped with rubber gaskets. This technology makes it possible to ensure their stability over many years of service, since rubber, with its elastic forces, does not allow the screws to become loose. If you plan to install snow barriers or bridges on the roof, then they must be attached strictly at the joints of the sheets.
Features of installation of the body kit
When installing the roof cladding, the following rules should be observed:
- Before installing the roofing, you need to use a building level to check the evenness of the ridge and sheathing ribs. They must be perfectly straight. The eaves overhang, which is located at the very bottom, must also be perfectly straight.
- The fastening of the cornices is carried out first of all before the installation of the sheets begins. Consequently, the holders for the gutter system are attached to the eaves board even earlier.
- After the cornices, valleys should be attached to the sheathing, covering their bases with a high-quality edged board.
- A durable polyethylene film or a special vapor barrier material is placed on the rafters, which is designed to protect the wood from moisture.
In addition to self-made seam roofing, there are ready-made sheets with edges curved as required. This is a professional standing seam roof. To install it, you only need to place the sheets on the sheathing and fasten them, as required by the instructions.
Ready-made metal seam roofing
Some nuances when laying a finished seam roof
Before installing a seam roof, careful measurement of the slopes is required. If they are rectangular, then their diagonals should be equal in length. During installation, the bottom seam is always directed towards the start of work. For this reason, some sheets will need to be unfolded. Sheets should always be laid from bottom to top. If the length of the slope is more than 6 m, it must be made composite. This is due to the difficulty of transporting sheets or rolls upstairs in the case of a very long slope. The pediment on the roof is attached in such a way that it completely covers the rebate. It is also mounted on roofing screws with rubber gaskets.
The ridge for standing seam metal roofing can be of different types. For a flat roof, you can use a flat ridge, but for a steep roof, its shaped version is better. It must be screwed onto roofing screws, especially at an angle of more than 25 degrees. At the junction of steel roofing sheets with walls or other structures on the roof, a rubber or plastic gasket is installed, which provides reliable protection from moisture.
Installing a seam roof yourself is quite labor-intensive, but doable. If you take into account the cost savings that this type of roofing provides, then this option is worth considering.
A seam joint is a permanent, but not rigid, butt joint of thin metal sheets. The word “rebate” comes from the German “Falz” and is translated as “groove, groove”.
This type of connection is most widespread in the roofing industry. The fact is that when joining metal sheets, one has to solve issues related to their thermal expansion.
Rice. 1
Changing geometric dimensions due to temperature changes does not allow for a rigid, hermetically sealed connection. At the junction site, tension occurs in the material, leading to significant deformation. That is why the best connection method is a seam connection.
When folding, two roofing elements are connected, the edges of which are pre-processed so that when they are brought together, a fixing seam can be obtained (Fig. 1).
Seam seams come in three types:
- recumbent;
- standing;
- angular.
Structurally, seams are divided into two groups:
- single;
- double (a variety of slatted folds).
Stages of installation of a galvanized steel roof
Before covering the roof with iron, it is necessary to make a strong sheathing that will prevent metal deflections. The basis for the iron sheets is wooden beams located 20 cm from each other, a continuous sheathing of edged boards or a step-by-step sheathing of boards nailed at a distance of 10 cm.
You can connect sheets with galvanized iron by laying them overlapping and securing them with nails with a special gasket, or in a more labor-intensive and reliable way - folding. To complete the work you need:
- wooden mallet;
- metal scissors;
- workbench for preparing paintings;
- metal hammer;
- comb bender;
- roulette;
- a mixture of drying oil and red lead.
Before starting work, iron sheets are primed with a mixture of drying oil and red lead to increase corrosion resistance. The dried iron is cut into pieces of the required size, using metal scissors (a grinder is strictly prohibited). The seam method reliably protects the joints from leakage. It is a connection of adjacent sheets of iron into a lock, made by bending the edge.
For horizontal connections, lying folds are made. They are made using special machines or on workbenches using a hammer and mallet. Draw a line at the edge of the sheet and bend the edge using a mallet; for this work you will need a workbench with a metal corner. On another sheet, the edge is bent several times until a U-shape is created. The joint is sealed and bent close to the metal sheet. In this way, blanks are formed for laying on the roof; they are called pictures.
On the roof, all the paintings are connected using longitudinal standing seams. In their manufacture, a comb bender is used. Before fastening, the position of the sheets in the vertical plane is checked. It is recommended that the length of the workpiece be equal to the size of the roof slope. The paintings are laid in rows from the ridge to the gutter. A steel strip is used to seal the lying seams.
In places that require special strength of the seams, a double fold is used. It is made by folding the edges of two sheets, followed by simultaneous folding. The rebated seam is installed with a bend towards the eaves, this allows water to flow freely along the roof. The paintings are attached to the sheathing with metal clamps.
The most difficult step is installing a collar for the chimney tube. It is pre-made according to the shape and size of the pipe. The collar is connected to metal sheets by standing seams.
To understand how to properly install a roof using a seam joint, you should watch a video with recommendations from professionals.
Features of roofing with profiled sheets
- When deciding on the size of the corrugated sheet, choose one that is equal in length to the roof slope; if it is large, focus on ease of transportation.
- When counting the number of sheets, take into account the angle of the roof; if it is within 15 to 30 degrees, an overlap of up to 20 cm will be required.
- Before installing the corrugated sheet, a waterproofing film is laid. It is attached with brackets to the rafters. Counter slats are installed on top of it, providing clearance with the metal sheets.
- The polymer coating of the corrugated sheets should not be damaged during transportation and installation; this will lead to the loss of the anti-corrosion properties of the material.
Brands of corrugated sheets differ in strength and wave height. To install a reliable roof, two brands are used:
- NS - for roofs with a significant slope angle that do not experience high loads;
- N - used for permanent roofing, characterized by additional stiffening ribs.
Corrugated sheets are easy to process; for laying and fastening you will need a hacksaw and a screwdriver. Lay the sheets from bottom to top, starting from the right end. Solid profiled sheets are pre-fixed with one self-tapping screw and laid along the entire length of the roof. After alignment along the eaves, final fastening is carried out using roofing screws, the heads of which are selected according to the color of the polymer coating. They are screwed horizontally with a screwdriver into every second wave, vertically at the distance of the sheathing step. The upper and lower parts are secured with a self-tapping screw into each profile.
When using several rows of corrugated sheeting, their transverse joints are connected with an overlap of at least 20 cm and coated with silicone sealant.
When working with profiled iron, care should be taken to prevent damage during movement. It is recommended to wear soft shoes or make a wooden deck on the finished roof area.
A properly installed iron roof will provide reliable protection for many years; this high-quality coating will withstand the influence of precipitation and wind. The shiny or colored surface of the metal sheets used will complement the architecture of the building.
Installation of corrugated sheets
Installation of corrugated sheets on the roof
Corrugated sheets are easy to process; for installation and fastening you will need a hacksaw and a screwdriver. Lay the sheets from bottom to top, starting from the right end. Solid profiled sheets are pre-fixed with one self-tapping screw and laid along the entire length of the roof. After alignment along the eaves, final fastening is carried out using roofing screws, the heads of which are selected according to the color of the polymer coating. They are screwed horizontally with a screwdriver into every second wave, vertically at the distance of the sheathing step. The upper and lower parts are secured with a self-tapping screw into each profile.
Video
This video talks about installing a metal profile with your own hands:
This video demonstrates the installation of a corrugated roof:
For a long time, roofs were covered with sheet metal due to the relative ease of installation, low cost, the ability to mount the covering of the most complex shapes and at a minimum slope angle to the horizon of up to 15 degrees. In addition, they are indispensable in cases where it is necessary to cover the roof of an object with a weak foundation, and other roofing material is not suitable for use due to its weight.
This material has not lost its relevance today: along with ordinary steel sheet, galvanized and profiled sheets are also used. Modern technologies make it possible to apply protective coatings to them, significantly increasing their service life, as well as paint them in different colors. Thanks to this, the products have a quite attractive appearance and can decorate any home or cottage.
Installation of paintings
Now you can begin installing the sheathing. It is made from edged boards 50x50 mm. It is stuffed perpendicular to the rafters, in increments of 250 mm.
If the distance is greater, the metal may bend, and this is not desirable.
Advice! If a continuous sheathing is used, it is necessary to leave a ventilation gap between it and the iron sheets.
The pictures are attached from left to right. When laying the first row, an overlap is made: along the gable overhang - 20-30 mm, along the eaves overhang - 100 mm. As mentioned above, the paintings are attached to the sheathing using clamps.
They are bent by 20-30 mm and attached to the boards with nails, on the right side of the sheet. Then they are folded along a standing seam. The distance between the clamps is 60-70 mm.
The roof is installed in vertical stripes from the ridge to the overhangs. They are connected to each other by lying folds. For this, it is most convenient to use a metal strip 50 mm wide, 800 mm long and 5 mm thick.
The lying seams must run strictly horizontally, relative to the roof ridge. In this case, it is recommended to coat them with putty (sealant) when flattening.
The second row of paintings is mounted as follows: the paintings are placed next to the first row. It turns out that the edge of the second row will be smaller in size than the first.
The strips are fastened with standing seams; their finished height should be 20-25 mm. In this case, it is advisable to shift the recumbent folds by 15-20 mm horizontally, relative to each other.
This will make it easier to install the standing seams. For bending, you can use special pliers or hammers, as you wish. All ridges should be the same in height and well compacted.
Docking along the ridge is done when all rows of paintings are mounted. The excess tin is cut with special scissors along the ridge, lower on one side and higher on the other, so that a standing seam can be formed. Then the edges are folded.
Please note: all metal elements of the roof (clamps, nails, bolts) must be made of the same material, the same as the covering. Otherwise, the service life of the roof will be determined by the service life of this element.
A tin roof will last a long time if all the nuances are taken into account during installation. Therefore, we will dwell on the most common mistakes when installing a tin roof.
Installation errors:
- If the roof slope angle is less than 14 0 C, the sheathing should be made continuous.
- Water may penetrate through connections. To avoid this, use a vertical connector with tabs. When crimping a seam, it is advisable to use silicone sealant (coat the joints), this will increase its water resistance. When using sheets of tin more than 10 m in length, fastening to the sheathing is carried out using floating clamps.
- When installing metal floors, the use of screws and bolts should be avoided. Rigid fastening does not allow freedom of movement, which leads to deformation of the coating.
- It is necessary to approach the arrangement of ventilation with all responsibility. If condensation collects on the back side of the roofing, this will lead to corrosion and premature destruction of the material. To avoid this, roofing felt or roofing felt is placed directly under the coating. The entire roofing pie is arranged in such a way as to ensure good ventilation of the under-roof space and minimize the flow of warm air from inside the house. For this purpose, special barriers and vapor barriers are used. The mounting points are carefully checked, as warm air usually leaks from them.
- Expansion or contraction of the metal can occur under the influence of temperatures. To avoid deformations, you should use special connecting elements that are designed to withstand such changes.
- When designing, all loads should be correctly calculated, first of all this applies to regions where there is a lot of precipitation, especially in winter.
- When installing metal aprons around shafts and in places adjacent to vertical surfaces, it is worth considering that installing them by pressing tightly against a vertical surface does not provide a proper connection; water will still get under the metal. To avoid this, these elements are installed in niches or grooves. Moreover, this applies not only to metal roofs, but also to other materials (roll, flexible). Traditional junction installation schemes are shown in Fig. 5.
- » onclick=»window.open(this.href,» win2 return false >Print
Details Category: Thin sheet metal
Connecting parts made of thin sheet metal.
There are several ways to connect parts made of thin sheet metal. The simplest of them is a seam seam connection.
.
It is obtained as follows. At a distance of 6...8 mm from the edge of the sheets to be joined, fold lines are marked and the sheets are bent at right angles (see figure on the left a
).
Then they bend the edges of the workpieces (see figure on the left b
), connect them into a lock (see figure on the left
c
) and bend the sheets near the seam using a wooden block, as shown in figure
d
, so that the connection does not come apart.
Connecting parts with a seam seam is used in the manufacture of buckets, drainage and ventilation pipes, cans, as well as when covering house roofs with roofing steel.
In factories, such work is performed by tinsmiths
on
folding machines
. Variants of such machines are shown below.
In addition to joining with a seam seam, sheet metal parts can be joined using rivets
.
Rivets
are used to create the so-called “
permanent
” connection. Typically, rivets are used to connect thin metal sheets, fasten facade plates, and also quite heavy structures.
Rivets have been used as a fastening element literally since time immemorial. It is enough to visit any archaeological museum to see this with your own eyes. For example, ancient warriors wore armor whose metal plates were connected exclusively by rivets. And if you remember that rivets were used as the main (almost the only) fastening element in the construction of the Eiffel Tower and the Aurora cruiser, you involuntarily gain respect for the people who invented the now so common fasteners.
Rivets
-
these are fasteners consisting of a mounting head and a rod
.
They are made of mild steel, copper, aluminum, brass. There are rivets with semicircular
(
a
),
countersunk
(
b
),
flat
(
c
),
semi-countersunk
(
d
) heads (see figure on the left).
To connect parts with rivets, first mark the centers of the holes for the rivets. Then the holes are punched with a punch or drilled.
The dimensions of the rivets depend on the thickness of the parts being connected. It is recommended to take the diameter of the rivet equal to twice the thickness of the thinner part.
The length of the rivet rod is the sum of the thickness of the parts being connected and the length of the protruding part (it is equal to 1.25-1.5 times the diameter of the rivet), on which the closing head is formed.
Often, two workpieces to be joined are drilled at once, clamping them with a clamp or in a vice.
The diameter of the hole D
should be 0.1...0.3 mm larger than the diameter of the rivet
d
(see figure on the right
a
).
The rivet is inserted into the hole (Fig. b
), and the length of the protruding part of the rivet should be equal to (1.3 ... 1.6)
d
.
The embedded head is placed in the support recess ( 2
) (Fig.
c
) and the parts to be connected are brought together by striking the tensioner (
1
) with a hammer.
Then, with circular blows of a hammer ( 3
), the protruding head is riveted (Fig.
d
) and given the correct shape using crimping (
4
) (Fig.
e
).
When making a riveted connection, you need to check the reliability of the hammer attachment on the handle. The workpiece must be securely fastened in a vice. You cannot stand behind someone working.
Rivet joints are used in aircraft construction, shipbuilding, for connecting bridge parts, and in the manufacture of metal utensils. In industry, workpieces are connected with rivets using pneumatic riveting hammers or special riveting machines. Undoubtedly, rivets have a lot of undeniable advantages. But standard, so-called “solid” rivets also have a rather significant drawback - to create a truly reliable connection, great attention must be paid to the quality of work with them. Considering that the rivet must be held tightly on the other side when riveting, this is a rather labor-intensive task. However, progress does not stand still. Advances in riveted joint technology have led to the development of blind rivets, which solve this problem.
Installation tool
(see figure on the left) for working with blind rivets is relatively inexpensive, and the ease of use is very high. Mechanical engineering, the construction industry, the automotive and furniture industries, and enterprises in the electronics manufacturing industry actively use blind rivets, since the one-sided fastening technology is definitely more convenient and reliable than other fastening methods.
One-way traction
(blind)
rivet
consists of two parts:
a body
and
a shank.
MONEL
alloy (Ni/Cu=70/30). The core of blind rivets is made of steel or stainless steel.
Design Features
: The rivet has a convex or countersunk head.
Installation of the rivet requires access from only one side of the material. Installation
: drill through the materials to be fastened, mount the rivet using a special tool.
From the characteristics
blind rivets, you should pay attention to the geometric dimensions (diameter and length of the rivet body).
The type of rivet can be a regular one with a shoulder
(
D
heads =
2D
rivet body, Fig.
1
), with
an enlarged shoulder
(
D
heads =
3D
rivet body, Fig.
2
),
countersunk
(Fig.
3
) and
blind with a water-gas-tight body
(Fig.
4
).
To make a round pipe yourself, you will need black or galvanized sheet steel, 0.45 - 0.5 - 0.55 mm thick. This thickness of material is sufficient for low-pressure or domestic ventilation, exhaust hoods from gas equipment, and drainage systems. On a sheet of metal, using a sharp metal scriber and a long ruler, draw a pattern for the future pipe. Measure the length of the workpiece equal to the length of the pipe. If the pipe will be inserted into the next one, then add the length of the “bolt” to the length of the workpiece (for example, 7 cm). Calculate the width of the pattern by multiplying 3.14 by the internal diameter of the pipe in millimeters: D * 3.14 (mm). To the resulting size, add allowances for the seam joint - 14 mm on both sides, or 28 mm to the width of the pattern on either side. The final formula for the width of the workpiece: 3.14D+28 (mm). Cut the outlined blank from the sheet using hand-held metal scissors.
Along the length of the workpiece, mark out and bend two edges in different directions for the seam connection of the pipe. The width of the folded edges is 7 mm. These edges can also be bent obliquely, for example: for one end of the future pipe 7 mm, and for the other end - 9 mm (or 6 by 8 mm). Then the pipes will be easily and fairly tightly inserted into one another. The sequence for preparing a seam connection is shown in the figure:
To give a straight sheet of tin the shape of a pipe, you will need a thick-walled metal pipe with a diameter of 80 - 100 mm, suspended horizontally from a board or from a flat wall in two “clamps” made of thin-sheet steel strips, as shown in the following figure. Place the pipe pattern with the prepared folds into the gap between the board and the suspended pipe, and gradually bend it around the mandrel pipe to the desired shape, after each bend pushing (pushing) the workpiece down:
Remove the workpiece from the device, check how correctly and evenly it is “rolled” into the shape of a pipe. Fasten the folds into the lock. Make sure that both folded edges fit securely into each other along the entire length of the joint. Place the folded workpiece (or part of it) onto the section of the rail extended beyond the workbench. Seal the seam of the pipe with a wooden mallet. Place the material along the entire seam, that is, cut it with the edge of a hammer or mallet, thus creating an additional lock that will prevent the folded edges from moving out of the joint. The reliability of the assembly can be ensured with a rivet.
Straighten any unevenness and possible ribbing in the homemade pipe on the rail using a wooden mallet. Choose sheet steel for the manufacture of pipe products that does not leave a trace at all, or leaves an inconspicuous mark on the surface when it is bent and unbent. This property of the metal can be checked by slightly bending and immediately unbending the sheet metal in the corner of the sheet. If rolled material is used to make a pipe, or a galvanized sheet clearly cut from a roll, then it should be cut so that the direction of bending or rolling the workpiece coincides with the direction of the rolled roll - this will reduce the appearance of ribs along the deflection lines. The optimal pipe length is 1 m or 1.25 meters, which coincides with the transverse dimensions of standard tin sheets.
The mechanized production of thin-sheet steel pipes is carried out on machines in various ways, which are briefly described on the page.
Category: Metal work
Which sheet metal to choose
Before covering the roof with iron with your own hands, you need to decide on the sheet material. The following types of sheet metal exist:
- Steel
, which is sheet metal produced in rolls or in the form of straight strips up to 5 m long, without applying any coating. It is resistant to mechanical stress, but does not tolerate environmental influences and therefore requires the application of an anti-corrosion layer and, if necessary, painting. Of all types of roofing materials it is the cheapest. - are more preferable than conventional ones, since they are completely protected from the external environment and are not subject to corrosion. Externally, the products have a metallic sheen and are not intended for painting. However, such sheets can be coated with a special polymer coating that has different colors and, accordingly, have a more attractive appearance. Typically, polymers coat metal profile sheets obtained by rolling, with various shapes, which can be used as the main and decorative roofing material. In order not to constantly repaint the roof, it is worth covering it with galvanized iron, which will not lose its properties and appearance over a long period of operation.
- Sheets of non-ferrous metals
such as copper and aluminum alloys. They are the most expensive, but their service life can be from 30 years, and at the same time they combine strength and ductility, which makes it possible to make complex structures, and also give the house a more expensive look.
Roofing
Preparation
- Then the roofing pictures are prepared. The production of this element of the roof covering, prepared for folding, usually requires two sheets of galvanized sheet, along the perimeter of which there are bends.
Connection types
The paintings are joined using a seam connection.
- To obtain a lying fold, the ends of the bottom sheet are bent by 5 mm at 90°, and the top sheet, respectively, by 10 mm. Then they are bent to the surface of the sheet.
- The lock is sealed using a mallet. In this case, you need to lay a wooden plank along the fold.
- For a standing type of connection, after bending the lower and upper edges, the left end is tapped by 2.0–2.5 cm, and the right end by 3.5–5.0 cm.
- The paintings are attached to the sheathing using clamps - special steel strips. They are cut from the same tin as the paintings. The sizes of the stripes range from 2.0-2 to 12-13 cm.
Installation of paintings
The sheathing of a tin roof is made from edged boards with a square section of 50 by 50 mm. They are stuffed perpendicular to the rafters in increments of 25 cm. A larger increment can cause the roofing sheet to sag, which is extremely undesirable. In certain areas: cornice, ridge, valley and roof ribs, a continuous sheathing of rectangular bars with a section of 50 by 20 mm is laid.
When working with tin, ventilation when installing continuous sheathing is a mandatory requirement. The ventilation gap must be located between the tin sheets and the sheathing.
- Connect the pictures from left to right. The initial row of roofing sheets is laid with an overlap: for the eaves overhang it is 10 cm, and for the pediment - 2–3. As already noted, the paintings are fixed to the sheathing using clamps.
- They are bent by about 20–30 mm, after which they are fixed to the lathing with nails. Fastening is carried out on the right side of the roofing sheet. Then they are folded along the standing seam. The distance between the clamps is maintained at 6-7 cm.
- The roof is covered by laying the strips vertically, securing them at the ridge. To connect the strips to each other, lying folds are used. The seam connection is positioned strictly horizontally in relation to the ridge beam. After sealing, it is recommended to lubricate the locks with sealant or putty.
- When laying the second row, the paintings are first placed next to what has already been laid. In this case, the edges are of different sizes: on the second it is smaller than on the first.
- These rows are fastened together with a standing seam. The finished seam should have a height of 2–2.5 cm. To make it easier to install a standing seam, it is recommended to move the lying seams horizontally by one and a half to two centimeters. For bending, use special pliers or a hammer. It is important that the folds are the same height and well sealed.
- Next, when all the paintings are laid, the joining is performed along the roof ridge. Excess roofing sheet in this area is cut off with special scissors. Cutting one side higher than the other will make creating a standing seam much easier. Then the edges are folded.
On a note
Roofing material must be used for fastening elements.
It is possible to make additional products from tin with your own hands. Tinsmith work of this type is not difficult to do independently.
Preparation of roofing material
Covering the roof with sheet or galvanized iron requires the use of seam joints of metal structures. To do this, you need to unroll the roll, carefully level it and remove a special lubricant from the metal surface. Then you should make bends along the edges of the sheet at right angles along the entire length so that it is convenient to connect the sheets at a height.
Note! The longitudinal connection allows you to firmly fasten the sheets together and prevent water leaks both when laying horizontally and vertically.
The following types of connections exist:
- A standing
seam is designed to form a seam along the sloping surface of the roof in order to organize the most efficient drainage of water. There are two types of connections: single - one sheet is bent in a U-shape, and the second with its bent end enters the groove and then sealed, and double - two sheets with their bent ends are folded simultaneously 2 times. In this case, the seam is left perpendicular to the flat surface. - The lying one
is similar to the standing one, except that the formed seam is in the plane of the metal sheet.
To bend the sheets, it is necessary to accurately mark the bending distance using a caliper, focusing on the seam height from 10 mm, depending on the type of connection required, since a correctly bent sheet will prevent the creation of additional problems on the roof during installation. The bend on one side must be twice as long as the other to form a single joint, and for a double joint they must be the same length.
The width of the canvas should not be more than 1 m for ease of installation, and the length should correspond to the size of the roof with an additional overlap, which will be needed for attaching gutters. It is convenient to do the bending on a workbench with a fixed metal corner and a workpiece: the sheet is installed along the corner and, using a wooden mallet, is bent by gentle tapping to a right angle, or a horizontal state with a gap.
Note! If the roof has a complex shape with transitions of planes, then you need to make corners bent at a certain angle with side dimensions of 30 cm.
Installation of metal sheets is carried out on the roof with a sufficiently strong sheathing that will not bend under the weight of the installers. This point is important because when a galvanized or metal profile sheet bends, the protective coating may be damaged, and in a fairly short time the sheet will rust and become unusable. Typically, edged boards are used, which are driven in at a distance of 100-300 mm from each other. Then they begin to install the roofing material.
First, the corners of the roof bends, if any, are laid out, and then metal sheets begin to be laid from one of the corners. Their fastening to the sheathing is carried out with self-tapping screws with a metal gasket, or using special locks - clasps, made in the form of metal corners, attached to the roof with nails or self-tapping screws, and to sheet metal by crimping in a formed seam joint. The second method is more labor-intensive, but the surface of the roof will be smooth and without damage, which will significantly increase its service life.
Note! The position of the first sheet must be leveled using a level in a horizontal or vertical position.
Then you should fix it with self-tapping screws. If a connection is planned with a clamp, then it is attached close to the folded corner of the sheet. After this, the second sheet is laid and a seam connection is made in the direction of a smaller bend using a special tool - a comb bender, or a wooden mallet and hammer. The first option is the most convenient and safe. The second option is suitable for more experienced installers when they need to feel the force of the mallet impact. After laying all the sheets, the gutters are installed.
Procurement of materials
If you decide to make folded pictures from rolled or sheet metal, then you cannot do without the use of sheet bending and folding machines. Purchasing such equipment for personal construction is impractical. But this does not mean that metal should be bent by hand.
It is better to use the service of a team that has a machine for rolling pictures. The quality of the roof in this case will be better than if you bend the rolled products by hand. There is even a separate one. Virtually every roofing company that has the necessary equipment offers it to their customers. Try searching in your area.
Also, using sheet bending equipment, you can produce the necessary additional elements. What kind of extensions will be needed for construction depends on the design features of the roof.
The photo shows typical profiles, the geometry and dimensions of which may differ depending on the characteristics of a particular roof.
Video
An addition to the article will be a video about fastening roofing iron with a seam connection:
Watch a video about the work of a professional roofer, in which he will give some useful recommendations:
Thin metal sheets are joined in different ways. The most common connection is a seam seam, which involves bending the sheets at the edges. The sequence of making a seam seam is shown in Figure 135.
Rice. 135. Sequence of making a folded seam
First, the sheets are bent at the edges at an angle of 90° by 6-8 mm (Fig. 135, a). To do this, each sheet is placed on a special table edged with a metal corner with an overhang (protrusion) of 6-9 mm and gradually, in several passes, it is bent with blows of a mallet (Fig. 136). Then the sheet is turned over and the bent edges are folded with a gap of 2-3 mm (Fig. 135, b). The sheets are inserted into the lock (Fig. 135, c) and securely fastened with blows of a mallet through a stepped block (Fig. 135, d). The protrusion of the step on the seam prevents the sheets from coming apart.
Rice. 136. Bending the fold: 1 - table; 2 - emphasis; 3 - bendable sheet
In this way, sheets of roofing steel are connected on the roofs of buildings, ventilation and drainage pipes, buckets, tin cans and many other products are made.
Practical work No. 40 Connecting thin metal sheets with a seam seam
Work order
- Mark and cut out sheet metal pieces with scissors for joining with a seam seam.
- Mark fold lines for the folded seam at the edges.
- On a specially equipped table (workbench), following the sequence of operations, make a folded seam.
- Check the connection strength. Put on gloves and try to move the fastened pieces in different directions.
New concepts
Seam seam, lock.
Types of connections of metal sheets: types of fasteners, joining
The traditional method for joining metal sheets is welding. However, welding thin sheets and sheets with protective coatings is often problematic or impossible. Therefore, we will consider alternative options - using folded seams, riveting and special fasteners.
Types of seam seams for joining thin metal sheets
These types of connections are popular when installing metal roofs.
Connecting metal sheets with rivets
Rivets are made of steel, aluminum, copper, brass, they are semi-circular, flat, countersunk or semi-secret.
Stages of connecting sheets with rivets
- The sheets are placed on top of each other and secured in a clamp.
- The centers of the holes are marked and punched.
- Holes are punched with a punch or drilled simultaneously in both workpieces.
- Rivets are immediately inserted into the punched holes and flattened with a hammer.
- Crimping is used to give the final shape to the top head.
The length of the rivet rod is selected so that it protrudes approximately 1/3 above the metal surface. The rivets should be located at a distance of 9-12 mm from the edges of the sheets, and at a distance of 25-30 mm between themselves.
For sheets made of high-strength, thermally strengthened aluminum alloys, joining with rivets is the main method. Relatively new products are corrugated aluminum bolt rivets. The rod of such a rivet is grabbed by a special pneumatic tool and tensioned.
Joining corrugated sheets
When laying profiled thin-sheet galvanized cold-rolled steel on the roof, the following connection rules apply:
- on steep slopes, there is enough overlap of sheets (more than 30°) - from 10 cm;
- with a tilt of 15-30°, the alignment is 15-20 cm;
- with a small slope - up to 14° - the joint width is 20 cm.
At the lower and upper edges of the roof, along the joints, fasteners are placed in each recess of the profile. At longitudinal joints, fasteners are placed in increments of 50 cm.
Types of fasteners
- An oxidized or galvanized steel self-tapping screw with a drill is used to fix a metal sheet to a metal sheathing. For sheet thickness up to 2 mm, no pre-drilling is required.
- An oxidized or galvanized steel self-tapping screw without a drill is used to fasten a metal sheet to a metal sheathing.
- To connect thin profiled sheets to each other, self-drilling self-tapping screws of the HILTI brand are used. Fasteners up to 19 mm long can be used to connect two or three sheets, the total thickness of which does not exceed 2.7 mm.
- Self-drilling galvanized HILTI screws with a diameter of 4.8-6.3 mm and a length of 38-55 mm are used for fastening corrugated sheets to the base metal directly or through an insulating layer.
- HILTI screws with a diameter of 4.8-5.5 mm and a length of up to 100 mm, made of corrosion-resistant steel, are designed for use in aggressive environments.
The method of joining expanded metal sheets depends on its thickness. For thick-sheet products, welding is used, for thin-sheet products, rivets or self-drilling screws are used.
metallz.ru
Standing seam
Single
This type of fold has the simplest design. It is used on roofs with a large slope (at least 10°).
Rice. 4 (1 - scraper; 2 - block)
Installation procedure for a single standing seam:
1) From the side of the smaller edge, press the scraper tightly against the high edge. Adjust the height of the scraper until it matches the smaller edge. Bend the high edge toward the surface of the scraper with a mallet. Remove the comb bender.
2) close the low fold of the fold with a high one.
3) press the seam using a hammer and a comb bender, which is pressed tightly against the back side of the seam joint (Fig. 4).
Double
Compared to a single seam, a double seam is more secure. Making it by hand can be difficult, but if you use special tools, such as seamers (Fig. 5), you can do the job quite well.
Bending machines also make the work much easier, with the help of which you can quickly and easily bend an edge to give it the required profile. Double standing seam is the most commonly used method for joining two adjacent roofing sheets. Seam roofing is one of the most common types of roofing.
The production of this seam connection begins with the creation of an angular standing seam, after which it is bent down 90°. To compensate for temperature deformations, a gap of 3 to 5 mm wide is left at the base of the folded structure.
Rice. 5
Since in order to obtain a double profile it is necessary to increase the number of working operations, the time for installing the roof covering also increases accordingly. But these inconveniences are fully compensated by the reliability of a thoroughly closed seam - because it ensures the hermetic integrity of your roof during precipitation.
However, even such a strong joint will not save you from stagnant water on the roof, so the use of a double standing seam is permissible only on roofs with a slope of 10° or higher. It is believed that a special sealant can help the matter - a tape that is inserted into the fold before it is pressed with a seaming machine.
Rack and pinion
This type of connection of roofing sheets is more typical for European house construction, although, recently, the rack seam (Fig. 6) is gaining popularity among Russian roofers.
Rice. 6
The slatted fold is essentially reminiscent of a double vertical fold, but, unlike it, it has a wider joining edge due to the use of a wooden block.
The bent parts of the roofing sheets rise along the sides of the bar and are attached either here (Belgian version) or on the surface of the bar (German version). The peculiarity of using such a seam connection is that it can only be used on roofs with a slope of more than 3°, otherwise the water accumulated on the surface will penetrate into the under-roof structures.
Angular
Thanks to the volume and the shadow it casts, this seam joint looks quite elegant, which is why it is traditionally used for finishing large and easily visible surfaces. It is typical for the installation of roofs with a large slope. Fixing the fold occurs in just one step. The design feature of the corner seam prevents stress from arising in the metal, which means that deformation of the roof surface is minimized.
Self-locking fold
Russian specialists have developed a unique seam fastening scheme - a self-locking fold (Fig. 7). This invention is superior in manufacturability to all foreign analogues. The use of a “latch” saves roof installation time and does not require special seaming equipment.
Rice. 7
There are two shaped profiles on the roofing sheet, made in such a way that one of them acts as the base of the latch, and the second plays the role of its cover. The profile with the latch cover of one leaf snaps onto the base profile of the other leaf by simply pressing from above. This creates a strong and reliable rebate lock. It only takes a few seconds to snap the locking system into place. This means a noticeable reduction in the time required to install the entire roof.
The advantages of the “latch” fold include:
- waterproofness of the locking connection: no additional sealing is needed;
- ease of assembly and disassembly of roofing sheets: no professional skills are needed, and you can do without special tools;
- a single panel covering the entire roof slope, without additional joints;
- insensitivity to thermal expansion of metal, which eliminates deformation of roofing sheets;
- affordable price of roofing material and installation work;
- speed in roof installation;
- special connection strength.
Seam roofing is incredibly popular in low-rise construction. It is recognized as a simple, reliable and high-quality design at the same time. Affordable price also plays an important role. If you are the owner of a private home, perhaps this was your choice. We would be grateful for your story about how you covered the roof and what type of flange connection you used when installing it.