How to cut a hole in different types of sinks
The lack of holes for taps or mixers in modern sinks is not a defect, but a necessity.
Installation technologies for such products require several positions for the sink itself. The product line offers several basic diameters for plumbing fixtures - try to guess which one is needed here! We won’t guess, we’ll install it.
Photo is a problem that we have to solve.
Two types of sinks
The most popular types of kitchen sinks now are:
- Stainless steel sinks;
- Porcelain stoneware products.
With both stainless steel and porcelain stoneware, manufacturers are in no hurry to drill holes, leaving these little details to the sellers.
The sinks are different, and so are the appliances.
For your information! You can arrange for holes to be drilled at sink sales stores. The price of the manipulation is negotiable, you indicate the diameter and location, pay and receive the finished product with places for installing taps and mixers.
The problem has been solved, and this topic can be closed, but there are situations that radically change the original plans. Moreover, the desire to do everything with your own hands, and the pleasure that you get from a job well done, is incomparable.
Independent work
Simple things can change the world. The initial desire to install the tap on the right side in the corner will be nullified if your wife is left-handed.
On a note! In the kitchen, more than anywhere else, great importance is given to beauty, functionality, and also ergonomics. It is very inconvenient for left-handed people to open the tap on the right with their left hand. Water gets on your hand.
You can press out a hole.
We recommend placing the sink in place first, taking a closer look, and then deciding and selecting nest locations. Have you decided to do the work yourself?
- Carry out all work on the product before installing it in a permanent location; with these simple steps you will prevent deformation of the item and premature damage;
- Place the sink horizontally on a wooden base. Drill a small hole with a metal drill, enough 5-6 mm to locate the center of the circle;
Advice! If you use punches and a hammer, then the above manipulation is not necessary.
Carrot drills and their capabilities.
- And then there are three paths to choose from:
- Hammer and punch. Here you simply pierce the fixed bowl with special nozzles manually, the nozzle is initially selected to match the diameter of the hole in the sink for the mixer or tap;
- Punch of special design. This is a mechanical toy that uses the extrusion method. Such a punch consists of a threaded pin and two nozzles, a tap and a pressing washer with a wrench head. By installing the pin into the hole from the outside, screwing on the washer with the head, you use a wrench to tighten and press. The result of this manipulation is a hole in the stainless steel sink for the mixer;
- The third way is a special drill called a carrot. The name has taken root so much that even on the factory packaging of the product it is not called anything other than a carrot drill. The drill is presented as a cone, with a cutting edge diameter from 6 to 32 and even 38 mm. We will not describe the principle of using a drill, everything is clear.
Punchers included.
To the piggy bank! Sometimes the consumer's choice is on mixers with large diameter glasses. A sink siphon with a large hole requires a large seat. Then there are several options: the first is to order a hole in the store, the second is to drill several holes of a smaller diameter around the circumference. Then simply connect them together by removing the inner circle with a chisel. True, accuracy and precision of movements will be required.
How to drill a hole in a stainless steel sink - we've sorted it out, let's move on to the stones.
Stone and under stone
Much more interesting is the topic of drilling landing sockets in stone sinks.
- At the location of the proposed hole, we make a mark and drill;
Note! A simple manipulation - working with a drill - is not very simple in practice. A drill with a pobedit insert is contraindicated for this work; it doesn’t drill so much as it chips and peels the material. The drill for metal performed well, but low speeds of the drill itself are required (ideally, it is better to use a hand drill). At high speeds, the edges melt.
We work at low speeds.
- During the drilling process, the material can heat up quickly, but this is difficult to control. It is better to drill a hole in a sink made of artificial stone with a thin drill. We work around the perimeter of the entire future nest;
- It is recommended to “pass” the partitions between the holes in two ways:
- We cut the strokes with an electric soldering iron, followed by knocking out the plug with a hammer;
- The material is cut well with a jigsaw. Although this process takes longer, the edge is the smoothest;
- Grinding the hole circumference is done using a round abrasive attachment for the entire circumference. If you don’t have one on your farm, use a regular round file.
Crowns coated with diamond are rare guests on the farm.
To the piggy bank! You can also drill a hole in an artificial stone sink with a diamond drill, if you have one.
We inform you! Some bowls have special marks. These are places where, by striking accurately with a hammer, you can punch a hole. This must be done with caution; the tags themselves are marked with paper stickers, which may slip during transportation. A blow to another point can only lead to destruction of the material.
Quality work is the key to longevity.
Types of modern sinks
The two main types of kitchen sinks that are in greatest demand today are stainless steel and ceramic. Manufacturers are in no hurry to make holes in them, placing this work entirely on the shoulders of sellers and end consumers.
Important! If you wish, you can agree directly in the store to drill a hole of the required size. The cost of such manipulation is quite reasonable; all you have to do is indicate the location, diameter, and make payment. As a result, you will receive a finished product with designated places for installing mixers and taps.
It would seem that the problem has been solved, but in practice situations often arise that do not coincide at all with the plans of consumers. For example, when ordering a kitchen of non-standard sizes, or the kitchen equipment itself, if the owner of the house is left-handed, the hole in her new sink is located on the right side, which is incredibly inconvenient for her.
Before cutting a hole in the sink for the faucet, first install it, take a good look, and only then decide where to make places for the nests. If you still decide to do everything yourself, then use the following useful recommendations:
- Perform all manipulations with the product immediately before installing it in a permanent location - this will prevent premature damage and deformation of the item.
- The sink should be installed horizontally on a wooden base, then a hole should be drilled with a special drill.
- If you use a punch and a hammer, punch a sufficiently fixed bowl manually with special nozzles, previously selected to match the diameter of the holes of the faucet or mixer in the new sink.
- If you want to use a specially designed punch, please note that it operates using the extrusion method. As a rule, such a device consists of two nozzles and a threaded pin, a pressing washer and a tap. It is enough to replace the pin from the outside, screw on the washer, and perform tightening and pressing.
- The use of a special drill involves the use of a cone-shaped drill that works according to the simplest principle.
- When purchasing a mixer with large diameter glasses, it becomes necessary to prepare a special mounting socket. This problem can be solved in two ways - you can order a socket in the store or drill several holes around a circle with a smaller diameter.
What is the diameter of the hole in the sink for the mixer?
In recent years, the assortment of stores has been expanded with sinks of symmetrical shapes. This is very convenient, since there is no fundamental difference in how to install them - on the right or left side.
The manufacturer assumes that the hole for the mixer will be made independently at the time of installing the sink. In fact, it is logical and convenient. It is often not always possible to purchase a sink with pre-made outlets, since the parameters of the mixers are different.
Most kitchen sinks are factory-prepared to have an outlet of 32 millimeters, but commercially available faucets often have a diameter larger than 34 millimeters. Shops are supplied with sinks without a pre-drilled hole, made of stainless steel and ceramics. Most consumers are faced with the almost impossible task of making a hole of the required diameter. However, not everything is so sad.
How to make a hole for a faucet in different sinks
Before you start drilling the sink, you need to make sure that everything you need is on hand. The following may be needed:
- drill for ceramics;
- tungsten carbide crown;
- perforator;
- marker;
- sandpaper.
The crown should be taken with a diameter of 33 millimeters. It is better to drill with a hammer drill rather than a regular drill. And the point here is not the force of the hammer blow; moreover, its striking abilities should not even be used. It’s just that the rotation of the rotary hammer is slower, but it weighs more than a drill, and it will be more powerful. Of course, if there is no hammer drill, then you will have to use a drill, but you will need to set the minimum rotation speed, otherwise the crown will not bring any benefit.
You should start, naturally, with markings. It is logical that you first need to decide where exactly the mixer will be located. Having determined the installation location, you need to mark it with a marker.
Having installed a drill bit for working on ceramics in the hammer drill chuck, you should start working. The hole must be through. We made it solely so that we could install the drill from the crown.
Reference. It should be understood that the strength of ceramics is very high. In terms of strength, it can be compared with porcelain stoneware. If you have ever dealt with this material at least once in your life, you can imagine it. Despite the strength of porcelain stoneware, it is very fragile.
What should be the diameter of the hole for the mixer?
If we focus on the existing standard, it should be noted that siphons that are installed under the sink are rarely more than thirty-five millimeters in diameter. If the sink already has a hole for the faucet, then, most likely, all questions will disappear by themselves, since it should fit.
But some companies have models of sinks, usually made of ceramics, which do not have holes for the mixer at all. The fact is that there are faucets that are mounted either on the side or on the wall above the sink. This raises the question of how easier it is to drill a hole. However, if you have a drill, the necessary drill bits and minimal operating skills, this will not become an insoluble problem.
If you use a crown with a diamond core, for example, with the same thirty-five millimeter diameter, you can easily make the required hole. In this case, there is no need to somehow cool the drill or pour water. With modern equipment, none of this is needed. With such a crown it will be possible to make a perfectly even hole, without any chips.
Once the hole is ready, you will need to think about sealing. You will need to lay a gasket on the sink, and when the mixer is installed in its place, it will be useful to treat the joints with silicone sealant. This will eliminate any possible leakage.
How to make a hole for a faucet
If you are careful and careful, drilling into a ceramic sink is not that difficult. This is done as follows:
- A mark is drawn at the place where the mixer will be located. This is where you need to drill. Making a hole is a very simple task at first glance, but it raises many questions, especially for those who are faced with this for the first time. Under no circumstances should you use a drill with a pobedit tip. It does not drill, but simply chips the material and peels it. It is better to use a metal drill at low speeds, or maybe even a hand drill.
- Next, holes are made in the partitions. The impact of the drill leads to strong heating of the ceramics; this heating must be strictly controlled. To work, you need to use a thin drill and work around the entire perimeter of the future nest.
- Using a soldering iron, you need to make notches, after which you can knock out the plug with a hammer.
- You need to go along the edges of the chip with a jigsaw and a diamond file to trim the hole.
- The edges of the hole must be treated with an abrasive nozzle. If you don’t have one on your farm, you can also use a round file.
On some models of ceramic sinks, manufacturers specially make special marks. If you hit them accurately with a hammer, they can be easily knocked out. This creates a finished hole for the mixer. The main thing is to hit carefully.
What are the benefits of a stainless steel sink?
I get asked very often why a stainless steel sink is so good. Naturally, installing this item in the bathroom is not aesthetically pleasing, not practical, and generally not entirely normal. To decorate this part of the apartment, it is best to use specimens made of artificial stone.
Installation of the product discussed is more appropriate as part of a kitchen renovation project. An alternative could be a product made from quartz, but not everyone can afford it.
Let us highlight the advantages of steel samples:
- price. The most important thing when performing repair work is rational savings. Yes, if the budget doesn’t bite you and you can afford a more aesthetic product, do it,
- mobility. More than once, even I have encountered moments when a new sink was installed, and the old one was sent to another place for service. For example, to the country house. The issue of removal and re-installation in this case is more convenient,
- reliability. Not every housewife can boast of being careful when working in the kitchen. She can drop something heavy at any moment, and if it is a cast-iron cauldron and it falls on marble, then a crack in the latter is guaranteed. On the steel sink, only a small dent will remain, which can be easily removed with a regular hammer and a wooden block, and the scratch can be covered with special means so that it will not be visible at all.
- it does not need to be embedded into the countertop. This way you can optimize its use and not pay extra when ordering the kitchen itself.
Making a hole for installing a mixer
Currently, there are many models of sinks that have a symmetrical shape. Such sinks are extremely convenient, as they can be installed on both the left and right sides.
Some models of modern faucets: a – kitchen sink faucet; b – kitchen sink faucet with shower net on a flexible hose.
In order for the sink to be installed on any side, during manufacturing there is no outlet for the mixer.
It is assumed that a hole for a mixer of the required diameter will be made immediately before installing the plumbing. On the one hand, this is very convenient, because it is not always possible to choose a sink with ready-made outlets due to discrepancies in parameters.
Single hole kitchen sink faucet: drawing.
Most ready-to-install kitchen sinks have a factory outlet of 32mm, while the faucet diameter can be over 34mm. Currently, versions of sinks without a ready-made outlet are produced in both stainless steel and ceramics. For many, making a hole of the required diameter may seem like an impossible task, but in this case there are a number of measures that can be taken.
In some points of sale of such sinks, it is quite possible to use the services of specialists: they will select the outlet for the mixer of the required diameter, and will do everything using special tools. But such services are not provided everywhere, and owners of sinks without a ready-made outlet for the mixer will have to make it themselves.
It’s worth saying right away that you can only make a neat hole yourself in stainless steel, while experimenting on a kitchen sink made of granite or ceramics is fraught with risk, as the material may crack.
Work on the manufacture of communication outlets in a ceramic sink must be carried out as carefully as possible so as not to spoil the appearance of the sink. If possible, you need to purchase tools: for stainless steel, special cutters for making holes are sold; for ceramics, it is best to use diamond-coated drills. It will not be possible to drill ceramic plumbing fixtures with a conventional drill, as the ceramics will simply crack. However, it is quite possible to get by with some available means, but you need to act extremely carefully.
Reasons for missing holes
Manufacturers of sinks and plumbing fixtures are trying to standardize the dimensional parameters of models so that they are as compatible as possible with each other. But there is one important circumstance: individual layouts in both the kitchen and bathroom are very popular. To meet such needs, it is necessary to produce sink models in which there is no hole for the faucet. The groove is made independently in the most convenient place and with the necessary characteristics.
There are no holes in metal double-bowl sinks, which by default do not have slots for washing or drying for practical reasons. A person chooses the best option for himself by installing a sink on site.
The size of the holes depends on the design of the tap. Faucet models may vary significantly. The size of the required groove in the sink depends on this.
What matters is: the location of the hot and cold water supply pipes, the design of the fastening mechanisms.
Before performing work, you need to select a model, find out its parameters and design features.
Hole for faucet in stainless steel sink
Diagram of approximate dimensions of a kitchen sink.
There are several proven ways to drill a straight hole in stainless steel. It’s worth noting right away that you cannot make an exit for the faucet in already installed plumbing fixtures, since due to the support on the countertop, there is a possibility that the plumbing fixtures will crack. Before carrying out work, you need to turn the sink upside down so that all its edges rest on the surface of the table, and only then begin work.
If you have the opportunity to purchase or rent a special cutter for making holes, the work will not be difficult. First of all, you need to make the initial hole using a drill and a 10 mm drill bit. Next, the cutter screw is inserted and tightened with the help of 2 keys, so it turns out that the metal is compressed from 2 sides and pressed through using a press. The diameter may vary depending on the type of cutter used. If it is not possible to purchase a special device, you can resort to other methods.
So, in order to make an outlet for communications of the required diameter in a stainless steel sink without the use of special tools, you will need the following tools and materials:
Diagram of a kitchen faucet.
- marker;
- mounting tape;
- hammer;
- round file;
- center punch
In order for the diameter to correspond to the standard, first of all it is necessary to make a circle of the required size and shape from the mounting tape. The cut circle must be attached to the selected location under the mixer and circled with a marker in order to subsequently cut out a smooth hole. In addition, you need to mark the center to make the initial hole with a center punch. The tip of the center punch should be directed to the center of the circle of mounting tape and lightly tapping to punch out the initial hole. If you have a drill, you can drill with it. Next, the initial hole must be expanded with a round file to the previously marked boundaries.
Simply drilling an outlet for the faucet in a stainless steel sink is not enough, since the edges may turn out crooked, and aligning them later will be very problematic. Once you have an exit for the mixer of the required diameter, you need to carefully sand the edges of the cut, then you can begin installation. To prevent further oxidation of the metal, the edges of the fresh saw cut must be treated with a sealant. After it hardens, you can begin installing the sink.
How to drill through stainless steel
Without holes, inset sinks are sold with so-called wings. They are easy to use. You can place washed dishes or vegetables on the wings after washing to drain water.
Depending on the placement of the sink in the set, the mixer can be located in different places. Therefore, manufacturers leave this process to buyers and sellers. Branded stores that sell plumbing supplies provide the service of punching holes in sinks.
There are several ways to make a hole in stainless steel yourself:
- Cut out with a chisel, and then file the edge.
- Punch with a branded punch.
- Drill with a small-diameter drill around the perimeter of the hole, then file with a round or semicircular file.
- Contact a metalworking company.
Of these four options, the second method is the fastest, but there is one caveat. This method is the most expensive of all. The cost of a branded punch can be equal to the price of inexpensive sinks. There is no point in buying a faucet just for the sake of installing it.
In order to cut a hole in stainless steel yourself, you need to have a solid metal stand, a chisel, a hammer, and a round file.
It is necessary to cut out the metal with a small allowance of up to 1 mm. The nicks should be smoothed out using a round file.
The third option is inexpensive, but this requires an electric drill with speed control, as well as drills designed for stainless and heat-resistant steels with the addition of cobalt.
The technology is simple: we drill holes with a diameter of 2-3 mm around the perimeter at low speeds, after which we then process it with a file to the required diameter.
To make a straight hole, you need to clean up the torn edges.
Take a large grit sandpaper and make a tube out of it. Using this pipe, grind the hole to the desired size.
You can buy a step drill with a diameter of 4 - 32 mm. This drill is convenient for drilling stainless steel to the required diameter. If there is a metalworking plant nearby, it is better to go there.
Where to start drilling a sink and how to drill a sink
To drill the sink, you will need ceramic drill bits and a tungsten carbide bit to cut round holes with a diameter of 33 mm. For drilling, it is better to use a hammer drill rather than a drill. And not because the hammer drill has a stronger blow. We will not use any blow at all. The rotary hammer has a lower rotation speed, but more weight in kg. and power in W. But if you don’t have a hammer drill, then of course take a drill, but reduce the speed, otherwise the crown will be of no use.
Marking and drilling
Start by marking, this is the smartest thing you can do, decide where the hole will be where the faucet will be installed. Once you have decided, use a marker and draw a dot in the desired location.
Now load a chuck with a ceramic drill clamped into the hammer drill and start drilling. You need to make a through hole. The hole is needed so that the drill that comes with the crown can be inserted into it.
The ceramics from which the sink is made are very durable. Its strength is comparable to porcelain stoneware. If you have ever drilled or cut porcelain tiles, you will understand what I mean. Porcelain tile material is very durable, but fragile. If you are not careful, it can easily break. Therefore, you should drill a hole in a ceramic sink carefully and without haste.
First you need to drill a very narrow hole, then widen it with another drill. To start, use a 6mm drill bit. Then go to 8 or 10. While drilling, constantly cool the drilling area with cold water, pouring from a bottle or other container.
Once you've finished with the center hole, start drilling with a core bit. The first 2-3 mm. ceramics will be drilled without much difficulty, but then you will be disappointed in the capabilities of the crown. The crown will rotate on the ceramic surface without causing any visible harm to it and without going deeper than a fraction of a millimeter.
Answering Dmitry Panin’s question (https://site/forum/viewtopic.php?t=1370), I did not go into details of the terminology, since the essence of the answer would not have changed. But, preparing the material for the Master Class, I can no longer use terms so freely. Therefore, let's start with the classification of sinks.
Depending on the material used in their manufacture, the following are available on the market:
1. Stainless steel sinks. The material is traditional – food grade stainless steel.
2. ceramic sinks, which are made from refractory clay or, as Blanco makes, from porcelain ceramics (kaolin).
3. sinks made of granite chips. They are a composite consisting of 70-80% granite chips (quartz sand) and acrylic resins and pigments. Granite composite is a particularly durable artificial material. The strength characteristics of these sinks allow them to withstand the fall of a steel disk weighing 800 grams without consequences.
Therefore, Dmitry’s letter is, of course, not about a sink made of granite chips (note: “fragranite” is a Franke trademark for sinks made of granite composite), but about a ceramic sink. Sometimes this confusion in terms leads to cracks during installation, since making holes in ceramic sinks requires a specialist to take different actions than those recommended for sinks made of granite chips. So, in order.
The simplest and most versatile way to make holes for two types of sinks is to use a diamond bit (photo 1). But at the same time, naturally, it is assumed that the master has it. If it is not there, then this is where you should pay attention to the difference in the ways of doing the work. Further advice is given in accordance with the recommendations of Franke for sinks made of granite chips and Blanco for ceramic sinks.
From experience, sinks made of granite chips always contain weakened cast plugs, which should be knocked out at the time of installation (photo 2). As a rule, they are already marked with a colored circle on the front surface of the sink.
First of all, the sink should be installed loosely in the cutout in the countertop (photo 3). In this case, the elements securing the sink to the countertop are not secured.
Next, install a suitable tool and knock out the cast plugs with a strong downward blow of the hammer (Fig. 1). A suitable tool in this case would be a punch with a diameter of 8 mm or a round steel bar, and not a screwdriver! Keep in mind that the cork must be pierced only from the front (top) side.
Use a rasp to align the edges of the hole (photos 4 and 5).
When preparing to make holes in a ceramic sink, immediately keep in mind that manufacturers recommend doing anything with the sink only when it has reached room temperature. Under no circumstances should you make holes in a sink that has been brought in from the cold. An unfixed ceramic sink requires careful handling. Until the sink is installed in the countertop and the drain fittings are installed, it is not recommended to allow sharp impacts on it.
To make a hole in ceramic sinks, mark the center and draw a circle (photo 6).
Along the perimeter of the circle, holes are carefully drilled with a thin drill at a distance of 4 mm from each other (photo 7). It is best to use factory-prepared areas for this on the back of the sink (photo 8). To avoid the formation of cracks and chips, before knocking out the hole, install the sink into the cutout of the countertop or otherwise firmly fix it.
Then, from the front side of the sink, without applying significant force, knock out the drilled disk with a punch or round steel bar (photo 9).
If there is a need to expand an existing hole in a ceramic sink, then draw a circle of the required radius with the same center around the existing hole. On the front side of the sink, make frequent cuts (at a distance of 4 mm from each other) around the entire circumference (photo 10). Using a chisel or punch, lightly remove the remaining parts (Photo 11). Then use a rasp to straighten the edges of the hole.
Fulfilling these simple requirements will allow you to avoid both cracks and save time and nerves on finding the culprit, purchasing and redoing the sink. And, very banal advice, immediately hire a qualified specialist.
Submitted: July 12th, 2007
Plumbing is a fragile business. . . The main thing is to organize the workplace correctly. Therefore, it is recommended to use wooden logs, which can successfully replace a regular wooden pallet for drywall or foam concrete. Everyone who has started a renovation probably has one. You need to place the sink on a pallet, and place the intended place for drilling so that it is right between the boards. Now, in order: how to drill a hole in the sink.
The standard diameter of the part of the mixer immersed under the sink does not exceed 35mm. Therefore, standard sink holes are quite suitable. But kitchen sinks from some companies (we are talking specifically about ceramic and porcelain stoneware products) are supplied without any holes for faucets at all. This is due to the fact that some faucet models are installed on the wall rather than on the side of the sink. Therefore, the question of how to drill a ceramic sink or porcelain stoneware sink is more relevant than ever. Although, with a drill and the appropriate type of drill, this is a matter of minutes; even a teenager can handle it.
How to avoid mistakes
Let's say you decide to make a hole using a drill with a cutter.
Often, experts make a hole when the sink is already installed in the countertop. This solution has only one advantage - the edge on the front side will be smooth. But it has many more disadvantages: you can scratch the stone, damage the sink, chip the edge, and so on.
Therefore, it is better to drill a hole from the back. But there is a possibility that the hole will have an uneven appearance from the outside. However, a mixer will be located in this place, which will cover the uneven edges. There is no risk of damaging the front side of the sink.
There are two fundamentally different methods of work. The first involves working with a drill, and the second involves knocking out the weakened cast plugs provided for by the design. Let's consider each of them in order.
We make a hole in the artificial stone sink using a drill step by step:
Some artificial stone sinks have cast plugs that are knocked out during installation. They are usually color coded on the front. First of all, the sink is installed in place in the countertop, but is not fixed.
Then you need to choose the right tool and beat off the plugs with a strong blow with a hammer. A punch with a diameter of 8 mm is suitable for this role, but not a screwdriver. You only need to knock out the cork from the top: that is, from the front side. Use a rasp to smooth out the uneven edges of the hole.
Using this method, you can make a hole for the mixer.
- The center is outlined and the circle is drawn.
- Using a drill, holes are drilled along the circumference, the distance between which is 4 mm.
- To prevent cracks from appearing when knocked out, firmly fix the sink.
If there is a need to increase the radius of the hole, you need to draw another circle of the required size. All cuts are made from the same front side along the circumference at a distance of 4 mm. Using a punch or chisel, remove unnecessary parts.
Nowadays, the question quite often arises of how to drill a hole in a granite sink. A similar circumstance is connected with the fact that in most cases, when purchasing the specified plumbing product, it does not have the mounting holes necessary for installing a mixer or flush switch.
Of course, the easiest option would be the help of specialists, although if you follow basic recommendations, you can perform this procedure yourself.
Two options for installing the mixer
There are two fundamentally different options for installing a sink mixer. These options for the selected sink differ, or more precisely, whether there is a hole in the sink for installing a mixer.
In the next two photos we see two different types of kitchen sinks. The first sink has a standard diameter factory hole for installing a faucet. The second sink does not have such a hole. This means that you can make a hole for the faucet yourself or install the faucet on the countertop next to the sink.
The option of drilling a hole yourself is possible, but has a number of disadvantages. First of all, in the place of the factory hole for the faucet, manufacturers of metal sinks strengthen the sink. Thanks to this, the mixer stands firmly on the sink and does not “play” with the metal. If you drill a hole yourself, the mixer may vibrate after installation. In addition, drilling the sink yourself will damage its anti-corrosion coating at the drilling site.
Therefore, if there is no hole in the sink, then the mixer is placed on the countertop. In the photo we see options for installing a mixer next to the sink.
Stages of installing a faucet on a sink
The mixer is installed on the sink before it is installed on the countertop. It is more convenient and technologically better.
Connecting the mixer to the water supply is carried out after installing the sink with the installed mixer on the countertop or kitchen cabinet. It is better to assemble the mixer on a comfortable surface.
For assembly, prepare the mortise sink itself, a faucet with an installation kit and a flexible hose. The installation kit is included with the mixer and includes:
- Gaskets;
- Fastening washer;
- Studs (stud) fastenings with nuts.
This is the most common option for attaching the faucet to the sink, which can be called standard.
Important! Faucets vary in how they are connected to the water supply. Here I show a mixer with a connection option through a flexible connection (connection hoses), which are screwed to the mixer separately.
There are options for faucets on sale with factory-installed permanent connection hoses. When purchasing them, you need to take into account that it is impossible to repair such mixers if the connection hoses are damaged.
Faucets with removable connection hoses also have a drawback. Faucets are sold complete with short hoses. Usually they have to be changed to longer options, NOT 15 cm, but 30-40+ cm. This makes it more convenient to connect and easier to maintain.
The flexible hose is screwed to the faucet before installing the faucet. There is no need to wind the flax under the thread.
To tighten the liner at its end there is a hexagon for an open-end wrench No. 10. The tightening must be done with a slight increase in order to avoid cracking the gaskets on the hose.
After attaching the hose, screw the fastening sleeves into the mixer body (if they are included separately and not assembled at the factory).
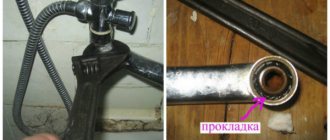
After assembling the mixer, it is installed in the sink hole. Don’t forget to install the gasket between the sink and the mixer, which comes with the mixer. The gasket can be pressed into the mixer body.
On the back side of the sink, we put a special gasket and a washer of the same profile on the mounting bushings. Next, screw the faucet to the sink with nuts, tightening the nuts until they stop.
Installation of the faucet on the sink is completed
To ensure that the fastening does not weaken over time, we fix the first nuts with second nuts, which are not included in the mixer kit and must be purchased in advance.
The result of the installation should be a strong fastening of the mixer, it should not wobble, the liner should be on the mixer.
Part No. 6 How to cut sheet metal?
Stainless steel is an alloy steel that is not easy to process. You can cut myth metal in 3.5 ways:
- thermal (metal melts under high temperatures);
- mechanical (cutting is carried out using a cutting tool by removing a layer of metal).
Thermal methods include:
- Oxygen cutting (gas arc cutting). The metal melts under the influence of an electronic arc. Oxygen supplied to the cutting zone promotes the combustion of metal and the removal of slag from the working area.
- Electroerosive cutting. The cutting process involves destroying the surface of the workpiece under the influence of an electronic discharge.
- Waterjet cutting. The metal is divided under the action of a narrow jet of abrasive consistency supplied under ultra-high pressure.
- Laser cutting. The treatment is carried out with a narrow laser beam.
- Plasma cutting. A plasma jet acts as a cutting tool.
Mechanical processing of steel is carried out using the following tools:
- Metal scissors. They handle sheets already 0.5-1 mm thick.
- A circular saw. Cutting is carried out using a cutting abrasive wheel. This method is of course suitable for cutting thick parts.
- Angle grinder. When cutting metal with a grinder, special thin stainless steel discs with a diameter of 125 mm are used. Non-specialized equipment can then cause corrosion in the metal.
When cutting correctly, the part should be firmly secured or rested against something, otherwise the workpiece may be pulled to the side and the cut will be damaged. It will be necessary to additionally process the docked edge if you cut without following the technology.
Stages of installing a faucet on a countertop
In this option, the sink can be placed before or after installing the mixer on the countertop. There is no difference, it all depends on ease of access.
A hole for the mixer with a diameter of 35 mm is pre-drilled in the countertop. The thickness of the countertops is 28 or 40 mm, and the length of the faucet mounting pins is 100 mm, so they should be enough to secure the faucet to the countertop.
Installing a faucet on a kitchen sink with your own hands does not involve any big problems. Especially if the connection is made through a flexible hose. It is much more difficult to change the faucet on an installed sink or connect the faucet to a rigid connection. More on this in the following articles.
Be sure to read the article on how to choose the right flexible hose for a faucet, it will be published on March 29. Subscribe! to receive the article by mail.