It makes no sense to talk about applying inscriptions on metal using special paints or varnishes. By the way, this is also one of the methods of engraving on metals. But how long will such drawings, symbols, and icons last on the sample? They will be washed off quite quickly with any of the solvents, although due to banal abrasion their service life will be short. There are more efficient metal engraving technologies, which we will talk about.
But are they all suitable for independent performance, and even at home? When you just read about them, everything is clear and easy. But practical implementation is another matter.
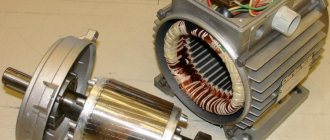
Laser engraving
This method is considered the most effective, as it allows you to apply a pattern (drawing) of any complexity to metal, “writing” the finest lines and smallest icons on it.
But taking into account the fact that engraving samples using this method will require expensive equipment, it is acceptable only for those who have decided to make this craft their business, that is, to put production on stream. It is unlikely that anyone will want to shell out a tidy sum just to put memorable inscriptions on a couple of teaspoons or on the blade of a hunting knife. The services of professionals in any workshop will cost less.
Mechanical engraving
The accessories are much simpler here - you only have to purchase a set of required cutters and the engraver itself. A drill is often used for these purposes (anyone who has ever visited a dentist knows what this is). Another option is to apply images using incisors.
The quality of the inscriptions will be high, but only if you have not just knowledge in this area, but also extensive practical experience. This work requires a “sharp eye” and a steady hand. How many of us can boast of our skills? It turns out that quite a lot of time will pass from what was conceived to actually executed, which is necessary to acquire skills. Who is happy with this prospect? In addition, you also need to be able to sharpen cutters (stiches) correctly if the work is carried out with their help.
Conclusion - for applying various inscriptions on metals at home, with your own hands, and by an untrained person (and these are the vast majority), the best option is electrochemical engraving. This technology is worth understanding in more detail.
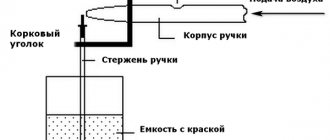
Let's consider the technique of electro/chemical etching for the purpose of applying inscriptions. It belongs to the simplest category, and anyone who has chromed metal parts at home will get the gist of it right away.
Engraving method 1
What you will need:
- Glass container (according to the size of the workpiece being processed). Naturally, not a bottle with a narrow neck, but a jar, glass or bath.
- Constant voltage source (up to 15 V). It should provide a current of 0.5 A, at a minimum. The best option is a battery charger for a personal car. This is exactly what the author used. Although some craftsmen use battery chargers for household tools (screwdrivers, etc.) and even cell phones for these purposes.
- A couple of wires for connection and clamps (for example, alligator clips).
- Any metal workpiece (the same spoon) that will play the role of a second electrode.
- Saline solution. The concentration is determined by eye, so the general recommendation is as follows: per glass of water – 2 teaspoons.
- Varnish. You will need it to paint the segment of metal on which you plan to engrave. Most articles devoted to the electro/chemical method contain tips on using the nail composition. The author, in order not to “injure” his wife with such extravagance, used the so-called tsapon-varnish, which is well known to radio amateurs and electrical installers. It costs a penny, is not in short supply, and can be easily removed with a solvent.
Engraving technology
Electrolyte is being prepared
Water is poured into the container, salt is added in the required amount (depending on the volume) and thoroughly mixed until completely dissolved. The quality of the engraving largely depends on this.
A part (product, sample) is being prepared for applying something
The dimensions of the inscription or design are known, so it is not difficult to determine the area of metal varnish coverage. After the layer “sets” a little, the required contour is drawn. What - a needle, a thin awl, a toothpick, a sharpened match and the like - is up to you, dear reader. Whatever it is more convenient to do the work with your own hands, do it. The task is to “expose” the base metal along the lines of the pattern to ensure its direct contact with the electrolyte.
You can do it differently. Wait until the varnish is completely dry, and only then “scratch” the lines. But these are already details, and it’s easy to decide on your own what’s best.
Next, the electrodes are placed in the solution
One is designated - any metal blank. It is connected by a wire to the “–” of the current source. The second is the sample on which the engraving is applied (to its “+”). The technology is similar to chrome plating of metal.
Supply voltage
The time of the technological operation is determined visually. If the etching depth suits the master, then you can turn off the charger. Typically, engraving using this method requires no more than 5 minutes.
All that remains is to remove the metal product from the bath, remove the varnish, rinse the sample well under running water and wipe dry. That's it, the engraving is done!
The drawing and inscription can also be made convex.
To do this, you need to apply varnish to previously drawn (felt-tip pen, pencil) lines (stripes). And all the rest, “uncoated” metal will be etched.
LiveInternetLiveInternet
Quote from Metodika message
Read in full In your quotation book or community!
Methods of electrochemical engraving of metals
Metal engraving! Basic principles.
The basis of the technique is the method of electrochemical etching of metals. Briefly, it is as follows: The part on which the inscription or drawing is made (previously applied with a special varnish) is immersed in an electrolyte solution; it is the anode. That is, the (+) current source is connected to it. The cathode, which is also immersed in the electrolyte solution, is a strip of stainless steel. The (–) current source is connected to it. When the current is turned on, electrochemical etching occurs, that is, the dissolution of the surfaces of the part unprotected by varnish.
The figure schematically shows the principle of the process.
The numbers show: 1. Metal part. 2. Etched area. 3. A layer of varnish keeps the metal unetched.
This is the basis. Now let's look at the whole process in detail.
1. Preparation of the part.
As a rule, it comes down to thoroughly degreasing the surfaces on which the varnish will be applied. Why is this being done? Firstly, the varnish sticks very firmly to the degreased surface, which guarantees that during the etching process it will not be torn off by parts, which will lead to irreparable defects in the form of undesirably etched areas. This can completely ruin the product.
Secondly: if there is a non-greasy area left on the surface to be etched. For example, even your own fingerprint! This fat can act as a layer of varnish, protecting the surface from etching. And then you get an etched fingerprint. This defect is unpleasant, but in most cases it can be eliminated by re-grazing.
And so we will clean the surface from foreign dirt, debris, etc. Be sure to wear rubber gloves so as not to leave fingerprints. And it’s easier to work this way in hot water.
Photo: washing the knife under running water and soap.
Degrease by soaking the part in a solution of soap, washing powder in hot water for some time. Then you need to thoroughly clean the part with a toothbrush (a toothbrush will do) in the same solution. Particular attention to blind (not through) holes. They are very difficult to wash. You can't leave dirt there. Washing is carried out under running water as thoroughly as possible. Don't take off your gloves! From now on, it is generally extremely undesirable to touch the part with hands without gloves, in order to avoid the appearance of the defects described above. If you do touch the part, it is better to repeat the degreasing process. How to check the quality of degreasing? Very simple. Water drains completely from well-degreased metal, leaving no drops or streaks. If drops remain, water sticks to the metal (exact expression), then there is fat in these places. Scrub them with a brush and solution more thoroughly and repeat washing and checking.
Another secret. An ultrasonic bath is used to degrease complex parts that have difficult-to-clean holes, crevices, etc. At home, it can be successfully replaced with a household ultrasonic compact machine. The use of ultrasound significantly reduces degreasing time and improves quality. But in most cases this is not necessary.
Small parts can be degreased by wiping with cotton wool and tooth powder moistened with alcohol. The powder contains soda, which will remove fat. A very quick method of degreasing, but it requires some skill.
Photo: degreasing with alcohol and tooth powder.
2. Preparation of a special varnish.
A special varnish is used to apply inscriptions and designs on metal. The composition and method of preparation have been developed as a result of practical work and, when following these recommendations, guarantee the quality of work. The varnish provides reliable protection of parts of the part from etching and is easily removed at the end of the process. We will need the following ingredients to prepare it:
— Gudron. The substance is black, fragile. Widely used in construction for roof waterproofing and road repairs. Sold in building materials stores in large pieces of 50 kg. For our purposes, such an amount will not be needed. Therefore, it’s easier to look for a piece of tar at construction sites, ask workers pouring roofs or repairing roads. In such cases, as a rule, fragments remain and are simply thrown away. It is important to find a sample that is clean and free of sand and other debris. The content of foreign impurities is highly undesirable and will significantly reduce the quality of the finished varnish. Main component. The required quantity is almost equal to the volume of the finished varnish.
- Rosin. A fragile, amber-colored substance. Made from pine resin. Widely used in soldering electrical products. Inexpensive. Sold in hardware stores, can also be sold as part of soldering kits, together with a soldering iron and tin. The required amount of crushed matchboxes (about 30 cc). Approximately.
- Resin turpentine. A flammable liquid used as a solvent for some paints and varnishes. Sold in hardware departments next to paint. Usually in 0.5 liter bottles. One bottle is enough.
As you can see, all three substances are readily available and inexpensive. Also not hazardous to health.
The tar must be crushed (cracked with a hammer) and placed in a metal container with a lid, in which we will prepare the varnish. Add turpentine there and stir to dissolve. You can leave it for a while to dissolve the tar pieces. Rosin is also crushed and mixed with pieces of tar. Although some sources recommend adding rosin to already dissolved tar. The main thing here is to ensure melting and uniform mixing. It is desirable to obtain the viscosity of liquid sour cream. Now you need to heat the mixture for better mixing.
Heating is carried out on an electric stove, at a low heating setting. It is not recommended to use heat on a gas burner due to the risk of fire. I highlight the most important issue of fire safety separately.
Attention! Varnish and its components are flammable!
Do not use open flame sources to heat the varnish and do not cook the varnish near the fire! Fumes from molten tar are also flammable! grayish-white smoke appears above the varnish melt , this is a signal of dangerous overheating. Do not open the lid! Vapors can flare up at any second even from simple stirring. Immediately and carefully, without jerking, remove the container with varnish from the heated stove and cool. Do not cook varnish in residential areas; it is better to do this in well-ventilated places, as a characteristic odor appears. Just in case, prepare a piece of thick fabric. If your polish catches fire, don't panic! Don't put it out with water! Cover the container with a tight lid or cover the fire with a thick cloth. The flame will go out immediately without oxygen. When extinguishing with water, you can be scalded by water vapor, burning splashes of varnish will fall on the body, clothes and objects, and then burns and a fire in the room are inevitable! Never move away from cooking varnish.
The main cause of all fires is that they forgot the varnish on the tiles and went to drink tea!
If you take reasonable precautions, you will avoid fire. There are practically no cases of fires at work these days.
Heating with stirring is carried out to a temperature of 60-70 degrees. This ensures that the components are mixed and a varnish with the required properties is obtained. Now the varnish can be cooled and stored in a container with a tight lid. The varnish will thicken slightly as it cools.
Simplified preparation of varnish. You need to purchase ready-made bitumen varnish. It is also freely available in paint and solvent departments. It is used in everyday life to protect water pipes from rust. The varnish is diluted with turpentine and finely ground rosin is added. Approximately a matchbox of rosin for 0.5 liters of varnish. Stir thoroughly under low heat until completely dissolved. Don't forget about fire safety! Cool and pour into a container for storage.
Before direct use, the varnish is diluted with turpentine to the required thickness. The varnish does not deteriorate during storage for a long time. If it thickens, you can always dilute it with turpentine.
3. Applying a design to a knife (another part).
You will say that only an experienced artist can draw a picture or an inscription. But what about someone who doesn’t have the ability to be an artist? The situation here is not at all hopeless. Even experienced artists resort to simple tricks that can significantly improve the quality and speed of drawing. Using this technique, almost any person (of course, if your hands don’t shake!) can successfully achieve good quality. A little practical experience will greatly increase your confidence in your work.
First you need to decide on the future miniature or inscription. Make a preliminary pencil drawing on a scale of 1:1 (it's called a sketch). At the same time, no one forbids you to cut out a suitable design from a magazine, newspaper, etc. with scissors. You can also run it on a computer, if you are familiar with the necessary programs, set the required scale and print it.
Photo: Preparing a sketch on the computer.
Now let's apply the design to the degreased surface of the knife, details using transfer paper! You just need to use a color translation of yellow, red, white (there is one). The transfer of black and purple colors does not leave marks on the metal.
Photo: The knife is inscribed with yellow transfer paper. Horizontal lines are also marked for writing straight letters.
Advice from an experienced craftsman: To prevent the design from shifting when copying, secure it and the transfer paper with pieces of tape. Then the drawing is translated using a pencil or pen. The line marks from the transfer paper will allow you to continue varnishing easily and accurately.
4. Painting with varnish.
To draw the future drawing and inscription with prepared varnish, you need to use thin brushes or feathers. By choosing the optimal thickness of the varnish and with a little practice, you can quickly learn how to draw the translated drawing. If you have some experience, you can also freely write with a pen, even without first marking with transfer paper.
Photo: the artist traces the translated inscription with varnish using a brush. Please note: a wooden hand rest is used. A stand in the form of a bench 3 cm high above the table surface. (width 6 cm, length 30 cm). Facilitates precision work and relieves stress, allowing you to work for a long time without fatigue. The stand prevents your hand from touching the grease-free metal surface.
The operation requires some skill and patience. Don't be discouraged if it doesn't work out the first time. You can always easily wash off the varnish using the same turpentine, solvent, gasoline (just use pure unleaded gasoline for nefras or galosh lighters, leaded gasoline is poisonous!) and try again.
It is also recommended to use special magnifying glasses and binocular glasses to reduce visual fatigue.
Photo: Binocular glasses with 5X magnification.
Doctor's advice: When working with glasses, it is recommended to break away from work from time to time and look out the window into the distance. This way the optic nerves rest and visual acuity is maintained.
Photo: The pattern on the knife is painted with varnish. Please note: continuous varnishing of areas not subject to etching has not been completed completely. This is done with the expectation of subsequent surface protection using plasticine!
5. Pre-drying the varnish.
The next technological operation is preliminary drying of the varnish to a semi-solid state. To do this, it is enough to leave the part in a ventilated place for 2-3 hours at room temperature. The varnish will partially dry and thicken.
6. Final elaboration of the drawing.
While applying the drawing with a brush or pen, you may have made some inaccuracies, mistakes and painted over those places that should have been left under the grass. Now you can fix all these defects. Using a sharpened stick made of wood, plexiglass, PCB or a thin metal needle, it is necessary to remove the varnish from excessively painted areas. You also need to clean up the edges of curved lines, making them smoother and more attractive. Trimming the edges of the lines is also important in view of the fact that the layer of varnish at the edge of the drawing is always thinner, and there is the possibility of unwanted etching. By removing varnish from the boundaries of lines, we thereby make the boundary layer of varnish thicker and increase its reliability.
Photo: tools for final elaboration of the drawing. A plexiglass stick, a needle at the end of a stick from an old brush, a fountain pen.
During final processing, an engraving operation is also performed. It involves scratching fine lines using a sharp needle attached to the end of a stick from an old brush. This way you can make very thin etched lines or write an inscription or imitate the knife number.
Removal of grains of excess varnish should be done by blowing off or using cotton wool soaked in alcohol. Alcohol does not dissolve varnish and easily removes debris. If you use turpentine, pure gasoline (galoshes) or any other solvent, the drawing will simply be washed off completely. This way you can delete unsuccessful work results, which is very possible at the initial stage.
Photo: The thin lines scratched with a needle are very clearly visible. For this operation, it is advisable to use a magnifying glass or binocular glasses.
7. Drying the varnish.
You can finally dry the varnish in various ways. Drying is a very important and responsible operation, the quality of which determines the result of the work.
The most common and reliable method is oven drying. Temperature 100-130 degrees. Drying time - 30-40 minutes. Then cool at room temperature. However, this method is used for large volumes of work. At home, we can recommend drying it in an old electric oven set to the lowest heat setting. Do not use ovens that are used for cooking! The remaining smell will linger for a long time and will make cooking impossible! If you forgetfully exceed the drying time, there may be cases of overdrying of the varnish.
Another method is natural drying. Just leave the part at room temperature in a ventilated place. Usually the varnish dries completely in 3-4 days. Drying is quite high quality, but very long. To speed up the process, tabletop heat fans are used, with the help of which drying occurs in 1-2 hours.
Photo: Drying varnish using a fan heater. 1 - fan heater. 2 - Details.
Then the cold air flow mode is turned on and the part quickly cools down to room temperature. Perhaps this is the only drying method for parts that have elements that are afraid of heating. For example, writing on a knife that already has a handle assembled. You can’t heat such a knife in a drying cabinet; you can simply burn the handle!
A special warning applies to knives in which the handle is attached to the blade using epoxy resin. When heated to 80-90 degrees, the resin softens and collapses. When it cools, it will not harden again. You can work with such a knife only after disassembling it. How to remove the handle? It’s very simple: heat the blade to 80-90 degrees and pull out the handle!
With natural drying there is practically no danger of over-drying the varnish.
A high-speed drying method is possible using an electric stove. The part is held with the help of a heat-insulating device (you can use pliers) above the heated surface of the electric stove 5-10 cm. The method is quite dangerous due to overheating of the varnish and its fire. The end of heating is considered to be the moment the temperature reaches 100-130 degrees. At this temperature, a drop of water falling on a heated part hisses and rolls along the surface. Which can serve as a simple heating indicator. This is then followed by cooling to room temperature. If you overheat a part, you can very easily dry out the varnish.
A well-dried varnish becomes rigid and does not leave a dent when pressed with the tip of the nail.
8. Danger of overdrying the varnish.
If it overheats or takes too long to dry, the varnish becomes too strong to such an extent that it becomes impossible to remove it with gasoline or any other solvent! This varnish turns into a durable coating, which can only be removed mechanically: by sanding with sandpaper or even using sandpaper!
This can very easily damage a part or a knife. Don't forget about the part located in the drying cabinet or above the tile! Better set a timer for reminders!
Forgetfulness is the main cause of dryness and fires!
Don't forget about fire safety rules! All the above precautions remain relevant during this operation!
Carefully inspect the quality of the dried varnish. It is very possible for bubbles to appear due to very rapid heating. They need to be tinted and dried for a short time.
Photo: part after etching; bubbles that arose during drying led to the appearance of undesirable etched spots (highlighted in red). The defect is irreparable.
9. Operation after drying.
Before subsequent weeding, it is necessary to additionally rinse and degrease the part, which is done by lightly wiping with cotton wool moistened with alcohol and a small amount of regular tooth powder. Then finally with pure alcohol. We have already discussed the need for this in the chapter devoted to surface degreasing. You will also additionally check the strength of the dried varnish.
10. Preparing the part for etching.
It is not at all necessary to paint over all other surfaces with the same varnish. It is enough to limit yourself only to the area around the inscription or drawing. For protection, you can successfully use plasticine, polyethylene and other available materials. Plastic lids and packaging for mayonnaise and other products can be very useful, from which it is convenient to cut out the necessary templates. Carefully wrap the knife handle with plastic wrap, securing it with electrical tape and tape. Plasticine, ordinary, for children, will reliably protect metal surfaces from etching. In general, it is necessary to try, if possible, to protect large painted surfaces with an additional layer of plasticine, which will provide additional protection against unwanted mordants. Looking ahead a little, we note that you immediately need to take care of securing the electrode, and the place of fastening also needs to be protected. At this stage there cannot be any specific recommendations; it all depends on your capabilities and the properties of a particular part. The main requirement is to provide airtight protection for parts not subject to etching.
Photo: the knife is prepared for etching the inscription. The handle is protected by a layer of polyethylene and tape. The blade is protected with plasticine. Only the etched inscription is left open.
Photo: the part is prepared for etching. Protection with plasticine. The wire for connecting the current is clearly visible.
11. Installation for etching.
The general design of the installation can be seen in detail in the diagram. It consists of a direct current source, a vessel (bath) for etching with electrolyte, stainless steel electrodes (cathodes), the part to be etched and conductors connecting the current source to the electrodes.
Let us explain in more detail.
DC source.
In general, the source must provide a constant current of 3-10 amperes; an ammeter that constantly shows the current is required. It is desirable to have protection against short circuits due to negligence, which can be successfully provided by a fuse of the appropriate rating. In practice, there is no need to purchase an expensive current source with a digital display and a built-in timer. An excellent solution is a device for charging car batteries. It is very possible that you have had it in your garage for a long time. And it's inexpensive to buy. Typically, such devices are equipped with an ammeter, a fuse and a current switch. For craftsmen familiar with electrical circuits, we can recommend assembling a homemade rectifier. I note that smoothing capacitors at the output of the current source are not at all necessary; rectified current with ripple is quite suitable. For pulsed current sources, a capacitor is still needed.
Pickling bath.
It is desirable that the bath be made of non-conducting material. For example: polyethylene, plastics, etc. The main requirement: the part must fit freely in the bath completely immersed in the electrolyte. It is possible to carry out the weeding in a metal container, but it is necessary to isolate both the electrodes (cathodes) and the part from electrical contact with each other. Remember that this significantly increases the risk of electric shock! Do not touch the metal bath while the current is on! Such a bath must be grounded. The safest way is still to use non-metallic utensils. Get creative. For example, to weed long blades of swords, sabers, checkers, use a piece of polyethylene pipe with a diameter of 150-200 mm and the required length as a bath. The bottom of the pipe is, of course, capped. Often, for weeding a single copy of a knife, it is quite possible to use a 1.5 or 2 liter plastic bottle of mineral water or beer, having previously cut off the top part. Although the electrolyte is quite harmless, it is still not recommended to use food utensils for pickling.
Electrolyte composition.
A simple solution of table salt is suitable for weeding most modern stainless steels! For a liter of plain (not distillate) hot water, add 3-5 tablespoons of salt and mix thoroughly. Sometimes it is recommended to add 8-10 milliliters of hydrochloric acid (concentrated) to such an electrolyte. Use extreme caution when handling acid! Although in practice, weed works just fine without it.
To pickle rusting types of steel, copper, brass, aluminum, add a tablespoon of copper sulfate to the salt solution. It is sold in hardware departments, fertilizers (bluish-green powder). I note that aluminum will be etched without any current being connected at all, releasing a large amount of heat. The electrolyte may boil.
The electrolyte is relatively harmless to health, you can work without gloves, but there will be stains that are difficult to wash off. After work, you still need to wash your hands with soap and warm water. It is quite possible to flush the used electrolyte into the city sewer, along with a large amount of water. The electrolyte has a limited service life. That is, during the etching process it is saturated with metal salts and gradually loses its properties. Insoluble brown and green precipitates also accumulate and contaminate the drawing and interfere with observing the process. This electrolyte needs to be replaced. Or let it sit and carefully pour, discarding the sediment.
Previously, solutions of strong acids were used for etching without the use of electric current. We don't recommend doing this. This is a rather dangerous and unhealthy process that requires exhaust ventilation; it is necessary to work with glasses and protective equipment. In addition, modern steels are so resistant to acids that it will take a lot of time with no guarantee of results.
And our simple, safe electrolyte copes with any steel!
Electrodes (cathodes, -).
The most suitable material for manufacturing is mild stainless steel. It is used to make dishes, thermoses, water tanks, spoons, and forks. Most often, the electrodes are strips of sheet steel located on both sides along the walls of the etching bath. If the part has an etched pattern on one side, it is necessary to place the electrode opposite the etched surface, otherwise etching with different (uneven) depths is possible, which is a noticeable defect. Accordingly, if we etch two opposite sides of a part (knife) at once, the electrodes should be on two opposite sides. The size of the electrodes (their surface area) is not particularly critical. The main thing is that the electrode must exceed the area being etched, otherwise an uneven etching depth may be obtained. To etch a small inscription on a knife, the author successfully used an old stainless steel tablespoon. (True, then it took a long time to clean it with sandpaper!) The service life of the cathodes is not limited. They do not dissolve during operation, but only become dirty. Metal salts are deposited on them; when brass is etched, a layer of copper is deposited on them.
Photo: brass etching. A layer of copper appeared on the electrode after 15 minutes from the start of the process, which can be easily removed by washing in hot water. After which the etching continued.
Caring for them consists of rinsing with hot water and sanding a little with emery cloth. The cathode plates must have holes to which the terminals for connecting the conductors are attached. A simple and reliable way is to clamp the wire using a screw with a nut and washers. Ensure reliable contact! A weak contact causes heating, sparking, and the electrode can turn off without you noticing! And then you will wonder why one side of the part was etched well, and the other very poorly.
Conductors.
There are two requirements: they must withstand current up to 10 amperes without heating and have waterproof insulation.
Pickling room (Click on the picture to enlarge it)
Hidden camera photo: pickling room at the enterprise. 1 - Current sources. 2 — Bath for pickling stainless steels. 3 - Plasticine. 4 - Bath for pickling brass - small. Made from a 50 liter polyethylene tank. Covered with polyethylene. 5 - Bath for pickling brass - large. 6 — Exhaust ventilation. Used for acid etching. Currently not working.
12. Etching process.
We assemble the installation according to the diagram. We pay special attention to correct polarity. We firmly fix the part and electrodes in the bath. Let's check if there is a short circuit between them. The current strength for etching a pattern on one medium-sized knife is about 3 amperes. It is necessary to set the battery charging device to the minimum current value. Increasing the current will lead to faster etching, but is still not recommended due to the possible phenomenon of varnish stripping. Monitor the process constantly. The appearance of pieces of varnish on the surface of the electrolyte indicates a possible partial separation of the varnish. It is necessary to stop the process, remove the part, carefully rinse it under a layer of water and carefully inspect it. Places where the varnish has been torn off must be repainted and dried again. Then continue the process. If you are etching a large drawing or inscription, you will need to increase the current accordingly. The etching time required is 30-60 minutes. On average, in 45 minutes you can achieve a sufficient etching depth. Check the depth visually, removing the part from time to time. To apply a knife number or a thin inscription, a small depth and time of 15-20 minutes are enough. Over time, you will gain experience and be able to accurately determine when to complete the etching.
Photo: etching in a glass jar. The electrode and the part are secured using clothespins. The electrode is located only on one side, which is not entirely correct. However, the process was surprisingly successful.
13. Washing.
Disconnect the etched part from the electrodes (after turning off the current!), remove the plasticine and other protective equipment. The varnish is washed off with a cloth soaked in turpentine. The final, final rinsing is done with galosh gasoline (for lighters).
The resulting drawing and inscription have a gray-matte background. It should be noted that in the background of the picture there are metal salts and other indelible substances and etching products. They are not harmful to health and this knife can be used to cut food. For most purposes the job can be considered complete.
Photo: Finished drawing on the knife. Etching time 30 minutes. Current strength is 2.5 Amperes. There are no defects.
Photo: Brass part. Etching is complete.
Photo: Same detail. The plasticine was removed, the varnish was washed off with turpentine. The etching depth is clearly visible. Etching time 45 min. Current strength is 1.2 Amperes. The process was successfully completed in a glass jar!
14. Additional operation for processing the background surface of the picture.
With a little work, you can give the background of the picture a metallic shine by clearing it of weed products.
Photo: The polished design has a shiny background and looks more attractive.
This is done by polishing the design, and the rest of the knife does not interfere with bringing it to good condition. Why do we need the following materials:
1. Electric emery or electric drill with a device for attaching to the table. 2. Nap circle with synthetic bristles. 3. Diamond polishing paste. The grain size is 10-40 microns or 7-10 microns. The colors of the pastes correspond to grey, blue and green. Diamond pastes have colors that correspond to the grain size. You can use pastes with a fine grain of 2-3 microns (yellow color), it will give a very good shine, but you will have to work longer.
Photo: Polishing the pattern with diamond paste with a grain size of 7-10 microns (green). Homemade emery is made on the basis of a washing machine motor.
As you probably already guessed, you need to fix the circle on sandpaper or a drill and carefully polish the design using diamond paste. The operation is so simple that it does not require a detailed description. We just need to remind you that you need to wear protective glasses and gloves when working. Hold the knife tightly! There is a great danger of cutting yourself, especially if it is well sharpened! From time to time, wipe the surface with a cloth soaked in gasoline. Quite quickly the background, as well as other surfaces, will acquire a metallic sheen.
Photo: giving final shine using diamond paste with a grain size of 2-3 microns (corresponding to yellow color). Please note: a soft fabric circle is used.
In conclusion, it can be noted that small inscriptions can be polished without using sandpaper, etc. An old toothbrush will successfully replace a polishing wheel. However, such cleaning will require much more time.
Photo: polishing a design with an old toothbrush.
15. Conclusion.
In this guide, we examined only the most important, key points of the method. In each specific case there may be deviations depending on the tasks and your capabilities. Don't be afraid to improvise and experiment! (Of course not on the customer’s things). It's safe to say that a little practice will give you confidence and allow you to achieve excellent results.
Photo: Examples of successfully completed work.
Every buyer of this technology has the right to ask questions that may have arisen while reading the material to the author of the book.
You can also count on my tips in the practical application of this technique. Questions, suggestions and complaints should be sent to mail to. I will try to answer as quickly as possible.
Features of the method
Preparing a drawing (lettering)
Everything you need can be easily found on the Internet and copied. For those who know computer graphics, this is not a problem at all. The main thing is to have a printer at hand for printing.
What to consider:
- You will have to do a mirror image conversion.
- For this technology, only a laser printer can be used. Any other type of device is not suitable.
- You will need not ordinary paper, but thin glossy paper. As an option - self-adhesive film. In this case, you need to refill so that the print falls on the substrate. You can also attach it to standard (office) paper with pieces of this film.
- The printer “brightness” mode is set to maximum.
After printing, the image is carefully cut out.
Attention! Work should be carried out with gloves to prevent contact of fingers with the pattern.
Metal preparation
It is cleaned of foreign fractions and degreased.
Fixing the stencil on metal
To prevent it from slipping in the future, it is advisable to secure it (at the edges) with adhesive tape.
Heat treatment
It involves ironing the stencil with an iron. The difficulty is that both the heating time and temperature will have to be selected experimentally. The general recommendation is no more than 2 minutes at maximum heating of the iron.
Technical features of printing on metal
One of the most effective ways to seal metal surfaces is UV printing. Printing on metal is carried out using special inks that harden under the influence of ultraviolet radiation. Thus, the dyes dry immediately after contact with the substrate and can even be used to transfer images to an unprepared surface.
A special printing machine applies ink in accordance with the sketch, which is loaded into the computer, that is, direct printing is carried out on metal without the use of intermediate printing forms. The absence of stencils and instant hardening of the ink make it possible to accurately print even complex materials that do not absorb moisture. Modern equipment guarantees accurate reproduction of the sketch.