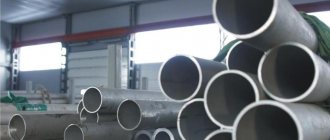
How to weld a stainless steel tank with your own hands - Metals, equipment, instructions
When performing a technological operation such as welding stainless steel, it is important to take into account both the physical properties of the material and its chemical composition. Only in this case can you count on the connection being made efficiently and reliably.
Argon welding of stainless steel
Difficulty factors for welding stainless steel parts
Welding stainless steel is complicated by the fact that this material belongs to the category of high-alloy alloys, which means that its composition contains elements in fairly large quantities that affect its basic properties.
In stainless steel, in particular, this element is chromium. Its content in this alloy can be 12–30%.
Chromium, along with elements such as nickel, titanium, manganese and molybdenum, forms the anti-corrosion properties of stainless steel, but at the same time gives it other features that affect weldability.
For those who do not like to read long articles and delve into technical details, we suggest you immediately watch two videos with the most relevant options for welding stainless steel for a home craftsman - with an electrode using an inverter and again with an inverter, but in a shielding gas (argon).
Welding of stainless steel must be carried out taking into account the following specific characteristics of this material. Sufficiently high coefficient of linear expansion
For this reason, welding stainless steel is always accompanied by significant deformation of the parts being joined.
In some cases, when the parts being welded are of significant thickness and there is no gap between them, such deformations can even lead to the appearance of large cracks.
Low thermal conductivity
The thermal conductivity of stainless steel is 1.5–2 times lower than that of low-carbon alloys. This feature of the material leads to the fact that the parts being connected in the welding zone are melted even at lower (15–20%) current strengths than when welding products made of low-carbon steel.
Intergranular corrosion
With strong heating (more than 500 degrees Celsius), so-called intergranular corrosion occurs in stainless steels. This happens because layers consisting of chromium and iron carbide begin to form at the edges of the grains of the metal structure.
This phenomenon can be avoided not only by careful selection of the welding mode, but also by forced cooling of the stainless steel parts being welded, for which you can use ordinary water.
However, it should be borne in mind that only parts made of chromium-nickel steels that have an austenitic internal structure can be cooled with water.
Overheating of electrodes with chromium-nickel rods
Due to the low thermal conductivity of the materials being joined and their increased electrical resistance, welding of stainless steel parts is accompanied by strong heating of the electrodes, the rods of which have a chromium-nickel composition. To avoid this undesirable phenomenon, use electrodes for welding stainless steel up to 35 cm long.
Welding electrodes Sabaros ME 101 3.2 mm for welding stainless steels
The most common methods of welding stainless steel
Welding of stainless steel products characterized by a high chromium content can be performed using several technologies. This includes, in particular, the following types of welding:
- argon arc (using a tungsten electrode and AC/DC TIG modes);
- performed in MMA mode with coated electrodes;
- semi-automatic arc welding in an argon environment, carried out in MIG mode and using stainless steel wire;
- so-called cold welding for stainless steel, performed under high pressure (the name of this technology is due to the fact that it does not involve melting the metal during the process of joining it);
- seam technology and resistance spot welding.
The technology for welding stainless steel parts involves thoroughly degreasing their surfaces using acetone or aviation gasoline. This is done in order to reduce the porosity of the seam being performed, to make the welding arc more stable, and to thoroughly clean the edges of the parts being joined.
Only after thorough cleaning can you begin to perform the operation using the chosen method. There are several basic methods for welding stainless steel parts, as well as technologies that are used quite rarely.
In any case, the decision on how to weld stainless steel should be based on the specific conditions and requirements for the joint being formed.
Welding with coated electrodes (MMA)
Welding stainless steel parts using MMA technology, which involves the use of coated electrodes, is the most common technology. This method is quite simple, it can be used at home, but it does not allow you to obtain the highest quality seam.
Conveniently, this kind of stainless steel welding can be done even at home, but for this you will need a special welding machine called an inverter.
In order for welding stainless steel with an inverter to produce a highly reliable connection, it is necessary to select the correct electrode for a specific grade of stainless steel.
All electrodes used to weld stainless steel products are divided into two main types:
- with a rutile coating based on titanium dioxide (welding with such electrodes, which provide small metal spatter and a stable arc, is performed with direct current and reverse polarity);
- with a coating based on magnesium and calcium carbonate (with such electrodes, stainless steel is welded using direct current of reverse polarity).
To understand which electrodes to use to weld stainless steel, just look at GOST 10052-75, which presents all types of such consumables, and also stipulates which one should be used for working with metal of a specific chemical composition. In order to select stainless steel electrodes that meet the requirements of this GOST, it is enough to know the grade of the metal from which the parts need to be connected.
All requirements for electrodes for welding stainless steel can be found by downloading GOST 10052-75 for free in pdf format from the link below.
Manual and semi-automatic welding of stainless steel in argon (AC/DC TIG, MIG)
To perform manual welding of stainless steel in an argon environment, tungsten electrodes are used.
This technology, even at home, allows you to obtain high-quality and reliable connections for products that are not very thick.
Welding with such electrodes on stainless steel is used mainly for installing communications from pipes through which gases or various liquids will be transported under pressure.
Austenitic stainless steel should be welded with particular care and caution
This technology has certain features.
- To ensure that tungsten, from which stainless steel electrodes are made, does not get into the molten metal in the welding zone, the arc is ignited in a non-contact manner. If it is not possible to do this directly on the part, then the arc is lit on a special coal plate and carefully moved to the workpieces to be joined.
- Welding stainless steel using this method can be performed with both direct and alternating current.
- The modes are selected depending on the thickness of the parts being connected. Such modes, in particular, include the parameters of the cross-section of the tungsten electrode, the diameter of the wire used as an additive, current parameters (strength and polarity), shielding gas consumption, and welding speed.
- It is very important that the alloy level of the filler wire is higher than that of the parts being joined.
- During the welding process, stainless steel electrodes should not make oscillatory movements. If this requirement is neglected, this may lead to disruption of the welding zone and oxidation of the metal in its area.
By using this technology, the consumption of tungsten electrode can be reduced. To do this, you need to keep the argon supply open for some time (10–15 seconds) after the welding process is completed. This procedure helps protect the hot tungsten electrode from active oxidation.
Semi-automatic welding of stainless steel in an argon environment, in fact, has few differences from the conventional manual method. Its main difference is that the wire is fed into the welding zone using special equipment. Thanks to mechanization, the process proceeds much more accurately and at greater speed.
Thanks to the use of semi-automatic equipment, the following welding techniques for stainless steel parts can be implemented:
- jet transfer method, which allows you to effectively weld parts of large thickness;
- short arc welding - for connecting parts of small thickness;
- Pulse welding is a universal technology that allows you to obtain high-quality and reliable connections and is the most profitable option financially.
Tig welding of stainless steel
Other stainless steel welding technologies
There are several other methods of welding stainless steel that demonstrate themselves better in certain situations, that is, they are not universal. This includes the following methods, which involve the use of special equipment.
Welding stainless steel using a laser beam
This welding method, which even looks very impressive on video, has a number of significant advantages: the metal in the welding zone does not lose its strength due to excessive temperature exposure, cools quickly, cracks do not appear on it, and grains of minimal size are formed in its structure . Equipment for laser welding and the technology itself are widely used in various industries (automobile and tractor manufacturing, installation of pipe communications, etc.).
Fuel tank repair using cold welding
If using a welding machine is impossible (for example, emergency repairs are required in the field), then the tightness of the tank can be restored using epoxy resin-based compounds. The material is applied to the damaged area, the hardener introduced into the composition ensures the polymerization of the composition.
Cold welding has good adhesion to the cleaned metal, but does not withstand vibrations and mechanical influences.
If the crack is located under the mounting clamp, then repairing the fuel tank by cold welding is impossible.
We recommend reading: How to adjust the welding current
How to choose welding
When selecting a composite material for sealing a crack, it is necessary to use mixtures that are resistant to petroleum products. This information is indicated by manufacturers on packages. An example is the Mastix Aqua cold weld, specially designed for restoring the seal of fuel tanks made of sheet steel or molded plastic. After combining the components, the mass is applied to the surface (processing of wet or fuel-coated walls is allowed), polymerization occurs in 1.5 hours (at +20°C).
Cold welding Mastix Aqua is designed specifically for restoring the tightness of fuel tanks.
Instructions for sealing a crack
To restore the tightness of the tank by cold welding, you must:
- Find the location of the fuel leak; if access to the crack is limited, you will need to drain the fuel and remove the tank from the car.
- Clean the surface of dirt and remove loose paint and corrosion products with a brush or sandpaper.
- Connect the welding components in the proportion specified by the manufacturer. Mix the ingredients thoroughly until smooth. Since cold welding has a limited application period (7-10 minutes after connecting the components), to seal large damages you will need to prepare several portions of putty.
- Apply the material to the surface of the tank with your fingers, pressing the mixture firmly against the base to eliminate cracks and penetrate the mixture into uneven areas.
- Wait 1.5-2 hours (depending on the manufacturer’s requirements) and install the tank in its original place. If the tank has not been removed from the car, then you can start using the car after polymerization of the cold weld. If a repeated leak is detected, you should repeat the repair procedure without using thermal effects or try to repair the cracks using other methods.
Using Epoxy Resin
Repair algorithm using epoxy resin:
- Prepare glue and blanks for the fiberglass patch. It is recommended to use several layers of material, each subsequent one should overlap the previous one by 20-30 mm.
- Mix the resin and hardener in the proportion recommended by the manufacturer, and then soak the first patch in the resulting adhesive mass.
- Carefully apply the patch to the damaged area, previously cleaned of dirt and traces of fuel. If there is a small leak, there is no need to drain the fuel from the tank; if there is a large leak, the tank must be cleaned.
- Wait 10-15 minutes and apply the next patch; no air bubbles are allowed to form between the layers of fiberglass.
- Install the last layer and treat the surface with aluminum powder, which is mixed with epoxy resin and provides a protective coating.
- Wait 24 hours for the final polymerization of the glue and check the tightness of the tank.
How to weld a stainless steel tank with your own hands?
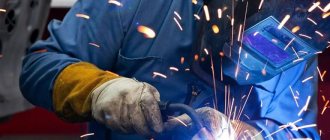
Stainless steel is widely used in various industrial areas and in everyday life. It produces durable, beautiful and reliable products. Things last a long time, but sometimes they require repairs. Most often, this is done by welding stainless steel with an electrode using an inverter unit.
Choosing the right device
Stainless steel is a high-alloy steel containing a lot of chromium, titanium, nickel and molybdenum. Metals protect against corrosion and improve the overall performance of products. It is difficult to weld the material due to its low thermal conductivity. It is necessary to use reduced voltage and current of reverse polarity.
Any brand of inverter is suitable for home use. Craftsmen often assemble models that are not inferior to their factory counterparts.
The main thing is that the unit must have a manual welding mode and the ability to regulate the current from 20 to 200 A.
To weld stainless steel, you need a device with the following functions:
- “Afterburner”, which reduces the arc voltage and increases the current;
- PV - duration of continuous operation.
The cable should be up to 6 m long. Large electrical wiring gets very hot. In case of sudden surges in the network, the functionality of the device must be maintained. It is better to take an inverter that operates at low temperatures.
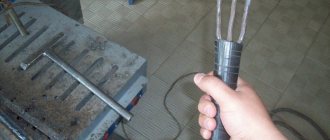
What electrodes should you use?
Welding stainless steel with an inverter using electrodes coated with magnesium and calcium carbonates. Popular brands are TsL-11 and OZL-8. The cost of consumables is low, but cheap electrodes stick and the arc does not hold well. The work requires the experience of a master. The resulting seams have anti-corrosion properties. After OK-45 or MZ-3, the slag can be easily cleaned off.
The best results are achieved when using products manufactured by the Swedish company ESAB. They are easy to ignite and hold the arc well. The amount of hot metal splashes is sharply reduced.
Even novice craftsmen produce a strong seam when working with stainless steel. When welding, you need to take into account the property of cooled slag to burst and bounce off the workpiece. It is necessary to take measures to protect the eyes and open areas of the body from burns.
When working with manual electric welding, the following electrodes are used: SEZ ZIO-8, SEZ TsT-15, ESAB FILARC 88S. They have a protective coating of calcium and magnesium carbonate.
Conventional electrode welding technology
To connect stainless steel you need to follow simple rules:
- Do not allow the workpiece to overheat to a temperature above 150°C;
- Weld at a low current, excluding unnecessary movements of the electrode. Increase wire feed speed to maximum.
- Ensure heat dissipation using copper plates placed under the parts to be connected.
- For thick stainless steel sheets, use multi-pass welding.
- Use special electrodes. Simple ones produce a low quality seam.
During operation, the joint is degreased. The method allows you to maintain a stable arc. The current value is from 80 A. Heat-removing copper plates are placed under the workpieces. To ensure reliable arc burning, the distance between the metal and the electrode is 2-3 mm.
Method using an inverter
The job requires experience and is not available to every beginner.
Advantages of welding stainless steel with a conventional electrode:
- low cost of equipment;
- low weight and dimensions of the device;
- ability to weld parts up to 2 cm thick;
- possibility of working without protective gases and fluxes.
Disadvantages of this method:
- formation of a large amount of slag;
- destruction of the coating followed by overheating of the electrode;
- current limit;
- increased time costs.
The work is carried out in three ways:
- Using manual methods. The joint between the parts is filled with molten electrode material. Only an inverter is used for operation.
- Connecting workpieces with a tungsten electrode used for thin sheets. The weld is obtained by melting the workpiece and filler wire. The welding site is protected by a layer of gas.
- Semi-automatic operation with wire feeding. Speed increases along with productivity. It is recommended to add carbon dioxide (up to 2%) to argon.
Before you cook stainless steel with an inverter at home, you need to properly prepare the apparatus and materials.
Necessary consumables
Using an inverter, you need to prepare everything necessary for work:
- unit of the appropriate type;
- solvent;
- steel bristle brush;
- personal protective equipment;
- electrodes;
- crocodiles - grounding clamps;
- cables with a length of 2 to 6 m.
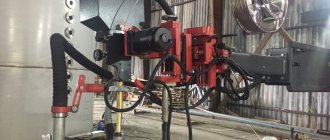
Joining sheets with a thickness of 3 or 4 mm and obtaining a high-quality seam becomes a difficult task, which can be accomplished using an inverter with an oscillator and the ability to carry out argon arc welding (TAW).
The popular device Aurora PRO INTER TIG 200 PULSE can become such a device. ADS allows you to create beautiful and durable seams on thin sheets or pipes.
Inverter setup
Before welding, the machine is set up correctly. This is done by switches on the instrument panel. The required values can be seen in the table:
| Workpiece thickness | Current value (A) | Voltage (V) | Electrode diameter |
| 1,5 | 40 — 60 | 13 | 2 |
| 3,0 | 75 — 85 | 15 | 3 |
| 4,0 | 90 — 100 | 16 | 3 |
| 6,0 | 140 — 150 | 18 | 4 |
| 8,0 | 150 — 180 | 20 | 4 |
| 12,0 | 180 — 220 | 22 | 5 |
| 15,0 | 220 — 260 | 26 | 6 |
When working in semi-automatic or argon-arc welding mode, the flow rate of inert shielding gas is set. Everything is done experimentally. Optimal values are 6-12 l/min. The movement of the wire during automatic feeding is adjusted to the maximum speed, which gives a high-quality seam.
Process step by step
Before work, the master must perform the following steps:
- remove dirt from the workpiece next to the future seam with a steel brush or emery cloth until it has a natural shine;
- treat the welding area with solvent or acetone to remove traces of fat;
- remove chamfers from workpieces with a thickness of 4 mm or more to fill the joint with molten metal;
- treat the rest of the metal with a solution of chalk in water so that hot drops do not stick;
- leave a compensation gap of 1-2 mm between the parts;
- connect thin sheets without gaps;
- place heat-dissipating plates under the workpieces;
- Thick parts should first be heated until they reach 150-170°C.
When working with direct current, reverse polarity is installed.
Post-weld treatment
At the end of the work, the parts are cooled naturally. You cannot speed up the process by pouring water on them. This will lead to the formation of microcracks. After cleaning the slag, the seam is ground and then polished.
For refining, abrasive materials containing aluminum or zirconium oxide are used. Corundum products are not suitable.
To ensure that the joint remains durable and aesthetically pleasing, it is coated with a paste with anti-corrosion properties. If these recommendations are not followed, the quality of the product will decrease due to the occurrence of rust spots.
Instead of a conclusion: manual welding is often used for small household and industrial problems. It is used to connect pipes, stainless steel tanks and other products in the country, in the house, in the garage. Repaired items last for many years.
Welding stainless steel at home: options, tips, videos
When performing a technological operation such as welding stainless steel, it is important to take into account both the physical properties of the material and its chemical composition. Only in this case can you count on the connection being made efficiently and reliably.
Argon welding of stainless steel
Plastic tank repair
Since the 90s last century, a massive replacement of steel tanks with plastic tanks, characterized by corrosion resistance and reduced weight, began. An additional advantage was the ability to manufacture containers of complex geometric configurations (to increase capacity when located inside a niche under the body floor).
The polyethylene used for casting has high mechanical strength and elasticity; the tank can restore its original configuration after hitting an obstacle.
Preparing the gas tank
Preparing a tank for repair consists of the following steps:
- draining fuel and removing vapors;
- flushing the tank with water and identifying through holes;
- sealing cracks with glue or using external thermal influence;
- leak testing;
- reinstallation on the vehicle.
We recommend reading: How to weld hinges and awnings on gates yourself
Seal the crack
Algorithm for repairing a tank with glue:
- Clean the surface from dirt and sand it with sandpaper.
- Wipe the area to be repaired with a degreasing compound.
- Impregnate the fiberglass patch with epoxy resin and glue the element to the surface.
- Gently smooth out the patch, removing any air bubbles.
- Wait a few minutes and stick on an additional piece of fabric that overlaps the edges of the primary patch by 20-30 mm.
- After polymerization of the resin, fill the repaired area with bitumen mastic to protect the fiberglass from the effects of road reagents.
Soldering
For soldering you need a hair dryer, an electric soldering iron with a power of 40-60 W with a flat tip and sheet plastic. Detected cracks must first be repaired with a heated soldering iron. Then strips of plastic should be applied, heating the joint line with a stream of hot air from a hair dryer (temperature +330°...+350°C). It is necessary to go along the edges of the patch with a soldering iron, providing additional sealing.
To increase strength, you can apply another layer of plastic strips directed perpendicular to the primary patch. After soldering is completed, the restored surface must be treated with an abrasive tool. For soldering, polyethylene strips from fender liners (for example, from VAZ cars) with a thickness of at least 2.5 mm are used. The width and length of the patch blanks are selected depending on the size of the area being repaired.
Using a rivet or self-tapping screw
To eliminate minor damage on the road, use a screw with a piece of rubber, which is screwed into a hole in the tank. Some owners use aluminum blind rivets instead of screws. Rubber that swells under the influence of petroleum products additionally seals the damaged area. The technology is not highly reliable and is suitable for emergency repairs. It is recommended to restore the seal using epoxy glue or soldering.
Welding a water tank with your own hands
For many residents of high-rise buildings, the problems of owners of private houses are not known. For example, welding a tank to fill it with water can only cause an ironic smile among city residents. Meanwhile, the question is not idle. The urgency of the problem lies in the question of which path to take - order a finished product or weld a water container yourself.
Two options for resolving the issue
To make a container for collecting water, you can seek help from specialists. They will weld a barrel or tank according to your drawings and dimensions or offer their own design option. But for quality products you will need to pay a hefty sum.
Therefore, many residents of the private sector choose the second option: to make containers themselves, while receiving savings on their own money and moral satisfaction from the welding process.
Application options
Storage tanks are relevant in places where there are interruptions in water supply. Indoors, water tanks are most often installed in a horizontal position.
The tanks are used to store rainwater and tap water. With their help, you can organize an outdoor shower or keep them for fire safety purposes so that you can extinguish the fire.
They can store water for watering plants, gardens and vegetable gardens. Often round tanks are installed in a bathhouse to store water. There are many designs that can be round, rectangular or other shapes.
It is important to understand what the tank is for. If it is used inactively, the water in it promotes the growth of algae and microorganisms. Moreover, if the container is constantly located in an open area under the sun's rays.
Therefore, choosing the volume of the tank is one of the main tasks before starting its manufacture. Ferrous metal tanks must be primed and painted to prevent them from rusting.
Welding stages
At the initial stage of welding, boards must be placed under the corners of the sheet, which will serve as the bottom. It is important that the thickness of the substrate is the same. This will give an even plane along the entire length and in the corners of the structure.
During the welding process, it is necessary to constantly check that the sides do not extend beyond the base. You can immediately grab all sides together, then weld them to the base.
The sheets should fit tightly to each other. The next stage is the final welding of the seams. Welding can be done inside the tank or outside.
There should be no lack of penetration. Self-welding takes about 7-8 working hours.
It is recommended to make the structure rigid. To do this, use squares inside the tank and on the outside. To drain the water, a pipe with a control valve is welded into the lower part.
You definitely need to put aside your laziness and check the structure for leaks . After completing the work, you should prepare a chalk solution and apply it to the seams from the inside.
When it dries, use a cloth soaked in kerosene to go along the seams of the tank from the outside. Purpose: identifying “lack of penetration” clogged with slag. It only takes a few minutes to control.
If the liquid does not appear, then everything is fine. If stains appear, the problem area should be boiled again. It is best to check and re-weld immediately before painting.
Installation can be done on pre-laid bricks, but it is better to use a stand. Next, fill the tank with water and observe for several days: no liquid appears on the walls of the structure.
Made of stainless steel and aluminum
When making a stainless steel tank yourself, it is recommended to use 1.1-2 mm metal. To prevent swelling of the filled structure, expansion tanks must be installed to protect against excessive pressure.
You can use food or technical steel as a working material. It is clear that food grade stainless steel will cost more.
Common welding methods include working with tungsten electrodes in argon or ground electrodes. A semi-automatic argon welding option using stainless wire is possible.
Aluminum tanks can be welded independently, but the process involves fulfilling a number of technical conditions that are only subject to specialists:
- it is necessary to calculate the dimensions of the water tank;
- choose the right grade of stainless material;
- calculate the wall thickness to avoid swelling of the structure;
- when using a hatch or roof, determine its type;
- determine the presence of partitions, frame and edging;
- possess welding skills.
Much in this process depends on the welding machines used and the skill of the welder. If welding is done incorrectly, microscopic cracks may appear, through which liquid will leak over time.
Typically, water storage tanks are made from stainless steel. It is better to order containers for a bath made of stainless steel from a permanent production facility. There is no need to paint them, because when heated, the paint will evaporate, polluting the air and water.
Expert advice
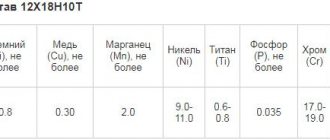
If you nevertheless decide to carry out your plans on your own, you should take into account that the most suitable grades of steel for storing water in this case will be 08Х17 (aisi 430) and 8-12Х18Н10 (304).
As for the volume of the stainless structure, in a bathhouse designed for 2-3 people, it is more advisable to install a water tank from 50 to 80 liters. According to the formula, 25-30 liters of water per visitor.
Manufacturers usually offer 1 mm thick sheets for tanks. When welding yourself, it is recommended to use sheets with a thickness of 1.2-1.8 mm. Design options may vary in size and shape.
Welding water tanks made of aluminum is a complex process that requires the master to have practical skills in working with this metal, an understanding of the drawings and two hands that are friendly with the tool.
Making tanks for showers, baths and other needs can be done on your own, although desire alone is not enough. If something doesn’t work out, you can consult a person with welding skills.
Self-production allows you to get the most practical design, invaluable experience and save money.
Fuel tank repair rules
Before welding a fuel tank (regardless of the type of fuel), the following rules must be observed:
- all work should be carried out on a container removed from the car;
- before starting soldering or welding, it is necessary to remove liquid fuel and vapors;
- Before processing with a gas torch flame or arc welding, it is recommended to fill the tank with water, which will eliminate the risk of ignition of residual fuel vapors.
Removing the gas tank
For dismantling you need:
- Bring the fuel level up to the point where the emergency fuel level indicator light turns on.
- Remove the fuel pump fuse and start the engine to produce fuel from the line.
- Disconnect the tube and disconnect the power cables for the pump and level sensor.
- Remove the metal clamps and carefully remove the tank (the machine should be installed on an overpass).
The removal algorithm depends on the design of the vehicle. On carbureted vehicles, pressure relief is not required; it is enough to disconnect the tubes and cables from the module in the reservoir body. Then you will need to unscrew the bolts of the mounting clamps and dismantle the tank.
We recommend reading Technology for welding pipelines under pressure
Before starting work, the gas tank must be removed.
Washing and cleaning
To remove residual gasoline or diesel fuel, you must:
- Unscrew the cap and carefully drain the fuel into the funnel installed in the neck of the canister.
- Remove the fuel module and collect the remaining flammable liquid with a syringe or medical bulb.
- Leave the tank in the open air for several hours. Some owners practice purging the tank with a stream of air supplied from a household vacuum cleaner, or connect a source of carbon dioxide (for example, from a fire extinguisher). It is allowed to evaporate the tank with a flow of exhaust gases supplied through an elastic hose from the muffler tip of another car. To completely remove fuel residues, it is necessary to rinse the container several times with running water.
Identifying the location of the leak
To determine the location of the leak, it is necessary to install the fuel module in place, close the ventilation ducts and install a plug with a line connected to the compressor.
The outer part of the container should be covered with a soap solution; when excess pressure is applied (up to 1.5 atm), the air escaping through the cracks will begin to inflate bubbles. The technician needs to mark the damaged area with a marker or quick-drying paint.
Difficulties in welding stainless steel with conventional electrodes
If you have not encountered welding household stainless steel before, you may encounter a number of difficulties during the work. Stainless steel contains up to 40% chromium, which provides a high level of corrosion protection. Due to the large percentage of chromium in the composition, there are welding features:
- low thermal conductivity, which results in lower melting temperatures. This is important to consider when welding to prevent the formation of holes;
- risks of deformation due to incorrect choice of temperature conditions;
- the formation of cracks as a result of the large thickness of the base and the small distance to the connection;
- heating above 500 degrees may cause layers of iron and chromium carbide to appear;
- loss of corrosion resistance due to improper welding conditions. In this case, the material will be of poor quality and susceptible to oxidation. To prevent this, treat parts with a protective solution or control the heating temperature.