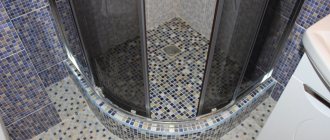
Shower cabins are gaining popularity every year.
This trend is not surprising, since plumbing fixtures are compact in size and have good performance. The market offers a wide range of models equipped with faucets, siphons, and hydromassage panels. But any fixture breaks, and the shower stall is no exception. Then the question arises: how to fix the breakdown?
There are two options. The first is turning to specialists who charge a lot of money for services. And the second is an independent solution to all problems. Of course, repairing shower cabins with your own hands is a troublesome process. But if you have the knowledge and skills, you can fix the problem yourself, saving money on the services of qualified technicians.
The main reasons for the malfunction of the shower cabin or its tray
Before you begin repair work, you need to find out the cause of the malfunction of the shower stall or tray. Based on the experience of specialists, most often they arise:
- due to poor quality installation of the structure;
- due to violation of the operating rules specified in the product instructions;
- due to voltage fluctuations in the electrical network;
- due to a manufacturing defect.
Simple breakdowns of the shower stall can be repaired yourself.
Breakdowns can also be divided into three types:
- Plumbing (cracks in the hose, malfunction of the siphon, mixer or its watering can).
- Electrical equipment (radio, lighting elements, steam generator, other sensors).
- Structural elements (cracks in the tray or glass curtains, malfunction of door rollers and hinges, as well as operational wear of other plastic elements).
You can fix a malfunction of a shower cabin or tray yourself only when the technician understands it. Unprofessional actions can lead to new breakdowns, as well as the need to replace the entire set of the product.
Causes of defects in pallets
The manufacturer issues a guarantee for high-quality shower cabins. It does not cover all problems that arise during operation.
Pallet malfunctions:
- Manufacturing defects. It is expressed in the presence of voids in the body of the device or a violation of geometric proportions. You must contact the seller, exchange the defective product for a high-quality analogue, or return the money.
- Incorrect installation, preparation of the base. An uneven surface contributes to deformation and gradual destruction of the material, which is under stress from critical loads.
- Operating a pallet with a weight exceeding the permissible limit. As a result, small cracks appear.
- Impacts, mechanical impact. They lead to deformation and cracking of acrylic and plastic.
- Excessive or insufficient tightening of fasteners (looseness, chips, cracks).
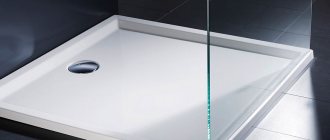
View of the shower tray.
Detailed DIY troubleshooting instructions
If the homeowner decides to fix the problem himself, during the work process he will need the following tools and materials:
Shower repair tool kit
- hammer;
- screwdriver;
- pliers;
- electric drill;
- special glue;
- sealant for plumbing equipment;
- container with liquid acrylic;
- putty;
- special hardener.
Attention! If the parts cannot be restored, they must be replaced with new ones.
Shower siphon repair
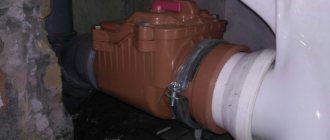
A broken siphon results in an unpleasant odor in the shower stall. In order to repair the siphon in the shower, remove the tray screen, unscrew the top part of the siphon and replace it with a new one.
Replacing a sewer siphon is a very labor-intensive process. During this type of work you will need rubber gaskets and special tools. It may also be necessary to clear a blocked bend. To do this, disassemble and clean the siphon.
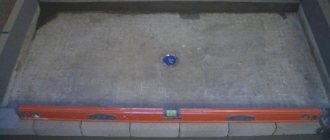
Repairing a cracked pallet
Of course, you can fix the problem by installing a new tray or acrylic liner (although it is not so easy to find one on sale), but this requires a large financial investment. The ideal option is to fix the damage yourself using available tools and special materials.
Cracks in an acrylic tray can be repaired using liquid acrylic
During the work it is necessary:
- Carefully remove the shower frame and damaged tray.
- Wash the tray from dirt and soap deposits and dry thoroughly.
- Join the resulting crack (a special drill attachment is suitable for this purpose). To prevent the crack from increasing in size in the future, two holes must be made along its edges using a special drill attachment.
- Using an alcohol-based solvent or a special liquid, thoroughly degrease the desired area.
- Strictly following the instructions, prepare a mixture of acrylic and hardener.
- Apply the substance to the desired area (make sure it fills all cracks and crevices).
It is important to distribute the acrylic evenly over the surface - Let dry thoroughly.
- Remove all irregularities using sandpaper.
- Install the updated tray and sliding curtains into place.
- Seal all cracks and seams with sealant.
Important! If there is a through hole in the pan, it can be repaired using fiberglass and epoxy resin.
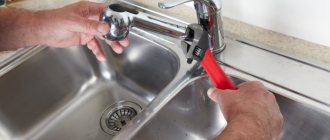
Do-it-yourself plumbing repairs
During the operation of shower stalls, the mixer quite often fails, and the drain system in the form of a siphon or a special cartridge for supplying water from the pipeline also becomes clogged. You can easily and quickly fix the following problems related to plumbing fixtures on your own:
- breakdown of the shower head - complete replacement if the switch fails;
- blockage in the sewer siphon - dismantling the pan and drain structure, followed by cleaning and degreasing the plumbing fixture, as well as installing all parts of the structure in place;
- failure of the shower mixer - dismantling the element and cleaning the filter from rust or small clogging particles;
- faucet leakage - replacing a worn rubber ring or gasket, tightening all loose nuts.
There are several breakdowns that cannot be repaired, so in this case it is necessary to completely replace the inoperative element. Such situations include the failure of the cartridge responsible for switching the system to the “shower” mode or water supply.
It is important to remember that any dismantled clogged parts of the shower cabin should never be cleaned using aggressive compounds or abrasive cleaning agents. Only a systematic preventive inspection of the shower stall will allow you to promptly identify and correctly eliminate breakdowns of expensive plumbing equipment.
Malfunction of rollers on sliding curtains
Another common breakdown is the malfunction of the rollers on sliding curtains (doors). This causes creaking, jamming of doors and their difficult opening, which leads to the impossibility of normal functioning of the cabin. There is only one way out - their immediate replacement.
Important! High-quality rollers are made of stainless steel or brass.
To replace faulty rollers with new ones, you must:
- Carefully remove the sliding curtains.
- Remove the broken rollers using pliers and a screwdriver.
- Install the purchased parts, adjust the nuts.
To replace the roller you need to select a part of the appropriate size - Install sliding curtains.
- Check the functionality of the new design elements and the quality of the craftsman’s work.
Important! To prevent corrosion of metal elements, it is necessary to treat them with a special substance that will resist the formation of rust.
Door roller repair
The rollers cannot be seen immediately, since they are located at the bottom of the plastic or glass door and are covered with decorative overlays.
Despite the tight closing lining, water still penetrates into the rollers. The result of contact of metal parts with water is known to everyone - bearings become covered with rust or become clogged with lime and other contaminants found in tap water.
The need to repair or clean the rollers is indicated by difficult opening of the door, the appearance of strange sounds of the door opening, or its partial blocking. You can solve the problem of how to fix a shower stall yourself. To do this, you should prepare a rust remover, kerosene, grease, a screwdriver and pliers.
The shower roller repair process is as follows:
- First you need to remove the decorative trim.
- Next you need to unscrew the fasteners and remove the roller.
- Now remove the seal, allowing access to the bearing.
- The selected product must be used to remove traces of rust.
- Then you need to treat the bearing with kerosene.
- The bearing is lubricated and the seal is installed.
- Check the performance of the roller.
- Place the roller in place and install the decorative trim.
Finally, you should open and close the door several times to check the quality of the work done. After proper repair, the door should open smoothly, without extraneous sounds, delays or jerks.
The process of cleaning rollers largely depends on the neglect of the situation. If the problem is solved at the first stage of its occurrence, then there will be no difficulties with repairs. Otherwise, restoring the performance of the rollers becomes somewhat more difficult. Of course, you can purchase new parts, but it may be difficult to select the size.
Shower stall leaking
A puddle on the bathroom floor after water procedures is the main sign of a leak. The main reason for its occurrence is improper installation of the shower cabin (tray) or poor processing of joints and seams.
To remove the root cause of the leak, you must:
- Use a sharp knife to cut off the remaining sealant (movements must be careful so as not to scratch the surface of the structure or wall).
- Remove the shower stall.
- Wash all elements thoroughly and degrease.
- Apply sealant to the required areas (the next stages of work should be carried out after the substance has completely hardened).
Applying sealant - Install dismantled structural elements.
- Once again cover all joints and cracks with sealant.
To avoid new leaks, it is necessary to systematically treat all surfaces of the shower stall with special chemicals. They help remove soap and limescale deposits, which have a detrimental effect on the sealant.
Required tools and materials
To repair the pallet, you need to purchase the following components:
- ethanol;
- acrylic liner or piece of fiberglass (for repairing through holes);
- sandpaper of different grain sizes;
- tape, scissors, brush;
- spatula with a rubber tip.
It is better to use an angle grinder and a drill with attachments.
To insulate the pallet you will need an acrylic two-component mixture. Prepare the composition immediately before applying to the damaged area. Degrease the acrylic surface only with medical alcohol or substances recommended by the manufacturer. Treatment with compounds based on acetone or petroleum products is not allowed.
Angle grinder.
Malfunction of plumbing equipment
Another possibility of a malfunction in the shower stall is a breakdown of plumbing equipment. This may include: malfunction of the watering can, cracks in the hose, clogged siphon and breakdown of the mixer.
- The main reason for watering can failure is a faulty switch. To avoid this, you just need to change the watering can itself, especially since it is not that expensive.
Shower head repair - Siphon blockage is a common problem, the solution of which requires a lot of effort and patience. To remove it, you need to completely dismantle the pan, remove and disassemble the siphon, clean it, and put everything back in place.
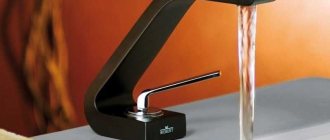
- The faucet is another weak point in the bathroom that requires special attention. If it becomes clogged, then you just need to clean its filter to remove the accumulated debris. But if the body itself becomes covered with cracks, then you should definitely and immediately replace the faucet in order to avoid more serious problems. Particular attention should be paid to the mixer switch. If a leak has formed above it, then you only need to tighten the nuts and replace the worn gaskets.
Repairing a shower cabin or tray is a simple and interesting job. Every homeowner can do it with their own hands - it won't be difficult. This will help save a lot of money on the work of expensive specialists, and this is very important for filling the family budget. Detailed instructions will help you complete the required amount of work - clearly, quickly, competently and confidently. Try, try, and everything will definitely work out!
Shower door repair: video
DIY shower cabin repair: photo
Other types of shower repairs
Various problems can occur in shower stalls. Many of these are due to leaks in pipes and connections that are hidden behind the shower panel. These types of problems are easier to prevent than to fix. The panel is connected to the rear walls of the booth, and to access communications it is necessary to completely dismantle it. The exception is the shower box, which is not attached to the wall, and repairs are therefore easier. To troubleshoot problems with it, you can simply move it away.
In addition, minor damage such as wear of rollers and door handles may occur. In this case, before repairing the shower, you will not have to study complex instructions, since the repair is simple.
This is what shower door rollers look like.
As a result of the aggressive influence of various means or mechanical damage, traces of corrosion may appear on metal parts. To eliminate them you need to:
- Sand the damaged area.
- In case of deep damage, apply auto putty and sand again.
- Degrease the surface.
- Blow out paint from a can.
If the cabin leaks, it is necessary to seal the equipment. Before doing this, remove the old sealant and wash the frame with soapy water. Dry, degrease and apply new sealant.
Glass replacement
Glass doors in the cabin are quite fragile parts. They can easily be damaged upon impact. Even if a minor crack appears, the structure should be disassembled and the damaged glass pulled out. The procedure must be carried out carefully so as not to get injured, because when dismantling the glass, the crack may increase.
Glass for shower cabin
The cost of this procedure will not be very cheap. New glass will have to be ordered in the required sizes. But this will ensure safe use of the device. You should not try to cover up or seal the crack that appears. This will extend the life of the glass for a short period of time, but soon the glass will have to be replaced.
Fixing shower glass
Prevention of breakdowns
Do not forget that the shower stall should be looked after. But it won’t be enough just that you keep it perfectly clean. The mechanical components of the cabins should be checked periodically: the mixer, hoses and everything else, so that there are no malfunctions anywhere. Also, before installing a shower stall, you should install filters on the water pipes. This is done so that sewage does not get into your home from the sewer along with the water, which will negatively affect the operation of the entire shower stall mechanism.
The best posts
- How curtains are finished: popular options
- Application “Migratory birds” made of paper and leaves using do-it-yourself templates
- City wallpaper on the wall: photo in the interior, winter Paris, London with a night pattern, black and white, Venice, view, image of New York, video
- Popular women's coat models: sewing patterns
- Green crochet tunic with pattern
- Decorating a room with balloons
- DIY plywood box
- Autumn paper crafts: quilling and scrapbooking - 2 master classes + 40 photo ideas
Leaks in cabin structure connections
This is exactly the case when it is impossible to do without dismantling the shower cabin, otherwise the result of the repair will be temporary, and within a week traces of leaks will again make themselves felt. The first and main cause of leaks is improper assembly of the structure and leakage of its connections.
Repair of shower cabin connections from leaks
The essence of the repair is disassembling and reassembling the shower cabin in compliance with the basic rules:
- the pallet should fit as tightly as possible to the wall, which ensures its rigid fixation. To do this, hooks are attached to it from below, which press it against the walls. After installing them, the pallet is slightly moved away from the walls, silicone is pumped into the resulting gap, and then the pallet is pressed tightly against the walls using hooks. At the same stage, it is filled with water, which allows you to control its tightness. The final touch is the installation of decorative corners, which can be attached immediately;
- Leaks can appear at the junctions of the walls with the cabin screen, and at the junctions of the screen with the pallet. To eliminate traces of leakage, the screen is removed, the joints with it are thoroughly cleaned of remnants of old silicone and filled with new silicone, after which the screen is installed in its original place. All fasteners are securely clamped, and the structure is left until the sealant has completely dried (6-8 hours).
If you follow the basic rules of repair and use high-quality materials, you can forget about leaks for a long time. Now your shower will look and function like new.
Baths, saunas and swimming pools
12 votes
+
Vote for!
—
Vote against!
An excellent solution for a small bathroom would be to install a shower stall in it. These devices are quite easy to use, easy to clean, and have a large number of functions. However, there are situations when shower stalls or certain components break down. Let's look at how to repair a shower stall below.
Table of contents:
- Shower cabin repair: options and causes of breakdown
- Features of repairing a shower tray with your own hands
- How to repair shower rollers yourself
- DIY shower cabin repair
- How to repair a shower faucet
- Repair of shower mode switch
Shower cabin repair: options and causes of breakdown
There are two options for repairing a shower stall. Solve all problems yourself or call a specialist. The second option will cost more, but will require less time to complete. The option of carrying out repairs in the shower stall yourself will be more complex, but less expensive. First of all, you should start by determining the cause of the breakdown. The main reasons why shower cabins break:
- carrying out poor-quality installation of a shower cabin;
- improper operation of the shower cabin;
- problems with sewerage or water supply;
- problems with power supply.
As a result, there are several types of breakdowns of shower cabins:
1. Damage to the body of the shower cabin. In such situations, the hinges or rollers that help open or close the locks break. In addition, in some cases, parts in the cabin wear out, cracks appear in the pan or glass elements.
2. Problems with plumbing equipment. In the process of repairing such shower cabins, it is necessary to replace the mixer, siphon, watering cans or various types of hoses.
3. Problems with power supply. In modern versions of shower cabins there are various types of devices, in the form of lighting, a radio receiver, sensors responsible for water, its temperature, loudspeakers or steam generators. If problems arise with them, you should check the power supply to these mechanisms.
Please note that it is better not to solve problems related to electronics without experience in this industry on your own. Since there is not only a risk of damage to expensive equipment, but also of receiving an electric shock.
In order to repair a shower stall with your own hands, you will need a certain set of tools, the composition of which depends on the main problem. However, most often, in the process of repairing a shower cabin, tools are used in the form of:
- hammer;
- glue, silicone sealant;
- putties with water-repellent properties;
- sharp knife;
- set of screwdrivers;
- plumbing sealant;
- pliers;
- liquid acrylic;
- drills.
If certain parts cannot be restored, then alternative parts should be purchased to replace them.
Features of repairing a shower tray with your own hands
If you have problems with the tray in the shower stall, work on its repair should begin first of all by inspecting it. There are situations when the pallet cannot be repaired and needs to be completely replaced. However, buying an identical pallet is a very difficult matter, so most often they try to restore it on their own.
If you observe cracks on the surface of the pallet, then to eliminate them you will need to perform the following steps:
1. The first stage is dismantling the tray and the shower cabin itself.
2. Next, you should inspect the pallet and take measures to restore it.
3. After this, remove the pan and clean it of dirt and rust, and then clean it.
4. The crack on the pallet needs to be jointed; this will require a drill. With its help, the crack increases by several millimeters. To avoid further expansion of the crack, holes should be installed at its end sections to prevent the occurrence of this process.
5. Next comes the process of degreasing the working surface. To do this, it is enough to use any solvent that has an alcohol base. Please note that the use of solvent on any other basis is unacceptable, as it may affect the structure of the acrylic coating.
6. The next stage is the preparation of a composition based on liquid acrylic and substances in the form of hardeners. For the technological correctness of this process, study the instructions from the manufacturer, which indicate the exact proportion of acrylic and hardener.
7. Apply the previously prepared composition to the surface of the crack. Try to distribute it evenly on the surface so that the gap is completely filled, but at the same time the solution should not be layered on it too much.
8. It is recommended, if possible, to install the tray outside so that the acrylic composition dries faster. After this, you should sand the surface using sandpaper.
9. Next, you should install the pan in place and check the tightness of the previously repaired crack.
If a through hole is formed in the shower tray, additional use of fiberglass and epoxy fiber will be required. Such materials can be applied to the outer part of the acrylic-based liner, and the application is carried out in several layers. Since epoxy resin has a fast drying time, the work is carried out very quickly.
In order to prevent damage to the tray in the shower stall, certain preventive actions should be carried out, the meaning of which is to install a brick cushion under the bottom of the cabin. To fill the empty space, just use foam.
How to repair shower rollers yourself
Quite frequent normal use of the shower stall prevents problems with opening or closing it. In this case, the main element that fails is the door roller. If you have this type of problem, you should replace the shower rollers.
Before you start replacing the rollers, you should decide on their diameter. In this case, it is permissible to use elements whose diameter differs by no more than half a centimeter. In addition, it is necessary to determine the exact width of the groove opening and the interval of the side opening of the door. High-quality models of door rollers installed in the shower stall should be made of brass alloy or stainless steel. In order to replace damaged elements and repair Apollo shower cabins, follow these steps:
- dismantle the doors and remove the rollers from them; in order to complete this process you will need pliers and a Phillips screwdriver;
- This is followed by the process of installing new elements and tightening the clamps that hold them in place;
- put the doors in the reverse position;
- adjust the rollers; they should be installed in such a way that the sashes fit tightly and hermetically to the frame.
This process is not particularly difficult; the most basic tools and skills in working with them are enough to carry it out. However, in order for the wheels to last a long time, they should be treated with an anti-corrosion compound.
When repairing fituche shower cabins, if you find corrosion on the surface of the doors or on any part of the shower cabin, follow these steps:
- treat the affected area with sandpaper;
- apply automotive putty to it;
- clean the affected area;
- degrease the shower cabin using acetone or ammonia;
- To paint a previously restored area, use spray paint.
DIY shower cabin repair
A fairly common cause of breakdown of shower cabins is their leakage. The cause of this problem is a violation of the installation technology or operation of the shower stall. Poorly processed seams can also cause leaks. To seal and repair ido shower enclosures, follow these steps:
- remove the old sealant from the surface of the cabin; any sharp tool, for example, a stationery knife, is suitable for this purpose; perform the work with extreme care to avoid scratches on the surface of the cabin;
- disassemble the frame part of the cabin into its components, wash all elements with a soap solution, dry them and degrease them with a solvent;
- apply a new sealant to the surface of the cabin;
- Assemble the structure, install it in place and apply sealant again.
If there is excess sealant in places where the sealant is installed, use a dry cloth to remove it. In order to avoid repairing eago shower cabins, it is enough to use special products after taking a shower that will prevent the formation of lime, which gradually destroys the shower cabin.
How to repair a shower faucet
Another reason for a shower stall to break down is plumbing problems, such as broken faucets, clogged siphons or pipelines. To fix this problem, first of all follow these steps:
- inspect the watering can for damage; if there are problems, it is best to replace it;
- check the sewer siphon - this repair is highly labor-intensive; in order to fix the problem, the siphon must be dismantled, then the element is disassembled and cleaned of dirt;
- after that, install the siphon in place; to do this, use rubber gaskets and a key.
In addition, during the repair and maintenance of shower cabins, problems with faucets often arise. The first step is to check the filter to see if it is not functioning. If there is rust or various small inclusions in it, clean it. If there are cracks on the body of the mixer, it should be replaced; it is unacceptable to use this element.
In addition, when repairing serena shower cabins, the following problems arise:
- the occurrence of a leak above the tap, the causes of the problem are: a loose nut, wear of the rubber rings; to carry out repairs, it is enough to replace the gaskets or tighten the nuts;
- If you have problems switching shower modes, examine the cartridge for cracks on its surface; if a crack is found, the cartridge should be replaced.
Repair of shower mode switch
If there is no mechanical damage on the mixer, but it still does not work, then there is a high probability of cartridge failure. If there is a continuous flow of water from a faucet that cannot be stopped by closing it, the problem lies in damage to the mechanical plate that is attached to the cartridge.
If, by changing the position of the handle on the tap, water does not flow into it, then the reasons may be different. First of all, this is a breakdown of the cartridge and plate fastening, a breakdown of the rod holding the handle.
If you have problems switching shower cabin modes, then the reason lies in the failure of the fastening of a certain plate. When water flows into both the faucet and the shower, you should inspect the cartridge plates, as they are the most broken.
In order to eliminate this problem, you should replace the cartridge in the mixer. To do this, first of all you should turn off the water supply. Next, remove the plastic plug located on the mixer. Remove the faucet handle. Do not use any kind of tools to open the decorative nut, as there is a risk of damaging it; unscrew it yourself. Unscrew the nut that secures the cartridge to the surface of the faucet. Replace it and attach the new cartridge back.
Please note that it is best to buy a new cartridge after removing the old one. Since there is a possibility that the previously purchased cartridge will not fit your faucet. Cartridges differ in diameter, which can be 3.5 and 4 cm, in the number of modes that can be installed, and in the length of the rod.
In the process of repairing and installing shower cabins, there is no need to rush; without experience working with plumbing equipment, it is better to trust the specialists. In addition, preventive measures should be taken to help avoid various types of breakdowns of shower cabins. First of all, the service life of plumbing equipment depends on the quality of water. If the water contains elements in the form of sand or scale, then additional coarse filters should be installed. When opening the tap, you should not apply too much force, as there is a risk of mechanical damage.
Repair of corner (fence)
The corner usually consists of an aluminum profile, sheets of plastic and glass. In addition, the installation of doors is impossible without fittings, and sometimes replacement is required. We are not talking about a set of videos now. The box must close tightly. For this purpose, seals with magnets are located along the outer rim of the sashes. In addition, the handles may need to be replaced. These are the most common breakdowns, followed by:
- Broken glass.
- Crack in the plastic panel.
Shower enclosure
In any case, the matter can be improved. We report that the problem is to find a service center where they will give us new glass. This is especially true for doors, the plane of which is often curved. Regular window glass should not be placed on the fence. What is required is hardened. Heat treatment of glass costs approximately in Moscow:
- 450 rubles per square meter 4 mm thick.
- 600 rubles per square meter 6 mm thick.
Rarely do cabins use anything thicker. In addition, a true craftsman (tempered) works with painted and frosted glass (they know what is required for shower enclosures). Therefore, all that remains is to find the canvas, cut out a sheet of the required size from it, drill holes, if any, and grind off the edges so that they do not cut. And you can go to the workshop to harden it. The fee is approximately 1,500 rubles for hardening and the sheet is really not such a high price. Moreover, the master does not require you to bow to him every day.
After so much work, assembly is usually not difficult. In most cabins, the glass is in frames on glazing beads. The doors are hung on rollers. As for plastic, the situation with it is much simpler. There is no longer any need for a master; there is no need for a service center either. Find better polycarbonate on sale. You will quickly understand that it comes in two types - cellular and monolithic. In order to mount the mixer on it, take, of course, the second option. Yes, take care of powerful sealing washers.
Polycarbonate comes in different thicknesses, but the thicker it is, the more expensive it is. The price per sheet thickness is within the following limits:
- 3 mm – 1000 rubles per square meter.
- 10 mm – 5000 rubles per square meter.
You need to find a middle ground so that both the mixer stands and the wall is cheaper. We believe that readers will solve this problem without any problems. A couple of notes:
- Polycarbonate sheets are traditionally used to enclose railway stations.
- Polycarbonate does not need to be heated too much; it will release toxic substances.
How to replace a cracked door glass
Most branded manufacturers equip shower stalls with shockproof glass, which, even if closed carelessly, is almost impossible to break or cause cracks to form.
But when purchasing budget glass assemblies, ordinary ones with a layer of film are used, which, if damaged, prevents fragments from scattering throughout the bathroom.
However, traces of cracks remain on the front side, spoiling the appearance of the booth.
To replace the glass yourself, you need to dismantle the doors.
Almost all glass options have a metal frame to which rollers are attached that move along guides
It is enough to unscrew the bolts securing first the lower and then the upper rollers using a screwdriver with a Phillips head, holding the door. Grab the door by the metal frame and take it to a safe place where you can replace the glass.
If traces of corrosion are found on the metal, they should be removed:
- Sandpaper is used to clean the damaged area to bare metal.
- Treat the surface with moisture-resistant putty.
- Clean the applied layer to obtain a smooth surface.
- Degreasing is carried out with a 40% aqueous solution of alcohol or acetone.
Pure alcohol cannot be used, as it can damage the decorative coating and will have to be completely restored.
- Apply a layer of paint that matches the base color as closely as possible.
Do-it-yourself door installation is done in the reverse order. However, after securing the rollers, it is necessary to center them and adjust the opening mechanism so that there are no backlashes, extraneous friction sounds or jamming.
If this is not done, then in the near future the rollers will need to be replaced.
To prevent damage to the glass, it is necessary to cover it with a protective film that can protect it from quite serious mechanical influences.
Some films can provide resistance to hammer blows.