There are situations when a reliable connection cannot be made using a welding machine. In such cases, threaded connections are used. It allows you to assemble and disassemble metal structures without deformation. However, to create a connection you need to know how to properly cut a thread with a tap.
Thread taps
How is the operation performed and what is its essence?
The main task of the mechanic is to create a hole in the metal thickness with the subsequent formation of hollows from the inside. They need to be made so that the turns fit the bolt, stud or other fastener.
A threaded element may be needed in everyday life for the most durable connection of two parts. Here it is necessary to achieve maximum cleanliness - so that there are no shavings, deformations, or broken threads left. It is also very important to follow GOST standards for the size of the device. The diameter should match the screw that will go inside.
Many parameters are important - the type of material, its density, as well as condition, for example, temperature, the presence of corrosion. First you need to prepare the workpiece - remove excess dirt. Then you need to select the right tool, and only then begin metalworking in two or three stages - from roughing to finishing.
Several parameters matter:
- hole diameter;
- cutting depth;
- number of threads (these are entries, the most common is the presence of three cavities);
- pitch, that is, the distance between two furrows.
How internal threads are cut - general information
The device is called a tap. It can be of two varieties - manual and machine, in accordance with the methods of making furrows. The material that is processed is metal, but not only it. There are also lightweight models that cut into plastic or wood. The last option cannot be called the most common.
Factories use mechanized technology - metal drills make through holes (or a blind cavity), and after the blade, several turns are applied with a predetermined pitch. The advantage of this processing is high accuracy. Calculations are made using computer-aided design programs, then the data is entered into the control module - manually or using CNC. The second advantage is that skew of the spiral angle and errors are virtually impossible.
But at home and in small industries, a simpler, but less accurate procedure is often used - manually cutting internal threads with a tap. The work can be carried out on site; for this you need to buy the device itself and a drill to make a preliminary hole.
The tool resembles a herringbone shape due to the fact that the working surface is a ribbed blade. Structurally, the product is a rather complex configuration made of tool steel. This material is used because of its strength and ability to process most alloys, even cast iron. It is not very good to work only with hardened metal - it has internal stresses, therefore it is considered fragile and can crumble during the cutting process.
Features of the technology
When cutting internal threads with a tap, the following algorithm is used.
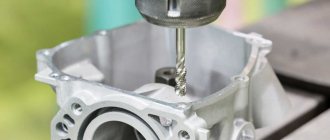
- In the place on the surface of the workpiece where the hole for threading will be drilled, it is necessary to form a recess for a more accurate entry of the drill, using a core and a regular hammer. The drill is fixed in the chuck of an electric drill or drilling machine, on which low rotation speeds of the tool are set. Before starting drilling, the cutting part of the drill must be treated with a lubricating compound: a lubricated tool enters more easily into the structure of the material being processed and creates less friction in the processing area. You can lubricate the drill with a piece of ordinary lard or grease, and when processing viscous materials, machine oil is used for these purposes.
- If it is necessary to cut threads in small parts, they should first be fixed using a bench vice. When starting drilling, the tool fixed in the equipment chuck must be positioned strictly perpendicular to the surface of the workpiece. You should lubricate the tap regularly and ensure that it does not warp and moves strictly in the given direction.
- At the entrance to the hole, as mentioned above, it is necessary to remove the chamfer, the depth of which should be 0.5–1 mm (depending on the diameter of the hole). For this purpose, you can use a larger diameter drill or countersink, installing them in the chuck of drilling equipment.
- The process of cutting internal threads begins with tap No. 1, which is the first to be installed in the driver. We should not forget about the lubricant, which must be applied to the tap for threading. The position of the tap relative to the hole being machined must be set at the very beginning of the work, since later, when the tool is already inside the hole, this will not be possible. When cutting a thread with a tap, you must adhere to the following rule: 2 turns of the tap are made in the direction of cutting the thread, 1 - against the direction. When the tap makes one revolution back, chips are thrown off its cutting part and the load on it is reduced. Thread cutting with a die is performed using a similar technique.
- After cutting the thread with tap No. 1, tool No. 2 is installed in the driver, and after it – No. 3. They are processed according to the method described above. When cutting threads with taps and dies, you need to feel when the tool begins to rotate with force. As soon as such a moment occurs, you should turn the knob in the opposite direction to throw the chips off the cutting part of the tool.
The harder the material being processed, the more abundantly the tap must be lubricated during the thread cutting process.
Before making internal threads with a tap or cutting threads with a die on external surfaces, you should thoroughly study these procedures and strictly follow the rules for their implementation. Only in this case can you count on the result satisfying you with its quality and accuracy.
Types and areas of application of taps
According to the drive method, they are divided into:
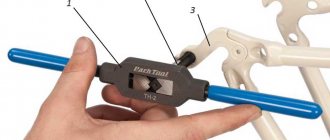
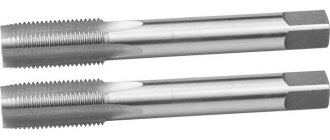
- Manual - they have a square tail, which is inserted into the knob. There are two handles that make it convenient to turn the product. It is important not to allow distortion. This result can only be corrected by drilling and cutting a larger diameter.
- Machine - used on metal-cutting machines. They are firmly fixed in the holder, accurate, and do not allow deviations.
By cutting method:
- Universal. Their design can be called classic. A tool with a running gear (its length determines the depth of insertion of the screw later if the hole is not through), which is divided into sections. Each of them has certain geometric parameters - angle, direction, distance, step. There are usually three of them, each designed for rough metalworking, intermediate and finishing. Thus, you can achieve the most accurate result with one movement.
- Complete. The name speaks for itself. You will need a set of 3 taps, since the internal thread must be made with high precision. First, the coarsest tool is used, then a finer one, and finally - with grinding and sharpening of the smallest corners. Buying a set is more expensive, but the result is much higher quality.
By hole type:
- For through. They are distinguished by a long working part. It gradually expands, moving into the working area, which is responsible for precise cutting.
- For the deaf. On the cutting section, calibrating turns immediately begin. Therefore, it is very important to sharpen them or promptly change the set as they wear out.
According to the groove design:
- straight – I work well with soft alloys;
- screw, their working area is staggered, they can easily pass even through cast iron;
- shortened - removes chips well.
The shape of the product resembles a cone (full or truncated) or a cylinder. They also all differ in diameter.
Types of instruments
The tool that is used to create threads is called a tap. These are cylindrical metal rods, on the edges of which there are sharp incisors located in a certain sequence. Taps are divided according to several factors:
- Method of use. A special wrench for carrying out the work is supplied with hand tools. Tooling for machine tools is fixed in the chuck thanks to a cylindrical shank.
- According to the type of holes processed. Devices are divided into two groups. Some are used for processing through holes, others for blind holes.
- For cutting internal, metric and pipe threads.
The shape of the taps can be either cylindrical or conical.
Technology: how to use a thread tap
There are several stages, each of which is important. These are preparatory procedures, 1, 2, 3 or more approaches of rotation, finishing grinding. We'll talk more about preparation below. The manipulation of the tool itself is relatively simple. It is necessary to direct the tip, set it level, and then use the wrench to make rotational movements.
Special recommendations:
- We do not recommend starting to cut unprepared workpieces. If you already have a sheet of metal where the through hole was obtained by stamping or other metalworking, you need to drill it out and then countersink it - cut off the edges.
- Remove the top 0.5 cm of chamfer from the sample. This must be done at an angle of 60 degrees.
- The tool must be lubricated and cooled during the process, otherwise additional heat treatment will result, during which the metal surface may acquire additional strength.
- Make a reverse move every 1-2 turns. This allows you to clear the working area from chips sticking to it.
Let's watch the video. It shows not only working with a tap for cutting internal threads, but also with a die for external threads:
Preparing for thread cutting
After determining the size of the holes and the pitch of the manufactured turns, it is necessary to prepare tools and devices for the work:
- Electric drill with the ability to change speed. An excellent option is a drill press with a setting panel. Work must be carried out at low speeds.
- Set of taps.
- Vise for clamping workpieces. Their size depends on the dimensions of the parts being processed.
- Hand crank.
- Core, hammer.
- Drill for metal.
- Rags, wire brush.
After preparing the tools, you can begin work.
Preparatory procedures
The beginning of any work is the choice of material and tools. The workpiece must have a hole. The worst processing options are those obtained by casting or stamping. It is better if pressure or melting was applied. But in any case, the most suitable conditions are created during fresh metalworking using drilling or countersinking.
The drill and its cross-section are selected in accordance with the required result according to the regulatory document - GOST 19257 - 73. This is a Russian standard, but it complies with international standards. It must be new or well sharpened. It must be firmly secured in the working tool (or in the machine chuck) so that there is no beating or wobbling.
Drilling holes and pre-processing bars
From the last observation we can conclude that the outer diameter of the thread is slightly larger than the original diameter of the rod on which it is cut. Likewise, the axial distance between the tips of the internal threads will be slightly less than the hole.
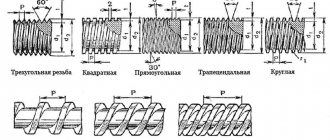
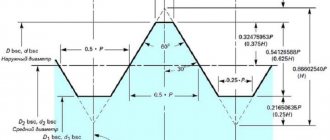
If you look at any drawing depicting a metric thread, you can note a number of key dimensions:
- Inner and outer diameter. These values change names depending on whether the thread is internal or external.
- Thread pitch is the distance between the tops of adjacent teeth.
- Shape and dimensions of the nominal profile, angles of inclination.
So: the diameter of the rod or thread hole is not equal to either the external or internal diameter of the thread. The easiest way to determine the hole size for an internal thread is to subtract the pitch distance from the outer diameter. For external threads, the same value must be added to the diameter of the rod.
However, real professionals always use tables of standard metric threads, where the recommended diameters also take into account the type of thread, the characteristics of metals and their alloys. So the main problem is finding the right rod or drill.
You set the basis for high-quality cutting at the stage of drilling or preparing the rod. The hole must be drilled strictly perpendicularly; among the ways to control the right angle, you can suggest combining the drill with the reflection in a placed mirror or placing a credit card nearby.
Rust should be removed from the rod and the side surface should be checked for evenness with a metal ruler. The best way to prepare the rod is to clamp it into the drill chuck and give the edge a good file. When rounding, it is allowed to grind the rod down a couple of tenths if this is necessary for alignment, which in practice is more important than the completeness of the cutting.
This is of little use when working with fixed rods. You have to select the thread diameter according to the diameter of the rod, choosing a value less than the recommended one. For a more convenient approach at the end, you need to remove the chamfer and perform the cutting especially carefully and accurately. Do not forget to generously apply machine oil to the area to be treated.
How to correctly determine the diameter and cut a thread with a tap - table
There are special standards for determining the cross-section. Let's present all the data in the form of tabular values. Let’s say right away that they are not suitable for all tasks, but only for standard ones. These include all nuts on sale that fit the screws. Therefore, if you require a connection with a specific fastener, pay attention to its markings.
| Marking | Turn pitch | Drill diameter | ||||
| 2 | 0,4 | 1,6 | 0,25 | 1,75 | — | — |
| 3 | 0,5 | 2,5 | 0,35 | 2,65 | — | — |
| 4 | 0,7 | 3,3 | 0,5 | 3,5 | — | — |
| 5 | 0,8 | 4,2 | 0,5 | 4,5 | — | — |
| 6 | 1 | 5 | 0,75 | 5,2 | 0,5 | 5,5 |
| 7 | 1 | 6 | 0,75 | 6,2 | 0,5 | 6,5 |
The table can be continued further, it is large. and we will not do this within the scope of this article. For more detailed values, we recommend that you refer to the document - GOST 19257 - 73.
These are standard sizes, but there are special purposes, unique connections. For them, everything is very simple to calculate independently. If the thread is marked M10 and the pitch is 0.3, then 0.3 mm must be subtracted from 10 mm. The result will be equal to the hole diameter - 9.7 mm.
If it is made smaller, it will be difficult for the tap to pass, and areas with poor processing will form. And if it is more, then the grooves will be shallow, the screw will wobble inside or even fall out over time.
Let's also imagine the international marking system in inches:
| Designation, inches | External | Interior | Thread, mm | Step |
| G 1/8 | 9,37 | 8,858,8 | 28 | 28 |
| G 1/4 | 13,16 | 11,89 | 11,8 | 19 |
| G 3/8 | 16,66 | 15,39 | 15,25 | 19 |
| G 1/2 | 20,95 | 19,17 | 19,00 | 14 |
| G 5/8 | 22,91 | 21,13 | 21,00 | 14 |
| G 3/4 | 26,44 | 24,66 | 24,50 | 14 |
| G 7/8 | 30,20 | 28,42 | 28,25 | 14 |
| G 1 | 33,25 | 30,93 | 30,75 | 11 |
| G 1, 1/8 | 37,90 | 35,58 | 35,30 | 11 |
| G 1, 1/4 | 41,91 | 25,59 | 39,25 | 11 |
| G 1, 3/8 | 44,32 | 45,00 | 41,70 | 11 |
| G 1, 1/2 | 47,80 | 45,48 | 45,25 | 11 |
| G 1, 3/4 | 53,74 | 51,43 | 51,10 | 11 |
| G 2 | 29,61 | 57,29 | 57,00 | 11 |
| G 2, 1/4 | 25,17 | 62,96 | 63,10 | 11 |
| G 2, 1/2 | 75,18 | 72,86 | 72,60 | 11 |
| G 2, 3/4 | 81,53 | 79,21 | 78,90 | 11 |
| G 3 | 87,88 | 58,56 | 85,30 | 11 |
| G 3, 1/4 | 93,98 | 91,66 | 91,50 | 11 |
| G 3, 1/2 | 100,33 | 98,01 | 97,70 | 11 |
| G 3, 3/4 | 106,68 | 104,3 | 104,00 | 11 |
| G 4 | 113,03 | 110,71 | 110,40 | 11 |
Cutting in several passes
Threads are usually made in several passes, using taps with different profile completeness. The main difficulty lies in the starting, setting pass. It is made with a tap with one thin groove on the shank. The tool must be inserted freely into the hole and, pressing it with a little force, turn it a couple of turns. In this case, the perpendicularity of the insertion is controlled by a credit card; small deviations of 5–7° are quite acceptable.
In 5–6 turns, the lead-in part is completely inserted into the hole and the tap confidently begins to move. Now the tool must be rotated without pressing force. It would be a mistake to correct minor deviations from perpendicularity at this stage - the tap is not to blame for this, it goes strictly along the hole. After every 1.5–2 feed turns, you need to unscrew the tool half a turn.
Read also: Recertification of gas cylinders in Moscow
After the starting pass, when the thread profile is 50–60% ready, it should be formed with medium (#2) and finishing (#3) taps with the corresponding number of grooves on the shank. Here it is only important to check that the tap fits correctly onto the existing thread; the rest is a matter of technique.
There are practically no special features of working with the die; the greatest difficulty is working on the lead-in part. The die is short, only 2.5–2 turns, so it is recommended to hold the tool with both hands.
Useful tips
- Determine the level angle and check the square after each turn for the first 3-4 rotations.
- Make turns in the opposite direction. to get rid of metal shavings. It may stick.
- Use linseed oil or drying oil, kerosene, turpentine, lard or regular soap for lubrication. But if you are working with cast iron or bronze, it is better to carry out the procedure dry.
In the article we talked about manually cutting internal threads with a tap and presented a table. To complete the topic, watch a video on how to make hardware using a die:
To clarify the information you are interested in, please contact our managers by phone;; 8 (800) 707-53-38. They will answer all your questions.
