- November 23, 2018
- Weapons and ammunition
- Natali Michaelis
“How to blue the barrels of a hunting rifle at home?” – one of the most frequently asked questions on thematic forums. As a rule, novice hunters who have just begun to comprehend the beauty of this fishery are interested in this. From a technologist's point of view, steel bluing is a complex process of applying a very thin coating to metal using various chemical reactions. You will find information on how to do this at home in our article.
Significance of the procedure
Most gun lovers are interested in this issue when they want to decorate the barrel of a gun more beautifully. However, this process has at least two more advantages: coating the metal with a thin film gives the barrel different shades, which increases its camouflage (especially in the sun), and the weapon will also be less susceptible to corrosion in the future. For a true hunter, both of these factors should be truly important. Therefore, it is worth approaching the bluing of hunting rifle barrels at home with great responsibility.
Who is this site for? What is the material about?
Link to purchase a bluing kit on Avito for 700 rubles.
A couple of years ago, the author of the site purchased several MP-654 air pistols that required re-warming. In search of an inexpensive but high-quality method, many forums, Internet articles and technical literature were studied, various bluing options were tried: from homemade methods (burner, “Mole”, citric acid, etc.) to store-bought products (“Clover”, "Super Blue") However, the former did not provide stable quality, and the latter turned out to be insufficiently decorative and durable. Fortunately, the author was able to familiarize himself with the publication of the USSR Military Ministry “Repair manual for 7.62 mm machine guns (submachine guns) mod. 1941 and 1943.” It turned out that the bluing process outlined in it can be easily adapted to home conditions. The oxidation of pistols carried out according to the instructions confirmed the high quality, simplicity and low cost of the method. Wanting to share the experience gained in oxidation, as well as high-quality and affordable methods of chemical coloring of metals found on the Internet, the author created the website “Steel Bluening” .
Section "Types of coatings"
The page “Methods of applying protective coatings” provides a brief description of the most accessible methods of chemical coloring of metals, incl. oxidation (bluing) and phosphating of metals. The page “Home methods for bluing weapons” lists the most popular methods of bluing weapons, indicating their advantages and disadvantages.
Section "Metal preparation"
It is known that without careful preliminary preparation of the metal it is impossible to obtain a high-quality protective and decorative coating on it. The page “Degrease, etch, activate” provides brief but sufficient information about mechanical and chemical methods of preliminary preparation of metal for chemical painting (blueing). The remaining pages contain recipes for solutions for degreasing, etching and pickling (activating) various metals.
Section "Alkaline bluing"
In the “Alkaline bluing” , the reader’s attention is presented to the page “Alkali bluing in the army” with excerpts from the Repair Manual for 7.62 mm machine guns (submachine guns). On the page “Alkaline bluing in pictures” , in an accessible language, the sequence of alkaline bluing of weapons is schematically depicted. Page “Kit for alkaline bluing for 700 rubles.” invites readers who do not want to purchase and package the necessary reagents to call the indicated numbers and order a ready-made kit.
Section “To black” and “To other colors”
These sections will be of interest to users involved in the manufacture of small items made of steel and non-ferrous metals, and those who restore metal objects. Often an important stage of such work is giving metal products various colors, including black. But modern technical literature focuses on the complex technology of electrochemical coating of metals, which requires expensive electrical equipment. In this regard, an accessible solution to the problem at home is a chemical method , which involves preparing and heating one or more chemical solutions into which metal products are sequentially immersed. This process, as a rule, creates a fairly durable protective coating, which compares favorably with cold “ink”. Recipes for chemical dyeing in various colors by oxidation and phosphating, collected by the author from various sources (patents, reference books, magazines), are presented in the indicated sections.
Section “Burning Guns”
“Blueing of Guns” will be interesting and useful for owners of hunting rifles . On its pages you can find recipes for bluing weapons from books on hunting from 1823 , 1928 and subsequent years, as well as read an article by a reputable gunsmith from the USA about bluing collectible weapons. Step-by-step instructions are also given here for gun owners who want to coat them with “ rusty varnish” .
I hope that the material collected on this site will be interesting and useful to its readers.
Best regards, Shooter197.
Features of the technology
You can often hear people say that bluing a gun can only be done in a factory setting; however, this statement is only half true. Yes, steel undergoes higher quality chemical treatment during the industrial process. This is explained by the high content of iron oxide in the substances used at the plant.
At home, achieving high-quality blackening of metal can be very difficult. According to some experts, oxidation of steel can only occur at the factory, however, this is not the only way in which a barrel can be blued. Most "home" technologies are divided into three main groups according to the fundamental principles that are necessary to carry out the process.
It is customary to highlight:
- oxidizing agent treatment;
- hot bluing of steel;
- cold blued steel.
Each of these processes has both its pros and cons. Features of the technology, as well as the step-by-step implementation of each process will be described in the following sections. However, first you need to familiarize yourself with the safety regulations, compliance with which is mandatory.
Restoration of machine covers
«
Basics of the design and operation of small arms and grenade launchers. Methodological manual" L. I. Vilinov. Military publishing house of the USSR Ministry of Defense. 1978
Paint and chemical protective coatings are the main type of protection against corrosion of metal parts and assembly units.
The protective properties of coatings depend to a large extent on the quality of their application.
Changing the color of the coating during use of the weapon does not affect the protective properties. Thus, as the gun is fired after 700-800 rounds, the barrel and muzzle of a KPV (KPVT) machine gun, which are subjected to strong heating, may lose their original color, becoming brown, but this does not affect the anti-corrosion resistance of the phosphate coating of the parts.
When repairing parts of small arms and grenade launchers, oxide, phosphate, passivated (phosphate-varnish, phosphate-oil) or polyvinyl butyral coatings can be applied.
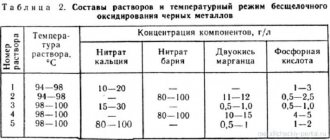
Characteristics of chemical protective coatings are given in table. 15.
| Coating | Coating film thickness |
| Oxidation: Treatment of parts with a solution of oxidizing agents at a temperature of 135 - 150º | 1 - 3 µm |
| Phosphating: processing of parts in a solution of complex salt “Mazhef” at a temperature of 86 - 92º | 10 - 30 µm |
| Then the parts can be soaked in hot oil or impregnated with BF-2 (BF-4) varnish | 5 - 10 µm |
| Phosphate passivation | Up to 7 µm |
| Polyvinyl butyral coating (repair coating) | Up to 30 microns |
Weapons are supplied for chemical coatings in disassembled form, the degree of disassembly is determined by the head of the repair department. During repairs, parts and cleaning units are also covered with protective coatings that were applied during production at the manufacturer.
In the repair manuals for weapons, the pictures of parts to be manufactured contain the name of the protective chemical coating.
Phosphating of parts is allowed to be replaced by oxidation, with the exception of parts such as the bolt frame, bolt, springs, etc. These parts are subject to phosphate passivation. If this condition is not met, the oxidized springs settle, and a crack appears in the bolt frames and bolts at the hole for the rod pin, in the jumpers of the bolt frame of the KPVT machine gun and in other stressed places.
Weapons designed with an oxide coating in mind are not recommended to be phosphated unless this replacement is specified in the repair documentation.
Replacing oxidation with another type of coating (phosphating, phosphate passivation) leads to a violation of the weapon’s assembly and to failures during shooting, since the shapes and sizes of parts change during the sandblasting process. So, pistols are only oxidized. Disc magazines for the PPSh submachine gun are oxidized, although the submachine gun itself can be used normally with both oxidized and phosphated parts.
Military repair agencies may carry out restoration or touch-up of lightened areas of coatings, with the exception of applying chrome plating.
The simplest is to apply a repair coating to replace worn coatings (oxide or phosphate varnish) on metal parts and assembly units of 7.62 mm Kalashnikov assault rifles and machine guns and hand grenade launchers.
Restoration of protective coatings on parts of other small arms is carried out only on external surfaces that do not interact with parts of moving parts, and oxide coatings are not removed.
The repair coating consists of a layer of phosphating primer VL-02 and a layer of varnish based on polyvinyl butyral. Both primer and varnish are applied using a spray gun.
The varnish is prepared at the rate of 12-14 g of nigrosin and 50 g of polyvinyl butyral (white powder) per 1 liter of solvent No. 646. The sequence of varnish preparation: nigrosin is kept in the solvent for 24 hours, and then polyvinyl butyral is kept in this solution for 24 hours. The solution is stirred every 3-4 hours. The working viscosity should be 13-16 s (according to VZ-4). For dilution, use solvent No. 646.
VL-02 primer is a solution containing a base (greenish-yellow liquid) and a colorless acidic diluent in a ratio of 4:1. The soil has limited vitality, so it is prepared immediately before use.
The weapon is subjected to partial disassembly, wiping parts and assemblies dry and then thoroughly degreasing in white spirit (gasoline). After drying, a thin layer of primer is applied to the parts and assembly units, and then after 30 minutes of exposure, varnish is applied. After 1.5-2 hours of drying at room temperature, the weapon is collected.
Damage to the coatings on the mane and slot of the sighting bar or frame, front sight, rear sight, as well as on parts lightened with a tool during the repair process, is repaired by touch-up varnish of a simpler formulation. This varnish consists of BF-4 (BF-2) glue, alcohol-soluble nigrosin and solvent.
This varnish is prepared from a mixture containing 300-400 g of BF-4 (BF-2) glue and 15-20 g of alcohol-soluble nigrosin per 1 liter of solvent No. 646, which is necessary to give it a black color. The varnish is thoroughly mixed and kept for a day (the container must be tightly closed with a lid). Touch-up is done after thorough degreasing with white spirit or B-70 gasoline.
In addition to the above methods of restoring the protective coating, bluing of small, non-thermally treated parts is used. After cleaning the surface of the part to a metallic shine, it is heated until a light blue tarnish is formed - a temperature of about 300 ° C and then the surface of the part is wiped with a clean rag (tow) moistened with gun lubricant, or the part is lowered into a vessel with lubricant. The required heating is determined by the characteristic crackling sound of the hot lubricant.
The part is cooled in air and then lubricated with liquid gun lubricant RZh.
The bluing process is carried out with a single heating, since repeated heating deteriorates the blued surfaces.
Preparatory procedures
Whatever method you choose for bluing a gun barrel, you must perform a number of preparatory procedures in a certain sequence, which will be described below.
- We carefully clean the surface of the barrel on which the steel will be blued using a cleaning rod.
- We polish the surface to perfect condition.
- We disinfect the surface (after this, all work is done exclusively with rubber gloves).
- We use special substances for bluing metal.
- We re-process the surface with a grinder.
After this, you can start bluing the metal, observing safety regulations.
Safety precautions
It is not difficult to guess that bluing the barrels of a hunting rifle at home is a rather dangerous procedure, so compliance with safety measures must be unconditional. To begin with, it is worth noting that chemical solutions contain a large number of active substances, which must be stored in a place inaccessible to unauthorized people. Also, do not forget that the entire process must be carried out in special containers.
Blueing of hunting rifle barrels at home should be carried out in a well-ventilated room, since breathing chemicals and dust is quite harmful to the human body. To sand the surface, it is best to use fine-grained sand, sandpaper or pumice.
Solution and brush
In specialized stores you can purchase various types of chemical mixtures that are used to blue gun barrels. As a rule, most of them are applied with a regular brush to the metal surface. Among such products, the most popular are “Voron-3” (domestic version) and “Parisian oxide” (imported mixture).
The advantages of this method can be seen with the naked eye. The process is quite simple, and you don’t have to make the bluing liquid yourself. Security requirements are also minimal.
However, this method also has certain disadvantages. Firstly, using a brush it will be quite difficult to penetrate into all the “cracks” of the weapon, due to the complexity of its configuration. Also, to make the product smooth, you will have to resort to additional polishing. Well, the most unpleasant thing is that when barrels are blued using a cold method, even slight chemical damage will leave a strong mark, after which the treatment will have to be repeated.
Immersion method
This method involves immersing metal parts of the weapon in a solution. The main advantage of this method of bluing a gun barrel at home is that the liquid will penetrate even the most inaccessible parts of the parts, which is why the coating layer becomes more uniform. Also, the liquid does not splash, unlike the first case, when it is applied with a brush.
You can prepare such a solution yourself or purchase it ready-made in a specialized store. For the first case, you will need to mix the following ingredients:
- FeCl3 (iron chloride) – 75 grams.
- HNO3 (nitric acid) – 20 grams.
- CuSO4 (copper sulfate) – 20 grams.
- C2H5OH (ethyl alcohol) – 30 grams.
After preparing all the reagents, you must mix them one by one in a glass container, waiting for the reaction to take place. When immersing a metal part, you must wear special protective gloves, otherwise you risk getting skin burns from nitric acid. The metal should be kept in the solution for about 30 minutes (depending on the quality of the steel), after which it should be thoroughly washed under running water using any detergent.
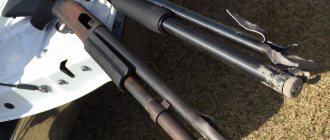
Blueing a gun with “rusty varnish” step by step
Remove the old coating. To do this, by changing sandpaper Nos. 400-600-800-1000-1500 and 2500, we remove traces of cavities and oxidation residues. Next, using a felt wheel with GOI paste, achieve a mirror-like finish on the barrel metal. Next, forcefully insert square wooden “chops” into each trunk at both ends, into which small nails are driven to hold and rotate. Thoroughly degrease the barrel with acetone, then place it in a boiling degreasing solution (soda ash 100-150 g/l with liquid glass 20-30 g/l) for 30 minutes. Degreasing is considered successful if the degreasing solution completely covers the entire surface of the metal without collecting drops. Rinse the trunks thoroughly under running water and place them on the “bed” to dry. Making a “bed” will facilitate the technological process, eliminating touching with hands and falling of barrels during the brushing process (cleaning with metal wool). Next, carefully apply a layer of “rusty varnish”, wait until it is completely dry, and apply it again (followed by drying). If the part is well degreased and washed, the applied solution will evenly cover the steel without collecting in drops, wetting the entire surface.
After waiting until the second layer of the reagent has dried and the trunks have acquired a reddish tint, carry out the “boiling.” To do this, hang the trunks by nails and boil in water for 15 minutes. After boiling, the iron should become velvety black. In those places where after the 1st boiling down there is an orange color, the bluing “does not go well”, there may be several reasons: either the part in this place is poorly degreased, or poorly washed from the degreasing solution, or the water for boiling down was of unsuitable quality. In these places the bluing will appear in subsequent layers. The next necessary procedure is brushing. Its goal is to remove all the velvety coating from the surface of the iron, under which the first layer of bluing is hidden. According to factory technology, this operation should have been carried out with steel brushes with fine bristles, but in the absence of the latter, replace them with the hard side of a dishwashing sponge. Carefully, without damaging the 1st layer, remove all “soot” deposits. In hard-to-reach places, it is very convenient to use steel brushes for a Dremel. After brushing, be sure to wait until the trunks cool down. If you apply a layer of varnish to a hot barrel, it will dry very quickly and the metal will not have time to react.
Now the operation of 2 layers of varnish (with intermediate drying), boiling, brushing, must be repeated at least 5 times.
Barrels after the 2nd welding (before brushing):
After the 5th boiling and brushing:
A total of 7 strippings were made (14 layers of varnish). After the 7th black plaque was removed very easily and with minimal effort, i.e. the metal already weakly reacts with the composition and the resulting oxide film has a thickness close to the maximum possible.
The final operation is oiling. Its purpose is to remove all moisture from the new oxide film and fix it. To do this, pour neutral mineral oil into the boiling bath and soak the trunks in it for 5-7 minutes at a temperature of 105-110 degrees.
Burnishing with rusty varnish
Such a knife is not suitable for bluing edged weapons, since the steel on most knives is poorly resistant to mechanical stress and wears out quickly. However, if you still want to bury your hunting dagger, then it is best to use rusty varnish - one of the most effective and low-cost methods. The essence of the method is to treat the surface with a corrosive medium - rusty varnish. By the way, this method is also suitable for bluing barrels.
The preparation of rusty varnish must be carried out outdoors or in a well-ventilated area. To avoid inhaling harmful gases during the process, use a special protective respirator. First, you need to place 12 grams of hydrochloric acid in a glass container, then add 20 grams of nitric acid. It is worth paying special attention to the fact that reagents should be measured by weight and not by volume, since they have different densities. Even one extra gram can lead to impaired reactions. Then 30 grams of rust (iron scale) and 5 grams of iron filings are added to the dishes.
After this, you need to wait some time for the reaction to pass. As soon as the process occurs, you need to add 50 grams of medical alcohol (ethyl alcohol C2H5OH) and 50 grams of distilled water to the solution.
The trunks are immersed in the solution for 12 hours, after which they must be treated to remove salts and scale that have precipitated. After this, the parts are re-immersed in the solution and kept in it until the metal turns black. After this, the metal is washed with cold water, and the red marks left by the solution are brushed off. As a result of such procedures, you can get a fairly good result of barrel bluing at home.
As in the case of using a brush, after the procedure the part is washed well under cold water using detergents. If you decide to bury a knife in this way, then the time the blade is kept in the solution should be controlled by you personally, since the steel on knives is different from gun steel. Prolonged exposure to rusty varnish can negatively affect the quality of bladed weapons.
Bluing with hyposulfite
The part is dipped into a saturated solution of copper sulfate, after adding 5-6 drops of sulfuric acid drop by drop. The part is aged to a red copper color. Then it is rinsed in hot water and dipped for 20-30 seconds in a filtered saturated hyposulfite solution. After which the part is kept in a solution of potassium alum 1:10 for 10-12 hours, then it is washed, dried and lubricated with drying oil. The coating turns out to be the color of black plastic and lasts a very long time.
Hot bluing
Are you interested in how to bury a gun at home? Many craftsmen prefer to use the hot method, considering it the only correct one. The arguments are quite simple. For a product that has been blued using a hot method, the protective coating lasts much longer, and the absence of harmful fumes during the procedure is an additional advantage.
This method is also commonly called oil bluing, since the technology involves the use of this substance. This method is quite simple. First, the part is heated to a high temperature, after which it is immersed in oil. Gun oil, olive linseed oil, or even machine oil can serve as a quenching liquid - this is not so important. The part is kept in the container for about 10 seconds, after which it must be removed, otherwise the metal will become covered with various stains.
The next step is to “boil” the oil on the surface. For this purpose, you can use a blowtorch or a stationary gas stove. An important point in blueing steel is determining the moment the part is “ready”. Experienced gunsmiths say that you need to stop heating the liquid the moment the gun barrel turns black. Oil is one of the oldest and most effective means for bluing the barrels of hunting weapons. Reviews about this method on thematic forums indicate its effectiveness.
Hot bluing: features, advantages, disadvantages
Many people, especially older craftsmen, prefer to blue their guns exclusively using the hot method, considering this method to be the only correct one. The argument is very simple. For a product that has been hot blued, the coating lasts much longer. Another advantage of this method is the absence of harmful fumes.
Quite often this method is called oil bluing, which actually explains the technology of the process. The technology is very simple and blueing steel with your own hands using this method is quite easy.
To begin with, the part is heated, the more, the better. After this, the part is immersed in oil (this is what gave the method its name as bluing steel in oil). It can be linseed, olive, or gun oil. In principle, you can even use regular machine oil.
After the part has been kept in the oil for ten seconds, the part is taken out, and the oil must be allowed to drain on its own, otherwise stains will appear. The next step is to “bake” the butter onto the surface. To do this, it is customary to use a blowtorch. An important point in bluing steel in oil is to determine when the product is ready.
Experienced craftsmen say that you need to stop baking at the moment when the part just begins to change its color from brown to black. Burnishing steel in oil is one of the oldest and most proven methods of protecting metals from corrosion; it has not failed craftsmen for centuries, and it will not fail now.
Oxidizing agent treatment
For a person who understands chemical processes, the question of bluing barrels should disappear by itself. The first thing that should come to mind is the need to treat the trunks with a special oxidizer. The only disadvantage of this method is that the mixture must be heated to the melting point, however, it is not always possible to do this at home. Most often, the processing is carried out using various nitrates, which is why the second name of the process came from - bluing of trunks in saltpeter. Although the choice of oxidizing agents is not limited to it, saltpeter is most often used at home - safely and effectively.
Oxidizing agent treatment: features, advantages, disadvantages
For a chemist, the question of how to bury steel is not worth it; literally the first thing he will suggest is the action of an oxidizing agent. The only disadvantage of this method is that the mixture needs to be heated to the melting point, and this is not always possible at home. Most often, this treatment is carried out using nitrates, hence the name - bluing in saltpeter. Although in fact the choice of oxidizing agents is quite large and bluing in saltpeter at home is not the only effective method using oxidizing agents.
Composition of working solutions
Among the recipes it is worth highlighting:
- Caustic soda (NaOH) – 2.8 grams; disodium hydrogen phosphate (Na2HPO4) – 100 grams; sodium nitrate (NaNO3) – 50 grams (Calculation is given for 1 liter of water);
- Caustic soda (NaOH) – 400; potassium nitrate (KNO3) and sodium nitrate (NaNO3) - 10 grams each (Calculation is based on 0.63 liters of water).
Immersion time in solutions is at least 30 minutes. This technique is suitable for bluing a knife at home, since it will allow you to obtain a durable coating without disturbing the hardness of the metal.
For all its advantages, the method of oxidizing metals using oxidizing agents is quite expensive and difficult for beginners, since it requires good knowledge of chemistry and certain dexterity. It should also be noted that bluing of stainless steel is carried out by other methods that are not interrelated with these techniques.
Methodology
Immersion time in the chemical composition does not exceed 30 minutes. During this half hour, you must carefully monitor the immersed parts and remove them as soon as they are completely blackened. This technique allows you to blue barrels at home, obtaining a hard metal coating that will not violate its integrity.
The metal oxidation method is considered quite effective, but very expensive and difficult for beginners. The process will require a certain skill and good knowledge of chemistry from the gunsmith. It should also be noted that bluing of stainless steel must be carried out with other reagents.
Video
If you are interested in the process of “home” barrel bluing, we recommend that you familiarize yourself with the following video. It will help you more clearly understand all the stages of cold bluing.
In conclusion, it is worth noting once again that bluing barrels at home is a rather hazardous process for health, so it must be carried out only with unconditional adherence to safety precautions. When using various reagents, be sure to use protective gloves, and carry out all work in a well-ventilated area.