- June 19, 2019
- Production
- Daniil Belousov
It’s worth noting right away that using a homemade seal for official documents is prohibited. This is clearly stated in the Criminal Code of the Russian Federation, or more precisely, in Article 327. If a citizen forges a seal or stamp, he faces imprisonment for a period of 4 years. Therefore, under no circumstances should you break the law.
If the question arises of how to make IP printing at home, then you should forget about this idea once and for all. Such stamps are registered with the tax authorities and can only be produced by accredited companies. But such products are not always used only for official documents. For example, someone might be interested in how to make a stamp at home for letters that are sealed using a beautiful wax stamp. Also, such a product is suitable for a school or a club where children are given gaming certificates for participating in competitions, etc. You can create a beautiful drawing on the seal or indicate your initials and feel like a lord or even a king from a fairy tale.
What you need for regular printing
First of all, you need to have a laser printer with black and white ink. It is better not to use colored devices, as they usually contain a wax-based toner powder. This material is not capable of transmitting light rays, so the illumination will be of poor quality. The toner consumption on the printer should be set to the maximum value.
Also, before you print at home, you need to make sure that you have an ultraviolet lamp. You can buy the cheapest device for drying nails. Additionally, you need to purchase two glass plates measuring 8x8 cm and 2 paper clips. You will also need regular double-sided tape. It is better if its thickness is about 0.5 cm.
It is more difficult to obtain photopolymer. It is sold in specialized stores or on the Internet. It's easier with the other components. You need dish soap, a toothbrush, baby powder, a needle, a brush and a hair dryer.
DIY stamps
How to make decorative stamps for children's creativity or scrapbooking with your own hands. Master Class.
Stamps for creativity
Stamps are a very convenient creative tool for people of different ages. Kids are happy to make prints with stamps just like that, and adult scrapbookers use stamps for professional design of works: postcards, photo albums, notebooks, frames, passport covers, etc.
The selection of beautiful stamps for scrapbooking in specialized stores is quite large. But there are situations when you need a stamp on a certain topic, but there is none. One way to make it yourself is to cut it out of eraser with a stationery knife. In my opinion, this is difficult, especially for children.
In this article I will talk about easier ways to make decorative stamps for children and adults with your own hands. Very young children, of course, will not be able to cope with this work, but starting from high school age, many children will be quite capable of it.
How to make stamps with your own hands
There are several options for making stamps; I suggest you get acquainted with those that involve the use of decorative foam or foam rubber. Read more about this material in the article “Porous rubber (decorative foam)”.
Option 1
The simplest stamps are obtained by gluing ready-made decorative foam stickers to the caps of plastic bottles or cardboard food packaging for drinks. The prints in this case are a painted outline of a certain shape.
If there are no such stickers, then you can make them yourself. To do this you need:
- Draw a template of the desired shape on paper.
- Attach the template to the decorative foam and trace it.
- Cut out.
- Glue to the lids using double-sided adhesive tape.
Option 2
Stamps with openwork patterns are not much more difficult to make than without patterns. The main thing is to draw the pattern as symmetrically as possible, if it is intended that way.
The stages of work are the same as in the previous version, only on the figure made of decorative foam you need to press the pattern from the template with a non-writing pen. First on one half of the figure, and then on the other.
Now all that remains is to apply the ink from the ink pad to the stamp, and you can see what kind of prints you get. My very first prints were unsuccessful.
My daughter did better. She immediately began to imagine what could come out of such hearts. For example, wings and a fluffy dress for a fairy.
Prints look good not only on white, but also on colored paper. I already showed a red heart on yellow paper in an article about how to make an envelope from a paper heart.
My daughter and I used these stamps to decorate homemade mailing envelopes as she used mail-order to add to her collection of gum inserts. We also decorated the envelopes with prints of kittens, now I’ll tell you about them too.
Option 3
This option is suitable if you want to turn some beautiful textured surface into a stamp, for example, a floral design from the frill of a kitchen oilcloth, or a piece of lace. Or if you need to make another copy of a ready-made stamp.
Working with a drawing
Continuing to consider how to make printing yourself at home, let’s move on directly to the main work. To do this, the prepared negative must be printed on film.
The next step is to cover the side of the glass plate with double-sided tape. The result will be a kind of bath. It is necessary to pour photopolymer into it. It is best to use a syringe for this, as too much liquid may come out of the bottle. It is also important that no air bubbles get into this composition. Using this method, you need to fill the bath to the brim. If bubbles appear in the composition, then it is enough to pierce them with a regular sewing needle.
Next, if you decide to print at home, you need to attach the previously made negative to the photopolymer composition and lightly press it with your finger so that it sticks to the surface. In this case, a few drops of the composition may spill out of the bath, but this is not critical.
After this, you need to close the container using a second glass and secure the resulting structure with paper clips.
Die-cutting dies – operating principles and requirements
The basic principle by which stamps (die-cutting molds) work is cutting out the required shape in the source material. They consist of a base on which cutting and scoring (pressing) knives are attached, following the contours of the future product.
In this regard, cutting dies must meet a number of requirements, the main ones being material strength, sharp cutting surface, and ease of design. Only if these features are observed, cutting dies are able to perform their functions efficiently and for a long time, without deteriorating the result.
Also, for the sake of operational safety and reliable separation of the finished product from the stamping mold, the cutting parts of the die must be limited by rubber stops.
Cutting dies are made of any size depending on the characteristics of the equipment.
Working with a lamp
The resulting “sandwich” must be placed in an ultraviolet nail dryer with the negative side down. After this, turn on the lamp for one and a half minutes. You need to clearly record the time, so you should use a stopwatch. After this, we turn the “sandwich” over and send it out to dry again.
After this, you need to disassemble the structure. To do this, first remove the clamps, and then the sides. The seal itself will be sticky, so you need to rinse it under running water. Additionally, it is worth using a soft brush to wipe off the remaining polymer composition. You need to act with extreme caution. You need to wash the seal until it is completely clean. However, even after this it will be slightly sticky.
How to make a stamp
Stamps are designed to record events on various materials. They may be needed in the office (to certify copies of various documents), or at home (to individualize an item dear to you). The impression can be left on rubber, leather, fabric, metal, wax or clay. There are many die manufacturing technologies that require special tools or raw materials. But there are also quite simple methods that will help you easily turn any image into a stamp at home.
Before starting work, prepare the necessary tools. Find a source of ultraviolet light (ultraviolet lamp), photopolymer, which will be required for the base where the cliche is cast. Take a transparent one so that ultraviolet rays pass through better. Cut glass plates measuring 20 by 20 cm. The perimeter of the plates should be covered with electrical tape and magnets should be attached to secure them. You will also need two containers for liquid, a timer, protective and transparent films, water for rinsing, tracing paper and a toothbrush.
Now prepare your sketch. It must be done in black and white with clear lines. On the computer in a graphic editor we convert it to negative. This can be done in Photoshop. The result is printed on tracing paper, which is sold in any office supply store.
The next step will be ultraviolet irradiation, but first we will make some preparations. We place an ultraviolet lamp on sheets of paper and place dishes with water. Now we cut out the negative with a margin of one centimeter from the edge and tape it to the glass plate with tape, so-called bars (only the edges need to be glued). The result should be a bath with photopolymer, at the bottom of which is our workpiece.
So, let's start irradiation. Fill the bath to seven millimeters from the plates. We pierce the air bubbles with a needle. Next we place the substrate with the matte side facing down, and the second plate on top. We secure it with magnets. We bring the UV lamp and turn it on for two hundred seconds. Then we turn the workpiece over to the other side and repeat the illumination procedure.
The next step is to remove the negative and glass. The backing should not be touched. We wipe the polymer image a little with a brush, after placing it in water. Our task is to remove hard areas from the image of the future stamp. Next, the result of wiping is placed back into the liquid under ultraviolet light for ten minutes until completely dry. Finally, you should wipe the stamp using a pink eraser. This way you will extend the useful life of the product.
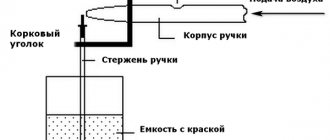
And in conclusion, let’s present another simple way to make stamps for the completely lazy. Prepare a thin sheet of foil and make a drawing on it. Using the empty pen paste, carefully press down a small indentation. Pour epoxy glue into this groove and leave it to dry for two days. We cut out a beautiful handle from the tree and glue the design to it with “Moment” glue or another of the same kind. And again we send it to dry until completely hardened.
Drying the print
In order for the product to last a long time, additional processing will be required. First of all, the print must be dried using a regular hair dryer. This will help completely remove any remaining water. But that's not all.
Additionally, you need to sprinkle the finished product with baby powder and shake it off. After this, the seal will no longer be so sticky. But it is also necessary to remove the remaining powder. For this you will again need a toothbrush.
If the product is not hard enough, you can additionally illuminate it in an ultraviolet lamp. But, you should not hold the seal for more than 3 minutes. But you can do without this step.
Methods of making seals
Here are 3 main methods: complex, simple, for children.
Complex: photopolymer printing
Photo exposure technology is capable of conveying the smallest details of a drawing. However, it is financially expensive and difficult to implement: you need to master graphics programs, buy film and polymer, find an exposure camera and a suitable laser printer.
Step 1 : Need a mockup of the image. To create a professional drawing, use Corel Draw, but other programs are also suitable.
Step 2. To print the layout, use a laser printer with a resolution of 600 dpi. Lomond or Kimoto films are suitable as a base.
Step 3. Straighten the negative and place it face up on the glass. Before doing this, moisten the glass with water so that the negative sticks better. It is advisable to cover it with protective film. Using smoothing movements from the center to the edges, remove air and remaining water from under the film.
Step 4. Cover the edge of the negative with border tape, leaving the corners free.
Step 5. Evenly, without breaking the stream, fill the negative with photopolymer. If bubbles appear, poke them with a needle or blow them out with a stream of air from a rubber bulb.
Step 6. Carefully place the film on the polymer with the rough side inward and the smooth side outward. Press it lightly in the middle and gradually release the ends. Place another piece of glass on top and use clamps (available at office supply stores) to secure it around the edges.
Step 7. Place the resulting “sandwich” in the exposure chamber. The front side should be on top. Set the exposure duration. When the process is complete, turn the composition over and repeat the procedure. Each polymer has its own exposure duration. For example, VX55 and ROEHM should be kept for one minute. To avoid mistakes, read the technical regulations.
Step 8: Carefully remove the glass and separate the negative from the resin. Leave the clear substrate in place. Use a toothbrush and a non-abrasive cleaner to remove any remaining uncured resin from the cliche. It is best to do this under running warm water.
Step 9. Soak the washed cliche in water for 5-10 minutes and re-expose it.
Step 10. Carefully cut out the cliche along the contour without touching the edges. Glue the workpiece onto the equipment. The print is ready!
Beginners often separate the substrate from the polymer after exposure. As a result, it is impossible to glue the stamp blank. Remember: the rough surface of the substrate comes into contact with the polymer, and the smooth surface sticks to the body.
This impression can be used to seal with wax or sealing wax.
Simple: stamp made using foil
Find an old stamp or board of a suitable size, preferably with a handle. Glue the resulting inscription to it, and you can test the quality of the print.
This technology does not require any special artistic talents from you. Materials for making blanks are available in every home. The wear resistance of such a stamp is lower than that of a photopolymer, but with its help you can make several hundred impressions.
Step 1. Choose a suitable pattern. Transfer it to tracing paper and then to foil. To do this, you can take a pencil or a non-writing pen and trace the outline with light pressure. Any foil will do: food foil on a roll or from a chocolate bar.
Step 2. Carefully pour strong putty or epoxy glue into the resulting recesses. Set the workpiece aside for two days to dry.
Step 3. At the end of the period, remove the resulting inscription from the foil. The cast should come off easily.
Step 4. Find an old stamp or board of the appropriate size, preferably with a handle. Glue the resulting inscription to it and test the quality of the print. Ready!
The basis may be a worn out rubber stamp
Prints for children
Who among us hasn’t drawn on an eraser and then enthusiastically stamped the last page of the notebook? Children love making prints. And you can make a whole collection of curly stamps with them.
You will need porous rubber (sold together with stationery), Moment glue, gouache, scissors, pencil.
Features of wax seals
Of course, today such products are used extremely rarely. Any stationery store has a lot of ready-made stamps for children, which differ in colors and low prices.
But there are also those people who love interesting experiments. For example, you can pleasantly surprise your beloved if you give her a beautiful confession, which is sealed in wax with a beautiful logo. Making such seals can be interesting as a hobby. Moreover, making such products is not difficult.
Methods of making seals
Here are 3 main methods: complex, simple, for children.
Complex: photopolymer printing
Photo exposure technology is capable of conveying the smallest details of a drawing. However, it is financially expensive and difficult to implement: you need to master graphics programs, buy film and polymer, find an exposure camera and a suitable laser printer.
Need an image layout. To create a professional drawing, use Corel Draw, but other programs are also suitable.
To print the layout, use a laser printer with a resolution of 600 dpi. Lomond or Kimoto films are suitable as a base.
Straighten the negative and place it face up on the glass. Before doing this, moisten the glass with water so that the negative sticks better. It is advisable to cover it with protective film. Using smoothing movements from the center to the edges, remove air and remaining water from under the film.
Cover the edge of the negative with border tape, leaving the corners free.
Evenly, without breaking the stream, fill the negative with photopolymer. If bubbles appear, poke them with a needle or blow them out with a stream of air from a rubber bulb.
Carefully place the film on the polymer with the rough side inward and the smooth side outward. Press it lightly in the middle and gradually release the ends. Place another piece of glass on top and use clamps (available at office supply stores) to secure it around the edges.
Place the resulting “sandwich” in the exposure chamber. The front side should be on top. Set the exposure duration. When the process is complete, turn the composition over and repeat the procedure. Each polymer has its own exposure duration. For example, VX55 and ROEHM should be kept for one minute. To avoid mistakes, read the technical regulations.
Carefully remove the glass and separate the negative from the resin. Leave the clear substrate in place. Use a toothbrush and a non-abrasive cleaner to remove any remaining uncured resin from the cliche. It is best to do this under running warm water.
Soak the washed cliche in water for 5-10 minutes and re-expose it.
Carefully cut out the cliche along the contour without touching the edges. Glue the workpiece onto the equipment. The print is ready!
Beginners often separate the substrate from the polymer after exposure. As a result, it is impossible to glue the stamp blank. Remember: the rough surface of the substrate comes into contact with the polymer, and the smooth surface sticks to the body.
This impression can be used to seal with wax or sealing wax.
Simple: stamp made using foil
Find an old stamp or board of a suitable size, preferably with a handle. Glue the resulting inscription to it, and you can test the quality of the print.
This technology does not require any special artistic talents from you. Materials for making blanks are available in every home. The wear resistance of such a stamp is lower than that of a photopolymer, but with its help you can make several hundred impressions.
Choose a suitable drawing. Transfer it to tracing paper and then to foil. To do this, you can take a pencil or a non-writing pen and trace the outline with light pressure. Any foil will do: food foil on a roll or from a chocolate bar.
Carefully pour strong putty or epoxy glue into the resulting recesses. Set the workpiece aside for two days to dry.
At the end of the period, remove the resulting inscription from the foil. The cast should come off easily.
Find an old stamp or board of a suitable size, preferably with a handle. Glue the resulting inscription to it and test the quality of the print. Ready!
The basis may be a worn out rubber stamp
Prints for children
Who among us hasn’t drawn on an eraser and then enthusiastically stamped the last page of the notebook? Children love making prints. And you can make a whole collection of curly stamps with them.
Regardless of whether you are planning to decorate greeting cards, envelopes or invitations, you can use any paper material with the help of the made stamp. In this article we will show you some simple ideas on how to make your own stamp! And also how to make small stamps with your children. The Handshaker mobile application gives you a great opportunity to order various services, for example, a good repairman, translator, realtor and other qualifications. Install the application and use it.
Stamp from scrap materials
Do you also collect wine corks, just in case, so to speak? So this case has come! And you can use a piece of wood or plastic as a stamp design. In general, from what is at hand. Or purchase these figures at any office supply store.
These stamps will decorate any card!
Glue the piece of wood onto the end of the cork with strong super glue! Remember that even the simplest handmade items are thousands of times better than any purchased trinket!
Stamp made of stones and foam rubber
A stamp made from stones is not so common, but it is quite quick to make, and it looks interesting! You will need small foam templates and stones collected from the street. Place the stickers on the rocks, color with a stamp pad, and start stamping!
We say thank you with a stamp!
A stamp with text is great! Take a look at our thank you stamp idea! It's perfect for gifts or just to show your gratitude! Materials we will need:
How to make a round wax seal at home
To do this, you will first need to create a blank. So, you can use any small round block. Its base must be level, since it is on it that the engraving will be done. Additionally, you will need regular stain and a glass of sunflower oil. You also need a soldering iron or a special device for burning on wood (the first option is preferable).
The wooden piece should be treated with sandpaper to avoid getting a splinter during use.
If we talk about how to make a wax seal at home, the preparation begins with cutting out a small circle from paper, which in diameter corresponds to the size of the workpiece. After that, we draw on it our initials or any image that we want to immortalize in wax. Next, you need to very carefully cut out the image to create a template. Working with scissors is not very convenient, so the best option would be a blade or a special paper knife.
The next stage of how to make a print yourself is that the made pattern is applied to a piece of wood and carefully outlined with a pencil. It is best to use bold, this will make it much easier to translate the image. When everything is ready, you need to heat the soldering iron and burn out the picture. This will require some skill. Therefore, it is recommended to practice on another wooden surface first. The seal is quite small, so the work is almost like jewelry.
When the image appears on the wooden piece, it will be necessary to treat it with stain. After this, the wax seal can be considered ready. All that remains is to dry it and start using it.
How to make a wax seal with your own hands? Instructions, tips and videos
We first encountered the need to apply a wax seal 3 years ago. The client wanted to decorate gift chocolate with sealing wax. And the client’s desire, as we know, is the law...
We bought a bunch of unnecessary (as it later turned out) equipment and got to work. The process went slowly and looked like this. One man was carefully applying wax seals. The second methodically tore them off: the prints turned out crooked and a good half of them were wasted. Of course, we fulfilled the order. But we spent a lot of time, nerves and money.
In general, as expected, the first pancake came out lumpy for us. But the very idea of using wax seals on the packaging of corporate gifts and branded chocolate seemed interesting to us. We started experimenting. And our experiments were crowned with success.
Now we actively use wax seals when decorating chocolate bars and corporate gifts. We learned how to quickly and accurately make prints on various materials: from craft paper to glass and wood. And we decided to share our experience with you. We hope that it will help you make high-quality wax seals at home.
Preparing for work: what do you need to have on hand?
To start making wax seals, you don’t need any complicated equipment. You can find everything you need to get started at home or buy it literally “for pennies” in the nearest store.
You will need:
- Sealing wax.
We recommend buying lump sealing wax - it is cheaper than candle sealing wax. Although if you need to decorate several invitations, for example, for a wedding or corporate anniversary, you can use sealing wax in candles: it is somewhat easier to work with. - Cliches for sealing wax.
You can order cliches from a company that specializes in the production of seals and stamps. And prepare the layout in any vector program (for example, Corel, Illustrator). - Metal cup
for melting sealing wax. We use cheap military grade camping bowls. - Tea spoon.
- A hair dryer
will help remove the remaining sealing wax from a spoon or speed up the process of melting the substance. - Electric stove.
If you plan to make several prints, then you can get by with a home stove or even a hair dryer. If there is a lot of work to be done or it will be carried out regularly, then it is better to purchase an inexpensive stove with one burner. Otherwise, you can seriously damage your home oven with sealing wax leaks.
Absolutely useless:
- Wax gun
. At its core, it is an ordinary heat gun. It is not just inconvenient to use, but almost impossible. - Wax seals
. They are not cheap, but they do not provide any benefit. We declare with full responsibility: the use of sealing wax will not speed up the process and does not improve the quality of the finished seals. Therefore, we advise you not to throw money away, but to spend it on something truly useful.
DIY wax seal: step-by-step instructions with video
So, we have stocked up with everything we need, now we can start making wax seals.
Before applying wax seals to wedding invitations, gifts, envelopes, etc., we recommend making several test impressions on paper. This will help you get used to the process and “feel” the substance.
When working, follow this algorithm:
- Solid sealing wax should be split into small pieces.
- Melt the wax on the stove at medium temperature, stirring constantly.
- Scoop up the sealing wax with a spoon and pour it onto the desired area.
- Wait for the sealing wax to harden and remove the cliche.
- Repeat steps three and four for subsequent products.
This way it will melt much faster. In addition, it is more convenient to pour small pieces into a cup for melting during operation.
We do not recommend melting a lot of substance at once: it will be difficult to work with. Also, do not bring the molten mass to a boil. Boiled sealing wax forms bubbles, which give the finished prints a sloppy appearance.
According to manufacturers, the melting point of sealing wax is 60°C. But, as our practice has shown, this indicator can vary significantly depending on the color of the substance. Apparently, this is due to the pigments that are used to color the wax mass.
Thus, black and white sealing wax have a much lower melting point than red sealing wax. Bronze sealing wax has the highest melting point and hardens much faster than sealing wax of other colors.
Make sure that the sealing wax is not too liquid, otherwise it will spread over the surface and give an unsightly impression. Press the resulting clot with a cliché and wait for a while.
Different colors of sealing wax require different times to harden. Black sealing wax is the most difficult to work with - it hardens for a very long time (several times longer than, for example, red).
After the sealing wax hardens, the cliche itself will easily separate from the finished seal. It is better to shoot the cliche a little sideways rather than horizontally.
On the Internet you can find recommendations for using fat to lubricate cliches. We do not practice this: if the application technology is followed, the cliché does not stick to the print and can be removed easily and simply.
Do not forget to add new batches of crushed sealing wax into the melting bowl as you use it - this will prevent it from boiling.
In addition to the article, we have prepared a video about how our company’s craftsmen apply wax impressions to corporate gifts. We hope that the video will give you a clear idea of the process of applying wax seals with your own hands at home.
- Sealing wax boiling.
- The print falls off after drying.
- Sealing wax sticks to the cliché.
When working with sealing wax at home, certain problems may arise. One of them is boiling wax, leading to printing defects. If the substance boils during melting, then you need to reduce the temperature of the stove and vigorously stir the sealing wax. Stirring will remove air bubbles from the sealing wax, which reduce the quality of the prints.
Another problem is the weak adhesion of the wax mass and the material on which it is applied. This leads to the fact that after hardening the seal simply falls off. In our practice, this happened with craft bags to which the sealing wax did not want to stick. We conducted many experiments and found a solution. If you add a small amount of hot-melt glue (hot-melt gun rods) to the molten sealing wax, the seal will reliably adhere to the craft paper.
In this case, we use a hair dryer. Using it, we heat the cliche and carefully remove the softened wax mass with a rag. Some people recommend using a solvent to clean the cliché. We have not tried this method. But you can try both methods and decide which one is more effective.
With the help of wax impressions you can design a wide variety of objects. Textured prints give them a vintage look, making them elegant and impressive.
- Applying sealing wax to paper and cardboard.
- Applying sealing wax to fabric.
- Applying sealing wax to wood.
- Applying a wax impression on glass.
Classics of the genre are scrolls and envelopes with wax seals. There are no difficulties with applying stamps to envelopes. As for the scrolls, there is one trick here. To make a scroll, take a round stick and wrap paper on it. You need to pour sealing wax into the right place - it should not be too liquid, otherwise the clot will spread. The sealing wax needs to be pressed firmly onto the cliche, and the scroll is ready.
This way, for example, you can decorate gift bags beautifully. Feature: when applied, sealing wax flows through the fibers of the fabric. Therefore, you need to place something metallic under the canvas - a thin ruler or a trowel. Rope sealed with a wax seal looks very impressive on gifts and scrolls. To get such a print, take a metal sheet or a construction trowel and grease it. Place ropes on the metal, fill them with sealing wax and place the cliche. After complete hardening, the wax seal will easily come off the metal surface.
We often use this technique to decorate wooden boxes with corporate gifts. By the way, a wax seal can be combined with a label. Applying sealing wax to wood, as a rule, does not cause any problems.
This method can be used when decorating bottles. To apply to glass, thick sealing wax with the consistency of “sour cream” is required. To get it, it is enough to lower the heating temperature of the stove. You can also add a few solid pieces to a cup of melted sealing wax and stir the mass vigorously.
How to Apply Wax Seal
In this matter everything is extremely simple. First you need to prepare the wax. It is best to take material of a thicker consistency without impurities, dyes and flavoring additives. The wax itself needs to be melted and poured a little onto the letter to fix its edges and seal it. After this, dip the seal in sunflower oil. This is necessary so that the workpiece does not stick to the wax base and spoil the entire image.
During this time, the wax will harden a little. But we must not allow it to completely seize. After this, just press the seal for a few seconds. When the wax hardens, it will leave a beautiful engraving, like in historical films.
From what is
If you can’t buy or order children’s stamps in the required quantity or want to get something special, you can make them yourself. The most suitable materials: eraser, foam rubber, thick cardboard, vegetables, etc. Here are options on how to do this.
- Prepare the details of the old construction set. Cut out squares from thick paper, or preferably thin plastic, equal in size to the base of the parts. Glue them together. From polystyrene foam - a food tray-container will do - cut out the necessary figures. Here you can use regular paper stencils. The only thing left is to glue the figures to the construction set cube using double tape. Homemade stamps are ready. Similarly, they can be made from a bottle cap (it will replace a designer part) or a cap from drinking yogurt and foam rubber.
- Make the necessary inscriptions (numbers, letters, whole words) or drawings on a piece of cardboard and coat with glue. Place a thick thread pre-selected in size and soaked in glue on top. Let dry. The original stamp is ready.
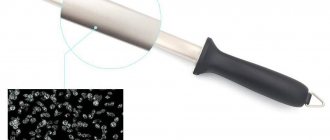
- It is very easy to make any raised print on an eraser, foam plastic, or even a potato. First you will need to draw the desired pattern on the surface - you will need to first cut the potato in half - then process it with a sharp knife. Then everything is as usual - dip the seal in paint and transfer the print to paper.
In general, anything can be used: buttons and a roller for cleaning clothes, real leaves and garden flowers, vegetables and children's toys, even the baby's hands and fingers. For example, from the cut stalk of Chinese cabbage you will get a beautiful rose, from the bottom of a plastic bottle - an elegant flower, and under a rolling pin with specially glued prints a whole composition will be born. Parents just need to show their imagination, listen to their children and, most importantly, not be afraid that they will get dirty.