Chemical solutions for pickling iron and steel
The simplest effective solutions for etching iron and steel parts are dilute inorganic acids, especially 20% sulfuric acid, in which etching is carried out at 45-50 ° C, or 20-25% hydrochloric acid, in which parts are etched at room temperature. For etching, 10-15% phosphoric acid is also used, heated to 60-70°C. Parts are etched in it, which will then be varnished or their surface will be left without further processing. If, after etching, galvanic coating of the surface is provided, then this bath is unsuitable.
Drawing
We start by preparing the product to be processed. It must be thoroughly cleaned of grease and dirt, rinsed with hot water and dried. After this, use a brush to apply varnish to the surface of the object to be treated (in our case, these are tablespoons).
Without allowing the coating to dry completely, apply a pattern or inscription.
Depending on the design option and the desired decorative effect, when etching metals, a pattern can be obtained either pressed into the material of the product or protruding on its surface. This can be achieved by removing the protective varnish layer. It is pure metal without a beautiful film that will be subject to chemical etching.
If you want to get a convex image, leave the varnish on it and remove it from the background.
Otherwise, remove the varnish film exactly in the form of the desired pattern - it will be “pressed” into the material of the product. To obtain a fine pattern, it is convenient to remove varnish from the surface with a sharpened wooden stick or toothpick. Try to get the smoothest possible lines without smudges, which can significantly spoil the entire work of etching the design on the product.
Chemical etching of non-ferrous metal surfaces
Etching copper and brass
On brass the solution forms a light yellow coating, on copper it forms a light pink coating. The solution contains:
- Concentrated nitric acid 250 ml;
- Concentrated hydrochloric acid 150 ml;
- Denatured ethyl alcohol 100 ml;
- Water 500 ml.
The parts are etched by briefly immersing them in a bath of solution, after which they are removed and immediately washed with water.
Brushed copper etching
After etching on copper, you will get a rough (to matte) surface. Bath composition:
- Nitric acid 40% 600 g;
- Concentrated sulfuric acid 400 g;
- Sodium chloride 3 g;
- Zinc sulfate 2 g.
Brilliant etching of copper and its alloys
- — Concentrated sulfuric acid 500 ml;
- — Concentrated nitric acid 500 ml;
- — Concentrated hydrochloric acid 10 ml;
- — Soot 5 g.
The operating temperature of the bath is 18-20°C. The degreased parts are immersed in a bath of solution for 10-30 s, after which they are removed, washed with water and dried.
Etching
This is where I made my biggest mistake.
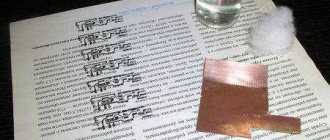
It was necessary to cover the other side of the foil. The articles advised to paint over it with nitro or seal it with tape. True, someone warned that it would be difficult to remove parts from the tape, but I was reluctant to paint, due to the smell and loss of time, and the film was “at hand.” “It will lag behind in the solvent,” I decided, and, without thinking twice, covered it with white ORACAL, deciding that the etching process would be clearly visible on white. I poured the ferric chloride solution from a mayonnaise jar into a plastic food tray (a commonly available analogue of a photo cuvette) and put foil there.
The etching process is boring as hell. To speed it up, I blew on the solution, creating a flow. Apparently this should not have been done. It seemed to me that the etching went faster where I was blowing, with all the sad consequences.
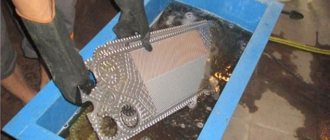
The plate was etched unevenly
Apparently there were several reasons: my “blowing”, and errors in the development of the master, and the bending of the plate. As a result, the rails began to “disappear” due to lateral etching in the middle, while the ladders had not yet been etched all the way through.
To avoid all this, it is necessary that the plate is positioned horizontally and the solution is mixed as evenly as possible. The etching surface must be thoroughly sanded/polished and degreased.
Having decided to wash the finished rails under water and cut them off, I made a second mistake - some of the lines were washed away, along with some of the steering wheels, to which I was too lazy to attach the sprues.
I managed to separate the parts from the film with great difficulty. Rubbing with acetone did nothing. The rails were torn during separation. I threw the small things entirely into acetone. The film fell off, but the glue layer swelled to 1 mm thickness and did not want to dissolve. It was the first hour of the night, and I just wiped it off with my fingers...
Then I found out that I needed gasoline for it..
Here's what happened:
But in the future my choice is transparent NC varnish.
In conclusion, I want to say: I was pleased with the experiment. Despite the fact that the parts turned out to be more or less only stop anchors and a few steering wheels, I gained “invaluable” experience and a firm belief that etching at home is possible and necessary. The whole process took me 3 hours. I consider the costs of materials to be insignificant - the foil was inherited from the pantry, ferric chloride will still come in handy.
Here are some conclusions that I drew for myself:
- The development of the master largely determines the quality of future parts. If possible, you should not place complex (ladders with handrails) and simple (handrails) elements together. Don’t get carried away with small details (it was completely in vain that I made buttresses in the anchor chains, although the ladders came out fine).
- It is necessary to achieve uniform etching of all areas; this is the key to quality.
In the future I plan to experiment with “volumetric” etching.
I will be happy to hear advice and criticism of my actions.
One of the methods of producing a convex or depressed pattern on metal products, which appeared relatively recently, is called etching. The operating principle of this method is based on the use of electrochemical processes in a liquid electrolyte. If you have artistic abilities, even at home you can get a high-quality pattern with a minimum of required materials and equipment.
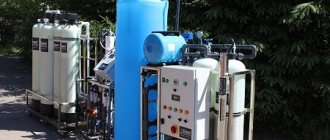
When doing etching yourself at home, you will need the following consumables and equipment:
- a product intended for decoration - various cutlery, hunting or camping knives, or simple soap dishes on which simple patterns can be made;
- a container of sufficient volume and convenient shape made of non-metallic materials, suitable for placing the entire product being processed or its part to be decorated. It is most convenient to use glass containers for this purpose, which allow visual control of the processing process.
- a sufficient amount of ordinary table salt;
- nail polish of any color;
- nail polish remover intended for cleaning the treated product;
- source of direct electric current of low voltage. In this capacity, a charger can be used to charge car or telephone batteries.
Etching metal at home using electricity and salt
Before you begin metalworking, you should remove any dirt, defects, or traces of rust from the surface. In this article we will talk about electrochemical etching of metal at home using electricity and ferric chloride.
What is the procedure for and where is it used?
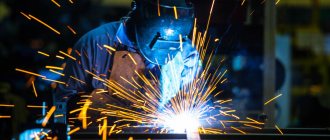
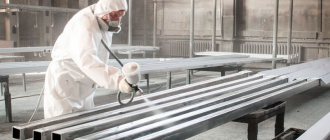
The processing method is used both in industry and for private purposes. The main task is to increase the adhesion of the material, that is, adhesion to another substance. Often used before painting surfaces, for example in the automotive industry.
At home, you can use the method for household purposes. In this way, for example, you can actually make a new one out of an old steel bucket. But? Before we understand the technology, we will highlight what types of methods there are and where they are used.
Metal etching: what is it?
This is a method for removing part of the surface layer (to microns) of a metal product using a controlled chemical reaction, often under the influence of a current. Substances of different acidity and salts react with the workpiece. The most common option for metalworking at home is to immerse the sample in a pre-prepared container with reagents.
Industrial Applications
- Cleaning from oxide film.
- Before painting or treating with special protective compounds.
- Before the galvanizing operation.
- To detect corrosion in stainless steel.
- Applying a pattern to small parts of microcircuits that facilitates the conduction of electrical charge.
This is an incomplete list of tasks that the procedure allows you to solve.
Types of etching
Let's present common methods. Most of them can be implemented at home. But you must adhere to safety rules - you will need to deal with chemicals.
Electrolytic
The second name is galvanic processing. The easiest way to use this technology is on small parts when it is necessary to urgently clean the surface. The essence of the procedure is as follows: a saline or acid electrolytic solution is introduced, and the workpiece is placed in it. Then a shock is given. Depending on how it is charged, etching is distinguished:
- Cathode. In an environment with the addition of chemical elements, hydrogen is formed at the cathode in the form of a gas; a reaction occurs with its release. It saturates the liquid and reacts with the alloys, removing scale. It should be taken into account that the strength of the surface suffers and it becomes more fragile, so it is better not to treat thin steel sheets this way. Suitable materials are high carbon steel, heat treated samples.
- Anode. Used more often. At the anode, the oxide film comes off with the release of oxygen. All “extra” particles melt in the solution. The top layer becomes slightly rough. There is a possibility of losing an excessively large amount of metal; it is important not to overexpose the product in a container under voltage.
Chemical
If the previous option was great for steel, especially carbon steel, then this procedure has the same goals, but a completely different audience. You can start processing if you have in your hands:
Suitable: H2SO4, HCl, HNO3. The duration of immersion in the bath depends on the concentration of the composition and the degree of contamination of the workpiece. The interval is quite large - cosmetic cleaning of a thin-walled product may take only 1 minute, and for a thick cast-iron part - up to 2 hours.
The technology is simple. There is metal. An oxide film has formed on it, which needs to be removed. Acids penetrate through the pores under oxidation and interact with the steel surface.
During a chemical reaction with iron, hydrogen is released. It repels pollution. But the metal surface can also be damaged.
This can be avoided if you pre-treat the part with special rust inhibitors.
Plasma
The procedure also takes place in a chemical environment. But the chemical reaction is excited by a plasma flow generated on the basis of inert gases (containing fluorine). When they interact with corrosion (or silicon), they do not affect the iron itself. This is a very accurate method, but it requires special equipment. The degree of accuracy is up to 10 nanomicrons.
Let's watch a video on this topic:
Galvanic
This is a very fast method, which is why it has gained popularity, especially among those who do it at home. Speed isn't the only advantage. Other advantages:
- fairly clear boundaries and contours;
- no acids are required, so it is a more environmentally friendly method for humans.
First, let's determine the composition of the liquid for immersion; it depends on the material of the workpiece:
A mixture of ammonia and iron sulfate
Copper, bronze, brass
Copper sulfate solution
The immersion bath must be made of dielectric. For example, a glass jar for small parts.
Place the element in a container and pour in a product with good conductive properties. We attach the anode to the product. You will definitely need a source of energy. The procedure takes no more than 2 minutes, then rinse the sample under water.
Artistic
The procedure is suitable for etching a knife at home. The process is very common among restorers and weapon connoisseurs. It can be used to engrave, write the owner’s initials, or add picturesque patterns.
The operation is very simple. You can use any of the above methods, but the fastest and safest is galvanic. A stencil of tape should be left on the surface of the metal. It's easy to do with a good inkjet printer. When the necessary areas are protected (make sure that there are no traces of air under the tape), classic etching can be carried out.
Let's look at the photo:
Surface preparation
In order for the operation to proceed at a fast pace and the surface layer to be removed evenly, it is necessary to make sure in advance that the product has gone through the preparatory stage.
- Using fine sandpaper, polish all defects and remove imperfections.
- Apply soapy water. Dishwashing detergent diluted in water until foamy is suitable.
- Carefully remove all dirt using a brush.
- Let it dry completely, you can use a hair dryer.
- Soak a rag in degreaser and wipe the surface thoroughly.
Drawing
If you are considering this method as an artistic idea if you want to decorate a knife or other element by etching metal at home with salt, then you need to protect and isolate certain areas. You can even achieve halftones, then some protective films must be left for the entire period, and others must be removed as the main background is etched. Let's consider what available methods can be used to secure the pattern area.
Nail polish
Among the advantages are ease of application and accessibility; it can be easily found in your spouse’s cosmetic bag or bought for a penny. But there are disadvantages:
- It is difficult to make too thin lines due to the high viscosity;
- it is difficult to carefully erase accidentally drawn elements;
- artistic skill required.
Primer or bitumen varnish
Since etching a design on metal with your own hands without a stencil is not easy, the easiest method is to completely prime the surface, and then draw a pattern with a sharp part, removing the excess. Don't apply too much pressure or you risk scratching the steel.
Glossy paper
There is special material for creativity, but a sheet from a magazine will also work. The pattern should be printed on it in a mirror image using an inkjet printer. Then the freshly printed design must be attached to the area to be treated and ironed with an iron. After cooling, moisten the area with warm water and remove the paper - the mark will be transferred.
Steel pickling
The procedure consists of several stages:
- degreasing and cleaning;
- applying a protective layer if necessary for artistic or other purposes;
- guidance of the solution;
- lowering the element into the bath;
- supply of electric charge.
Mordants
Usually nitrogen is mixed with one of the following:
For the best effect, you can first soak the element in glyphogen for several minutes, then dry it and begin the main etching.
For non-ferrous metal, etching metal with acid at home is suitable.
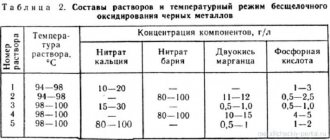
Let us present in the form of a table recommendations for compositions:
Metal blank material
Substances that are added to the mordant
Cuprum, an alloy of it
Chromium or nitrogen is added to sulfuric, hydrochloric, orthophosphoric, nitrogenous
Alkaline mixtures based on sodium hydroxide and hydrogen peroxide
First - alkali, then strong mixtures, for example, hydrogen fluoride
Water solution with hydrogen peroxide and methanoic acid
Printed circuit boards
The point is to apply a thin pattern on microcircuits that will have the ability to conduct an electrical signal. The dielectric blank is covered with foil. The necessary lines are protected on it, the rest is etched using one of the methods listed above.
Let's look at the video on how to do this at home using lemon juice and hydrogen peroxide:
Features for other materials
For decorative purposes, you can use a similar technique on a glass surface. The pattern should be protected with wax or rosin, and the mordant can be a hydrogen fluoride reagent, since only it has the ability to dissolve glass. The main part turns out matte and rough. Let's see the details in the video:
Safety precautions
When working with any chemicals, you must be aware of the possible harm to the body. We recommend in advance:
- turn on the forced air circulation system;
- put on a respirator;
- protect all open areas with rubber special clothing, gloves are especially important;
- when diluting the composition, pour the acid into water, and in no case vice versa;
- Place equipment nearby to extinguish a possible fire.
In the article, we talked in detail about the types and technologies of chemical etching of metal at home. Be careful.
Can all metals be processed this way? Will there be a difference in what is released during the etching process? The process seems to be very simple, but I can’t find a description. There is simply no time to experiment.
I would be very grateful for the information.
Registered: 09/14/2004 Messages: 37
From: St. Petersburg
Replacing the protective coating
You can not only clean brass objects yourself, but also replace the old layer of varnish with a new one. To do this, use any varnish solvent and a soft brush. Use a brush dipped in solvent to remove the old layer of varnish. After removing the varnish, the item should be polished with brass polish. And the final stage is applying varnish to the product.
The varnish is applied with a soft brush, or with a cotton swab or disk. It is important that the varnish is distributed evenly over the surface so that there are no smudges. In order to protect the accessory from environmental influences, experts recommend varnishing it after each cleaning.
Related video: How to clean brass with citric acid
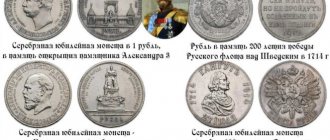
Brass items can be found in any home, so it will be useful for everyone to know how to clean brass at home. At the same time, people simply remove figurines and souvenirs made from this material from prominent places as soon as the aesthetic properties are lost. However, each product, even if contaminants have become embedded in the material, is cleaned using specialized means.
The article provides some safe and simple ways to return brass products to their original appearance, how to clean brass coins, mechanical mods, or clean a brass samovar (the given methods are universal for products made from this material).