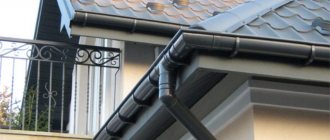
The drainage system is designed to remove melt and waste water from the roof surface and in the drainage system with subsequent transfer to treatment systems. Heating storm drains prevents the formation of ice and snow blockages along the entire path of water, ensuring its unhindered drainage from the facility to prevent flooding and premature damage to the drainage system and roofing material.
A heating cable in a storm drain is most often part of a heating system for roof gutters. It allows you to efficiently and safely deal with icing of the entire drainage system of your home. The main danger of freezing storm drains is the formation of ice build-ups and ice crusts on the surface of the earth in the drainage pipe discharge area. In addition, ice and snow blockages in storm pipes lead to premature failure of the underground part of the pipeline.
Types of storm drainage
- Surface (open) drainage
- Underground (closed) drainage system
The main advantage of surface drainage systems is easy installation that does not require major work; storm drains are laid with a slight slope to remove water from the local area. For heating, a self-regulating braided cable with a linear power of 30-40 W/m is used. The self-regulation function allows you to avoid overheating of the cable in places where debris, dirt or sand accumulates, so it is not recommended to use a resistive cable in storm drains.
Where do the icicles on the cornice come from?
Many people are interested in why icicles appear on roofs and adjacent structures. This is usually due to the fact that snow begins to melt when it hits a surface that is at least slightly warmer.
Water drops overcome a warm surface. After this, the condensation moves to the cold eaves outside the walls. Gradually the composition freezes again, forming larger icicles. No less problems arise due to ice, which forms due to too great a difference in temperatures. This is why roof heating is so necessary.
Incorrect thermal insulation
If the material is used correctly, then the temperature of different and neighboring structural elements remains almost the same. Therefore, upon contact with such surfaces, snow does not begin to melt.
The optimal solution is often considered to be a complete reconstruction of the “roofing pie”. But the heating system also helps to cope with the problem.
Climate Features
If the insulation is correct, then there should be no connection between it and environmental conditions. At night the temperature is lower, during the day it rises.
The sun heats the roof surface. Therefore, snow often begins to melt, even if the temperature is sub-zero. The water flows to the gutters and freezes there. The roof is destroyed, insulation in this case does not help.
Complex roof structure
The process of formation of the “ice shell” also depends on this. The more decorative elements there are, the more often snow cover forms between them, which negatively affects the result of operation. Experienced designers recommend abandoning “exclusive” solutions. It is better to give preference to simple roofs, where the slope level is at least 30 degrees.
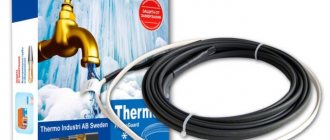
Heating cable for storm drains
Self-regulating cable SAMREG 30-2CR
- Power: 30W
- Purpose: pipeline/roof/tank
- Screen: Tinned copper wire braid
- Type: self-regulating
- Type: low temperature
- Application: without explosion protection
Heating cable Raychem ICESTOP GM-2X-C
- Power: 27 W
- Purpose: roofing
- Type: self-regulating
- Type: low temperature
- Application: without explosion protection
- Max. temperature (operating): 65 °C
Heating cable Heat Trace 17FSM2-CF
- Power: 17 W
- Purpose: pipeline / tank / roof
- Type: self-regulating
- Type: low temperature
- Application: explosion-proof
- Max. temperature (operating): 65 °C
To section
Heating is necessary along the entire route of melt water, so rainwater wells and storm drains (gutters) along the entire length to the well of the treatment system must be heated.
Installation and connection of automatic roof heating systems
Let's move on to connecting the automation. To control the entire roof and gutter anti-icing system, you will need the following components:
- modular input circuit breaker + RCD with leakage current of 30 mA
Or they can be replaced with one diffautomatic circuit breaker with the same current.
- modular starter with normally open contacts
- 3 position switch
To switch the system to manual and automatic modes.
- thermostat or weather station
The brains of the entire system.
- automatic switches for heating sections
- humidity, temperature, precipitation sensors
Heating of open storm drains
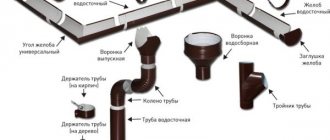
Depending on the diameter and material of the storm drain, the cable is laid in 1 thread (with a diameter of 120-150mm), or in 2 threads if more than 150mm. For plastic pipelines, a cable with a power of 30 W is used, for concrete pipelines - 40 W. In the case of heating a storm drain with 1 thread, the heating cable is laid on the bottom and, if necessary, attached to a perforated mounting tape every 300-500 mm.
In the case of heating a storm drain with 2 threads, it is necessary to provide measures to prevent the cables from overlapping each other. For this purpose, special galvanized clamps are used to separate the cable strands from each other or the cable is secured to a perforated mounting tape.
Heating element subsystem
It is necessary not only to choose the right material for insulation, but also to take into account other nuances. One of them is that for some time the starting currents will exceed the calculated values. Over a short period, this excess can reach 5-10 times.
If the indicator persists for a long time, the likelihood of negative consequences increases; even insulation for a pitched roof does not help.
Therefore, when designing, it is not recommended to exceed the recommended length of sections for the heating cable.
Minimum bending radii are also taken into account, as are mechanical protection measures for the cable when passing corners. It is assumed that brackets and other connecting elements of the appropriate type will be used.
Resistive cable
Resistive heating cables are a special type of equipment. It is used when it is important to ensure high power density and temperature resistance. In this case, the resistance remains at the same level. Essentially, it is a metal core covered with a layer of insulation.
Among the positive aspects of use, note:
- Increased strength to mechanical stress.
- Stable characteristics throughout the entire operational life.
- Heat dissipation, which also remains consistently high.
- Start-up pre-launch and normal warm-up.
- High temperature characteristics that a warm roof maintains.
An example of this type of product:
- Orange Hit.
Self-regulating cable for roofing and gutters
It is distinguished by a sensitive reaction to any changes that occur in the environment. At the same time, the linear resistance of the equipment is also adjusted automatically. The action is performed for the entire area, or for its individual parts. You can cut out the sections that are necessary for working on the roof and insulation.
In the resistive type, heat is supplied in one or two cores. But application and installation are complicated due to the fact that the readings are always constant.
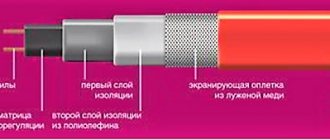
In the case of a self-regulating cable, heat is generated by a polymer matrix installed between a pair of current-carrying wires. There are additional inclusions that can conduct current. Only when the background temperature increases, the connections between the components can be disrupted. When the indicator decreases, everything is restored.
At one time, self-regulating cables provide different temperatures in different areas of the roof. There is no threat of local overheating, as well as additional maintenance requirements. Such a gasket reduces consumption, and then it is cheaper to install roof ventilation from corrugated sheets.
Heating of closed storm drains
It is quite difficult to install a heating cable in a closed storm drain. The main problem is that the sufficient flexibility of the cable does not ensure its unhindered pushing along the pipe; after several meters of installation, the heating cable can bend in the pipe and “get stuck”.
The cable is laid in one thread by pushing it along the pipe to the maximum possible length. Cable fastening is not provided.
To lay the cable in two threads, a special fastener is used to separate the cable threads from each other at a distance of 50-100mm. To do this, the fastening elements are first installed on the heating cable in increments of 300-500mm, and then the entire structure is pushed along the pipe to the maximum possible length. This design, as a rule, allows you to install the heating cable further than when installing the cable in one thread.
How is heating of gutters and gutters installed?
The technology for creating anti-icing systems consists of several stages, their sequence must be followed.
Marking places
In this case, the main thing is to take into account the complexity of the areas. If there are sharp turns on the route, it is recommended to cut the cable into several elements and then connect them with couplings. There should be no sharp corners or protrusions on the base.
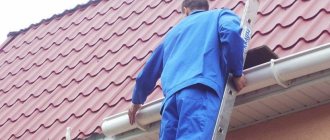
Installation in gutters, pipes, on the roof
It is recommended to secure the cables inside the gutters with mounting tape, which will not damage parts of the system. It is attached across the wires. The pitch for a resistive cable is 250 mm, but for a self-regulating cable it is larger - 500 mm. For reliability, the tape is additionally fixed with rivets, and they are treated with foam or sealant.
Then they securely fix it in the drainpipes and on the roof. The same mounting tape is used inside the gutters. If the length of vertical structures is more than 3 m, then the heating elements are attached to a metal cable, the purpose of which is to remove the load from the working wire.
Any loose sagging of the heating cable is excluded. Inside the funnels it is secured with tape and rivets, and on the roofing material with tape and sealant or foam. The use of rivets on the roof is absolutely prohibited, since any hole in the near future will cause a leak.
Point drainage and drainage systems
They consist of a rainwater well connected to a sewerage system. They are installed in places where drainage water accumulates, either natural or specially designed during landscaping of the local area (usually under drainpipes). In the rainwater inlet, the cable is laid in a spiral, the turns are connected with special galvanized fasteners. The pitch between turns is 50-100mm. Next, part of the heating section goes into the sewer pipe.
Heating of a drainage system with a closed storm drain channel
Separate cable line in storm sewer
The part of the cable located in the drainage ditch (pipe) can be laid in one thread or in two.
When placed in a drainage pipe, a cable loop fastened with clamps is made in advance and then inserted into the pipe. In this case, the length of the loop itself is determined by the maximum possible length of the loop passing through the pipe. As a rule, this is the place where pipes are bent or connected. If the cable needs to be routed to the next section of the internal drainage system (for example, from a local area to a storm well or an open storm pipe), the pre-pass method can be used. A nylon thread is tied to a floating object (a piece of foam plastic, a plastic ball, a cork, etc.) and passed through the storm drain, spilling water on it. The second end of the thread remains at the beginning of the storm drain. At the other end of the storm drain section, they catch this object with a tied thread. Next, a heating section is tied to the end of the thread, which is located at the beginning of the storm drain, and from the other end the thread is pulled out along with the heating section.
Heating of roofs and roofs in residential buildings
To organize reliable protection from ice blocks or snow masses, you can use the FreezStop Roof kit. It is designed for high-quality heating of roof gutters: pipes, trays, small valleys, structures for ground drainage. The set of equipment promotes the formation of a channel for drainage of melt water, prevents clogging of the pipeline, and removes formed ice.
The system elements are installed in plastic or steel gutters, on roofs made of galvanized metal, metal tiles, metal profiles or soft tiles with a bitumen base. If the roof is made of zinc-titanium or copper, fasteners made of the same materials are used to heat the external drain.
Gutter heating kit
FreezStop Roof brand kits are included. include:
• self-regulating FreezStop cable, • KTU set for creating sealed heating sections, • perforated strip, • installation and use instructions, • packing box.
Each heating section consists of a cable of the required length, a power wire for connecting to the power supply, end and connecting couplings. Depending on the control method, total power, and the distance of the heating zone from the power source, intermediate connection boxes or control equipment may be required.
Cable design for heating a drainpipe
The FreezStop self-regulating cable is made of two parallel copper conductors. The gap located between them is filled with a matrix (semiconducting composition). It changes its resistance as the temperature of the object increases or decreases.
The system for heating gutters using a self-regulating cable has the following characteristics:
• supply voltage – 220–240 V, • maximum operating temperature – up to +65 °C, • minimum installation temperature – up to –30 °C, • linear power – 25 W/m, • operating temperature range – from –50 °C up to +50 °C, • flame resistant, • black outer shell.
To improve electrical safety and protect the semiconducting matrix, thermoplastic elastomer (TPE) insulation is provided. A tinned copper braid and a TPE sheath are placed on top of it. The shell has the following properties:
• resistance to ultraviolet radiation, precipitation; • high mechanical strength; • resistance to temperature changes.
These qualities ensure stability of operating parameters and reliability of the system throughout its entire service life - it is over 25 years.
Self-regulation principle
Heating occurs when current passes through the semiconducting matrix from one core to another. The change in matrix resistance depends on the temperature of the surface on which the cable roof heating system is mounted. The linear power of the wiring is affected by changes in temperature indicators: when they increase, the resistance of the matrix increases, and the power decreases, and vice versa. The manufacturer recommends using the cable in conjunction with thermostats.
To start operating self-regulating equipment, it is necessary to connect it to the electrical network when the first frost occurs and the temperature drops to +5 °C. The anti-icing system operates in automatic mode: voltage is supplied to the sections only during those periods when ice formation is most likely. If the ambient temperature is outside the range set on the regulator, the power supply is cut off.
There are several basic operating principles.
• If the air temperature is within the set range, but there is no snow or water in the trays, the cable reduces its power. • When precipitation occurs, the cable increases power to effectively melt snow or ice. • If you turn on the system late, if the trays are already filled with snow or ice, the efficiency of the equipment will decrease.
To automatically control and reduce energy consumption, various devices compatible with the FreezStop Roof kit are used.
• Temperature regulator TP 140
– wall-mounted operating temperature regulator.
• Electronic thermostat RT-330
– a device for heating control, installed in a cabinet with DIN-rail mounting.
• Repeater-relay “Roomstat” 190
– a device for connecting an additional load. It is ordered in addition to the kit when the total system power is over 3.5 kW.
Gratings and dirt-proof coverings
A large amount of debris and dirt accumulates in the door dirt protection system, so electric heating systems are installed in them extremely rarely. Since gratings most often cover a sump without drainage, heating can be mounted around or under the sump directly in the concrete base of the porch or under the facing tiles.
Installation errors
Even the smallest mistakes lead to problems during operation. Insulation doesn't matter.
Rough installation
The cable easily breaks in several places if the installation technology is not followed. Because of this, there is a high probability that the entire system will collapse.
Mobility
This happens when cables are attached only to mounting tape. This design cannot last even two years. After all, snow and ice constantly have a mechanical effect. Flat corrugated sheets are no exception.
Incorrect fastening
You cannot use the same tape that is also suitable for heated floors. After all, the clamps used are completely different; they are not interchangeable parts. Under the pressure of sliding snow, these parts can easily collapse. Typically, floor clamps are only used as a temporary measure.
Specialized plastic fasteners that are mounted with a click are also not suitable for such projects. Such fasteners quickly disintegrate when exposed to ultraviolet rays. The ban applies to white plastic ties. You should only take black products from well-known companies. Then the heating will not fail.
Excess of mounting holes
Over the years, leaks appear in any openings, even if they were sealed correctly. You should not strive to ensure that the cable is secured as well as possible from the very beginning.
Incorrect cable insulation
When the wire heats up, the tightness is lost quickly if a heat-shrinkable tube is installed on the end of the cable and then wrapped with pliers. You can’t insulate a façade like that.
No cable
In this case, there is a high probability of the cable breaking. The system will not allow you to do anything wrong.
Using the wrong cable
You cannot select cables that are not specifically designed for this type of work. In this case, the system constantly turns off and shocks those who touch it. And there is no need to lay the cable where it is not needed, in fact.
Calculation of cable length for heating storm drains
- When designing a storm drain heating system, it is necessary to take into account all problem areas of the storm drain, in which an ice plug or snow accumulation may form. It is not necessary to heat the entire storm drain, since the intensity of drainage in some areas may be small and does not lead to the formation of ice jams.
- Determine the length of the heating sections, taking into account the specific features of the area (diameter, depth, material). The rules for choosing the type, number of cable threads and installation method are given above.
- Sometimes it is impossible to determine the length of a section (a straight section of a closed storm drain). In this case, the cable, terminated on one side, is pushed into the pipe to the maximum possible length, and only then is the section cut to connect to the supply wire.
Heating of drains and gutters, its tasks
This anti-icing system is a whole complex of devices that prevent the formation of ice on the eaves, the appearance of plugs in gutters, and the deformation of gutters. Correct and timely installation of heating will make it possible to protect structures from contact with water, from the formation of dangerous icicles and snow debris.
Heating of gutters and gutters is provided by special cables, which, when heated, contribute to the thawing of snow and prevent the formation of ice build-ups. The main feature of this system is the ability to work only during the period when the building needs to be protected. With proper installation of the system, the risk of icicles forming and falling, deformation and pushing through of gutters, and blockages in drainage pipes are completely eliminated.
Systems that include roof protection, as well as heating of gutters and gutters, perform the following tasks:
- removal of heavy ice and icicles;
- protecting the drain from damage;
- automatic roof cleaning;
- reducing the load on the structural elements of the building;
- protection of wet areas of the roof from damage (rotting);
- preventing the occurrence of congestion due to ice jams in pipes;
- protection from sudden daily temperature changes that threaten roofing materials.
The anti-icing system also performs a more “global” task: protecting the roof, heating gutters and gutters increases the service life of the roof covering, and also helps preserve structural materials - rafters and drainage systems.
Installation of heating cable in storm drains
- Sections of self-regulating heating cable of the required length, according to the heating scheme, are manufactured directly at the installation site. Coupling (end sealing and connection of the supply and heating parts) is carried out with special kits of the TKT type, which are ready-made sets of heat-shrinkable tubes and copper connections that ensure the tightness of the section.
- In addition to heat-shrinkable couplings, electrical connectors and connectors are also used, which are well suited for elements of storm drains that require frequent cleaning (for example, sand traps).
The use of these connectors simplifies installation, since preparatory operations for the manufacture of finished sections can be performed before installation. The detachable parts are connected directly on site. This connection allows you to quickly disconnect the heating section (sections) for cleaning storm drain elements, and then also quickly connect it to the general heating system. Connectors also replace mounting boxes, allowing you to assemble an extensive heating system.
When calculating the length of heating sections, it is necessary to take into account the maximum permissible length of the self-regulating cable section. Exceeding the maximum length will result in system overload and failure of the heating control system. There are standards for braided heating cables, which can be found in the next section.
Installation of a roof anti-icing system - materials
To install the anti-ice system you will need the following materials:
- three-wire power cable 220V – VVG
- panel for control equipment
- automation (full equipment will be given below in the diagrams)
- cable KVVG
This is the control cable that will connect the sensors.
- sensors – precipitation, humidity, temperature
- protective junction boxes
They must have a degree of protection IP55.
- mounting tape for fastening the heating cable
- galvanized rope or chain
- mounting clips
- resistive heating cable itself
Where does installation begin? First of all, measure the cable on the ground along the mounting tape. Choose the distance between the tapes from 30 to 50cm.
The descent into the drain is immediately measured and the cable is installed.
List of main elements
An anti-icing system is a device designed to heat a certain area of a structure, ensuring controlled melting of snow and preventing the formation of ice. For roofing systems are used consisting of the following elements:
- A heating element. Heating cables or heating cables are used as a heater. They are able to convert electricity into thermal energy due to the high resistance of electrically conductive elements.
- Control block. It includes starting, regulating and protective devices: controller (weather station, thermostat), temperature and humidity sensors, control cabinet with circuit breakers, starters and RCDs. Temperature sensors are mounted on the roof and walls, and it is recommended to install a humidity sensor in the drain. The control cabinet provides automatic and manual control modes.
- Distribution system. It includes power cables for supplying electricity, control cables for transmitting signals from sensors, mounting boxes and terminal connectors.
The anti-icing system works quite simply. Heating of the problem area is provided by heating the cores or a special element of the heating cable when current passes through them.
The cable is turned on and off automatically when a signal is received from the sensors. The temperature sensor gives such a signal at a temperature of the order of plus 2 or minus 3 degrees.
Corresponding information also comes from the drain when moisture accumulates in it, which can create an ice plug.
Features of the heating system arrangement
Methods for heating different types of roofs may vary. We are talking about the so-called “cold” and “warm” roofs. Let's look at the features of each option.
Heating a cold roof
This is what they call a thermally insulated roof with good ventilation. Most often, such roofs are located above non-residential attic spaces. They do not allow heat to pass out, so the snow cover on them does not melt throughout the winter.
For such structures, installing heated gutters will be sufficient. The linear power of the laid cable should gradually increase. They start with 20-30 W per p/m and end with 60-70 W per meter of drainage.
How to heat a warm roof
A roof with insufficient thermal insulation is considered warm. They allow heat to pass out, so that even at sub-zero temperatures the snow cover on the surface of a warm roof can melt. The resulting water flows onto cold parts of the roof and freezes, forming ice dams. For this reason, it is necessary to arrange heating for the edge of the roof.
The so-called warm roof allows heat to pass out. Therefore, the snow over the “warm” areas melts, the melt water falls on the “cold” fragments and freezes
It is implemented in the form of heating sections laid along the edge of the roof. They are laid in the form of loops 0.3-0.5 m wide. In this case, the specific power of the resulting heating system should be from 200 to 250 W per square meter. The arrangement of heating gutters is implemented in a similar way to that used for cold roofing.
Video description
Video on installing a heating wire on the roof and in the gutter:
Connecting the heating cable
This operation must be carried out carefully.
- Remove the plastic insulation.
- The shielding braid is cut lengthwise, rolling it into a bundle.
- Cut off the bottom insulating layer.
- The matrix is cut to a length of 3 cm.
- The conductors of the supply cable are also cleared of insulation.
- The wires are connected in pairs using a thermal tube. This is a plastic tube into which a heating conductor core is inserted on one side. It is pulled out from the opposite side of the tube and connected to the core of the supply wire. The connection is made by soldering. Then the heat tube is pulled over the joint and heated with a hairdryer. It expands, becomes soft, and after cooling decreases in size, compressing the veins together. The thermal tube performs insulation functions.
Using a heat tube and a hair dryer to connect two wires Source sosyalforum.org
- In this way, two wires are connected. And then two of them are immediately clamped with a sleeve, which will protect the connection from mechanical loads.
The supply wire is connected to an alternating current network with a voltage of 220 volts. An RCD is installed between the connection point and the wire. This device will protect the entire system from stray currents that appear if the insulation of one of the elements of the anti-icing system has been broken. That is, even when a person touches the wires, the current will not strike.
Please note that the anti-icing is a grounded system. Therefore, the shielding braid rolled into a bundle is connected to the grounding conductor of the supply wire in the same way as the wiring. In this case, two conductors (zero and phase) are connected by one sleeve, the grounding circuit by another.
When it comes to network connectivity, the anti-icing system is straightforward. It consumes little electricity, so a regular outlet will be enough. Although other options are not prohibited. For example, to the switchboard via a machine.
FAQ
The most questions arise from those who are just starting to equip the system or operate it. But finding the answers is not that difficult.
How much electricity is consumed?
Users are afraid that the consumption will be too high during operation, so they are in no hurry to make the final choice. But you need to make an accurate calculation to understand how erroneous such statements are; technology only benefits from this.
To do this, use the formula:
Wyear = Pн xh
Wyear – total electricity consumption throughout the year.
H – number of working hours.
Pn is an indicator of the rated power of the system in kW.
Downtime aside, it rarely exceeds 20% of the total. But we must take into account that the calculated result is often 10-15% more than the real one. Warm type systems are not so difficult to equip once the calculations are completed.
How to roughly calculate the material?
25-30 W per meter is the minimum power for cables that are recommended for such systems. Heating cables of both types are used for other purposes, but then the power indicators will be different.
Power consumption is estimated based on the active mode. This is what we call the periods with maximum load. Usually this is 11-33% of the entire period with negative temperatures. Conventionally, the entire period lasts from mid-November to mid-March. The values indicated are averages; they differ for each location. Separately calculate the total power for the system when it will be operated.
It is necessary to know exactly the parameters that the drainage system has.
The cross-section of a vertical drain is 80-100 mm - a standard indicator. The diameter of the gutter pipe can be 120-150 mm.
We can give standard calculations for this situation:
- The lengths of all gutters for water drainage are calculated separately. The resulting values are added to each other.
- The result is multiplied by two. This will give you the length of the cable that is laid along the section in a horizontal plane.
- The length of all vertical drains must also be measured. Add the resulting values, as in the previous case.
- The vertical section of the system will have a length equal to the total length of the gutters. One line of cable should be enough to solve most problems.
- The length indicators for both sections are added up.
- The result is multiplied by 25. The power for the system that must be maintained in active mode is obtained. The device is ready, the installation technology is already known.
These are rough estimates. Specialized calculators located on thematic websites help solve the problem. You can turn to specialists if solving the problem yourself is difficult.
How to determine the heating zone?
Here it is necessary to take into account such a factor as the efficiency of water flow. Cables are usually laid where there is a high risk of ice formation. This applies to difficult and dangerous areas.
It is necessary to add together the indicators for all areas of the roof that require the installation of heating elements.
Installation of snow guards is mandatory for steep slopes, when the snow is likely to melt. Then the gasket goes between the edge of the roof and the safety element. The width depends on the characteristics of the cornice.
Heating only gutters is allowed if there are no particularly dangerous areas.
How much does roof heating cost?
For installation, specialists usually charge up to 30-50% of the cost of materials. Planned system maintenance can also be trusted to specialists.
Electricity consumption will be minimal, because the system is turned on only when necessary.