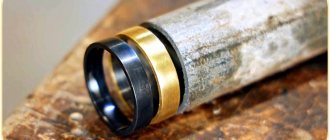
We have all encountered rust more than once, it follows us everywhere, it can be found both on fences, locks, chains located on the street, and on items that we store at home, for example: on knives, keys, reconstruction swords and on the barrels of weapons. This is quite a serious problem, because even a small area corroded will eventually grow throughout the entire metal product. Rusty objects become less durable, unpleasant to look at, holes appear on them and they lose their functionality.
Previously, it was possible to protect or rid a metal object of rust only in industrial conditions, but now compositions have been invented that can be used to combat this problem at home.
The topic of this article will be bluing with rusty varnish at home.
Why metals rust and how to deal with it
Rusty metals are metals that have passed into an oxidized form as a result of environmental influences. The metal is protected from corrosion by thin invisible films of oxide compounds formed naturally under the influence of oxygen in the air. Despite the fact that thanks to them the metal has some passivity, they still cannot completely protect it from the formation of rust.
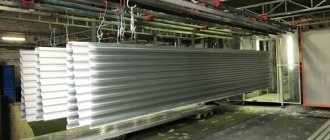
Usually, to increase anti-corrosion resistance by chemical or electrolytic means, additional protective films are applied to the metal at industrial enterprises.
Compositions to increase the metal's resistance to corrosion paint it black, but a number of drugs can change the color of the product in the most unpredictable way. One of the most reliable compounds for protecting metal at home is rust varnish.
We do not advise you to use industrial methods to form a protective film at home, as this is a very expensive and useless exercise.
What can you achieve with bluing?
As a result of this work, a film of iron oxide will appear on the surface. The dimensions of its thickness completely depend on the technology used. It can be 1-10 micrometers. Using the metal bluing method, you can solve the following problems:
- protect the coating from corrosion, since rust does not appear on blued surfaces;
- give the product a more presentable appearance.
You can obtain the required coverage in many ways. But the most popular of them are alkaline, thermal or acid bluing. Alkaline treatment is ideal for DIY work. To do this you will need water, a digital scale, sodium nitrate and sodium hydroxide. You will also need a protective mask and gloves for personal safety.
For work, use only stainless steel utensils. Steel bluing is carried out under a certain temperature regime. The solution is kept in a boiling state, which is why you need to work with it extremely carefully.
To create a durable steel coating at home, the process lasts at least 1.5 hours. Before starting blackening, the surface must be degreased with a solvent. The color of the protective film is determined by the heating time, as a result of which it will constantly change. To avoid strong differences in shades, the surface is completely immersed in the solution.
Important! After completion of processing, metal products must be thoroughly washed in a soapy solution.
What is rusty varnish
Rust varnish is a solution that, when used, forms magnetic iron oxide on the object being treated. Also, this mixture of a number of components causes severe corrosion of the top layer of steel.
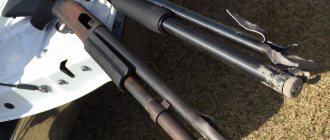
Most often, gun barrels are blued, although blueing of some other metal products is also possible.
Rust varnish contains acids, metal shavings and sometimes heavy metals.
When blued with this compound, a thick layer of black iron oxide forms on the metal. The surface damaged by corrosion is removed with a stiff brush, and the black metal acts as a protective film.
Selection of technology for bluing parts
To choose the right bluing method, it is advisable to decide on a number of specific parameters and recommendations:
- In the case of restoration of damaged coating, the extent of existing damage should be determined. If you need to revive limited areas where there are scratches or small abrasions, the choice is made on the alkaline method of producing an oxide film on the metal surface.
- If the surface of the part is significantly damaged and there is corrosion on it, the existing coating will have to be completely removed.
- Each product has a certain value. Based on this, it is worth estimating how long subsequent operation is expected. If the item will spend most of its time on the wall as an exhibit, simple chemical processing methods are possible.
- For products actively used on hikes or in the open air (knives, utensils or firearms), thermal methods using oil are used.
- When performing work to order, much depends on the price that the customer can pay. Cheap orders are carried out using simple methods, expensive ones involve the use of more expensive bluing techniques. When performing work for third-party customers, the question is: “How much does it cost?” – will be very relevant.
- At the training stage you will have to pay for everything yourself. Any professional training is expensive, but self-learning the basics of the profession has the advantage: knowledge is acquired without additional payment to the mentor.
All that remains is to study the basic methods of applying an oxide film, and then practice the techniques through real experience and gain the necessary skills.
Blued with rusty varnish. Advantages and disadvantages
Since the oxidation of iron with rusty (English varnish) is an acid method, in addition to a number of advantages, this treatment also has disadvantages.
The advantages of this method include:
• For items soldered with tin, this oxidation method is the main one. Because this is one of the few solutions that, when painting tin, does not damage it.
• When used, it creates a beautiful thick matte surface that hides all visible imperfections and scratches.
• Since the temperature of bluing with rusty varnish does not exceed 100 degrees Celsius, you do not have to purchase special utensils for this procedure.
• Where you apply rusty varnish, that’s where the product will become tarnished.
• Compared to other oxidizing compounds, English varnish releases a small amount of toxic fumes when heated.
Disadvantages of bluing with rusty varnish at home:
• If preliminary cleaning is not of sufficient quality, some elements may remain unpainted when applying this solution.
• Blueing a gun with rusty varnish is a rather lengthy process, but despite this, all actions must be carried out quickly enough, otherwise you risk being left with a product that is too rusty.
• Difficulties may also arise when using this method due to impurities in the metal. This may result in reddish-brown areas appearing on the product. To eliminate this effect, the resulting film will have to be removed and the entire bluing procedure must be performed again.
• If the iron content in the alloy is small, you will have to experimentally select the temperature from 20-50 degrees Celsius. If the temperature is incorrect, the product may turn red.
Here, in fact, is all you need to know about the advantages and disadvantages of bluing.
How to properly prepare a product for oxidation?
In order to ensure the formation of a beautiful black film over the entire surface of a metal object, the product must be sanded, polished and degreased. If this is not done, then instead of a beautiful, even layer of shiny black, you may end up with an uneven surface with streaks and reddish-reddish spots.
Materials:
• Coarse sandpaper.
• Sandpaper “zero”
• Brush.
• Paste GOI.
• Degreasing solution.
You can make degreasing solutions yourself; to do this, dilute soda ash at the rate of 40 grams per 1 liter of water or caustic soda at the rate of 13 grams per 1 liter of water.
Let's look at what operations need to be done before bluing barrels with rusty varnish:
• Treat the surface of the object to be oxidized with coarse sandpaper.
• Carefully go over it with a “zero” emery board.
• Rub the brush with GOI paste and polish the metal with it.
• Wipe off any remaining paste with a lint cloth.
• Bring the degreasing liquid to 100 degrees Celsius.
• Keep the metal being treated in the liquid for 20-30 minutes, to understand that the metal has degreased, remove it from the solution and make sure that the liquid covers the surface with an even film, without collecting drops.
• Rinse the grease-free product with clean water.
Degreasing and bluing with rusty varnish must be carried out immediately one after another, otherwise a natural oxide film will form on the metal again under the influence of oxygen, and the varnish will lie unevenly.
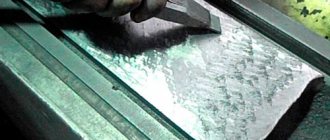
Applying rusty varnish
Burnishing begins with the application of rusty varnish in two stages (we outlined instructions for making it at home earlier). When applying this varnish, be sure to wear gloves, otherwise, due to the sebum present on your fingers, the composition will not cover the metal in the places where you touch.
So, let's start applying:
• Apply a thin, even layer of rusty varnish over the entire surface of the product. If this is a weapon barrel, then its end must be processed with special attention.
• Use a thin brush to blot smudges, excess polish, and drips in holes and grooves.
• After applying the first coat of rust varnish, place the product in a warm place with a temperature of about 50 degrees Celsius. At the beginning of drying, the product will have a slightly yellowish tint, then it will begin to darken and become covered with a dark orange layer.
• When the rusty varnish is completely dry, cover the product with another thin layer, making sure to eliminate all drips and unevenness.
• Place the product again in a place with a temperature of at least 50 degrees Celsius (this could simply be a place near a stove or radiator). As a result, the metal should be covered with a uniform rusty layer.
Oiling stage
If you have completed all the steps a sufficient number of times, then you should end up with a product evenly covered with a film of a beautiful graphite color.
Now you can oil the metal. This procedure is performed not only to add additional shine to the treated metal, but also to remove residual moisture from the black film formed as a result of bluing.
It is important to remember that after oiling you will not be able to correct any uneven or unpainted areas on a blued object, so it is important to remove all imperfections before oiling.
• Heat the machine oil in a cleaned container previously used for cooking to a temperature of no lower than 100 and no higher than 110 degrees Celsius.
• Boil your product there for at least 5 minutes.
As a result, you should have a shiny black product.
Let's talk again about all the points that you must follow to achieve the best effect.
• Preparing the product for bluing, which includes grinding, polishing, degreasing and cleaning the metal from a degreasing solution.
• Applying rusty varnish in two stages (1).
• Applying rusty varnish in two stages (2).
• Applying rusty varnish in two stages (3).
• Applying rusty varnish in two stages (4).
Despite the fact that gun barrels are usually oxidized with this composition, bluing of household tools, dumbbells and weights with rusty varnish is also common.
At the moment, oxidizing barrels with rusty varnish is not done in production, since there are a number of methods by which bluing can be done much faster and more profitably, but at home this is the most economical and simplest method known to us.
In this article, you learned the reason why rust appears on metal, looked in detail at making rusty varnish at home using commercially available substances, examined the process of bluing with rusty varnish with your own hands point by point, and learned how to independently make all the tools needed for this. .
Boiling stage
This step is necessary to obtain a beautiful black color on the metal product being oxidized. The metal being processed must be boiled in distillate or steam.
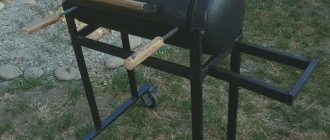
You can prepare the boiling equipment yourself. To do this, weld the bottom to a metal pipe of a suitable diameter and install a heating apparatus from an electric kettle.
The boiling process includes the following steps:
• Pour purified or rainwater into the pipe (tap water is not suitable due to the impurities it contains).
• Add nitric acid to the boiling container with water (1.3 ml of acid per 1 liter of water).
• Bring the solution to a boil and boil for 5 minutes.
• Boil brown-orange colored metal products for 15 minutes.
Popular bluing methods
Blueing technology includes several methods, the main ones being the following:
- Alkaline method. In this case, you will have to work with oxidizing agents at a temperature of 130-150 degrees. Thanks to alkaline oxidation, iron is oxidized. But you should not work with this method in a house or apartment, as an unpleasant odor is released during the work.
- Acid method. In this case, the work is performed in acidic solutions using a chemical or electrochemical method. It is important to place the item in the solution for the specified time and act in accordance with the instructions.
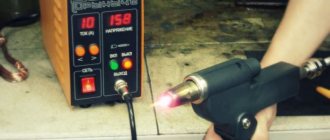
- Thermal method. This type of bluing is considered the oldest and simplest in existence. This technology involves heating steel in the open air. The procedure continues until the top layer of metal reacts chemically with oxygen. The higher the heat, the darker the part will become.
There are other ways to obtain blued iron. You can choose the most suitable one and do all the work yourself. The main thing is to strictly follow the sequence of actions and use the correct bluing compounds.
Alkaline
To blue metal using this method, you must follow a clear sequence of actions. First of all, you will have to degrease the surface with a solvent. Then do the following:
- Take a bowl and pour 100 ml of water into it.
- It is necessary to dissolve 120 grams of caustic soda and 30 grams of sodium nitrate in it, stirring them until smooth.
- Heat the composition to a temperature of 130-150 degrees.
- Place the part in the boiling mixture so that it does not come into contact with the walls.
- The part will turn black after 20 minutes, after which it is washed in distilled water.
When the product is completely dry, it must be lubricated with machine oil and wiped dry. As a result, the coating becomes smooth and wear-resistant. You will not have to additionally polish the product. These rules allow you to give the surface the desired effect without resorting to complex technology. Remember to use a protective mask and thick gloves.
It is important to carry out work only in a stainless container that is of sufficient size. This can be a problem if you plan to burnish a large knife. To avoid color changes, the entire surface of the product must be in the solution.
Acid
This option is performed in acidic solutions. In this case, electrochemical or chemical processing technology is used. It is important to clean off the rust. Regular sandpaper will do for this. To increase the cleaning speed in advanced cases, you can use an angle grinder equipped with a metal brush.
Then use a cleaning composition such as sodium triphosphate, ethyl alcohol with kerosene, or simple kerosene. The part must be immersed in the solution for 15 minutes. Finally, the product should be rinsed in running water, wiped well and dried.
While the part is drying, it is necessary to prepare a solution for acid bluing. Mix the following ingredients:
- 1 liter of water;
- 2 grams of tannic acid;
- 2 grams of tartaric acid.
At the next stage, the knife is directly blued. Heat the mixture to 150 degrees. Place the item in the container for 15 minutes. Make sure that the metal surface is completely immersed in the solution. Then rinse it under running water and plunge it into boiling water. This allows you to completely clean the surface of the solution.
At the final stage, the process of bluing the steel in oil is carried out. In this case, the product is immersed in machine oil for 60 minutes, after which it can be used for its intended purpose.
Important! When using this method, cold bluing is also possible. To do this, use a product such as rusty varnish.
Thermal
Everything is very simple here. This bluing is considered the oldest. This technology involves heating steel in the open air. The procedure continues until the top layer of metal reacts chemically with oxygen. The higher the heat, the darker the part will become.
Stage of cleaning from the rusty layer
The cleaning stage is carried out using a special brush, which you can buy either in a specialized store or do it yourself.
To create a special electric brush you will need:
• Metal mesh made of wire with a diameter of 1 to 1.5 mm.
• Scissors.
• Nut, washer and long enough bolt.
• Drill or screwdriver.
Electric brush making process:
• Cut out 4 to 7 circles from the mesh.
• In the center of each circle, cut a round hole equal to the diameter of the bolt.
• Secure the wire circles using a nut, washer and bolt.
• Insert the protruding part of the bolt into the screwdriver hole and tighten it.
Brush the blued surface with a homemade brush until the entire surface is shiny black. For the first time, stains of a reddish tint will most likely remain on the surface being treated, so all the above steps (coating with rusty varnish, boiling and cleaning) will need to be repeated at least four times.
Hunting and fishing in the Tver region
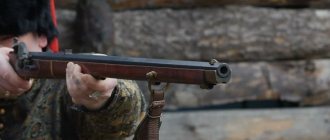
The process of bluing gun barrels is aimed primarily at protecting the metal from corrosion. In addition, various chemical and electrochemical methods of painting barrels, giving them different colors and shades, make the gun itself less noticeable to game.
There are a great many recipes for painting metal parts of guns. Using different chemical compositions and dyeing techniques, a wide variety of colors can be achieved. But for all bluing methods without exception, the common thing is that immediately before painting, barrels and other metal parts of guns must be cleaned as thoroughly as possible from rust and stains until they are completely white. And only after that they start bluing. Most bluing methods are labor-intensive and involve the use of rather rare chemical compounds.
The most common and repeatedly proven method of bluing is acid oxidation, which is often called differently - rusty varnish.
Rusty varnish is a name for compounds that cause increased rusting of the steel surface with the formation of magnetic iron oxide. They are acidic solutions of iron salts, sometimes containing salts of mercury and some other heavy metals.
Method for preparing the “rusty varnish” composition
To prepare the composition you will need: - technical hydrochloric acid - 50 ml; — concentrated nitric acid — 54 ml; — cast iron or carbon steel shavings — 30 g; - metal scale - 20-30 g; — distilled or drinking water — 1 l.
The process of preparing the composition can only be carried out outdoors. Make sure that the wind is blowing away from you, as the reaction that occurs is accompanied by the release of gas. Pour 50 ml of hydrochloric acid into a glass flask with a capacity of 1.2-1.5 liters, add one-third each of cast iron shavings and scale, then carefully add one-third of nitric acid. After some time, the mixture will turn a little green and begin to bubble, heating up and releasing brown gas. Wait until the reaction calms down a little and add the same amount of chips with scale and another third of nitric acid. The vigorous boiling will resume for a few more minutes, then subside, after which you can add the remaining shavings and acid.
As a result, you should get a creamy, red-colored mass, which must be allowed to brew for at least a day. Wrap the neck of the flask with plastic wrap, securing it securely. This must be done because the reaction in the flask will continue for several hours, releasing a small amount of gas.
After 24 hours, proceed to the second stage. To the creamy mass obtained the day before, add one liter of prepared clean water to the flask. That’s it, the composition for oxidation using the “rusty varnish” method is ready. The contents of the flask must be shaken and poured into a wide-necked container that is convenient for you to work with. At the bottom of the flask there may be excess chips and scale that have not reacted with the acid. The prepared composition does not require special storage conditions, with the exception of ordinary safety measures, and will serve you for many years. The finished “rusty varnish” is safe for your hands and lungs.
Preparing the metal surface for oxidation
Before oxidizing, the metal surface must be thoroughly ground and polished. To obtain the most smooth and even surface of the workpiece, grinding is carried out in several stages. First, sanding is carried out with sandpaper, from relatively coarse to “zero”, and ends with processing with a fine abrasive. At this point, the preparation of the metal can be considered complete.
If you want to achieve a better result, you can perform another additional operation called peeling or matting. This operation is used before oxidizing elite weapons. Grinding is usually carried out using round hair brushes, using pastes consisting of fine abrasive, evenly mixed in a mixture of technical lard and stearin.
The cutting properties of emery grains lubricated with lard are significantly weakened, and the organic acids present in the lard help remove the oxide film from the metal being processed. As a result of desalting, the surface of the parts becomes much more even and smooth, which facilitates better polishing with cloth wheels lubricated with polishing pastes. To obtain a high-quality finish, it is recommended to apply salting immediately before polishing. It should be noted here that the higher the quality of grinding and polishing, the better the surface of the oxidized metal resists wear and the higher its anti-corrosion properties. Degreasing. The purpose of this operation is to remove fats, various contaminants and mineral oil residues from the metal surface, since the oxide film forms only on a clean metal surface.
For degreasing, a solution of the following composition is used (per 1 liter of water):
- caustic soda (caustic soda) - 10-15 g; - trisodium phosphate - 50-70 g; - soda ash - 30-40 g; - liquid glass - 3-5 g.
If the barrels to be oxidized are soldered with tin solder, then it would be better to use the following composition:
- soda ash - 100-150 g; - liquid glass - 20-30 g.
With both methods of degreasing, the temperature of the solution should reach 90-100 °C. The exposure time of parts in the solution is about 15-30 minutes. After the parts have been in the degreasing solution for the specified time, lift the barrels - the liquid should evenly cover the surface of the metal without collecting drops. We can assume that complete degreasing is complete.
Fat-free parts must be rinsed thoroughly in water. Now you can start applying “rusty varnish” to the surface. Try to reduce the time between these operations to a minimum so that an oxide film does not form on the metal surface.
Applying rusty varnish
Apply “rusty varnish” to the surface using a brush in an even thin layer, avoiding smudges. Particular care must be taken to cover the ends of the trunks. Excess solution, drops in the lower parts of parts, in various grooves and holes must be carefully removed with a brush. Touching metal with bare hands is extremely undesirable, since you will not be able to obtain high-quality bluing at the contact points. After applying the composition, the barrels and other parts must be placed in a warm place (40-60 ° C). This could be a place near a stove, radiator, or in a drying cabinet. The metal will take on a light red color as it dries. During the drying process, the color will turn from light red to dark orange.
The dried surface of the trunks should be re-coated with “rusty varnish” and the drying procedure should be repeated. As a result, the surface of the trunks should be a uniform dark orange color.
Boil down
First you need to prepare an evaporation solution. Pour water into the boiling bath (you can use a piece of 100 mm pipe with a welded bottom and a heating element from an electric kettle), not tap water, but rain water. Tap water contains various additives that will prevent the boiling process from working. To oxidize organic substances in water, it is necessary to add nitric acid at the rate of 1-1.5 ml per liter of water. Then you need to boil the water in the container for several minutes, after which the barrel boiling bath is ready for use.
The trunks, covered with a layer of dark orange oxides, should be boiled in a boiling evaporation solution for 15 minutes. In the evaporation solution, dark orange oxides should turn into velvety black iron oxide. If during the first welding process the metal did not turn black in places, but remained “rusty”, do not be upset, this sometimes happens during the first welding. This happens either if you have not degreased the part properly, or if you have not rinsed it properly from the degreasing solution.
Brushing
For this operation you will need a powered round brush. You can make such a brush as follows: buy a fine wire mesh with a diameter of 0.1-0.15 mm at a hardware store, cut out several squares or circles with scissors, cut a hole in the center and assemble the whole package onto a mandrel using a nut and washer. The electric drive can be a drill, grinder, electric motor, etc. When working with a brush, be sure to wear eye protection.
Clean the barrels and other parts from loose iron deposits using a brush until a shiny black film is obtained on the entire surface of the metal. In those places where the metal did not turn black, but remained “red”, bluing will not occur the first time.
But this is not scary, since the bluing procedure you performed is only the first of eight. The fact is that the total number of barrels coated with “rusty varnish” must be at least eight. Accordingly, there must be four welding procedures and four brushing operations.
Oiling
After the fourth brushing operation, the metal surface will acquire the color of graphite. To remove residual moisture from the oxide film, which has a thickness in the range of 0.6-1.5 microns, it is necessary to carry out the final operation - oiling.
The oiling procedure involves immersing the parts to be oxidized in a container with heated neutral oil. You can use any machine oil heated to a temperature of 105-110 °C. Oiling lasts about 5 minutes. It is not recommended to use cold lubricant, since due to its high viscosity it will not fill the pores of the oxide film well.
Weapons oxidized with “rusty varnish” can resist corrosion for a long time, even in the most unfavorable conditions.
Extending the life of rifle barrels
Many hunters have old guns. Some are still in good condition. Many of them are distinguished by amazing combat. Others are dear as a memory. But it’s no secret that a significant number of old guns, while having good working qualities, are in poor condition both in appearance and in the condition of the mechanisms and barrels.
Removing rust from the inner surface of barrels
While improving the appearance is relatively simple, doing something with the inner surface of the trunks is more difficult. And sometimes rusty barrels continue to rust intensively, leading to the death of the gun. Meanwhile, there is a fairly simple and affordable way to extend the life of rusty trunks. This method consists of three sequential operations.
Since old guns, as a rule, do not have chrome-plated barrels, corrosion affects them if they are neglected not selectively, but almost entirely. Therefore, first of all, you need to remove the rust. This can be done using an electric drill with a long ramrod-shaped attachment, but instead of a regular brush, you need to use fine emery cloth, preferably on a fabric basis. To ensure that the skin fits tightly to the surface of the barrel, foam rubber is placed under it. By moving the cleaning rod attachment along the entire barrel, you can quickly and effectively remove almost all rust. After this operation, the trunks look much better. But where the rust was removed, shells remain. And the biggest harm of shells is not that they deform the shot. The combustion products of the primer and gunpowder accumulate in them, which leads to even more intense rusting.
Therefore, the second operation is to remove rust from the sinks. Theoretically, a brush made of steel wire, rotated by the same drill, could cope with this task. But a rust converter is more effective. This drug, transforming rust, creates a microscopic film on the surface of shells, which prevents (to some extent) the action of aggressive substances on the metal.
The third operation to protect old trunks is to apply a chemical preservative, the automotive preparation Movil-2, to the treated surface. This preservative is also capable of reacting with rust; in addition, it partially neutralizes the combustion products of the primer and rust. Among other things, “Movil-2” when applied has a liquid consistency, and after application it hardens, therefore, having filled the shell and hardened, it affects the obturation, and reduces the deformation of the shot, and, of course, protects the shells from further corrosion. Moreover, if during shooting the Movil located on the unaffected surface of the barrel is erased, then the one located in the shell remains unharmed and continues to perform its functions. Of course, this does not continue forever - Movil inevitably burns out and needs to be renovated. It is best to use it instead of oil when cleaning a gun, although it is not so convenient. By using this method of processing barrels from the inside, you can extend the service life of an old but dear gun for a long time.