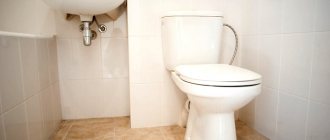
In what cases is it recommended to install toilets with glue?
The method, which takes into account the use of adhesive compositions, is gaining more and more popularity among professional craftsmen and self-taught people every year. Most often, this installation option is chosen when a heated floor system is located under the tiles in the toilet room. In this situation, drilling into the cladding may damage it.
Note! This method can also be chosen based on aesthetic considerations. Plumbing fixtures that are not equipped with fasteners look more stylish and impressive in the toilet room.
It is not difficult to carry out such installation correctly, but it should be remembered that installation using an adhesive composition takes quite a lot of time. This is due to the fact that you need to wait until the glue completely hardens. If you ignore this rule, then the connection will become unreliable, and the toilet will wobble or even completely move away from the tile. In order for the adhesive to harden, you must wait 12 to 24 hours.
Useful tips
To properly install a toilet on a tile, there are a number of useful tips:
- Before installing plumbing, it is necessary to complete all repair and finishing work in the bathroom. This is necessary so that during the installation process there are no problems with fitting the tiles.
- Always measure the distance to the sewer pipe and surrounding walls.
- It is best for two people to install the toilet.
- If there is an uneven surface in the bathroom, then to prevent the toilet from wobbling, a backing is placed under it during installation.
- If the toilet has a heated floor, this means that drilling cannot be done. Drilling tiles with a heated floor system will lead to damage. For this purpose, only methods involving gluing the toilet to the tile are suitable.
Types of adhesives
Gluing a plumbing fixture is easy. This method is much simpler than drilling holes and installing fasteners. To bond the surface of a toilet bowl with tiles, a variety of adhesive compositions are used, which are suitable in their characteristics for this purpose. Let's look at the most popular of them:
- epoxy adhesive;
- silicone sealant;
- liquid Nails.
There is another non-standard option that takes into account the use of cement mortar. We will also look at it in this article. Some of these options are more suitable for DIY, while others are not recommended for beginners.
Liquid Nails
Liquid nails are also quite common. This adhesive material will help with the installation of plumbing fixtures on tiles. Installing a toilet with liquid nails has some nuances. In order to install with liquid nails, it is necessary to apply them to both surfaces being joined. Next, you will need to disconnect the toilet from the tile and lay it on its side. You should wait a certain amount of time, after which the final installation of the device is carried out.
Note! As a rule, the waiting time between preliminary and final installation of the device is indicated on the label of the adhesive composition.
To prevent the plumbing fixture from wobbling, it is recommended to apply a seam of liquid nails around the perimeter of the base of the toilet connected to the tile. After this structure hardens, it will be ready for use. The reliability of this method is quite high.
Interesting: We build a toilet in the country house ourselves
Epoxy adhesive
The easiest way is to purchase this substance in a store or order it online. You can also make epoxy glue at home, but to do this you need to maintain the proportions of the ingredients. To make it, the following components are mixed:
- epoxy resin (10 parts);
- cement (20 parts);
- solvent (2 parts);
- hardener (3.5 parts).
Epoxy glue
After preparing all the necessary components, you need to heat the epoxy resin to a temperature of 50 degrees. Next, a solvent is mixed into it. The next step is to add a hardener. Cement is added last.
Important! The resulting composition must be mixed very thoroughly. You can use the finished glue within 2 hours.
Epoxy glue has many benefits. But the most important thing is that it ensures high strength of the finished connection. Such a seam will last reliably for many years. The ability to prepare this composition with your own hands is also a big plus.
Required materials and tools
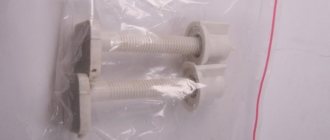
When purchasing a toilet, you should pay attention to the delivery package. Depending on the device design and installation method, the installation kit should include appropriate mounting brackets, studs or bolts, plastic dowels, gaskets, washers and decorative plugs.
If there are no fixing elements, they should be purchased separately.
It is also necessary to prepare the tools that will be needed during installation activities:
- a hammer drill or impact drill with a set of drills for working on concrete and ceramic tiles;
- Adjustable wrench;
- center punch or marker;
- rubber spatula;
- pencil;
- screwdriver;
- hammer;
- construction level.
In addition, you will need to purchase materials and accessories that will be needed to install and connect the device to utilities:
- flexible hose for supplying water to the drain tank;
- ball valve;
- FUM tape or tow and special paste for sealing threaded connections;
- fan or corrugated pipe for connection to the sewer.
Connecting the toilet
Connection to the sewerage system
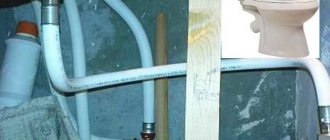
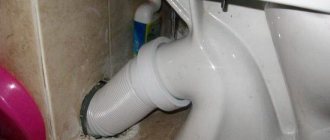
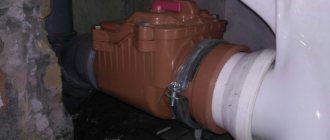
A flexible corrugated pipe allows you to eliminate any displacement of the toilet bowl relative to the inlet of the sewer system
To connect a toilet with an oblique or horizontal outlet to the sewerage system, a plastic corrugated pipe is used . The flexible element of the drainage system allows you to change the angle of entry into the riser, as well as adjust the distance from the outlet pipe to the inlet of the sewer system. The corrugation has internal and external flexible sealing membranes that provide a tight and airtight connection with the toilet outlet and drain riser. At the same time, it turns out to be of such high quality that any penetration of drains and unpleasant odors into the bathroom is excluded, so additional sealing with silicone is not required.
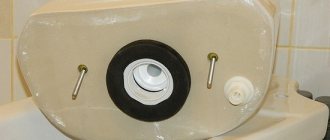
Connecting a toilet with a vertical flush is done a little differently, by combining its lower outlet with the inlet of the sewer system. In this case, the sealing of the connection is ensured by a special rubber cuff, which is included in the delivery package of the device. The sealing element is attached to the floor at the entrance to the sewer pipe. After tightening the bolts, the coupling is deformed, preventing the penetration of moisture and odors.
When installing the tank on a toilet with a shelf, do not forget about the sealing gasket
The process of connecting the device to the sewer system is completed by installing a drain tank, after which they begin connecting the water supply system.
Connection to water supply
Connecting the toilet to the water supply can be done either open or hidden. In the first case, a copper tube or flexible liner is used, which is connected at one end to a pipeline with cold water, and at the other to the inlet pipe of the drain tank.
The toilet is connected to the water supply using a flexible connection or a rigid copper pipe.
Connection to the water supply is carried out according to the following scheme:
- shut off the water supply at the entrance to the apartment;
- cut a pipeline with cold water to install a tee of the appropriate diameter or a special clamping coupling, which in plumbers' slang is called a “vampire”;
- a ball valve is mounted on the installed insert, designed to turn off the device during repair or replacement;
- The flexible liner is connected on one side to the valve, and on the other side to the threaded pipe of the shut-off valve of the drain tank.
Hidden installation is carried out in a similar way, only when connecting a toilet with an installation, the flexible hose is hidden in a niche. A device with a vertical outlet is often installed away from the walls, so the communication elements are laid under the floor. A drain tank is connected to them, the design of which provides for an internal water supply.
After connecting, be sure to check all connections for leaks, and then finally tighten the mounting bolts and threaded connections of the utilities.
Preparatory work
You can mark the place where the toilet is attached with a marker.
After all the necessary tools and materials have been prepared, everything unnecessary is taken out of the bathroom, freeing up space for the toilet.
The first thing to do is to place the device at the intended location and mark its contours. In addition, you will need to apply marks corresponding to the mounting holes. Next, the plumbing fixtures are moved to the side, and the drilling sites are treated with a center punch, causing microscopic chips on the surface of the tile.
Drilling ceramics should be done in two stages. First, use a tile drill, and after making a hole in the tile, change the tool to one that is designed for working on concrete. The cavities prepared for fastening are protected from moisture by filling them with silicone sealant.
When drilling into ceramic tiles, be sure to keep the drill bit cool, otherwise it will overheat and the cutting edge will burn.
At this point, preparation for installing a toilet with an oblique or horizontal outlet is considered complete. If you plan to install a device with a vertical drain, then prepare the inlet of the sewer system in advance and clean it of dust and dirt.
Methods for attaching a toilet
Depending on the type of toilet you purchased, it can be mounted in two ways: open and closed. When the mount is closed, the bolts are placed inside the structure; when the mount is open, the bolts are attached to the base of the toilet. Let's consider both methods in detail.
Open installation method
The open method is considered simple and reliable, but in terms of aesthetic characteristics it is inferior to the closed method in that the fastenings are located in plain sight. However, the open installation method takes less time and effort.
Open method of toilet installation
In order to begin installation, select a location and place the toilet as it should be located in the future. Using a pencil, mark the places where you will need to drill holes for fasteners.
Attention. When marking, hold the pencil strictly vertically, otherwise this may lead to displacement and misalignment of the holes with the attachment points.
Draw the outline of the toilet base with a pencil. At the location for the holes, you must first scratch the glaze onto the tile with a core, otherwise the drill will slide along the smooth surface of the tile. After that, a hole is made in the tile using a glass drill, and then the required depth is drilled with a hammer drill using a concrete drill.
The holes are thoroughly cleaned of dust and filled with silicone sealant, into which the dowels are inserted. The sealant will not only serve as fastening, but will also act as waterproofing. Before installing the toilet, you should apply a strip of silicone sealant along the drawn contour. This will prevent moisture from getting under the base of the toilet.
Marking the floor before installing the toilet
The last step is to install the mounting bushings and tighten the bolts. This should be done carefully; over-tightening can damage the toilet and contribute to the formation of cracks. To avoid overdoing it, check how firmly the toilet is standing as you tighten the bolts.
The fastening points are closed with special plugs sold complete with fastenings. This allows you to smooth out the visual imperfections of external fastenings. At the end of the work, excess silicone must be removed with a rubber spatula.
Closed method
If you want to install the toilet in such a way that the fasteners are not visible, you should check when purchasing whether the selected model is suitable for this. Installation is carried out similarly to open. The toilet is installed in place, the outline is drawn on the tile with a pencil and the marks for the holes are transferred.
Closed toilet installation diagram
The rigid mount is installed first. To do this, holes are drilled in the tiles using a method already known to us, filled with silicone and dowels are installed, onto which the connecting structure is attached. After which the toilet is placed on it and secured with bolts through the holes on the side.
Advice. Craftsmen advise not to tighten the bolts all the way until the connection between the toilet bowl and the water supply and sewer outlet pipes has been adjusted.
It is worth mentioning cases when it is impossible to drill tiles to install a toilet. The reasons may be different, for example, a floor heating system installed under the tiles. In this case, the toilet is most often simply glued to the tiled surface using special glue, liquid nails, or epoxy resin is used for fastening. In this case, the tiles and the lower base of the toilet must be pre-prepared, because smooth surfaces have little adhesion. To give roughness, the bonded substrates must be treated with sandpaper.
Installing a toilet using fasteners
It cannot be said that this installation option was somehow complicated. On the contrary, it is considered the most correct, although no special skills are required here either. Well, maybe drilling ceramic tiles, which in fact also turns out to be not such an impossible task. If, of course, you have the right tool.
For work you will need, in addition to tools for plumbing operations:
- An electric drill that can handle concrete screed in the toilet, or a hammer drill. Appropriate drills or drill bits for concrete.
- It is best to “go through” ceramic tiles with a special “pick” drill with corundum or diamond coating or carbide tipped. Moreover, to drill the laid tiled cladding, a screwdriver will be sufficient.
Victory-tipped drills allow you to drill through ceramic tiles very accurately.
How to choose quality drills?
- Hammer.
- Wrench, open-end or socket. Most often, toilet fasteners have a 10 mm hex head.
- Silicone in a tube, dosing gun for such tubes.
- Sandpaper with grain P60 ÷P80.
- Pencil or marker for marking.
Now manufacturers produce artificial coatings that quite accurately imitate classic mosaics. There are several ways in which mosaic flooring can be installed in a bathroom.
Covering the floor surface around the installed toilet
Sometimes circumstances develop such that the toilet was installed before the flooring was completed. For example, there is no money to purchase high-quality tiles, or the desired option has not yet been found in the assortment of stores. But it is impossible to live normally in an apartment without a toilet; it was installed and the finishing was left for the future. Another option is to carry out cosmetic repairs, laying new tiles directly on the old ones (such technologies exist), but it was decided not to change the toilet.
Those owners who plan to take this path should immediately be warned - many difficulties await them. These include difficulties with curvilinear cutting of tiles and problems with fitting fragments. Moreover, you will have to work in very cramped conditions.
Laying beautiful tiles around an installed toilet is by no means an easy task!
One more nuance.
If the new lining is laid on top of the old one, without dismantling it, then the previously standing toilet will be slightly lower relative to the resulting floor surface. It may not seem like much, but it can cause serious inconvenience for some family members, at least at first.
For cement mortar
This method is well suited if a new toilet is installed in place of a dismantled one. But, you can also use it when the house does not have the tools necessary to secure the plumbing accessory to the floor.
The simplest, but far from the best way is to install the toilet on concrete mortar.
In order to install a toilet on a tile in this way, you will need concrete mortar or cement-based ceramic tile adhesive, a marker, a chisel, a hammer and two spatulas - narrow and medium width. The installation process itself is carried out in the following sequence:
- The toilet is installed in the place provided for it and connected to the sewer pipe with a rigid or corrugated adapter. A trial connection must be carried out in order to make sure that all elements fit perfectly together.
- Next, the base of the toilet seat is outlined with a marker.
- Then, the toilet is removed, and at the place of its installation, in the outlined area, notches are made on the tile using a chisel and hammer. This process must be carried out carefully so that impacts leave marks only on the front surface of the tile, but do not cause cracks. It is recommended to carry out this work wearing safety glasses to prevent breaking off crumbs of the coating from accidentally getting into your eyes.
- Instead of notches, you can chaotically stick waterproof masking tape onto the outlined area. O is also capable of creating a rough base on which the solution can adhere well. It is important to ensure that the pasted tape does not extend beyond the edges of the outline.
- The next step is to make a concrete solution from sand and cement in a 2:1 ratio, or dilute tile adhesive. The latter solution is preferable, since it sets quickly and has a fine granularity of powder, which is much more convenient than concrete, which can contain large fractions of sand. The finished solution will require 3÷4 kg.
- The next step is to spread the finished mixture onto the prepared and moistened area of the tile with notches or masking tape glued to it.
- Then, the lower section of the toilet leg is also wetted around the perimeter, and the device is installed in its designated place. Two plastic pads 5÷7 mm thick and 50÷80 mm wide are placed under its base on the front and back sides. These elements are necessary to create a “cushion” of mortar between the tile and the toilet. When performing this operation, it is very important to level the toilet bowl, since it must stand without distortion, perfectly horizontal.
- The mortar that has protruded beyond the edges of the toilet seat is immediately collected with a spatula, and the joining seam is carefully leveled. The gaskets can be removed only after the solution has set well, and the recesses remaining from them must also be filled with the solution and leveled. The drying time for the tile adhesive is indicated on the packaging, and the concrete must stand without use for at least 3-4 days. The toilet can only be used after the solution has completely hardened.
The disadvantage of this installation method is that if you have to dismantle the toilet, it is not always possible to remove it entirely - it usually ends with the base splitting.
Find out which is better to choose a wall-hung toilet with installation from a new article on our portal.
Installing a toilet on tiles using cement mortar
Installing a toilet on tile using this method is not the best option. It is suitable for cases when the toilet is installed in place of a dismantled one or when installation tools are not available.
To attach a toilet to a tiled floor without drilling using cement mortar, you need the following tools:
- cement mortar or cement-based tile adhesive;
- marker or pencil;
- hammer;
- spatula (narrow and medium);
- chisel.
Before you begin, you need to roughly check the joints of all installation elements by installing the device in the intended location and connecting all the necessary plumbing elements. Then you need to outline the base with a marker or pencil. Using a chisel, it is necessary to apply notches at the marks.
Important! The notches must be applied carefully to prevent the tile from cracking. Be sure to wear safety glasses to prevent shrapnel from getting into your eyes.
The next step is to prepare the cement mortar; the cement mortar is diluted 2:1. The cement mixture contains large admixtures of sand, which can affect hardening. It is best to use a ready-made mixture of tile adhesive, as it is much more reliable and dries faster. Calculate the preparation of the solution for 4 kilograms.
Once the mixture is prepared, it should be carefully applied to the notched area. Before gluing the toilet to the tile using the resulting composition, you need to moisten the surface a little. The base of the device’s legs must also be moistened and installed in the place allocated for it. On the front and back sides, plastic plates must be placed under the base, the thickness of which should be 5 mm and the width 50 mm.
Important! While placing the plates, it is necessary to ensure that the toilet seat is perfectly level.
Remove excess solution using a spatula. After drying, it is necessary to remove the pads and concrete the holes from them with the same solution. Do not use plumbing fixtures for 5 days.
Installing a toilet with liquid nails, epoxy resin, silicone
It is possible to install the device on the tile using liquid nails, silicone sealant, or epoxy resin. When using these methods, it is necessary to study all the pros and cons of such an installation.
If you use liquid nails, subsequent dismantling will lead to splitting of the base.
Fixing a toilet with silicone is a common method, but this method does not guarantee that the installation will not move over time. The only advantage of installing on silicone is that subsequent dismantling will take place without damage to the device and tiles.
A safe and reliable mounting method is to glue the toilet to the floor using epoxy resin. But this also has its drawbacks; when dismantling, the tile covering will be damaged.
Installation using all three methods is similar to mounting on cement mortar. The first step is to mark the edges of the leg on the tile. Then degrease the joints, namely the edges of the base and the tiled surface. Apply the mixture to the tiles and the base of the device, then press well and wait until the mixture hardens.
Toilet installation methods
There are at least three options for installing a plumbing fixture on the floor:
- using fasteners supplied as standard;
- fixation with adhesive;
- using cement mortar.
The standard delivery with the toilet comes with fasteners in the form of dowel screws. Installation in this manner is recommended only on a flat surface.
This technique is quite acceptable in terms of its reliability and stability. True, it is not always applicable. This type of mount is most often chosen for small-sized, light-weight devices.
Another installation option is fixation with glue. This method gives good strength. But if you need to carry out urgent dismantling, it won’t be possible to do it quickly and at minimal cost. This mounting option is used if there are no plans to replace the structure in the near future.
In addition, you can install plumbing fixtures using cement mortar. This is a unique alternative to standard screw mounting and adhesive fixation. This method is not much different from installation with glue, because the cement composition also includes an adhesive component. But in terms of the quality of fixation, the cement solution is less reliable than special glue.
How to install a flush cistern on a toilet
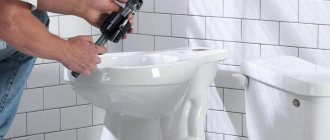
After the silicone has completely hardened and the flush mechanism of the tank has been assembled, you can begin installing it on the toilet.
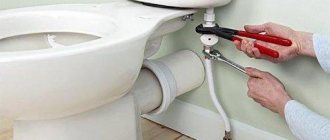
Between the flush cistern and the base of the toilet it is necessary to lay a soft gasket in the form of a ring (included with the toilet). Then slide the tank onto the toilet so that the holes for the tie screws on the toilet line up with the holes on the tank. The connecting screws should have a plastic flat washer and a rubber cone washer. Insert the mounting screws into the holes in the drain tank and use plastic nuts (horns) to tighten them on the other side. When tightening the screws, make sure the tank is horizontal.
Screw the flexible hose supplying water to the fitting at the drain tank. This connection does not require the use of fum tape, since the connection will occur through a rubber gasket.
The installation of the flush tank on the toilet is completed, you can open the tap and check the flow of water, as well as see and eliminate possible leaks in the system.
Place the lid on the drain tank so that all elements of the trigger mechanism fit into the hole. Screw the release button into the hole. Check the functionality of the button. At this stage, the installation of the toilet cistern is complete.
Water connection
The water supply to the toilet can be external or internal, depending on the model purchased. But in any case, all joints must be treated with sealant so that not the slightest leakage occurs. The internal (hidden) water supply system involves the use of a flexible hose or tube made of copper, which are usually sold as a set with toilet mounts, but when purchasing it is worth checking their availability and purchasing additionally if necessary. In addition, you may need adapters if the threads on the faucet and the threads on the tube do not match, and special seals.
Tank connection
When all communications are properly connected, you should check the operation of the tank. If there are no leaks and everything works as it should, then you can tighten the mounting bolts to the end. This completes the installation of the toilet on the tiled floor.
Let's get started
Each new toilet, when purchased in official stores and construction markets, must be accompanied by appropriate detailed instructions for its installation. It must be carefully studied and followed with precision for each point. Before you begin installing a new toilet on tiles, you need to buy a part such as flexible corrugation at any plumbing store, and with it individual rubber seals. It will help to extend the toilet to a fairly significant distance in the depth of your bathroom.
Flexible corrugation allows you to control the installation depth of the toilet
At the place where you plan to create the foundation of the product, inside the future outline of its base, make a mark on the tile using a chisel or file. This will help the cement to work properly on all uneven surfaces. Then, in order to begin installing the toilet itself, you need to prepare the cement mortar itself, which will act as glue.
Marking the position of the toilet on a tiled floor
Wet the mark on the tiles and bottom of the toilet. Apply the cement mixture over the entire surface of the bottom of the structure. Immediately after this, carefully place the toilet in the designated place. Leave the structure for 24 hours as the cement needs time to harden. After that, install the tank and connect the water
Pay special attention to the bolts: if they are metal, you should be extremely careful, as there is a risk of damage to the ceramics. In general, the product is ready for use
At this stage, it is recommended to stop for those for whom it would be preferable to install the toilet on a tiled floor without drilling, in order to keep the tilework intact.
Treating the joint with sealant
For everyone else, for greater reliability, we recommend securing the toilet using special fastening bolts
It is very important to remember that tiles for the toilet room must be drilled exclusively with a tile drill. Drills for wood or other materials should not be used, as there is a very high risk of damaging the tiles
The advantage of this method is that this particular installation of a toilet on a tiled floor will be absolutely “painless”, in other words, after some time it can be dismantled, and then easily installed again. For example, if you suddenly decide to carry out a major overhaul of your sanitary unit, at the same time, do not replace the toilet with a new one. The final stage will be the installation of a toilet seat (a seat, which is mainly made of plastic).
Drilling tile floor
Common Mistakes
The most common mistake is poor surface leveling. As a result, equipment breakdown and leakage may occur. To do this, you need to have a building level on hand.
Poor sealing can lead to unpleasant odors and unwanted leaks. You need to use only high-quality components with good rubberized gaskets.
There is no need to skip the point of cleaning all pipes from contamination so that the service life of the equipment is longer. If a leak in the drain barrel is detected, it is necessary to check the serviceability of the valves.
Installing a toilet is not a complicated process; you can do it yourself. The main rule is to follow all instructions and recommendations for its installation.
Is it possible to make glue yourself?
You can make your own adhesive composition using acetone and polystyrene foam. This glue is excellent for ceramics and provides high reliability of adhesion.
Step 1. Clean the tiles on the floor with sandpaper.
Step 2. Pour a handful of crumbled foam into a glass container and gradually pour in acetone.
Step 3. Stir until smooth.
Step 4. Apply the mixture to both surfaces, distribute evenly and firmly press the toilet body to the floor.
It takes several hours to harden. This mixture can be used to glue a toilet to a tile no worse than using an epoxy compound.
Choosing a toilet and options for its installation
The method of installing a toilet directly depends on its type and design features. On store shelves you can see two main types of this plumbing fixture, installation technology, which is fundamentally different from each other, namely:
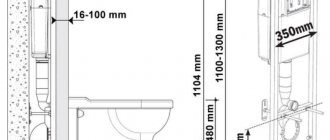
- Wall-hung toilets, the installation of which is usually carried out before the start of repair and finishing work using special bolts at a height of approximately 45 cm from the floor level;
- Floor-standing toilets, which are installed after completion of all finishing work on the floor surface, are most in demand among consumers, and therefore consideration of the technology for their installation will be the most appropriate.
When choosing a floor-standing toilet, you should take into account not only the appearance and design of the device, but also the method of connection to the sewerage system. In this regard, they distinguish:
- toilets with vertical outlet, connected to the sewer system through the floor;
- toilets with horizontal outlet, connected to the sewer at an angle of 90 degrees into the wall;
- toilets with an oblique outlet, the connection of which is made at a certain angle.
It is also worth paying attention to the method of attaching the toilet to the floor, which can be external or internal, since the technology for installing this equipment depends on this. The external method of fastening is considered simpler, the internal one is more aesthetically pleasing
Before proceeding with the actual installation of the toilet, it is necessary to carry out certain preparatory work, which consists of dismantling the old toilet, if there is one, of course, as well as purchasing all the necessary tools and materials.
Briefly about how to install a toilet on a tiled floor
Which installation method should I choose? This, of course, depends to a large extent on the characteristics of the room - how ready it is, whether there is cladding on the floor. Well, it also depends on the skill and instrumental equipment of the owner of the apartment (house).
Let's clarify this “verbosity”:
- The “classic” way to install a toilet is to install it on a floor that is already completely tiled with ceramic tiles. It is clear that this becomes possible only taking into account the design features of the toilet, since some models require a sewer pipe to be supplied from below. But this is a special case of installation, for the implementation of which it is better to invite an experienced technician.
The entire cycle of supplying communications, preparing and installing a toilet with a vertical outlet is quite a large-scale task, and for its implementation it is better to use the services of specialists.
Installing a conventional toilet directly on tiles can be divided into two more “subtypes”:
— Installation with fixation to the floor using standard fasteners. The most correct approach, which you should strive to use.
— Installation on mortar, in the event that it is not possible to drill holes in the floor for standard fasteners. It’s difficult to call this method successful, but it is also practiced from time to time. By the way, a lot of toilets in old high-rise buildings were “molded” this way.
- A diametrically opposite approach - first a toilet is installed on the floor (using one of the methods mentioned above), and only then the floor is covered with ceramic tiles.
This option can almost be called “force majeure,” but it also has, as they say, the right to exist.
Well, now, about all these installation methods - step by step, with details.
How to install a toilet on a tile without drilling: how and how to glue the base
Sometimes it is not recommended to drill into tiles, since various communications may pass under the tiles: a water or electric floor heating system. According to the recommendations of experts, it is best to glue the toilet to the floor surface. In this case it is used:
- epoxy resin;
- liquid Nails;
- special glue.
To improve the adhesion of the bonded surfaces, it is necessary to prepare them, that is, first clean them of contamination with white spirit and treat them with sandpaper.
After installation, the adhesive must be given time to dry. On average, this takes 12 hours (possibly more). This much time is needed to firmly install the toilet in order to further prevent the device from loosening during operation.
How to install components
Installation of the flush cistern is carried out depending on the modification of the toilet: it is located on the bowl of the structure or mounted on the wall.
Before installation, you need to check the functionality of the internal fittings of the drainage device. Installing a part in the compact tank that collects water and regulates its level is done in several steps. A filter for cleaning the incoming water is installed at the external outlet of the tank. Having secured it to the bottom wall of the tank, put on the sealing gasket from the inside and tighten the parts with a fastening nut from the outside. Use a flexible hose to connect water to the tank. Attachments are often sold assembled. Installing a toilet on a tiled floor yourself is within the capabilities of every person. The main thing is to follow the installation sequence of the selected device model.
Sources
- https://nedvigdom.ru/kak-ustanovit-unitaz-na-plitku/
- https://postroika.biz/6440-kak-ustanovit-unitaz-na-plitku-svoimi-rukami.html
- https://pol-exp.com/ustanovka-unitaza-na-kafelnyj-pol/
- https://stroyday.ru/remont-kvartiry/ustanovka-i-remont-santexniki/kak-ustanovit-unitaz-na-plitku-svoimi-rukami.html
- https://kachestvolife.club/o-chistote/santehnika/kak-ustanovit-unitaz-na-kafel-nuyu-plitku
- https://oboiman.ru/poly/ustanovka-unitaza-na-kafelnyj-pol-razlicnye-metody-posagovo.html
- https://OPlitke.com/montazh/ustanovka-unitaza-na-kafelnyj-pol
- https://santehnika.guru/unitazy-i-bide/ustanovka-unitaza-na-kafelnyj-pol.html
[collapse]