What is the device used for?
A children's toilet seat cover is necessary for convenience. The dimensions of the toilet are designed for adults, so children do not feel very comfortable. Often children are simply afraid of falling into a hole, so they refuse to leave their favorite potty and give preference to the toilet. Of course, there is also special plumbing for children. However, not every family has the opportunity to install such an additional toilet. In this case, a special children's pad will come to your aid.
The device can be attached to the toilet in several ways. Manufacturers often make special mounts that come included. They allow you to hold the accessory on a standard seat. Also, some companies offer Velcro and brackets that securely hold the pad when a standard seat is lowered onto it. How to choose a device? If you decide that you need a children's toilet seat cover, then you need to take many parameters into account. Let's look at them.
Attaching the toilet lid: options for installing the lid, typical problems and their solutions
The topic of our article is the mount for the toilet lid. It would seem that what could be simpler - put the lid and seat in place? However, as in any business, there are subtleties here.
We will figure out how the seats are attached to the toilet and what problems may arise during their operation and replacement.
One of the many types of fastenings.
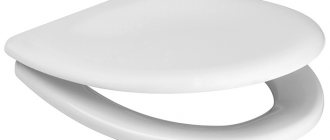
Seat cover mounting options
The type of toilet shelf plays a fundamental role in the installation process, since the overhead copy, popularly called “eared”, will require more work and attention than a solid model. This is due to the need to fix the lid in the same holes where the water tank is attached. Before attaching the lid to the toilet with “ears”, you need to purchase auxiliary equipment - polyethylene clamps. They will be needed to secure the bolts holding the entire structure.
Fastenings for mounting the toilet lid
A few tips to make the process easier:
- the optimal mounting for the toilet lid is plastic or brass;
- when screwing in brass parts, it is advisable to use intermediate plastic washers (otherwise you can easily break the entire toilet);
- You should not choose steel elements for new structures and, if possible, you should replace them on old toilets;
- If, after installing a new seat, the toilet shelf moves and water begins to leak, you need to check the rubber cuff (for this you will need a flashlight and looking under the rim: if the structure is simply askew, just secure it with wire, and if there is a rupture or dilapidation of the element, a complete replacement will be required).
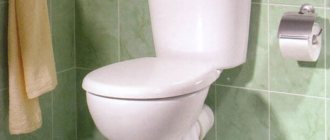
Installation of the toilet lid
The procedure for replacing the cuff is simple, but it still takes time. First you need to turn off the water supply, then disconnect the drain tank, and then remove the cuff itself. Before installing a new part, it is advisable to thoroughly clean the mounting area from lime and plaque. And only then proceed with installation:
- the narrow part of the product is placed on the toilet shelf;
- the water tank returns to its rightful place;
- the cuff is straightened and the wide part is thrown over the bell of the body;
- By draining the water, reliability and absence of leaks are checked.
Installing the toilet lid on metal fasteners
Installing fasteners for a toilet seat on a solid cast shelf is as easy as shelling pears: in such options, separate holes for installation and special clamps for “clamping” are already prepared.
First aid in case of breakdowns
Situations where the lid or mount for the toilet seat is damaged are by no means uncommon. There can be a lot of reasons for this: long service life and normal wear and tear, careless handling by the owners, a blow from something heavy, too much load on the surface of the product (for example, if you stand up with your feet), and many other options. If there is no opportunity or desire to purchase a new model, you can try to “reanimate” the old one.
Screw the lid tightly
Acetone or dichloroethane will help eliminate a crack on the surface of a plastic seat: just drop a little liquid on the accident site and tightly join the edges, then let it dry thoroughly.
Damaged polypropylene or polyethylene elements are susceptible to fire: the broken areas must be carefully melted to a soft state, connected and allowed to cool. And then lightly sand it. With care, the joints will become almost invisible.
“Eared” toilets have a characteristic unpleasant feature: if the initial installation is incorrect, the weight during use is distributed unevenly and for the most part the emphasis is on the plastic structure. Sometimes it’s enough just to lean harder on the tank or carelessly touch the product with your foot for the surface of the lid or seat to burst and the “ears” to fall off. The easiest way to fix it is to buy a new cover and install it carefully. However, you can correct everything yourself.
To do this you will need:
- thoroughly clean the damaged area from dirt and plaque;
- dry thoroughly (you can use a hair dryer);
- completely degrease (for example, acetone, gasoline);
- mix epoxy resin and hardener in any not too valuable container;
- Carefully coat the chipped areas with the resulting composition, while it is very advisable to remove excess mixture immediately, since the composition quickly hardens and is difficult to remove;
- Connect the edges of the chips evenly and press firmly against each other.
After final hardening, you can put everything in place, but it is advisable not to forget about the cause of the damage and put up supports or correct the entire structure. Otherwise, after some time the same problems will appear, but on a larger scale, which will require a complete replacement of the structure.
Plumbing, like any other equipment, breaks down sooner or later. However, in most cases, fixing these breakdowns yourself is not difficult. In this article we will look at how to dismantle and install a cover with a seat.
Dismantling the old product
There is nothing particularly difficult in the process of removing the toilet lid, but in some cases real problems arise. It all depends on which mount for the toilet lid was installed previously:
- The plastic one is removed very easily; usually the bolts do not “resist” and are easily unscrewed. But if the product has been in use for a long time and is quite dirty, some effort may be required. In cases where the plastic bolts do not want to be removed, they can simply be cut off with a hot knife blade. There is no need to be afraid that the molten material will stain the toilet: after hardening, the plastic can be easily removed from ceramics/faience.
- Brass also does not cause problems when replacing the lid, but if some bolt decides to “be capricious”, it will not be difficult to calm it down with the help of ordinary kerosene.
- Steel often becomes the source of problems. It is generally not recommended to install fasteners made of this material in places with high humidity, since excess moisture provokes the formation of rust. But, if such an incident does occur, there are several ways to correct the situation.
Methods for dealing with rusted steel fasteners
When the bolts are so welded to the body that it is unclear how to remove the seat from the toilet without brute physical force and damaging the entire structure, you need to resort to a trick. First of all, you will have to go to the store to purchase a special lubricant, which tends to penetrate into the cracks between materials and freeze the rust. This effect works very simply - old pieces of deposits begin to crack and release the bolts. To achieve an even better result, it is recommended that after thorough lubrication, wrap the problem area with a cloth for about 15 minutes, and then try to remove the bolts.
Plastic toilet lid mount
If the steel bolts are so “grown” into the product that the penetrating compound does not take them, you can resort to using an ordinary electric drill with several drills. First, using a ¼-inch drill, you need to drill around the circumference of the joint between the nut and the bolt. The main thing with this manipulation is slowness and accuracy, since in a hurry it is easy to touch and damage other parts of the structure.
Then you need to change the drill to a 1/16-inch one and continue “drilling.” And then, using a socket wrench, you need to not only unscrew the bolt, but also loosen it in the grooves. This procedure may take some time, but eventually the structure will yield.
If you have the choice of mounting, it is best to buy plastic products. They are not only easy to install and unscrew without any special tools, but they are also easy to remove even when dirty. Steel structures complicate the process of dismantling the toilet lid many times over, so it is better to never purchase them for bathroom needs.
Instructions for replacing a toilet seat
You don't need to call a plumber to replace a broken lid or cracked seat. The design of modern devices is such that anyone can handle its installation; installation does not even require the usual tools. To give you a better idea of how to properly remove the toilet seat, we offer brief instructions with photos.
First, buy a new kit, which should be exactly the same size as the old model. After analyzing the cause of the breakdown, you will understand which device is best to replace. For example, the place where the lid is attached has burst, or the plastic has lost its original appearance, has become worn and cracked - think about replacing cheap plastic with more durable duroplast.
Then remove the old seat by unscrewing the two nuts threaded onto the long bolts.
If the structure is very ancient and cannot be unscrewed by hand, try using pliers (for nuts - a wrench), or, as a last resort, cut it with a hacksaw
After removing the old seat, put in order the place where the new set is fixed (seat + cover).
The place where the seat is attached is located near the drain tank. In some cases, it makes sense to at the same time carry out preventive maintenance on the drain mechanism and check the reliability of the tank so that there are no leaks
When the mounting location is completely ready, unpack the new kit.
Budget model made of plastic: the kit includes a pair of seat/cover and two mounting bolts with nuts. The cost of inexpensive plastic models is from 150 rubles. up to 500 rub.
Insert the bolts first into the holes in the lid (instead of holes there may be special grooves that allow you to adjust the position of the product), then into the holes on the toilet shelf. Tighten the nuts.
Plastic fasteners must be handled very carefully: if they are not tightened enough, the structure will move in different directions; if the pressure is too strong, the fasteners may not hold up and burst
This is the procedure for fixing a simple device. If you bought a model with a microlift or automatic system, carefully follow the attached instructions. There are models that require electricity and water connections.
Installing a regular toilet seat:
Microlift design
The microlift most often comes complete with a cover, and not many are interested in its design. Subsequently, in case of breakdowns, questions arise as to whether it is possible to replace the parts and elements of the mechanism yourself and what they are.
The product itself is not exactly plastic, but a more modern polymer material – duroplast. Although it looks like plastic, its characteristics are more similar to ceramics.
It is not difficult to understand the internal structure of the lid microlift. It consists of the following elements:
- a rod on which the seat and cover are securely fixed;
- a spring that provides braking (smooth lowering) of the lid;
- articulated micro-lift mechanism, thanks to which the device can change position;
- The lubricant is transparent, viscous, and has a very unpleasant odor.
It is believed that this mechanism is non-separable and cannot be repaired. However, after repair and making some changes, the device can work again.
In more expensive models, the structural elements are slightly different, more reliable - pistons instead of springs and cylinders instead of rods. It is impossible to restore the operation of such a functional system, since the structure is non-demountable.
Choosing a new seat
Before removing a toilet seat that is broken for some reason, you should buy a new one. Since the range of these products is huge, making a choice is not easy. Therefore, below are the main features of seats made of different materials:
| Materials | Peculiarities |
| Plastic | This material includes:
The seats, made of plastic, have stiffening ribs and rubber inserts or plastic protrusions on the bottom side. Their main advantage is their low price, but their disadvantages include fragility. |
| Duroplast | This material is essentially the same plastic, but with a denser structure, reminiscent of ceramics. Duroplast products are resistant to ultraviolet radiation and chemicals, and usually have an antibacterial coating that prevents bacteria from multiplying. The advantage is an attractive appearance and good strength, however, the cost of such seats is higher than plastic ones. |
| Polymer fabric with foam rubber (soft seat) | The design is a rigid plastic base covered with polymer fabric, under which there is soft foam rubber. This seat is more comfortable, however, it breaks quite quickly. |
| Chipboard, MDF or wood | Seats of this type usually look very attractive, however, their disadvantage is their heavy weight. If it falls, the structure can simply split the toilet. |
Having decided on the material, you should decide which functions of the product are important to you. After this, you can select specific models.
Normative documents
Are there any standards in the production of seats and covers? Or are they, like toilet lid mounts, produced entirely by manufacturers at their own discretion?
Nothing like this. The production of seats is regulated by no less than GOST number 15062-83. It also specifically specifies the fastenings used.
What interesting things can you learn from the text of the standard?
- Plastic seats can be manufactured both with and without covers. Wooden ones are produced without lids.
Please note: on sale, however, you can still find seats made of natural wood, equipped with wooden covers. However, most of it is imported. Foreign manufacturers, of course, are not obliged to follow our GOST.
Contrary to standards.
- Plastic seats can be made from acrylic plastics, low-density polyethylene, high-density polyethylene, polypropylene, plastic polyurethane and ... any other plastics that are beautiful, pleasant to the touch and durable. The wording is, frankly, vague.
- Wooden seats are made from birch plywood. Only from her. In the paragraph above we have already seen a refutation of this point of the standard.
- Seat shock absorbers (rubber inserts that are located between the seat and the toilet) should be made of chemically resistant rubber of medium hardness.
- The toilet seat mount should be made of any plastic that is strong enough to hold the lid in place. For toilets with a separate shelf, however, low-density polyethylene is especially recommended.
- The seat must have at least four shock absorbers (see also How to choose a toilet seat and what the market has to offer).
- The toilet seat mount must allow it to rise and fall freely.
- The assembled and mounted seat must withstand, without cracking or destruction, a load of 120 kg, distributed evenly over the seat, or 80 kg along one edge. If you weigh more, you stand on the edge of the seat entirely at your own peril and risk.
Perhaps it's time to think about a diet.
- The seat and lid package should include toilet lid fasteners and an assembly drawing.
Well... It’s interesting and informative, but the range of seats in construction stores does not always correspond to this standard.
- As already mentioned, most of these products are imported . Why would a manufacturer living in China coordinate its technology with Russian (or rather, Soviet) regulatory documents?
Residents of the Celestial Empire sometimes make their products very creative. But they are of little interest to the standards of the importing country.
- Many small manufacturers produce products not according to GOST, but according to technical specifications, agreed with the wholesale batch customer. In this case, the variation in the strength and quality of products can be very large.
Toilet lid repair: how to remove the old one and attach the new one
Plumbing repairs, as a rule, do not bring much trouble. Frequent breakdowns include leakage of the tank, damage to the fasteners or the seat itself.
In the first case, you can tinker with it a little yourself and correct the situation. In others, you will need a new seat with a cover. Repairing the old one will most often do nothing. Therefore, it would be better to go to the store.
But before visiting the store, you need to decide on the material and shape of the seat.
Choosing a new cover
You can choose a toilet lid without any problems. Moreover, not only classic models are available, but also versions with additional options: intestinal gas analyzer, microlift or heating option.
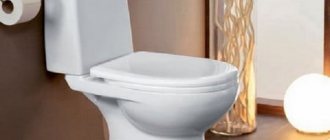
Modern toilet lids can be equipped with additional functions
There are even seats with a built-in radio tuner and sound system to improve the client's psychological mood. Sometimes the manufacturer builds a speaker into the toilet lid that produces the sound of flowing water to improve the process of emptying the bladder.
Material
The material can also be selected from various options:
- Plastic. Seats of this type are supported from below on ribs with rubber or plastic inserts. Their advantage is low price, disadvantage is low strength.
- Duroplast. This material is a more durable type of plastic, and looks similar to ceramics. Its advantages include bacteriological and acid resistance and pleasant appearance. A conditional disadvantage is the higher cost than plastic.
- Plywood. This type of seat is rather a thing of the past. True, sometimes you can find them in a store, but now they can only be used in the countryside. Their advantage is their extremely low price, but their disadvantage - unpresentability - significantly limits their use in apartments and cottages.
Soft pads for toilet lid
Plastic with foam rubber. The seat is covered with fabric of various colors. The advantages lie in its comfort, and the disadvantages lie in its fragility.
Wood and wood materials. The quality of such seats depends on the manufacturer. Their advantages are the possible interesting shapes of the lids and seats, the disadvantage is their heavy weight.
Seat shape and inserts for babies
In addition to the material, the shape of the seat also plays an important role: for example, for a square toilet, a round seat will not only be illogical, but also uncomfortable.
In order not to make a mistake with the shape of the seat and lid, you can take a photo of your toilet on your mobile phone, measure and write down its overall dimensions and the distance between the mounting bolts on the toilet.
This distance must correspond to the same distance on the purchased cover, otherwise installation will fail.
Read our review of which toilet is better to choose in a separate article.
Most of the lids offered in the store have a semi-oval shape. There are much fewer rectangular models; their corners are rounded so that the client does not get hurt during use. For those who want to create a positive atmosphere in the restroom, you can choose original lids with ducks, frogs or flowers, in the shape of folk instruments (guitars or domra).
Baby pad and seat with step
If there are small children in the family, for whom the potties are already small, but the toilets are still large, you can look for a special seat with an insert for babies
Pay attention to the bidet attachments for the toilet
Removing the old seat
Before removing the old seat, you need to prepare the necessary tools. The degree of complexity of the work will depend on the material of the bolts. If they are plastic, then you can simply cut them off with some old knife, previously heated over a fire. Even if melted plastic gets on the toilet, there won’t be any special problems with its removal.
Broken lid fasteners are the most common reason for repairs.
We tried to tell all the secrets of repairing a toilet with our own hands in our review.
Brass bolts can also be removed relatively quickly. If the nut on them does not give in even with a little force, you should moisten the threads with a drop of kerosene or kerosene lubricant (from a car dealership).
It is more difficult to deal with steel bolts. High humidity in the restroom can have a negative impact on them - they become rusty and difficult to handle. You can remove them using one of two methods.
- Carefully cutting off the heads with a metal grinder.
- Cutting through with a hacksaw for metal, having previously placed plywood or thick paper under the cut area so as not to touch the toilet itself.
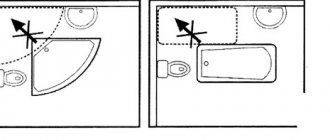
How to choose a toilet seat according to the size of the toilet
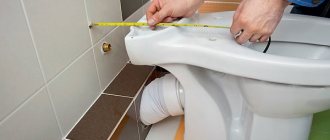
Pay attention to the shape of the seat. It must match the shape of the toilet and can be elongated, round, or square. The toilet seat must fit exactly to the bowl. How to choose the right toilet lid size? To do this you will need to take three measurements.
- The distance between the mounting holes (marked with number 1 in the photo), the measurement should be taken approximately from the middle of the hole;
- The distance between the front of the toilet and the line of mounting holes (number 2 in the photo);
- Measurement of the widest part of the bowl (number 3 in the photo).
The seat should be selected based on these measurements. All sizes are usually indicated on the packaging. A lid of the wrong size either cannot be installed or will quickly become unusable (if it is larger).
Overlay shelf
This design is also called “eared”. It will be installed in the same holes as the drain tank, which complicates the work
Attention is paid to:
- Type of fasteners. For fastening, only brass or plastic fasteners are used, since steel is susceptible to corrosion.
- Plastic washers are provided for brass bolts. If secured using metal elements, the toilet may be damaged.
- Preventing the shelf from moving relative to the toilet. In this case, the tightness of the tank structure will be broken and leaks will occur.
- Steel fasteners must not be used. Their use will lead to corrosion and problems during further repair of the device.
You need to install the seat. At the same time, check the integrity of the cuff between the tank and the toilet.
Seat fastener
Choosing the right quality seat is only half the task. You also need to secure it, for which you will need seat fasteners. Although at first glance this may seem like a trifle, it is they who will make the operation of the seats reliable and durable.
The mounting kit includes:
- a brass or plastic screw designed to secure the sleeve. The price of the latter will always be lower, but its reliability will also be lower;
- nut - most often plastic or nylon for easier tightening. Sometimes it is made of stainless steel;
- decorative cap (not always used).
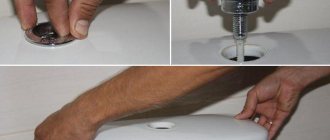
The photo shows plastic screws and a nut for attaching the seat to the toilet
Fasteners for toilet seats are made from different materials. The most popular are systems made of stainless steel; this material is intended for long-term use.
Installation is quick and easy; there are special holes on the toilet for this purpose. Most often, only the strength of your hands is enough; sometimes you can tighten the nut with a wrench.
Tip: The plastic fastener is quite fragile, so when tightening it, do not use wrenches, only your hands.
How to choose a toilet lid
Before you replace the seat, you must select the correct cover shape.
- Currently, their range is huge, so you should pay attention not to the fact that it is soft, very expensive or, for example, in the form of an aquarium, but that it is exactly the same size as the previous one.
The lid and seat must match the shape and dimensions of the toilet
Tip: take a photo of the old lid so you don’t have to take it to the store or forget it, and show it to the sales assistant.
- The seat must match the dimensions of the toilet rim . Otherwise, the latter may be wide, and you buy a narrow model, then dirt will begin to accumulate. In addition, the seat itself will become unstable.
When choosing a seat, you must take into account the dimensions of the toilet bowl
Removing the old seat and installing a new one
Let's consider the simplest option:
- Look under the toilet where you should see 2 screws with nuts.
- If they are plastic, unscrew them yourself, otherwise you may need wrenches.
- Take the new seat out of the box.
- Make sure it fits your toilet and is stable.
- Check the completeness of spare parts and prepare them.
- Insert the prepared screws into the holes of the seat and toilet.
- Attach a cover to them (if the design provides for this).
- Carefully tighten the nuts from below.
Bottom view of a screwed plastic nut
Installation of a seat with microlift
There is no need to worry in advance about the unclear name of this product. The installation method does not change from loud words. You also need to install the lid in 2 holes on the toilet, which is still considered the most optimal option for attaching it.
Installation work
Removing the old cover
So, a new seat has been purchased, before installing it, you need to remove the old one. This operation will not take much time to complete.
The only thing you may need is some tools:
- Socket wrench;
- Pliers;
- Hacksaw.
Instructions for removing the cover are as follows:
- Regardless of the type of construction, the seat is fixed with two nuts
. Before using the tools, you can try to unscrew them by hand. - If the nuts do not “give”, you should use a socket wrench
. - In some cases, the bolts may turn
. To prevent this, they should be clamped with pliers. - If for some reason it was not possible to unscrew the fasteners, the bolts must be cut off with a hacksaw
. However, before taking drastic measures, you can lubricate the thread with silicone or oil and try to unscrew it again.
Installing a new cover
Now let's look at how to install a toilet seat.
It should be noted that depending on the product model, the installation diagram may differ slightly, but in general, the sequence is as follows:
- First of all, you need to install fasteners into the seat structure.
- Then you need to get the bolts into special holes in the toilet and attach nuts to the bolts.
- Next, you need to adjust the position of the lid relative to the toilet and tighten the bolts. If you are installing a cover with a microlift, before tightening the bolts, you should make sure that the structure fits tightly to the plumbing. Otherwise, the position should be adjusted using special adjusting elements.
For products with microlift, adjustment is of great importance, since their durability depends on it.
- When installing complex ones, it may be necessary to connect the structure to water supply and electricity.
- After installing the toilet seat with your own hands, the structure should be raised and lowered to ensure its functionality.
This is, perhaps, all the information you need to know in order to remove and install the seat yourself.
What types of toilet seat mounts are there?
From time to time you still have to change the toilet seat along with the lid. The process is actually simple and easy to do yourself. Even if you have never done this, the work will not be difficult.
Today our task comes down to telling you in clear language how to properly remove the old seat, what needs to be unscrewed and where, and then showing with your fingers how to assemble and screw on the new one.
Fastening to the toilet seat can be very different
Repair work
It is worth saying that the microlift system is characterized by faster wear compared to conventional systems. In addition, when you close the lid of the toilet cistern, which has a microlift system, manually, you reduce its service life. Of course, in this case the system can continue to be used, but it is best to make repairs so that it does not creak. To properly repair such a system, it is necessary to correctly determine the cause of the problem and only then carry out repairs. Quite often a problem occurs that the base with the lift mechanism is disconnected directly from the toilet. You can fix this damage either yourself or with the help of specialists. If you decide to repair such a cover yourself, then first of all you will need to unscrew the nuts that are screwed to the bolts connecting the back of the cover near the tank and the elevator mechanism. If these nuts are damaged, then they must be replaced with new ones.
If you cannot reach the nuts, then you cannot do without removing the tank and the toilet itself. In this case, you will need to disconnect the toilet from the drain and disconnect it from the floor, then install the lid in the right place and reinstall it. After such a procedure, problems may arise related to the operation of the tank.
For example, water can continuously flow into the tank or, conversely, it leaves from there all the time. The solution is that the float located inside the tank will need to be installed in the optimal position for you, approximately 2.5 cm below the inlet of the underwater pipe. In addition, other problems associated with the operation of the tank are quite common. For example, a faulty release valve. In this case, valve repair is most likely the last resort, short of completely replacing the valve.
https://youtube.com/watch?v=34_EhH10M8w
To solve this problem, the water must be released so that the valve moves and then leaks. If the movement of the valve was recorded, but no water flowed, then the problem is the float, which is most likely already worn out, which means it needs to be replaced with a new one. If advancing the valve and replacing the float did not help solve the immediate problem, then most likely the cause of the breakdown is something else, which means replacing the valve or float will not help you.
Additional functions
Today, a toilet seat can be equipped with the following additional functions and capabilities:
- Microlift. The lid is equipped with a special closer that ensures smooth closing. This function is also called soft close or soft closing. The microlift not only protects against loud noise when closing, but also against the appearance of cracks that can occur with a strong impact. Please note that the lid with a microlift cannot be closed by force, this will lead to rapid breakdown of the mechanism;
- If there are kids in the house, pay attention to models with a built-in pad for children. This will allow you to save on the purchase of an additional accessory;
- Heated seat. In this case, a connection to electricity is required; it is necessary for the operation of the device, which maintains a constant temperature of the surface of the seat in the region of 34-36 degrees. Using plumbing fixtures with such an accessory will be very pleasant;
- A separate category is smart seats; they can react to the approach of a person and include a bidet and hairdryer function.
Smart toilet seats originated in Japan in the 80s. These models are not very common here. They include many functions and require water and electricity connections. Bidet lids allow you to combine a toilet and a bidet in one piece of sanitary ware. The fact is that special nozzles are built into the rim of the seat, through which water is supplied. Such devices are usually controlled using a panel located on the case or a remote control. Additionally, such seats can be equipped with heating, an ozonizer, filters to remove unpleasant odors and a hairdryer.
How to attach a lid to a toilet
Removing the old cover
Before carrying out this process, you need to prepare a tool, which is selected depending on the material of the bolts:
- Plastic products
can simply be cut with a sharp knife, only its blade needs to be heated over an open fire. If remnants of melted plastic get on the toilet, it’s okay - they can be easily scraped off in a frozen state. - Bolts made of brass and other non-ferrous materials
can be removed quickly; if the nut on them does not unscrew, you can moisten it with kerosene or kerosene grease. - Steel bolts
are the most difficult to dismantle, as rust can form on them after prolonged contact with moisture, making them difficult to unscrew. You can use a grinder and cut off their heads or use a hacksaw, but in this case, in order not to accidentally hit the toilet, you should place plywood or thick paper under the cut point.
Installing a new seat
The selected seat is first applied to the toilet; if this is an option with built-in fittings, then you can immediately check the symmetry of its bolts relative to the holes in the bowl of the plumbing fixture. If the fittings come separately, then you need to align the lid ears with the places for fasteners on the toilet and insert the fastening bolts into them.
The process of installing a toilet seat with your own hands is presented in the video:
How to install the lid and seat on the toilet
Installing the cover does not require any special skills. The holes on the seat must coincide with the holes on the toilet, then bolts are inserted into them and screwed from below with nuts.
Many toilet lid designs contain plastic, metal-plastic or metal hinges.
Installing a cover with a hinge mechanism occurs as follows:
- align the holes on the lid and toilet seat;
- a nylon bushing is inserted into the hole from the inside of the toilet seat;
- a metal pin is inserted into the nylon bushing;
- the same procedure is performed with another hinge;
- Decorative washers and gaskets are placed on the studs;
- The product is placed on the toilet, the pins are inserted into the holes and tightened with nuts from below.
There are also lids that close and open using a semi-automatic mechanism - a microlift.
A toilet seat with a microlift is mounted as follows:
- microlifts are mounted on the pins of the pads;
- insert microlift bushings into the holes of the hinge ears;
- Gaskets are attached to the rear edge of the toilet above the holes;
- install the product on the toilet, insert the studs into the holes, and screw it down with nuts.
Shape of toilet seats and its types
Most often, the toilet lid follows the shape of the seat - a semi-oval
. This is a familiar, safe and convenient form. But for admirers of everything unusual, stores offer products of other configurations: rectangular or chopped, in the shape of a frog or duck, musical instruments, hearts.
Sharp corners are slightly rounded
for safety reasons, so as not to cause injury or tear clothing.
There are also seats for children that are equipped with an intermediate insert with a small hole, or equipped with a lowering seat. This additional accessory will help teach your child to be neat and tidy. It is advisable to purchase a child seat complete with a stand
, thanks to which it will be easier for the baby to sit on the toilet; the legs will be supported and not dangling in the air.
Children's seat models come in a variety of colors, shapes and sizes. For those who like to travel, a portable folding seat will be useful on the road, because you will have to use a public toilet. When folded, the toilet seat takes up very little space and, if necessary, it can be quickly unfolded and installed on the toilet using special clamps
that firmly secure the seat and prevent it from moving from side to side.
For people with disabilities there are covers with soft seats and folding armrests
in the form of supports. Armrests help disabled or elderly people sit and stand comfortably. Some toilets are equipped with height adjustment.
In addition to differences in design, size, and material, all toilet seats have rubber or plastic shock absorbers.
Usually there are at least 4 of them. Plastic shock absorbers are mainly made as one piece with the toilet seat.
How to install special covers
Today, toilet seats with added electronic features are no longer new. Water supply, disinfection, drain adjustment, filtering are available. Heated seats and bidet lids are also in demand. The installation of such products is largely standard. Additionally, you will need to lay a cable and install an electrical outlet. Illuminated products will require electrical wiring in the toilet, but battery power is also possible. In the latter case, the batteries are placed in the device itself. To operate the motion control cover, you will also need to install an electrical network.
Installing a new toilet lid does not require exceptional knowledge and skills. You just need to familiarize yourself with the installation methods of different models of toilet seats and apply the information received in practice. Many actions are intuitive, and an absolute beginner in this matter can handle them. A new lid will be the key to cleanliness, convenience and freshness in the toilet.
Basic rules for choosing a seat
Different types of seats
The toilet seat has different properties depending on the design and material. To decide how to choose it, it is recommended to adhere to certain rules:
- The comfort of the seat depends on the degree of its rigidity: soft and hard seats are available. But it should be remembered that soft ones are more comfortable, but have a shorter service life.
- The seat must match the dimensions of the toilet in terms of dimensions and mounting distances.
- The color is chosen taking into account the entire interior of the toilet: it is not recommended to make the lid a bright spot against a background of light colors.
- The quality of the seat should not allow for defects (chips, cracks, etc.), roughness and unevenness of the surface, or uneven coloring.
- When choosing, you need to take into account special conditions: the presence of small children, certain diseases, the need for additional functions.
- Finally, the choice is based on the financial capabilities of the buyer.
The main condition for making the right choice is taking into account the required dimensions. Before purchasing a device, you must measure the following dimensions of the toilet:
- center-to-center distance between the holes in the toilet bowl for attaching the lid;
- length from the front border of the toilet to the center of the mounting hole;
- the largest width of the toilet.
Selection criteria in case of replacement
If it so happens that the question of replacing the toilet seat has arisen, you need to choose a toilet seat that matches the existing plumbing fixtures. It is recommended to take measurements of the plumbing fixture in terms of dimensions and shape. You should also clarify the location of the mounting holes under the seat.
The width size is measured at the points of greatest “run-up” of the structure. The length dimension is taken from the edge of the front part of the curb to the point of the center line passing between the centers of the holes intended for attaching the toilet seat.
Standard dimensions of plumbing fixtures for different designs. Based on these parameters, a toilet seat is selected in case of a new installation to replace the old toilet seat. If you know these dimensions, choosing a seat of a suitable configuration is easy.
Often, toilet owners who have had to change the toilet seat prefer to choose more advanced models instead of the standard design. This choice is explained by their desire for novelty.
Meanwhile, new products “with heating”, “with backlighting”, “with motion sensors” in practice turn into even bigger problems. A serious manufacturer of plumbing fixtures is not yet in a hurry to offer such an “exclusive” to the buyer. Such proposals usually come from Chinese companies.
Features of installing a seat with smooth lowering
If a seat with a “Microlift” function is selected for installation on the toilet, this means that the manufacturer provides for smooth lowering
Carefully secure this seat through the 2 holes that are on the toilet.
Installation of the lid with smooth lowering is carried out according to the same plan as the installation of a simple seat, however, it must fit very tightly to the surface of the toilet. If the fit is not tight, this will very soon lead to a breakdown of the device, and then you will again have to spend money on buying a new cover.
In this regard, carefully check exactly how the lid fits against the porcelain, and if necessary, make adjustments.
In order to adjust such a seat, you need to screw the adjustment cups onto the mounting bolts. Tighten all the nuts well and remember that the “soft-lowering” lid cannot be forced down, otherwise it will simply break.
It happens that the holes in the porcelain base are much larger than the diameter of the bolts intended for fastening the seat. To prevent play, it is recommended to wrap electrical tape around the bolts so that they sit firmly in the holes.
The rules for installing a toilet lid remain unchanged, no matter what additional functions it has. How securely the structure will be fastened directly depends on the quality of fastening of the bolts and the material from which they are made.
Remember that during work you must take into account all the principles and rules described above. The cover will serve you for a long time only if you do everything correctly and do not forget to check the quality of the fasteners.
Main advantages
Many people who have not yet had time to evaluate a toilet seat with a microlift doubt the advisability of installing this mechanism. In fact, such devices have a number of undeniable advantages, which include:
- simple and quick installation;
- possibility of functioning in automatic mode. However, it is provided in more expensive models;
- quiet operation, which is especially important at night;
- long service life;
- The microlift ensures neat and smooth lowering of the lid, so there are no scratches left on the surface of the toilet.
Requirements for cover fasteners and their types
- Fastenings can be a structural part of the seat.
- Installation of the seat to the toilet is carried out with the fittings provided with it.
- The threads on the cover fasteners should unscrew freely without special tools.
- The fastening bolts must be designed for 25 thousand cycles of closing and opening the lid.
- The fittings should not interfere with the free rotation of the lid circle.
- The fastening can be made of any polymer material: polypropylene, polyethylene, polyurethane.
When choosing between plastic and metal fasteners for the lid, you should give preference to the first type, since it makes installation easier, although steel fasteners are more reliable.
- With shelf
. To fix the lid, holes are used through which the tank fasteners pass. In this case, separate fasteners are not needed. - Without shelf
. To fix the seat, the holes in the toilet bowl are used; fittings for this are included in the kit.
Fastening system
Pay attention to the cover fastening system. It can be plastic or metal. Fastenings of the latter type can also be quick-release. These seats can be removed literally with one movement of the hand, which makes cleaning much easier.
In addition, the fastening system can be simple rigid or adjustable. In this case, the position of the seat can be slightly aligned relative to the toilet bowl.
So, today, the most optimal is a seat made of duroplast with a metal quick-release fastener.
Disassembly and repair
Let's look at a few common problems with seats and seat attachments.
Removing the old seat
It may not be the trivial matter it seems.
The amount of work is determined primarily by the bolts between the seat and the toilet.
- If the seat used plastic bolts, they usually unscrew without excessive effort . As a last resort, the plastic bolt can simply be cut off with an old knife, which is not of particular value. Simply heat it red hot over a gas stove. Don’t be afraid to stain the toilet with plastic drips: it can be removed from the smooth surface of earthenware or porcelain without much effort.
- As a rule, there are no special problems with brass bolts either . If the nut does not want to budge with a little force, drop a little kerosene or WD-40 lubricant containing it, which is easy to find in auto parts stores, onto the threads.
- Steel bolts are the worst . As already mentioned, it is absolutely not worth using them in the humid atmosphere of the toilet room. If they do end up there (most often between the toilet lugs and the tank shelf, with the seat fastening in the middle) - you have two options.
You can carefully cut off the protruding head of the bolt using a grinder with a metal disc. Or you can, by inserting any object between the tank and the shelf as a wedge, saw through the bolt with a hacksaw or a blade from it. The blade will pass through the bolt, cutting the plastic toilet seat fastener.
The efforts are rewarded. The seat has been removed, the toilet is intact.
Automatic seats
The product is a modern toilet lid, which has the following functions:
- automatic lifting when a person enters the room;
- automatic lowering after a person leaves the bathroom;
- smooth lowering and lifting;
- heating.
The cost of the product compared to conventional lids with a closer is twice as high.
- LiveJournal
- Blogger
An automatic toilet seat is the most expensive model.
What should you pay attention to when choosing a product?
To select a toilet lid without errors, you need to check its compliance with the following criteria:
- convenience;
- lifetime;
- dimensions;
- seat type and additional functions;
- colors;
- quality of material.
If you take measurements of the product before going to the store, there will be no problems with the third point. Colors should be selected depending on the decoration and style of the room. The quality of the material must correspond to its price.
Methods for attaching the lid and seat
They depend on whether the toilet has a separate shelf or a solid one.
Separate shelf
The toilet lid mount uses the same pair of holes as the cistern mount.
This affects the installation of the seat to a greater extent; however, the fastening itself in this case may be somewhat different.
Tip: it is acceptable to use both plastic bolts and brass bolts with plastic spacers. You should avoid fastening with brass bolts without soft spacers (they can chip the earthenware) and steel bolts (after a year they will not be able to be unscrewed due to rust).
- In some cases, L-shaped fasteners are used, which are placed on top of the shelf . Then the structure is also bolted together.
Here the plastic fastener will be located on top of the shelf.
Solid cast shelf, wall-hung and wall-mounted toilets
In such cases, in particular, mounting on a wall-hung toilet with installation is even simpler: the seat has its own pair of holes. The toilet seat mount is secured through the holes with a pair of plastic or brass bolts.
Modern toilets have a separate pair of holes for the seat.
If the mount is broken
The reasons for such breakdowns are different: someone stood with their feet on the seat, or dropped a heavy object, or opened the lid too sharply. It turns out that you can fix minor problems yourself without spending money on a new kit:
- To fix a crack in plastic, just apply a little acetone to it. Acetone dissolves many types of plastic. Then connect the parts along the break and wait until the mass hardens again.
Important! You can use dichloroethane using approximately the same principle.
- Cracked parts made of polyethylene or propylene can be repaired using high heat. Melt the edges of the part a little and connect them. Once you carefully sand the seam, it will become almost invisible.
“Eared” toilets have one problem: either the shelf ear or the shelf itself breaks. The reason for this, most often, is that the tank is not secured correctly. But this is a fixable problem:
- Clean the cracked surface from debris.
- Wipe and dry it thoroughly (you can use a hairdryer for this).
- Using gasoline or acetone, degrease the surface.
- Mix epoxy resin and hardener in a clean container.
- Apply epoxy to the chips on both sides and press them together. Be sure to remove excess epoxy when doing this.
- After the epoxy has cured, reinstall the shelf, flush tank and seat, and attach the lid to the toilet.
We hope that the article will help you deal with such a simple matter as installing a toilet seat, and now you can comfortably and conveniently visit the toilet as needed!
For the toilet, you need to choose the right lid that is installed on its bowl. Comfortable living conditions in this place depend on the reliability of its fastening. Regardless of which cover design is chosen, it should rise and fall freely. How to attach the lid to the toilet?