It is impossible to imagine a kitchen without a mixer. During the day, it opens and closes many times to fill containers, wash vegetables, fruits or dishes, rinse hands, etc. Due to high loads, insufficient water quality and natural wear of parts, the faucet fails over time. In some cases, you can repair a kitchen faucet yourself.
Main signs of malfunctions
The mixer is a structurally complex piece of plumbing equipment. Its operation and service life are influenced by many factors. The main signs of faucet failure include:
- Difficulty moving the lever or rotating the valves . It may also be difficult to adjust the flow parameters: adjusting the temperature and pressure. Such manifestations occur when the mechanical components of the mixer wear out due to the ingress of small solid inclusions or the formation of dense limescale;
- water leaking from under the control lever or valves . Such a breakdown can be caused by a number of reasons: failure of the cartridge, a small crack in the housing, insufficient tightening of the threaded couplings (nuts), wear of the seals on the crane axle boxes;
- low pressure in the kitchen tap without a similar problem at other water intake points . Most often, the cause of such a malfunction is overgrowing or clogging of the aerator mesh. Also, a decrease in pressure can be caused by poor passage of supply pipes (hoses), overgrowing of channels in the mixer, pinching of gaskets on the supply;
- formation of a puddle at the base of the mixer . Its cause may be wear of the sealing rings in the rotating block or the appearance of a crack in the housing;
- constant leakage . A trickle of water regularly drips or flows from the spout when the tap is closed. With a high degree of probability, we can say that the ceramic parts of the valve part or seals have worn out.
How to disassemble?
Disassembly of the tap begins after shutting off the water supply from the filter and draining the excess. If there are no leaks in the installation hole, there is no need to unscrew the nut and completely remove the housing.
In this case, a simple scheme is selected to parse :
The gander carefully turns in different directions and stretches upward.- The shutoff valve is removed: for models with a rotary valve, the top cover is first lifted, the thumb is unscrewed second, for lever valves the valve is turned up or towards the opening.
- Remove the decorative plug by hand (after loosening) or using pliers with a piece of leather or rubber.
- Using a regular, Phillips or hex screwdriver, unscrew the nut securing the valve axle box.
- The crane box is removed with tweezers or by hand, inspected, cleaned and repaired.
Important! At all stages of disassembly, attention is paid to the position of elements and gaskets and their condition.
It is not recommended to displace intact and dense rubber bands on the rod or gander (it is easy to damage them when removing them; select gaskets of the required size and pull them onto the rod - vice versa).
It is not difficult to distinguish gaskets that need replacement - in addition to their solid service life (more than 2-3 years for high-quality models), they:
- crack,
- crumble
- leave black marks on fingers.
If there is a leak near the installation hole, the disassembly process becomes more complicated; work begins with unscrewing the water supply nut and removing the valve body.
The rest of the steps remain the same; regardless of the chosen method, the device is disassembled carefully, there is no need to jerk or exert unnecessary effort.
Hard-to-give parts (lever or decorative plug) can be poured with hot water; direct contact with pliers or a similar tool is avoided.
What taps can be repaired?
Two-valve kitchen faucets are considered the most repairable. Their design is simple and traditional. However, single-lever models are especially popular among housewives. Their main advantage is ease of use, the ability to adjust with one hand or even a finger. These are the types of mixers that are most often equipped with GranFest sinks. To achieve a harmonious interior, the catalog of this brand presents models to match the bowls. Touch-sensitive faucets are used less frequently in kitchens. This is primarily due to their comparative high cost. It is also not recommended to repair such products yourself. In case of breakdown, it is better to contact specialists.
Repair of different types of mixers
Repairing two-valve
Repair of a kitchen faucet with a two-handle structure varies according to the type of axlebox. You can determine it without taking it apart. To rotate the flywheel by ½ or ¼, a cermet axlebox is installed, with several turns of the threaded axlebox.
Breakdowns are eliminated by changing axle boxes. And also during operation they deteriorate and a simple change of rubber bands and washers is necessary. There are many suitable parts in stores. But if you wish, you can repair old parts without replacing them.
We repair cermet axle boxes
Not complete overlap. If the liquid partially overlaps, then most likely the reason is the fluoroplastic washer. It acts as a spacer between the iron components and becomes thinner. The rod begins to stretch, the distance between the ceramic plates increases and liquid oozes out when the valves are closed. Eliminate damage by replacing it with a larger washer.
Elimination methods:
- Replacing the washer. To do this, disassemble the device, take out the valve axle, remove the rubber band and remove the ceramic balls. Then they pull out the rod, prying the stopper at the top of the axlebox with a screwdriver or something narrow. You will see a white washer - this is a replacement part. It can be replaced with: a copper washer 10x13x1mm. or 10x14x1mm, sold in a car store; homemade ring 1mm. made of wire or copper cable with one core and a cross-section of 0.75 mm2; plastic ring from simple threads, 2 ml syringes. or 3ml.
- Installation of a prefabricated axle-box crane. You need to do simple things - take out the damaged part and select a new, similar one. After installing the spare part, reassemble the unit.
Interesting! A homemade part made of plastic will last a couple of years, and one made from a copper washer will last forever.
Flywheel leaks. Streams under the handle indicate the unsuitability of the sealing rings - due to their thinness, they began to let moisture through.
Solutions:
- Changing rubber rings. Having disassembled, remove the device with a screwdriver, a thin-tipped blade or an awl from the ring rod and insert fresh ones. They are available in repair kits or on metal-plastic pipe fittings.
- To temporarily get rid of damage, a special tape or technical thread is wound onto the grooves into the gap areas. The main thing is not to wind too much so that the rod fits back.
- Complete replacement of the axle box crane. They take out the worn-out spare part, buy a good one and replace it.
We repair threaded axle boxes
Impossibility of completely shutting off the water. In threaded devices, leakage is caused by abrasion or damage to the rubber gasket located on the edge of the rod. Wear of the spare part increases the gap between the housing and the sealing elements and leaks appear.
Solutions:
- We change the gasket. Having disassembled the structure, remove the valve axle box, remove the gasket and insert another one. Moreover, you don’t have to buy it, but make it yourself from leftover rubber.
- Reversing the gasket. After disassembly, turn the spare part over to the other unworn side and put everything back together. This repair will briefly eliminate moisture seepage.
- Installation of a new axle-box crane.
Flywheel leaking. Repairing a kitchen faucet with a thread if there is a leak near the flywheel can be eliminated using the same means as for cermets - installing fresh rings, winding threads, or a complete replacement set of spare parts.
Repairing a single lever
Leaking from the handle. Failure occurs due to incomplete contact between the cartridge and the internal cavity. Such situations occur due to accumulated lime salts.
Methods:
- Tightening nuts on cartridges. Before tightening the nuts, you should know how to disassemble the ball mixer. First, remove the handle and decorative nut. Using a spanner, carefully tighten the brass nut inside the body. If you overdo it, it may break or the cartridge, so after each movement, double-check the readiness.
- Changing the cartridge. This procedure is done if the lift does not work. Before replacing the cartridge in the kitchen faucet, the unit is completely disassembled and the one purchased in the store is installed according to the article number or the broken one.
The handles jam or creak, and as a result the water pressure does not stop. The problem is due to wear and tear of the cartridge components. It's better to install a new one right away. Disassembling, cleaning deposits and lubrication will not increase operation for long.
We repair models with a watering can
Units with a flexible spout are subject to the same breakdowns as single-lever and double-lever models. But in addition he has to repair the watering can and the pull-out spout. The spout deteriorates due to constant maximum pressure, lack of or improper care, and the composition of the water being passed through.
On the retractable bend, holes and plastic inserts become clogged, and the threads become deformed. Self-replacement is not difficult - you need to know how to unscrew the tap on the bending line and screw in a new spare part. But this spare part is not easy to find, especially not from Chinese manufacturers.
Interesting! Branded devices provide a 5-year warranty, so there are not many materials to replace.
Therefore, before purchasing, find out about the availability of repair shops and the cost.
Reinstalling hoses is easier because it is possible to select many “non-native” and suitable ones.
Problems with the aerator
An aerator is a small element that is screwed onto the spout. It serves to saturate the water with air. This makes the flow softer, and there is also a saving of useful resources. The working body includes meshes with cells of different diameters. If the water is of insufficient quality, then over time solid inclusions accumulate on them or sediment forms. This leads to a decrease in pressure. Leakage may also occur at the place where the aerator is fixed. To solve the problem you need:
- unscrew the aerator . In most cases, this can be done simply by hand. If that doesn't work, you'll have to use the key. It is important not to lose the gasket! Usually you can see particles of rust, etc. on the inside;
- wash off all solid suspension with a reverse flow of water . To remove it, just place the aerator under the stream. Small impurities can penetrate into the cells. To remove them, you will have to use a needle or toothpick;
- remove limescale. If available, you can use folk remedies. Limescale can be easily removed with a solution of vinegar or citric acid. It is enough to lower the aerator into a small container with such liquid and leave it for several hours. After this, rinse well.
Important! The aerator is an inexpensive element that can be purchased separately from the mixer. This eliminates the need to clean it.
Other renovations
Troubleshooting minor problems
In addition to actually repairing the locking mechanism, other measures must be taken from time to time to restore the functionality of the faucet.
For example, in case of problems with the aerator, we proceed as follows:
- Using an adjustable wrench with plastic pads, carefully grab the aerator and unscrew it from the spout.
- We take out the installed mesh and carefully rinse it, removing all contaminants.
- At the same time, we clean the mixer spout with a flexible brush, trying to remove as much deposits as possible from the inner walls.
- We screw the aerator onto the spout, making sure that the thread is not skewed.
If a leak appears in the place where the swivel spout is fixed, proceed as follows:
- Carefully tighten the union nut using an adjustable wrench. We remove the “gander”.
- Remove the rubber gasket from the socket.
- We install a new one in its place. The thickness and diameter of both elements must match.
- We return the spout to its place, securing it with a union nut.
Coating restoration
Some problems do not affect the operation of the mixer, but significantly worsen its appearance. In most cases, these include scratches, chipped coating, abrasions, etc. And although complete restoration of chrome or nickel plating by galvanic method costs a lot, throwing away the faucet and getting a new one is not at all necessary.
It is possible to restore an attractive appearance to a product using the painting method:
- We dismantle the mixer by completely disassembling it and removing all non-metallic parts.
- We grind the iron surfaces, removing scratches, and then thoroughly degrease them.
- Apply metallic paint to the grease-free mixer. For application, you can use either an aerosol can (cheap, but not very well), or an airbrush (quite expensive and complicated, but the coating is more even).
- While the paint has dried, we treat the surfaces with a special protective polish for metallics. You can purchase it at any automotive chemical store.
Note! If the scratches are minor, then this polishing can be used without painting: it perfectly restores the factory chrome/nickel plating.
- Once the polishing is complete, we assemble the faucet and install it in place.
Single lever tap repair
Replacing the cartridge. Most modern models of single-lever faucets, regardless of their design, are equipped with a cartridge with ceramic plates. This system is considered more reliable and durable. Its repair may be required if the lever moves too tightly or too easily, or if water flows through the top of the faucet. For such repairs it is necessary:
- remove the handle. First, the decorative plug indicating hot and cold water is removed. Under it there is a fixing hardware. It can be for a screwdriver (straight or curved) or a hexagon. If the screw does not come off, you will have to additionally use WD-40. After some time, the hardware will easily unscrew. After this you can remove the handle. This should be done carefully so as not to damage the coating or deform the metal;
- remove the decorative cap. It is made of thin metal and can be removed simply by hand. If this cannot be done, you need to use a gas wrench;
- Unscrew the clamping nut. To do this, use a regular open-end or adjustable wrench. After removing the top, access to the cartridge is freed. After this it can be easily replaced;
- install a new cartridge. The cavity inside the housing should be thoroughly cleaned. It should be free of rust, limescale and other inclusions. A new one is installed in place of the old cartridge, taking into account the location of the centering protrusions. When purchasing it, it is important to take into account the features of the model: height, diameter, location of channels, etc.;
- Reassemble in reverse order.
Replacing the sealing rings of the swivel spout. This procedure will be required if a leak appears in this area. In most cases, this requires completely removing the faucet from the sink. After dismantling it, the procedure is as follows:
- Unscrew the ring-shaped lock nut. It is located below;
- remove the fluoroplastic ring;
- remove the spout swivel block;
- replace worn seal. Some craftsmen recommend simultaneously replacing fluoroplastic rings, which are also subject to wear;
- carry out assembly.
Repairing a single-lever ball-type mixer
There are four reasons why a faucet needs to be repaired:
- Cracks, chips caused by mechanical damage to the body;
- Blockage in the cartridge between the seats and the ball;
- Gasket wear;
- The aerator is clogged or rusty.
What to do if a defect appears on the case? You can try to repair it by cold welding - sealant (putty). But this is still a temporary measure, and soon you will still have to change the mixer.
If the problem is low water pressure, then most likely the cause is a clogged aerator. Then you need to take it out, clean the mesh, for example, with a toothbrush, and then install it back.
Let's look at the problems more seriously.
When the faucet leaks without visible damage, the problem is most likely a violation of the integrity of the gasket or a broken cartridge. In this case, complete disassembly of the kitchen single-lever mixer is required.
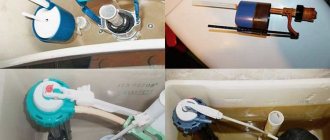
How to disassemble the tap? First, turn off the water and let the remaining water flow out of the tap. Then study the structure of the single-lever kitchen faucet in the photo.
Now let's start the repair step by step:
- The screw on the main body is unscrewed. It is usually hidden behind a decorative plug that needs to be removed with a screwdriver, as shown in the photo.
Advice! You can disassemble and repair the device even if you don’t have a hex wrench at hand. To do this, carefully tap the fastening nut with a hammer on a screwdriver.
- The lever and cap are removed, and now we need to remove the cartridge and inspect the entire device for defects. To do this, unscrew the cam washer using an adjustable wrench.
- The disassembled faucet is inspected for defects: the gasket, the surface of the ball and the springs supporting the rubber seals in the holes are inspected. Loose springs and worn taps are replaced if necessary. At this stage, you need to clean all parts from accumulated water deposits.
- Most often, a leak from a faucet occurs due to a blockage formed between the ball and the valve seats in the cartridge. In this case, you just need to change it. The whole difficulty of this task lies in the correct choice of cartridge, and repairing the faucet with your own hands is not at all difficult.
Advice! When going to a plumbing store to buy a new cartridge, take the old one with you so as not to make a mistake with the size, because the cartridges are not standardized - they are produced in a variety of diameters and materials.
We install the new cartridge so that its holes align with the holes inside the mixer body. Then screw the washer back on (first with your hands, then tightly, but not too tightly, with a wrench).
- We check the quality of our work by running water. If it does not leak, then we proceed to install the cap, and then the lever - we tighten the screw in it and fasten the plug.
How to change the gasket in the mixer? This is also quite easy. You need to remove the old O-rings and replace them with new ones, to which we first apply a little plumbing grease.
Advice! For all rubbing parts of the product, non-toxic silicone-based lubricant should be used. This will double the service life of structural elements.
Replacing the crane axle box
The faucet is a regulating element in two-valve mixers. Sometimes during repairs it is enough to install individual new parts, in other cases it is necessary to replace the entire assembly. This is determined during the repair. First, you need to unscrew or remove the protective polymer cap, and also remove the hardware and flywheel (“lamb”). This frees up the crane axlebox for inspection. Repair features depend on the type of device.
Axle box with rubber latch . Older type of mechanism. It is characterized by several malfunctions:
- Gasket wear. In this case, water will constantly drip from the tap. Wear occurs due to natural causes or due to the presence of solid inclusions in the flow. To solve the problem, just replace the gasket. To do this, you need to remove the locking screw, install a new element and screw the hardware back.
Important! This problem is also typical for axle box valves with a ceramic valve.
- Worn rubber sealing ring. Leads to leaks at the junction of the valve axle box and the housing under strong pressure. To eliminate the problem, the ring must be replaced.
- Wear of internal seals. Leaks appear at the flywheel. Jamming is also observed during its operation. In this case, it is advisable to completely replace the crane axle box. Repairing the element is impossible or impractical.
Axlebox with ceramic valve . Special repair kits are offered for sale for repairs. When choosing them, you should take into account the existing model. The most likely malfunctions include:
- deformation or wear of the silicone gasket. Leads to constant flow of water into the spout. To solve the problem, it is enough to install a new gasket;
- production of fluoroplastic plate. This defect is easy to check. To do this, press the axlebox rod from above. If the leakage stops, the fluoroplastic ring should be urgently replaced;
- wear of adjacent ceramic plates. Occurs due to constant abrasive effects of heavily polluted water. In this case, the tap operates unevenly; it does not always hold the flow. In case of such malfunctions, you should find a repair kit with ceramic plates or completely replace the axlebox;
- reducing the thickness of the O-rings on the rod. When worn, water leaks into the flywheel area. To eliminate this, new elements must be installed.
Repair of a two-valve mixer
Two-valve devices are inexpensive, have a simple design, but break down quickly. Repairing a faucet in a kitchen sink if it is leaking is as follows:
- We pry up the cap with a thin screwdriver or knife and remove this element.
- Unscrew the screw that is used to secure the flywheel. Let's remove this part.
- Under the flywheel we find a crane axle box. We unscrew this element counterclockwise and inspect it.
- Water leakage in two-valve mixers with worm axle boxes occurs through damage to the gasket. You can buy such a part in a store or cut it yourself from a piece of rubber.
- The faulty crane axle box is replaced completely. The parts are installed in the reverse order.
If the crane axlebox fails, it must be replaced. When choosing this part, it is important to pay attention to the diameter and size of the mounting thread, the dimensions of the device and other features. You should take the flywheel to the store (the splines on the old and new parts must match).
Before installing a new crane axlebox, carefully wipe the seat with a soft cloth, remove debris and other unnecessary particles. The part is screwed in manually, then the water is turned on. If there is a leak, the nut is additionally tightened with a wrench. At the final stage, a decorative cap and valve are installed.
Important ! If the faucet is leaking, it is necessary to fix the problem as quickly as possible.
What to do if the case is defective
It happens that all components function normally, but drops of water constantly appear on the mixer body. The cause of this phenomenon may be a small crack. Typically, defects appear due to poor-quality material, mechanical damage, severe overtightening of taps or nuts. You can detect them with a magnifying glass. For sealing, some craftsmen use special compounds, “cold welding”. But such repairs will not give long-lasting results. A new leak may form at any time. To play it safe, it’s better to buy a new faucet.
Basic faults
Before repairing a water faucet, you should take the time to analyze the situation. This way we can understand exactly what actions should be taken, thereby saving a lot of time.
Leakage is the most common problem
The list of breakdowns includes the following items:
| Breaking | Description |
| When the valve is closed, drops of water flow out of the tap | The locking mechanism becomes unusable. To fix the problem, it is necessary to either replace the element responsible for blocking the pipe clearance, or install new sealing gaskets. |
| Water drips at the connection point of the spout, hose or valve | The tightness of the connection is broken. It can be restored either by replacing the gasket or by installing a plumbing tap on the thread. |
| The flywheel turns | The flywheel housing has come off the rod or the rod has failed. In the first case, it is enough to install the part in place, in the second, you will have to replace the locking element. |
| The faucet makes a humming sound when operating | The gasket has worn out and its edges begin to vibrate under water pressure. Usually, to eliminate extraneous sounds, it is enough to replace the gasket. |
| Leak on body or spout | The integrity of the product has been compromised. It can be temporarily sealed using “cold welding”, but it is worth replacing the faucet as soon as possible. |
| Splashes fly from the aerator, water flow is obstructed. | The aerator grille is clogged and requires cleaning. |
In principle, this table describes the main faults. Other situations that may arise during the operation of the crane are derivatives of those already analyzed, and therefore they need to be repaired using a similar algorithm.
But such cracks cannot be repaired
Also, before starting work, you should carefully familiarize yourself with the design features of the model you have installed. As a rule, the assembly drawing of the water tap comes complete with the product itself, so when installing a new mixer, this document should be kept.
Note! If you can’t find a diagram, then you should enter the query “assembly drawing method for indicating a water tap” into a search engine and select your model. Most manufacturers post technical documentation online, so the chance of finding what you need is very high.
Now we will try to figure out what to do in each specific case. And let's start with the most common situation, namely, eliminating the causes of leakage of the shut-off element.
Drawing of a water tap body and a schematic representation of shut-off elements
Causes of faucet leaks
Kitchen faucet leaks can have different types and causes. Among the main types are the following:
- the appearance of water from under the gander . A common problem if there is a two-valve faucet. The reason is the wear of the gaskets, which fail when the water is turned on frequently. To replace it, just unscrew the nut, remove the gooseneck and install a new gasket or cut it out of rubber. When reassembling, do not tighten the nut tightly so as not to damage the base, especially if it is made of silumin;
- valve leaking or inability to completely turn off the water . To solve the problem, the axle box assembly is changed;
- leak under the sink . Often the problem is hidden in the hoses that supply water to the tap or wear of the gasket at the connection points. Repair consists of the usual replacement of a hose or seal;
- poor quality mixer . The problem appears very often, especially if a Chinese faucet is purchased. The service life is only a couple of years, after which it begins to leak;
- improper installation or poor quality of work performed . The leakage problem is caused by improper selection of gaskets or poor connection of parts;
- incorrect use of the mixer . Problems begin when turning the handles at a different angle or increasing the force on the levers.
If the mixer does not work well after a certain period of operation, and there are no obvious reasons, then the problem is hidden in limescale deposits on the parts. To solve the problem, you need to disassemble the device and completely clean it of salts using household chemicals.
The problem of leakage often appears when installing a new faucet, although this should not happen. In this case, there is room for defects and the product must be replaced under warranty. It is strictly forbidden to repair the device, as this will not allow for a replacement.
Design features of the main types of kitchen faucets ↑
Such delights as thermostatic and touchless faucets are good for bathrooms. In the kitchen, more practical models - traditional two-valve and single-lever - are fighting for a place in the sun. The common elements for them are: body, spout (spout), aerator, sealing gaskets. Otherwise they differ significantly.
Design of two-valve taps ↑
Faucets with two valves that are familiar to the eye are designed quite simply. Under the flywheel, which you turn when operating the structure, there is a crane-axlebox - its locking element. Below is the design of such a kitchen faucet in pictures.
Axleboxes in a two-valve mixer (sectional view)
In products where several revolutions of the flywheel are required to supply or shut off water, worm axle boxes are installed. Their work is based on rotational-translational movements. The more you unscrew the valve, the further the axle box gasket will move away from the so-called “saddle”. The consequence of this is the flow of water into the internal cavity of the mixer, and then into its spout (spout).
Worm worm valve axle box for mixer
In models where it is enough to make only half a revolution to supply water, axle boxes with ceramic plates are installed. When you open the tap, the holes in them coincide and water flows into the spout.
Crane axle boxes with ceramic plates
The cost of faucet axle boxes is low, they are always available in plumbing stores, and their replacement is extremely simple.
Design and types of single-lever mixers ↑
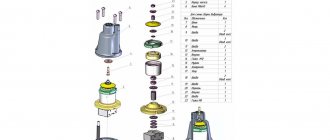
More modern and practical are models of faucets with one handle (lever) that regulates pressure and temperature. Mixing water in them is carried out in a hollow ball with three holes or in a special cartridge.
The mixing element in ball models has three openings, two of which are inlets - designed to supply hot and cold water to this miniature container, and one outlet - for supplying water at a given temperature to the sink.
Ball mixer device
The ball itself is located on two rubber “saddles”. Its displacement relative to them, carried out when the lever moves, allows you to regulate the pressure and temperature of the water being poured out. The ball is secured at the top with a sealing collar and a lock nut.
Schematic structure of a ball model of a kitchen faucet
The operating principle of a mixer with a cartridge that replaces a ball is similar. At the same time, their internal structure is fundamentally different. There are still the same three functional holes, but inside the cartridge there is not a cavity, but special metal-ceramic disks. Due to their displacement relative to each other and the degree of overlap of the supply holes, when turning the lever, the water supply is adjusted.
Replaceable ceramic cartridges
Do-it-yourself valve repair
Valve taps can be called classics of water supply. And, although they are gradually being replaced by new designs, there are still plenty of them. Their internal structure has not changed over the decades. Only the design has changed - it has become more diverse and sophisticated. Today you can find both the most ordinary models and very exotic ones.
Structure of valve taps
Water taps of this type are still used today, as they are simple and reliable, serving not for years, but for decades. If all the “filling” is of proper quality, all that can fail during this time is the gaskets. Replacing them is the main way to repair a valve.
Replacing the rubber gasket
If the faucet in the kitchen or bathroom continues to drip when the valve is completely closed, most likely the reason is that the gasket on the valve has lost its elasticity (see photo in the next paragraph). It no longer presses tightly against the saddle, which is why water continues to flow and sometimes the faucet not only drips, but even flows. To repair the faucet in this case, replace the gasket. To do this, you will need a wrench, or better yet, an adjustable wrench and a set of spacers.
Before fixing a dripping faucet, turn off the water supply (you can completely, you can only in this thread, if possible). Next, it’s a good idea to make sure that the water is turned off. The water doesn't flow - we're starting repairs. You will need a wrench or wrench. They will need to unscrew the head housing (the top part of the housing).
It is better to work with an adjustable wrench. To avoid damaging the surface during the operation, wrap it with a soft cloth and then apply the key. Unscrew the head and remove the valve. Now you can replace the gasket or install a new valve. You pry off the old one with something sharp - you can use a screwdriver with a flat blade, you can use an awl, etc.
When choosing a gasket, please note that its edges should be beveled at approximately 45°, otherwise the water supply will make noise during operation. If you don’t have one like this in your arsenal, you can trim the edge with something sharp - a knife or scissors.
Replacing the gasket in a faucet in pictures
If there is no suitable gasket, it can be cut from a sheet of dense rubber (porous is not suitable). The thickness of the rubber sheet or gasket is 3.5 mm, the inner diameter is slightly less than the diameter of the rod, the outer one should not protrude. Don't forget about the 45° beveled edges.
Having installed the gasket, put the valve in place and tighten the head. New models do not require winding on the thread. Moreover, winding is contraindicated - it can cause a crack in the body. If an old tap from the times of the USSR is being repaired, tow is placed on the threads, lubricated with packaging paste, and then tightened. After this, you can turn on the water little by little.
Sometimes the opposite story happens with this gasket on the valve - water does not flow or barely oozes out. In this case, the gasket came off the stem and blocked the flow of water. First, you can try opening/closing the tap a couple of times, and if that doesn’t help, you need to repeat the operation described above, that is, repair the tap by replacing the gasket. Just remember to remove the old one stuck to the saddle.
Water seeps out from under the stem
If water drips from under the valve, the seals are most likely worn out. There are two ways to repair a faucet with a leaking stem. To begin with, you can try to tighten the head housing more strongly. They do this again with an adjustable wrench. It is not advisable to use pliers, as they leave marks. Tighten the head as much as possible (just don't overdo it).
Valve valve structure
If the threads are tightened as much as possible and water continues to ooze out, the gaskets on the oil seal must be replaced. To do this, first tighten the tap to the limit, then remove the tap head again, pry it with something sharp and remove both rubber rings, replacing them with new ones.
The water does not shut off
If the gasket is changed, but the water does not shut off, when the tap is rotated, the thread breaks, the rod needs to be changed - the thread on it has worn off. There are two options here - replace the stem itself or the entire valve head.
There may be a hole in the saddle
If the threads are not worn, the gasket is new, but the valve is leaking, inspect the seat. There may be a hole in it. It forms gradually - it is washed away by water supplied at high pressure. If the gasket is not pressed tightly in some place, a sink will form in this place. Sometimes water completely undermines the entire circumference, forming sharp edges that quickly damage the gasket. The hole and sharp edge must be removed. Take a regular screwdriver and run it along the edge to dull the sharp edge. The same operation can be done using a natfil or a piece of fine-grain sandpaper. The main thing is to achieve a smooth (as much as possible) and non-sharp edge.