08.03.2020
Grohe wall-hung sanitary ware enjoys well-deserved popularity among users due to its first-class product quality, reliability and functionality. But not everyone knows how to adjust the flush of an installation when the drainage system of the structure is isolated behind a wall and hidden behind a protective screen. In the case of a classic toilet, you just need to open the tank, remove the valve and adjust the water flow rate. When working with overhead equipment, things are a little different, but not much more complicated.
DIY toilet installation
A metal structure with special devices designed to secure plumbing equipment is called installation . It is used for installing bidets, sinks, and toilets. Plumbing fixtures attached to the wall help save space and create a feeling of lightness. In addition, installation of the installation helps to hide all communications and pipes that are located in the wall, allowing you to achieve an attractive appearance of the room and hygiene.
Types of toilet installations
Today, there are 2 types of installations that have their own design features.
- Block structures are mounted only on main walls and consist of a plastic tank with reinforcement. A set of fastenings is additionally included with the toilet. This type of installation for toilets is installed in a pre-prepared niche and is completely hidden in the wall. The main advantage of this design is accessibility, but if there are no solid walls in the bathroom, then installation is impossible.
Block design
- Frame installations are a reliable steel frame with studs to which the toilet flush system, tank or other equipment is attached. According to the standard, a distance of 18 or 23 cm should be maintained between the studs.
Frame installation
Frame installation diagram
This type of installation can be mounted in different ways:
- on the main wall at 4 points;
- on the wall and floor, at 2 points, which are located in each of the surfaces.
The installation for toilets of this type can have an angular shape, which allows it to be mounted at the joints of walls or partitions. This design is more expensive than the block version and gives a wide scope for design ideas.
Corner installation
Corner installation drawing
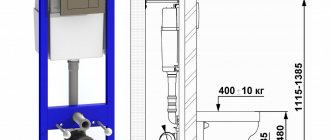
The installation used for a wall-hung toilet has standard dimensions:
- The width of the bowl is 300 – 400 mm;
- Height is 300 – 400 mm;
- The length of the bowl from the front edge to the wall is 500 - 600 mm.
Block structures are located in the wall at a depth of 100 - 150 mm, their width does not exceed 600 mm, and their height does not exceed 1000 mm.
As for frame installations, their depth is 1050 - 300 mm, width does not exceed 600 mm, and height - 1400 mm. When installed on a sloping wall surface or in an attic, the height can be reduced to 800 mm.
The convenience and quality of operation of plumbing equipment will depend on the correct choice of the appropriate installation, fittings and barrel.
Do not forget that the structure is located in the wall, which is then sealed. To replace the installation, it will be necessary to break down the wall, and this entails unnecessary material costs and inconvenience.
We recommend choosing a washing machine for your cottage: without running water and with a water tank
Types of installation systems
There are two types of installation systems: frame and block.
Frame installations are more complex and are used for installing hanging plumbing equipment on load-bearing and plasterboard walls or partitions. This is a metal structure that is equipped with everything necessary for attaching plumbing fixtures and itself.
The systems are placed on the floor or on a solid foundation.
It can also be installed in a corner; corner brackets are used for this. Frame systems are adjustable in height up to 20 centimeters, which makes it possible to install the toilet to the required height.
They are installed on unplastered walls. Block installation systems are simple. Such systems are fastened only to main walls with anchor bolts , where the entire load falls on them.
Advantages and disadvantages of toilets and installations. What's better?
Wall-hung toilets and installations have their advantages and disadvantages; let’s look at them in more detail.
The advantages include:
- Compact sizes . The product takes up very little space and allows you to visually expand the space;
- There is no noise from draining water due to the fact that the barrel is covered with a wall;
- Convenient care . It will be much easier for the housewife to keep the bathroom clean, so cleaning will take less time and will not cause unnecessary hassle;
- Water savings provided by a separate drainage system. If necessary, you can use a strong or weak flow;
- Reliability and durability of the design . The installation can withstand heavy loads;
- Simplicity of bathroom design . A wall-hung toilet does not interfere with the installation of a heated floor system or laying tiles.
As for the disadvantages of installing the installation, here we can note:
- Lack of free access to pipes and various modifications, since they are all hidden in the wall;
- To eliminate tank breakdowns, additional labor and financial costs will be required. Although malfunctions in the operation of the structure are quite rare;
- Installing a toilet installation may require renovation of the entire bathroom ;
- Classic toilets can be located near any walls, and block installations require high-quality support for installation , that is, a solid wall.
Common types of breakdowns and their possible causes
A master guarantees high-quality plumbing repairs. However, you can carry out repair work just as well on your own if you know how to fix a toilet installation. You should always start by identifying the cause of the malfunction, after which it is eliminated. To make it easier to navigate the problems that arise, we localize them according to individual installation nodes:
- tank;
- frame;
- toilet.
Tank
What causes the owners the most trouble is the tank, or rather its fittings. Although rare, the tank body also creates problems, and rather big ones. Let's look at the causes of malfunctions in more detail.
The tank body is leaking. The plastic body of the tank may leak water through a crack caused by:
- frame distortion - during installation, mistakes were made in fastening the frame due to carelessness, as a result, due to uneven stress, the plastic may crack over time;
- A strong accidental blow to the body after some time also leads to the formation of a crack.
The installation does not hold water. The constant flow of water into the toilet does not lead to catastrophic consequences, but it spoils the appearance of the bowl: red streaks appear and the water bill increases. This is possible for several reasons:
- low quality of plastic mechanisms of the drain unit - they become bent over time and do not ensure a tight fit of the valve to the drain hole;
- the membrane valve is coated with plaque (hard water) and does not hold water well, resulting in a constant overflow of water;
- the valve or membrane has naturally worn out during operation. The water either does not hold or overflows;
- a foreign object has fallen under the valve: hair, construction debris, etc.
Water flows into the tank continuously. This is usually one of three reasons:
- a crack has appeared in the float and, having filled with water, it does not rise;
- the float lever is deformed - the float cannot rise up;
- the diaphragm valve is damaged.
Water either does not enter the tank completely or flows very slowly. Coarse and fine filters clogged with dirt do not allow water to pass through.
Continuous, strong flow of water into the toilet. In this case, the problem is in the exhaust valve: it has become worn out or deformed over time.
The drain button does not work. Quite rarely, but installation owners are faced with the fact that the drain button does not work. There are several reasons:
- the latch broke, as a result of which the pusher changed position and went deep into the tank;
- the rocker arm broke;
- The rocker arm has come out of the hook of the valve lifting rod.
The given malfunctions and the reasons that caused them are inherent in all installation models, regardless of whether it is a popular brand (Sanit, Tece) or an unknown brand.
Frame
The installation frame is designed to weigh about 400 kg. This margin of safety is explained by the fact that the frame bears the load not only of the person sitting on the toilet, but also of the components attached to it. This strength is ensured by powerful metal profiles. However, not all manufacturers meet this criterion.
On sale you can find models with a load rating of 600-800 kg, as well as 100-200 kg. The lightweight frame is designed for children. From an adult (70-80 kg + toilet + water tank) it can bend or crack with all the ensuing consequences.
Toilet
Problems with the toilet itself can be twofold:
- The toilet installation leaks after flushing: water appears on the floor in the toilet. There is only one reason in such cases: the sealing of the earthenware (porcelain) pipes with plastic fittings has been broken, where water leaks;
- Chips and cracks appeared on the toilet bowl - the problem arose due to careless handling of heavy objects. They fell on the toilet and damaged it.
What is a classic toilet?
A classic toilet is a structure with a flush barrel behind it, which is attached to the floor. Thanks to its traditional shape, this model can be installed absolutely anywhere in the bathroom. The height of the standard product will be approximately 50 cm higher than the hanging one.
The design of modern toilets, as well as colors, can be varied. But regardless of any stylistic solution, the cistern will always be monolithic with the toilet and located outside.
general information
Grohe toilet installations are lightweight. This, in turn, greatly facilitates their installation. In addition, the products are reliable and durable. It is also worth noting that the installation for the Grohe toilet is also suitable for plumbing items from other manufacturers. The products are ideal for installation not only in home bathrooms, but also in public buildings. The products are characterized by high wear resistance, practicality and durability. The Grohe installation can be installed anywhere in the bathroom. This is of particular importance in the interior design process. The installation for Grohe meets all existing quality standards.
How do installations differ from classic toilets?
The main technical characteristics of standard toilets and installations were described above; now let’s figure out how these models differ.
- The installation can be installed anywhere on a monolithic wall. The design is very stable and can withstand impressive loads, so there is no need to doubt its reliability;
- The installation does an excellent job of saving space and facilitating the cleaning process. The leg that a classic toilet has is absent in this case, which helps to avoid the accumulation of dirt and bacteria;
- The structure is mounted on a rigid steel frame with rods that can be extended. This helps to select the most suitable height of the installation system for the toilet;
- Tanks for installation are installed in niches made of styrofoam, which prevents condensation. In the front part of the tank there is a hole intended for a drain button through a special panel;
- The installation is connected to the water supply system through holes located in the side of the tank. As a rule, manufacturing companies make several holes that correspond to different pipe sizes;
- Inside the installation tank there is a special valve that shuts off the water, as well as protection against overwatering and a drain control system. These qualities allow you to regulate or stop the water supply if necessary.
How the installation flush button works and works
Modern installations can be equipped with mechanical and pneumatic flush control systems.
In the first case, the force from the key is transmitted mechanically to the upper rods of the reinforcement. When you press the button, the rocker arm block, which is located in the tank, is activated, the membrane rises and the water is drained.
In the second case, instead of a rocker block, a hydraulic lift with pneumatic hoses is used. The force from the flush button is transmitted to it pneumatically through silicone hoses. The drainage mechanism, onto which a special set of nozzles is placed, is activated by water pressure.
In most installations, dual-flush keys are installed. When you press the left one, both rocker arms are raised or two tubes are activated, and the maximum volume of water is supplied to the toilet. When using the right one, you save money and benefit from reduced drainage.
How to do the installation yourself?
If you decide to install the installation yourself, you must remember that the quality of the work performed and the serviceability of the entire structure will depend on the accuracy and correct sequence of all actions. Tools you will need:
- Building level;
- Marker;
- Hammer;
- Roulette;
- Drill for concrete with dimensions that correspond to the parameters of the fastenings;
- Open end wrenches.
Reviews about the installation "Groe"
Manufacturers of this type of product note that their products have important advantages, one of which is hygiene. Now there is no need to wash the space between the wall and the toilet elbow, where dirt mainly accumulates. The installation creates a beautiful look in the bathroom. All models, due to their compactness, allow you to increase the usable area of the bathroom. Users like the fact that when installing such systems, water consumption becomes less. Economical consumption is made possible due to the presence of a separate drain system in the design, which allows you to regulate the pressure.
The assembly itself is quite simple and convenient. One of the advantages that distinguishes this type of installation is its silent operation. The fact is that the joints and the wall obscure the cistern, so the sound of water cannot be heard. Despite its many advantages, negative reviews about the Grohe Solido installation are associated with its high cost. This also applies to other models of this company. Although it should be noted that all of them are distinguished by safety and reliability. During operation over a long period, the systems do not require maintenance.
Different models of installation systems are equipped with additional parts that significantly improve the quality of assembly and further operation. As users say, everything in these products is thought out to the smallest detail. This durable toilet mount allows you to disguise communications that have an unaesthetic appearance and spoil the interior of the bathroom. Bathroom design benefits from this. Everyone can choose the most optimal version of the installation system - and all thanks to a wide variety of models. They can be placed in any area of the bathroom, thereby allowing you to plan the interior in a variety of ways.
Step-by-step instructions for installing a wall-hung toilet
- Taking measurements and marking
From the very beginning, the central axis of the device is revealed, which is indicated by a line. Next, the distance from the wall to the installation structure is noted, which should not be less than 13.5 mm. After this, it is worth finding out at what height the drain tank will be located. Usually its height does not exceed 1 m. Places are marked on the surfaces of the floor and walls where holes will subsequently be made for installing fasteners.
Measurements and marking of fastening points We recommend Toilet seat: varieties, materials, selection tips
- Preparing the fastening system
Using a hammer drill, you need to drill holes that completely coincide with the marks made earlier. Dowels should be inserted into the holes, followed by mounting anchors.
- Installation installation
The installation structure is mounted in a pre-prepared place. It is secured using special nuts and screws. The housing is set simultaneously at both vertical and horizontal levels, and then this position is fixed using plugs.
- Connecting pipes
To connect the toilet to the water supply system, you must use plastic clamps that secure the pipes from the sewer and from the tank. After carrying out this work, you should check how well it was carried out.
- Installing a toilet bowl
When performing installation, carefully adjust the pipes that connect the toilet and the installation. There are 2 pipes in total: one for clean water, and the second for sewage. Such connecting parts are original, so they are always included with the product.
Before installation, a special gasket is installed for shock absorption, and couplings made from PVC are put on the studs. After this, the toilet is installed on the studs and fixed.
For a more accurate idea of the necessary work, you can watch a video of the installation.
Possible problems
The main problem when installing Grohe installations is the level of sewage system that the builders have overestimated. This is especially true for new buildings; instead of 23 cm from the floor covering to the axis of the sewer pipe, which is included in the kit of the frame structure manufacturer, here it turns out to be 27 - 30 cm.
In this case, an additional fitting is used - a 45° tee:
- it is mounted in a horizontal line of the drainage system;
- By rotating clockwise or in the opposite direction, the height of the hole for connecting the standard installation pipe can be adjusted in a wide range.
However, it must be taken into account that when rotating from the wall, the distance between the enclosing structure and the toilet increases. That is, the installation will move away from the wall further than the design value.
The problem of short studs from the standard Grohe kit for fixing the frame to the wall with stops is solved by extending them with threaded hex couplings, as in the bottom photo.
Thus, Grohe produces hanging plumbing fastening systems of extremely simple design. This makes it easier for the home craftsman to install them independently. A minimum amount of tools is required; basic qualifications in performing home repairs are sufficient.
Follow this installation guide steps by steps or play the video to watch the installation.
Cost and equipment of basic installation models
- The Geberit wall-hung toilet includes an installation, a set of fasteners, a flush button, a toilet bowl, a lid, and a soundproofing gasket. The cost of such a product will be slightly higher than 15,000 rubles.
- The Normus toilet is sold complete with a mounting frame, toilet bowl, seat lid, and flush panel. The price is slightly higher than 8,000 rubles.
- The Parva toilet comes complete with installation, seat, flush button and bowl, and costs just under 9,000 rubles.
Geberit
Normus
Parva
What are the benefits?
This specially designed wall-hung installation system saves bathroom space. It allows you to hide:
- installation elements;
- pipe structures;
- toilet cistern.
There are many options for colors and shapes of drain buttons, so you can choose it to suit any design. The Grohe Rapid installation, reviews of which are mostly positive, can significantly reduce water consumption when draining.
Installation for Grohe toilet - advantages and disadvantages
Grohe is a German brand of plumbing equipment that is in high demand among our compatriots.
The installation system for the Grohe Rapid toilet is characterized by reliability and ease of installation, which is why they are increasingly used in the formation of modern interiors. Most people dream of seeing their owl’s home not only functional and comfortable, but also aesthetically attractive. The latest design trends are aimed at creating free space where everything is compact and comfortable. The Grohe installation fully meets these requirements and also makes cleaning the room easier.
The versatility of the installation for Grohe toilets gives users complete freedom in designing and decorating the interior of the bathroom. Everything that can limit your activities is imagination.
The Grohe installation has many positive characteristics, including almost silent water drainage . This advantage is not available for classic toilet models. Flush panels in Groy's installation can have one or two buttons. By choosing the latter option, you can save water by using minimal flushing when necessary.
The only drawback of the design can be considered its high cost, which varies depending on the model from 2,500 to 10,000 rubles.
We recommend a small toilet sink: features, materials of manufacture and installation methods
Flush buttons
In installation systems, this is not just a key, but an important part of the system. In the event of an emergency, all work is carried out through this panel, and the wall itself remains intact. In the manufacture of flush panels, Grohe uses the new Grohe EcoJoy technology, which makes it possible to significantly save resources - the flush can be stopped without allowing the full dose of water to spill out.
Another innovation is Grohe Whisper technology, also used by the company in the manufacture of concealed-mounted tanks, which ensures very quiet operation of plumbing fixtures. This is achieved by decoupling the support pipes, which prevents vibration from being transmitted to the structural elements of the building.
What are the benefits of Grohe installation systems:
- System modules are installed very quickly. Various settings and adjustments allow you to place the structure exactly the way you want.
- They do not clutter the room, so the space visually increases.
- Installation systems allow designers to give free rein to their imagination - with their help, you can completely change the configuration of the bathroom.
- Thanks to the introduction of new technologies, they make little noise and save water.
The flush is as silent as possible
Installation features of the Grohe installation
Installation of the Grohe installation is carried out quickly, since the number of fasteners is minimal. When carrying out work, some nuances should be taken into account:
- The installation is completed 10 days after finishing work;
- Installation of pipes is carried out after measurements are taken. Their fitting must be done very carefully, since these elements are not sold separately;
- Installation of couplings and a special shock-absorbing gasket is required. Only after this can the toilet bowl be installed;
- The drain button is mounted exactly according to the included instructions;
- If all the work was carried out correctly, there will be no leaks, and the drain button will be easy to press.
Installation progress
The couplings should be put on the studs, then a shock-absorbing pad should be installed. After this, the bowl and pipes are fastened. Fixation must be done by tightening the nuts one by one until the toilet is in place. After installation, a control drain is performed. If there are no leaks, proceed to install the button. Before doing this, you should carefully read the recommendations in the instructions. The tappet hoses are cut exactly to the size shown on the drawing. It is best to place the drain button along the seam of the tile or in the center. If the installation is done properly, the system elements should not leak. When installed correctly, the drain button should move smoothly and be easy to press. Deflections of the bowl under the influence of load on it are not allowed. Due to the fact that the installation of the installation system is carried out before finishing, before installation it is necessary to close all openings in the pipes and drain tank with plugs to prevent debris from entering.
Gerebit installation - advantages and disadvantages
Gerebit is a product that is manufactured in Switzerland . The brand has long been known for its high quality around the world.
Gerebit installation for a toilet allows you to shape the space of the bathroom at your discretion, while saving space is obvious. Ease of installation and operation is another advantage of the convenient design.
The Gerebit installation can reduce water consumption due to the technological design of the drain panel with two buttons. The water drains almost silently, which brings owners a feeling of comfort and coziness. The Gerebit installation for the toilet provides a single connection between the pipe and the tank, which protects the entire system from leaks.
Another important positive property of the Gerebit installation is the reliable design of the frame, which is made of steel coated with an anti-corrosion compound. The cost of the design can be considered the only drawback, since it amounts to 15,200 rubles.
Device overview and problems
Before you begin repairing the toilet installation, familiarize yourself with the device and operating principle. A frame made of rectangular steel profiles serves as the basis for a wall bowl, drain and sewer pipes, a plastic tank with fittings, and a flush control system.
Frame installation Cersanit.
Composition of the Rapid SL Grohe installation
Filler (inlet, filling) and drain (bottom) valves are fixed inside the container, serviced through a technical window closed by a mounting box connected to the control panel brought out. Water drainage is initiated by a mechanical or pneumatic button located on the panel.
Here are possible installation malfunctions based on functional characteristics:
- Problems with the frame: distortions and movements occur due to improper installation and assembly of the frame; use of cheap profiles with low load-bearing capacity.
- Leaks at the connections of the inlet and outlet fittings of the toilet. They appear due to installation errors, frame deformation, aging, and seal defects.
- Cracks, chips of the bowl are the consequences of “crooked” assembly, accidental impacts during operation. At home, it will not be possible to reliably glue a broken one together, not to mention the aesthetics.
- Breakage of the lid microlift mechanism. When securing the seat, carefully adjust the even fit to the bowl, then tighten the nuts. A typical failure is a broken spring. The difficulty lies in the exact selection of an analogue; a mistake can lead to a sharply falling or “freezing” lid.
- Failures of cistern cistern components are the most common cases.
Installation features Gerebit installation
Installation of the installation for the Gerebit wall-hung toilet is carried out according to the principle described above. The manufacturer produces universal models suitable for installation almost anywhere in the room, including under the window.
Another nuance can be considered the existence of Delta models, which are mounted not only on load-bearing walls, but also on less durable surfaces. This Giberit installation has a reinforced lower support, so its reliability and stability will be at the highest level.
Having understood the types of designs, you can decide which installation to choose for your own home.
When is the choice of installation justified?
Installing a bidet with installation is the optimal solution in the following situations:
- The wall-hung toilet with installation and bidet are located in close proximity to each other and on the same level.
- An additional wall allows you to hide communication connections and systems behind the external decor without disturbing the overall style. Maintenance windows are provided for access to the equipment.
- A toilet with a bidet installation is fixed in a corner, niche or on a double-sided partition.
- The decor of the bathroom can be significantly damaged by pipes, water supplies, and sewer drains that are left in sight.
A drain tank is attached to the installation