Shower cabins, which occupy a small space in the room and, compared to a bathtub, are much more economical in water consumption, are in great demand and popularity among consumers. To reduce financial costs, many people connect the shower cabin to the water supply and sewer system themselves.
The process is not very complicated, it does not require expensive special plumbing tools, but in order to avoid common mistakes, you should know the basic rules and technology of the work. The task is made easier by the fact that all shower stalls have the same design, consisting of two main parts - a tray and a frame with doors installed on it; expensive modifications are also equipped with side walls with a roof, a stand for placing taps and a shower.
What types of showers are there?
The range of manufactured shower cabins is very wide, despite the variety of their designs and sizes, all products can be divided into several categories. Many high-tech cabins require electricity for lighting, hydromassage, ventilation and other functions.
Shower corners
Open
Open-type shower cabins (corners) are structurally designed in such a way that they can be integrated into the corner of the bathroom. Their standard design is an angular arched tray and a frame with doors in the front, while there is no side overlap - its role is played by the walls of the bathroom.
The doors of the products are made of organic or quartz glass, the frame is made of aluminum and metal profiles with anti-corrosion coating, the tray is made of plastic (acrylic), less often of sanitaryware and enameled metal. The walls of rooms exposed to water are usually lined with ceramic tiles, natural or artificial stone.
There is no roof in such models, so the shower head is installed on the side wall of the bathroom along with the mixer; sometimes a homemade tray is used or it is completely missing (the water flows through a drain in the floor). Open cabins are a budget option compared to other types; they do not have overhead lighting and various water flow control systems (hydromassage, tropical shower), so electricity is not supplied to them.
Pallet shape
Distinctive features of open cabins:
- Shower corners have a rectangular or arched shape (Triton, River) and are placed in a corner of the bathroom or niche.
- Low cost in the range of 6,000 - 15,000 rubles.
- A simple design and connection diagram for the shower cabin, allowing most users to carry out all the assembly and installation work themselves.
- Increased humidity and noise in the room due to the lack of a ceiling.
- Inability to use additional functions of high-tech shower cabins - steam generator, ozonation.
- Rigid connection of the structure to the bathroom (the metal profile is attached to the walls with self-tapping screws), which places high demands on the finishing work - the quality of laying materials and surface geometry.
Shower boxes
Closed
In closed-type models, the pallet, walls and ceiling are an autonomous structure that can be installed in almost any room without compromising the integrity of the decorative coating of the walls (naturally, with the exception of water supply and sewerage). Such cabins are called shower boxes; they are made of the same materials as the open type; the brands Niagara, Aqualux, and River are in great demand among buyers.
A prefabricated frame made of metal profiles with glass covering the walls on both sides is installed on an acrylic or steel pallet; a roof with lighting and ventilation is placed on top.
Shower boxes have the following features:
- Their cost, depending on the number of additional functions, starts from 15,000 rubles. and reaches 30,000 rubles.
- They are isolated from the microclimate in the room and do not change its parameters - temperature, humidity. Therefore, they can be installed in any room other than the bathroom with appropriate water supply and drainage.
- They have good sound insulation, which expands the scope of their application in premises for various purposes.
Shapes of bathtubs in shower boxes
Have a number of the following functionality:
- Hydromassage. There are horizontal types (in an acrylic bathtub) and vertical ones with adjustment of the water flow by force and angle of supply, while the nozzles are screwed into the side walls of the box.
- Turkish bath. The steam generator creates one hundred percent humidity with hot steam, which is distributed throughout the entire area of the cabin by a fan.
- Tropical shower. The specially shaped nozzle produces very thin streams, reminiscent of rainfall in the tropics.
- Cascade shower. A powerful stream of water falls on a person lying on top.
- Aromatherapy. Used in systems with steam generation, steam, passing through a container with an aromatic liquid, fills the box chamber with a pleasant, relaxing smell.
- Chromotherapy. It has a beneficial effect on human health and the nervous system through the use of ultraviolet rays and light effects together with water jets.
- Ozone therapy. Exposure of the skin to active oxygen molecules.
- Voice control. High-tech shower boxes provide voice control of water flows and various functions - it is possible to adjust water temperature parameters or turn jet massage on and off.
- Telephony. Many boxes have built-in radios, through which they can listen to the radio, talk on the phone using a speakerphone, and are equipped with control panels.
- Internal attributes. The presence of lighting, mirrors, seats, shelves, and detergent dispensers increases the convenience of using the boxes.
Modifications with bath
Combined
The combined cabin is a box in which, instead of a base, a deep tray in the form of a Jacuzzi is installed. Structurally, it is designed like a bathtub, on the walls of which a metal frame with doors and side walls is mounted, and a roof is often placed on top. They come in open and closed types and have the following features:
- These are the most expensive modifications of shower boxes, their cost starts from 30,000 rubles.
- They combine all the advantages of cabins and standard Jacuzzis with the largest selection of possibilities for water procedures.
- They occupy the largest area, comparable to the dimensions of jacuzzi and bathtubs.
Preparing water sockets
Types of pallets
Pallets made of steel with an enameled surface are lightweight, durable, and have a long service life. The rather thin walls and bottom of such containers quickly heat up and cool down quickly, which is not acceptable for everyone. It is worth noting the poor sound insulation. When choosing a shower cabin with a steel tray, you need to pay attention to the quality of the enamel layer, since with the smallest cracks and chips the product will quickly lose its appearance.
Acrylic trays with adjustable legs are beautiful, durable and quite durable, but if someone in the family is overweight, you should look for a fiberglass reinforced acrylic tray.
The strongest and most durable are cast iron trays with an enameled surface, which have excellent performance characteristics. The enormous weight of such a pallet ensures the stability of the entire structure.
Earthenware pallets are massive and stable, but quite fragile. It is recommended that pallets of this type be installed extremely carefully on a pre-leveled surface.
For any pallet, you can buy a special rubber mat or a decorative lattice made of durable wood to prevent your feet from freezing and slipping.
The classification of pallets is not limited to materials of manufacture. Their depth also varies, according to which they are divided into:
- flat - no more than 3 cm;
- shallow - from 10 to 20 cm;
- deep - more than 40 cm.
Preparation for connecting the cabin, tools and components
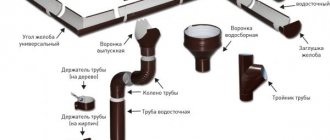
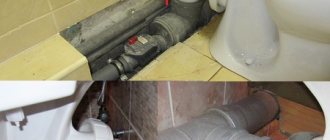
Before connecting any type of cabin, hot and cold water and sewage outlets are installed in the floor and walls near the location point. When using open types of cabins, water sockets are built into one of the side walls to connect a mixer with a shower; a sewer pipe with a cross-section of 50 mm is usually also installed in the walls at a small height from the floor and then connected to the central riser.
The hydrobox has ready-made inputs for connecting to the water supply line; water is transported from the water outlets through flexible plumbing hoses. The shower stall to be placed and the sewer drain must match each other in height - if the tray is low with short legs, they are lengthened or a special podium is laid out of brick, which is then tiled (mosaic, narrow trims).
Main tools and components for connection:
- Siphon included in the cabin package.
- Flexible connections for cold and hot water supply, corner adapters.
- Polymer hoses for internal water distribution when installing hydroboxes.
- Screwdrivers or screwdriver, pliers.
- An adjustable wrench or a set of wrenches.
- Silicone sealant, FUM tape (plumbing thread, anaerobic sealant).
- Construction metal level.
- Hammer drill with a set of drills for ceramic tiles and concrete.
Connection to the sewer
Recommendations from qualified plumbers
Even if the assembly was completed without flaws, it is advisable to check all tightened bolts. After complete installation, the connecting elements will no longer be accessible.
It might be interesting: How to make a socket when repairing a sewer pipe
It is unclear what will happen behind the hidden panels. But it’s better not to let things get to the point of flow. The main thing is to ensure tightness and treat all joints with a sealant. No connection should leak water droplets, even after several years of regular use.
There are times when the drainage area is far from the sewer. To solve this problem, an additional pump installation will be required. The system operates without unnecessary noise, and the dimensions are just right for placement under the base. The bathroom area with an installed stall must be complemented by good ventilation. This point is very important, especially if the system is supplemented with a “steam room”
All pipeline elements must be located at a minimum slope. This guarantees gravity flow of water. Sewer pipes are laid by tilting them towards the riser. Water pipes are inclined towards the box. This is done so that when the water is turned off, droplets do not accumulate.
In some budget booths, the drain is made of silumin alloy. The service life of such a system is up to three years. It’s better not to save on this and spend more money on purchasing a stainless steel drain. In addition, a high-quality normal plastic siphon is always supplied with it.
It is recommended to supplement the water pipes that are laid to the cabin with ball shut-off valves and dirt traps. The water that enters the system is not always clean and sterile. The watering can nozzles or holes will certainly become clogged, which will provoke the emergence of new problems.
Connecting all the parts yourself is not at all difficult. It is enough to study the manufacturer’s recommendations and strictly follow the instructions. The main thing is to triple check everything before starting the system. A lot depends on her work - the integrity of housing, repairs to neighbors, etc.
Currently reading
- Features of installing a shower without a shower cabin
- Subtleties of choosing a mixer for showers and cabins
- Types of flexible hoses for connecting faucets
- We reveal the intricacies of saving water for the family budget
Connection to the sewer system
When connecting the shower stall to the sewer with your own hands, pre-insert a 50 mm pipe outlet into the floor or wall under the tray; the connection operation consists of the following steps:
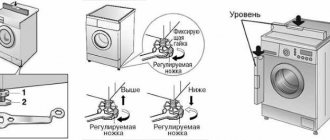
- The pallet is assembled in accordance with the step-by-step instructions, installing its legs in a horizontal plane using an adjustable wrench and a building level.
- Assemble the siphon by screwing it to the pallet.
- Place the tray in place, additionally adjust it in level with the legs and clamp them tightly with nuts to prevent self-unscrewing.
- Turn the pan over, insert the end of the siphon into the outlet of the sewer pipe, put it in place, turn on the water and check the drainage system for leaks.
- A pre-assembled frame with doors is installed on the pallet and secured to the walls on previously screwed guides, the seams near the wall are sealed with sealant.
Connecting the shower box to the water supply
Connection to water supply
Supplying water to the shower stall is not very difficult if the water outlets are installed correctly in the wall. When using shower boxes, hot and cold water is usually supplied to the back panel, which does not completely reach the corner; two water sockets are pre-installed in this free space on the wall. Their height and relative position do not play any role; they will be hidden behind the walls of the shower stall and not visible.
In a private house or country house where water is heated through a water heater (boiler), the pipeline is also hidden in the wall or under a screed so that it does not interfere with the tight fit of the cabin to the cladding surface.
Connecting a closed cabin to the water supply system consists of several operations:
- For ease of connecting hoses, corner adapters with external threads are first screwed into water sockets, using FUM tape for sealing.
- Next, flexible rubber hoses in aluminum braiding or bellows sleeves are screwed to the adapters; the “American” connection has a rubber gasket and does not require additional sealing.
- The hoses are connected to two threaded fittings on the corner panel, marked with red and blue dots. Internal wiring is carried out using flexible water pipes included in the kit; they are fixed with metal clamps.
- The shower box is connected to the electrical network in accordance with the electrical diagram; usually the control unit with electronic circuits is located on the back wall and a plug comes from it, which is plugged into a pre-installed socket.
Important: It is mandatory to use grounding and automation to protect against electric shock from an RCD; the cross-sectional area of the wiring with copper conductors is at least 2.5 mm2.
Before connecting the shower stall to an open-type water supply system, two water sockets with 1/2-inch internal threads are installed on one of the bathroom walls in the right place according to the instructions in the drawings.
How to connect a shower stall
All cabins differ in water supply points and drainage area. Before dealing with plumbing and sewer drainage equipment, you need to buy a shower stall, or at least obtain its technical documentation from the manufacturer.
A number of models require the installation of a drain pipe in a floor screed or the construction of an additional tray (stand).
The sewer pipeline is installed at a slope. Its degree should be three percent. To install booths in the cheaper segment, they must be raised above the floor. This ensures independent drainage of wastewater.
The distance of the mixer to the water outlet affects the reduction in the length of flexible outlets for plumbing installations. The same situation applies to sewerage.
Electrical connection and tests
Before the test and launch stage, it is necessary to connect the booth to the electrical network and install the blocks on the base.
If the base or any parts are made of steel or cast iron, they must be grounded. If an electric razor or hair dryer falls during bathing procedures, unforeseen consequences may occur, so it is important to worry about this in advance.
First, all panels are combined and assembled. At this stage, the screws and self-tapping screws are not fully tightened. Only when the list of actions has been completed correctly can the details be secured. The resulting structure will be smooth, without chips or visible displacements of parts. It is important to use sealant to treat not only the pipe connection areas, but panel and sub-joints
The electric line must have a sufficient number of cross-sectional and grounding conductors. Modernized models, which are complemented by innovative functions, consume a lot of energy. Many lay individual three-core cables to ensure their operation.
The electrical appliances in the boxes are powered through a step-down transformer. Its voltage is 12 W, which minimizes the possibility of receiving an electric shock (more precisely, it is equal to 0).
However, the bathroom is supplemented with other household systems, which pose a real threat. Therefore, to connect the booths, it is necessary to use a wire with grounding and ground the devices directly, and use sockets with a special water-repellent coating.