How to melt iron at home
10.06.2020
Since melting iron at home requires a heat source with a high temperature, the design of a homemade furnace is chosen based on this condition.
It must meet environmental safety requirements and not take up much space in the workshop or garage.
These requirements are fully met by installations in which even refractory metal is melted by electric current.
Making a furnace for melting metal
If there is free space for placement, make a stationary diesel or coal stove from fireclay bricks. A fan will be required to supply air.
The compact electric furnace creates temperatures of up to 3000⁰C due to the flow of current between two electrodes through a layer of carbon-graphite powder. It melts small portions of any metals.
The disadvantage is the long period of heating to the melting temperature and the need to manually turn the metal for uniform heating.
An induction furnace heats the metal throughout its entire volume due to the induction of eddy currents in it by the magnetic field of a coil (inductor) connected to the generator. The advantages include:
- uniform and rapid heating of the metal;
- high efficiency, since only the melting object is heated, and not the installation parts;
- no evaporation of alloying additives:
- mixing of the metal during smelting occurs naturally;
- heating temperature regulation;
- due to high productivity, it is possible to melt small portions of molten metal in short periods of time;
- Melting is carried out in accordance with environmental safety requirements.
Among the disadvantages it should be noted:
- lower temperature of the slag compared to the metal, since eddy currents are not induced in it;
- During melting, it may be difficult to remove sulfur and phosphorus impurities from some types of metal.
Depending on the location of the heated object, induction installations are:
- Channel, when the containers where the metal is melted are made in the form of channels that are installed around a coil with an internal core. They are used in industrial enterprises when large volumes of cast iron, steel, and non-ferrous metals need to be melted.
- Crucible with a removable container made of heat-resistant material - a crucible, which is placed inside the coil. This design is compact and convenient for home use.
You can buy a ready-made induction furnace or, if you have the skills to work with electronics, make it yourself.
A homemade crucible installation will cost an order of magnitude cheaper.
The generator is assembled using a transistor or tube circuit, or an inductor is connected to a welding inverter. When making a homemade installation, it should be taken into account that the duration of metal remelting is affected by:
- generator power and frequency;
- magnitude of eddy current losses;
- interference from nearby metal objects.
Induction furnace from a welding inverter
This option is easy to make yourself and is safe to use, since the inverters are equipped with protection against short circuits, overloads, and overheating. To assemble the stove, it is enough to make an induction coil.
It is wound with a copper tube with thin walls with a diameter of 8 - 10 mm on a cylindrical template with a pitch of 5 - 8 mm. The number of turns, from 7 to 12, is selected depending on the parameters of the inverter.
It should be taken into account that with low inductor resistance, melting will often be interrupted due to overload protection.
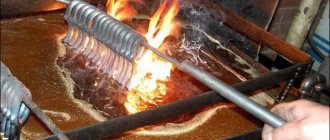
Melting metal in an induction furnace from a welding inverter
The finished coil is installed on a heat-resistant surface or placed in a housing made of graphite or textolite.
If you use a conductive material, melting will take longer, since part of the magnetic field energy will be spent on the passage of eddy currents through the walls of the housing.
To connect the welding inverter, install a socket that can withstand the maximum current consumed by the equipment.
Important!
The inverter frame must be grounded.
Transistor induction furnace
A furnace for melting metal using transistors that is simple in design can be assembled from available parts:
- two field-effect transistors IRFZ44V;
- pairs of UF4007 diodes (can be replaced with UF4001);
- two resistors with a nominal value of 470 Ohm, 1 W;
- several film capacitors with an operating voltage of 250 V, so that the total capacitance is 4.7 μF;
- copper wire with enamel insulation with a diameter of 1.2 and 2 mm;
- two ferrite rings for chokes (bought at a radio store or removed from old computer power supplies).
Transistor induction furnace
Assembly is carried out in the following order:
- Since the transistors will get very hot when melting is in progress, they are installed on radiators. The larger the cooling area, the better. When placed on a common radiator, the transistors are isolated from the surface with plastic gaskets with high thermal conductivity.
- The chokes are wound with 1.2 mm wire on ferrite rings. 7 - 15 turns are evenly laid around the circumference at the same distance from each other.
- Film capacitors are soldered in parallel into a battery;
- The induction coil is wound with a 2 mm wire on a template with a diameter slightly larger than that of the crucible. After 7 - 8 turns, the ends are left for connection to the generator.
- The prepared parts are installed on the board and connected to each other as shown in the diagram:
Transistor oven circuit
Voltage is supplied from a 12-volt battery with a capacity of 7.2 A/h. With a load of 10 A in operating mode, the charge will last for 30 - 40 minutes of melting.
The battery can be replaced with a power source connected to the mains, with an output voltage of 10 - 20 V and a current of at least 10 A. If desired, a housing is made of heat-resistant dielectric material for installation.
To regulate power, change the number of turns of the coil and/or its diameter. But it’s easier to make several replaceable inductors with different parameters.
How to smelt iron at home?
A smelter is a large or portable structure in which a quantity of non-ferrous metal can be melted. The induction melting furnace is widely known.
In production conditions, large quantities of induction melting furnaces are installed in special rooms to melt metal in large quantities. They melt metal from which many parts for motorcycles, cars, and tractors are cast.
To melt up to 5 kg of aluminum, you can build your own induction melting furnaces, solid fuel installations, and gas ones. They all work great. How and from what can you make a home melting pot?
We build our own smelting furnace
The installation for melting metal (Fig. 1) is assembled from bricks. It must be fireproof. Fireclay clay is used as a binder. To fire the device with coal, forced air is needed. For this, a special channel must be left in the lower half of the unit for air access.
A grate is located under this channel. This is a special cast iron grate on which coal or coke is laid out. The grate can be used from an old stove or purchased at the market or at a hardware store. For strength, some scald the finished structure with a metal belt.
The brick can be laid on its edge.
A smelting furnace cannot do without a crucible. You can use a cast iron cauldron instead. You can look for it on the farm. It will be good if it turns out to be enameled.
The crucible is installed closer to the burning coke. All that remains is to install a fan as forced air, light the coke and start smelting. The oven is ready with your own hands.
It can be used for melting cast iron, copper, bronze, aluminum.
Construction of a tabletop oven
From simple materials you can build gas or electric devices that fit comfortably on a table or workbench. To work you will need:
- graphite;
- mica;
- asbestos tiles;
- transformer;
- brushes from an electric motor;
- rods from an arc melting furnace;
- copper wire;
- nails;
- cement tiles;
- fire brick.
Asbestos has been banned for home use in recent years, so it can be replaced with tiles or cement. The sizes depend on the wishes of the owner. The power of the electrical network and the output voltage of the transformer play a big role here.
It is enough to apply a voltage of 25 V to the electrodes. For an industrial transformer used in welding work, this voltage is usually 50-60 V. In this case, the distance between the electrodes must be increased. Much is done by experience.
As a result, melting 60-80 g of metal is a good result.
It is better to make electrodes from brushes from a fairly powerful electric motor. They have a very convenient current supply wire. You can grind them yourself. There shouldn't be any big problems finding material.
In a homemade product, you need to drill holes on the side with a diameter of 5-6 mm, insert a copper stranded wire about 5 mm thick into them, and carefully hammer in a nail to secure the wire. All that remains is to make a notch with a file, it will help improve contact with the graphite in powder form.
The inside of the oven is lined with mica. This is an excellent heat insulator. The outside walls of the oven are reinforced with tiles.
To power the furnace, you can use a transformer that lowers the mains voltage to 52 V. The network winding is wound with 620 turns of wire Ø1 mm. The step-down winding is wound with a 4.2x2.8 mm wire having fiberglass insulation.
The number of turns is 70. The furnace is connected to the transformer with wires with a cross section of 7-8 mm² in good insulation. The finished installation must be turned on for a while so that all organic inclusions burn out. The oven was assembled by hand.
Metal smelting is carried out as follows:
- using a scoop or spatula, pour in graphite and make a hole in it;
- a material blank is placed in the hole;
- precious metals must be placed in a glass ampoule;
- tin and aluminum are placed in a separate iron cup;
- For alloys, the refractory metal is melted first, then the low-melting metal.
You cannot melt magnesium, zinc, cadmium, or silver contacts in such furnaces.
Cadmium burns out when melted, producing toxic yellow smoke.
When working with the installation, you must follow safety precautions:
- Do not allow short circuits in the wires.
- The power switch must be located near the operator.
- Do not leave the device unattended during operation.
- Nearby there is always a container filled with water in which the workpieces are cooled.
- When melting cast iron and other metals, you must use safety glasses and gloves.
If desired, you can make gas installations. They are well suited for melting small batches of non-ferrous metal. Induction melting furnaces are capable of melting any metal.
They can be used as conventional installations for working with non-ferrous and precious metals, as melting and holding furnaces in production.
They are suitable for various needs: for heating metals, for making alloys of several metals, for melting cast iron.
Soldering cast iron: methods and methods, selection of flux and solder
Graphite, as one of the main components of cast iron, has a strong influence on the course of processes. During thermal, mechanical and other types of processing, its influence is felt on the quality of the seam and its durability.
Melting metal at home
In the Technology , to the question Tell me, how can you, roughly speaking, melt iron at home? The best answer given by the author Djin If it is iron (Fe), then it is impossible. Where will you find temperatures over 1500 degrees at home?
in the oven, muffle, high frequency currents, autogenous, electrode, I don’t know what kind of iron you have and how many tons
Depends on what kind. Lead can be placed on a spoon above the candles. Of course, if there is not enough of it, for example, steel that is no larger than a coin, you can try to float it with a gas burner. (these are sold) It seems the outlet temperature is about 750g. This is not enough for
At home, no way! 1500 degrees can theoretically be obtained if there is gas in the apartment (gas stove), but the iron will melt and immediately turn into scale (iron oxide).
Well, in general, there are 2 methods for the home: A stove using high-frequency currents and an acetylene gas burner accurately melts
You can try connecting a graphite rod to a 12 volt DC source. And then think about it.
How to melt 10 grams of iron at home...
how to melt iron 10 grams at home
- iron melts at a temperature of 1539C, you can try to set fire to the house and throw a piece of iron into the thick of it, it might melt
- Go to the housing office to see the welders.
- Using an oxygen-acetylene torch (used in car service centers and construction sites). or build a HDTV.
- The most interesting way to melt iron is with thermite :-)) This is done like this: Take aluminum powder (If you have silver paint, use it) and mix it with potassium permangonate (potassium permanganate, this is a good oxidizing agent) 1:1. The combustion temperature will be sufficient even to melt the frying pan. This mixture is ignited with a good charge of match powder or something better, you just can’t light it with a match. This thing burns very powerfully, so take care of safety carefully, do the experiment on the street, do not stand nearby (the column of sparks and fire will be more than a meter). In fact, when thermite is used for welding, for example, rails, it seems that iron oxide is mixed with aluminum, which, when melted, is reduced into pure iron, flows down and thus welds the rails. But as I understand it, you need to melt a certain piece of iron? Then my recipe is what you need. And the New Year is just around the corner, you can melt the metal and at the same time you can set off fireworks :-)))))))
- Iron? Fe? Or some other metal? Lead, tin - please. Iron - no way. Other temperatures are needed.
- you need to look at what temperature the autonomous Rothenberger gas burners develop, maybe they’ll give you a ride, they’re sold here in Ob. About the arc - I dabbled once, although the voltage was 12V at a current of about 10A. I melted a drop of iron so that it melted into the glass, but something more massive could not be heated - the temperature gradient would be too great, it would be barely red at the edges, and it would evaporate and boil near the electrodes. Unless you build an electrolyzer and heat it with a hydrogen flame, you just need to clarify the temperature.
How to smelt iron
When manufacturing metal structures in a home workshop, sometimes you have to deal with the need to melt metal. An electric oven can help you cope with this task. Such a device is capable of melting many metals, including iron. By making a furnace with your own hands, you will significantly expand your capabilities in iron processing.
— electric melting furnace;
Sponsored by P&G Articles on the topic “How to smelt iron” How to get iron How to forge metal How to make nails
Determine the dimensions of the electric furnace. They are not standard, but depend on the goals you set for yourself and the amount of iron you intend to smelt. Also consider the power of the electrical network and the output voltage of the transformer. With a furnace volume of 100x60x50 mm, several tens of grams of metal can be melted.
Other news on the topic:
Nowadays, aluminum can be melted in a variety of ways. One of the most common options is crucible melting. To implement this method, we will need a stove that we can make ourselves. You will need • mica; • carbon graphite powder; • asbestos tiles
To melt silver at home, you can use a homemade melting device. Its main element will be a powerful transformer that will heat carbon-graphite powder to 3000° Celsius. This makes it possible to melt most metals, including silver. To you
To melt copper, as well as any other metal, it is better to use special equipment and work under the guidance of a master. But if circumstances forced you to start melting metal at home, then make a special melting furnace. Sponsor of P&G placement Articles on the topic “How
To make products from precious metals at home, you need a melting furnace. Of course, you do not need an industrial plant that can process several kilograms of gold, because you are not going to produce jewelry for sale. Enough
Gold is that precious metal, jewelry made from which is loved by all the ladies of the world and not only ladies. Surely in every home there is a gold item that has already gone out of fashion, is broken, or was inherited from a grandmother and no one needs it in the form it is. In this case, the ideal option for
Jewelry casting at home
Greetings, Samodelkins!
In this article we will look at the simplest, most inexpensive, and most importantly, complete method of casting metal using a burnt-out model. The method is so simple that you can literally cast a ring or any other product in your kitchen.
Also, the author of the YouTube channel “Bonn Factory” will share the most budget-friendly recipe for homemade modeling wax, and will show metal that pours perfectly without a vacuum or any centrifuges, which can be melted right at home on the kitchen stove. Let's go in order. First, let's prepare homemade wax. For this you will need an electric stove and a metal container.
Of course, this is not some kind of secret recipe. If you were interested in such information, then with a high degree of probability, you could very well find a mention of it on the Internet. To make homemade modeling wax, you will need paraffin and silicone sticks from a glue gun.
When the paraffin melts, cut the rods into small pieces and throw them into the melt.
After the rods have heated up and begun to dissolve in the paraffin, everything must be thoroughly mixed. When heating the mixture, it is advisable to use full ventilation; in our case, a kitchen hood is suitable.
The next step
is to tint the melt. For this purpose, the author decided to use ordinary food coloring. But, as it turned out later, food coloring was not particularly suitable for this task. On the World Wide Web, experts advise using wax children's pencils for this task.
Meanwhile, the melt began to boil violently and splash out. And since the author used a metal container with holes, the composition flowed out quite decently. And suddenly the vessel began to smoke heavily and this happened around the tiles:
The abundance of paraffin spilled on the electric stove ignited. And okay, everything in the workshop is under relative control, at least there is a fire extinguisher at hand, and the entire structure was on metal. When doing this at home, you should be extremely careful and do everything carefully. Don't forget about fire safety precautions!
In general, the master disconnected the tile from the power supply and began to extinguish the fire that had occurred. You cannot water such things with water, it will only worsen the situation. In such a situation, you need to act as follows: you need to cut off the access of oxygen to the source of the fire. The author covered the melt with a glass cap. As the oxygen under the glass runs out, the fire also goes out.
Having finished struggling with his own carelessness, the master looked at the jar of homemade wax. Oddly enough, after the burning there was still something left. Enough for once. Pour the melted mixture into a prepared foil container.
The fire that occurred certainly affected the ratio of components in the melt, but how much and what burned out more is unknown. The author aimed for a ratio of 1 part paraffin and 1 part silicone (50 to 50) in this melt. The result is a small briquette that can be processed quite well with a cutting tool.
The homemade wax turned out to be relatively flexible and did not crumble like pure paraffin. In general, the conclusion is the following: the composition has adopted the best quality of the two materials.
Now you need to level one of the sides on sandpaper and draw the desired tire diameter.
Having cut off a piece, the master immediately realized that it is not yet known how this material is soldered, and whether it is soldered at all. Without knowing this key property, there was no point in continuing further. Therefore, after testing a small piece of material with a soldering iron and making sure that everything is in order (everything melts, cools and holds tightly enough, in short, all the attributes of branded foundry wax are present), you can continue working.
A coarse thread bolt can be used as a file for processing wax. A bolt like this is very convenient for leveling the inner surface after rough work with a knife.
Since pouring will be carried out without the help of centrifuges or vacuum, fumes must also be added to the design of the gating system. Vapors are gas outlets that are installed at the extreme points of the figure, where, in theory, air could accumulate and prevent the metal from filling the mold.
During the pouring process, the air, which will be pressed from top to bottom by the metal, will freely escape through such fumes outside the model. Moreover, the more complex the model and the more geometric dead ends it has (vertices, branches, whatever you want to call it), the more similar fumes it will need.
Next, we fix the model on a plasticine base, install the flask and fill it with plaster.
But before you start heating, you need to let the mold sit in the air for about 30 minutes.
The flask began to warm up on the tile and the bulk of the wax began to flow out of it. The author then used a gas torch to speed up the process, but overall there is no need for a torch. For this technology, an ordinary oven or similar tile, or even a steam bath, is quite suitable. The main task is to completely get rid of the wax inside the plaster. After that, the plaster mold will need to be thoroughly dried and you can start casting.
When the flask is completely dry, you can start melting the metal. And we will melt tin. We will use the most common soldering solder.
As you know, tin melts at a temperature of 300°C, and home tiles can easily provide this temperature. So in this case, a torch is not needed to melt metal. An ideal home option for first experiments, agree.
This is followed by polishing.
After polishing the ring, the master decided to apply “cold enamel” in the form of epoxy glue. To do this, he diluted the glue and added dye to it, but this time not food dye, but simply sprayed it with spray paint. In home casting, all methods are good.
The result was very good. In the end, we managed to make a cool ring in the most artisanal and simple way possible.
Try to make your own products, but do not forget about safety precautions. Thank you for attention. See you again!
You can learn more about the technology by watching the author’s original video:
Source
Iron smelting at home - Metals, equipment, instructions
In the Technology , to the question Tell me, how can you, roughly speaking, melt iron at home? The best answer given by the author Djin If it is iron (Fe), then it is impossible. Where will you find temperatures over 1500 degrees at home?
in the oven, muffle, high frequency currents, autogenous, electrode, I don’t know what kind of iron you have and how many tons
Depends on what kind. Lead can be placed on a spoon above the candles. Of course, if there is not enough of it, for example, steel that is no larger than a coin, you can try to float it with a gas burner. (these are sold) It seems the outlet temperature is about 750g. This is not enough for
At home, no way! 1500 degrees can theoretically be obtained if there is gas in the apartment (gas stove), but the iron will melt and immediately turn into scale (iron oxide).
Well, in general, there are 2 methods for the home: A stove using high-frequency currents and an acetylene gas burner accurately melts
You can try connecting a graphite rod to a 12 volt DC source. And then think about it.
Iron alloys and their melting points
- Chemical element number 26 is the most abundant in the solar system. According to research, the iron content in the Earth's core is 79–85.5%. In terms of abundance in the planet's crust, it is second only to aluminum.
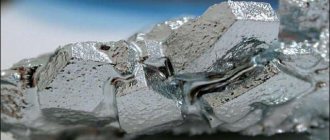
- The metal in its pure form is white with a silver tint and is distinguished by its ductility. The presence of impurities determines its physical parameters. Iron tends to react to a magnet.
- This chemical element is characterized by polymorphism, which occurs when heated. Increased concentrations of the metal are observed in areas of rock eruptions. Industrial deposits are formed as a result of external and internal processes occurring in the earth's crust.
- River water contains approximately 2 mg/l of metal, and the figure for sea water is 100–1000 times less.
- Iron has several oxidation states, which determine its geochemical characteristics in a certain environment. In its neutral form, the metal is found in the Earth's core.
- Iron oxide is the main form found in nature, and iron oxide is located in the uppermost part of the earth's crust as part of sedimentary formations.
- of chemical element No. 26 in minerals with an unstable composition increases with a decrease in the temperature gradient. Boiling occurs when heated to + 2861 °C. The specific heat of fusion is 247.1 KJ/kg.
Metal mining
Among the ores containing iron, the raw materials for industrial production are:
- hematite;
- goethite;
- magnetite.
Goethite and hydrogoethite form formations in the weathering crust that are hundreds of meters in size. In the shelf zone and lakes, colloidal solutions of minerals form oolites (leguminous iron ores) as a result of precipitation.
Pyrite and pyrrhotite, widely occurring iron minerals in nature, are used as raw materials for the production of sulfuric acid.
Commonly occurring iron minerals also include:
- siderite;
- lellingitis;
- marcasite;
- ilmenite;
- is violent.
The mineral melanterite, which is fragile green crystals with a glassy luster, is used in the pharmaceutical industry for the production of iron-containing preparations.
The main deposit of this metal is located in Brazil. Recently, attention has been focused on mining nodules present on the seafloor that contain iron and manganese.
Melting iron
What determines the melting point of iron?
Metal production involves various technologies for its extraction from ore raw materials. The most common method for smelting iron is the blast furnace method.
Before smelting the metal, it is reduced in a furnace at a temperature of +2000 °C. To extract impurities, flux is added, which decomposes when heated to an oxide, followed by combination with silicon dioxide and the formation of slag.
In addition to the blast furnace method, iron smelting is carried out by roasting crushed ore with clay. The mixture is formed into pellets and processed in a hydrogen reduction furnace. Further smelting of iron is carried out in electric furnaces. Production of alloys in furnaces.
The properties of a metal depend on the purity of the material. For technically pure iron, the melting point is +1539 °C. Sulfur is a harmful impurity. It can only be extracted from a liquid solution. Chemically pure material is obtained by electrolysis of metal salts.
Metal alloys
In its pure form, this material is soft, so carbon is added to the composition to increase strength.
What metal can be melted at home?
For a long time, men began to think about how to create their own furnace for melting metal at home. It must be portable and meet all conditions. The production facility has furnaces for melting large quantities of metal. At home, you can assemble a furnace for melting up to five kilograms of aluminum. Let's look at how to make a smelter at home.
Melting metal at home
Equipment and materials you will need
In order to melt metal, you need to buy the following components for manufacturing:
- fire brick;
- nails;
- transformer;
- copper wire;
- graphite;
- mica;
- asbestos and cement tiles;
- gas-burner;
- crucible.
The dimensions will vary depending on the wishes of the person collecting it. It is better to create a small furnace for melting metals if you want to use it only for your needs. You will spend less time making it, and a small amount of kilowatts will be spent heating it. If you do it using diesel fuel or coal, then do not forget about installing thermal insulation and air supply.
Homemade crucibles
Metals such as iron, nickel, tin, and copper are melted in an electric furnace. The output voltage in an electric furnace should be greater, which means the distance between the electrodes will increase. Brushes from an electric motor are suitable instead of electrodes.
Step-by-step instruction
How to make a melting furnace at home - read the following instructions:
- A high-frequency alternating current generator is installed.
- Spiral winding. Made from copper wire.
- Crucible.
All these elements are placed in one housing. The melting cup is placed in the inductor. The winding is connected to the power source. When the current is turned on, an electromagnetic field appears. The resulting eddy currents pass through the metal in the cup and heat it. Melting occurs.
Homemade muffle furnace
The positive properties of an induction furnace are that when melting metals, a homogeneous melt is obtained, alloying components do not evaporate, and melting occurs quite quickly. In addition, the installation of such a stove does not harm the ecosystem and is safe for the user.
Cooling can be done using a fan. Only the latter should be located as far as possible from the furnace, otherwise its winding will serve as an additional closure of the vortex flows. This will reduce the melting quality.
Wheel furnace
Features of melting some metals
In order to melt metal at home, this element must be placed in a small cup or crucible. The cup with the material is inserted into the oven. Then its melting begins. To melt the precious elements, they are placed in a glass ampoule. In order to make an alloy from several components, follow these instructions:
- First, a refractory element - copper or iron - is placed in the melting cup.
- Then a more fusible component is placed - tin, aluminum.
Melting aluminum in a homemade furnace
Steel is a refractory material. Its melting point is one thousand four hundred degrees Celsius. Therefore, to melt steel at home, you must follow the following instructions:
- To melt steel at home, introduce additional regenerators. If the furnace runs on electricity, then electricity is used.
- During induction heating, slags are added. They increase the speed of melting.
- Constantly monitor instrument readings. If necessary, lower the melting temperature by switching to a more moderate mode.
- It is always correct to determine whether the steel is ready for work or melting. Follow all the above steps. Only then will the resulting metal be of high quality.
Metal smelting
To melt iron at home, the furnace must be preheated. First, a large piece is placed, and then small ones. Iron must be turned over in time. A properly molten metal will have a spherical shape.
If you are going to make bronze, you must first place copper in the melting hole. Since this component is more refractory. When the copper is melted, tin is added.
Under no circumstances should elements such as cadmium, lead or zinc be melted. When burned, they produce toxic yellowish smoke.
And when melting aluminum, tin or iron, you must be careful. Rivet slowly and should be done with a small hammer. Heat the material frequently until reddened and cool in cold water. Only then will you get the perfect alloy at the end.
, please select a piece of text and press Ctrl+Enter.
Melting copper at home: temperature, tools, rules
Jewelry and other items made of copper or with copper elements have become widespread throughout the world. Finding it at home, in scrap metal, will not be difficult.
There are many applications for this metal. Often, in order to achieve the goal, it is necessary to melt copper, and do it at home.
The procedure is quite simple if you know its characteristics and melting point.
Characteristics
Copper is one of the first metals that people began to obtain and use for further processing. Products made from an alloy or pure copper were used even before our era. This demand arose as a result of ease of processing using conventional methods, as well as ease of melting and casting.
The material has a characteristic red-yellow tint, and due to its softness, it can be easily deformed, melted, processed and made into various objects. When the surface comes into contact with oxygen, it begins to form an oxide film, which gives a beautiful shade.
A very significant characteristic is the electrical and thermal conductivity of the material, which ranks second among all types of metals, with silver in first place. These characteristics made it possible to use it in the electrical field, as well as for rapid heat removal.
Melting temperature
Melting is the process by which a metal changes from a solid to a liquid state. Each material has its own melting point, at which a liquid state can be obtained. The presence of impurities plays a major role in smelting.
The metal itself begins to melt at 1083 degrees. If the composition contains tin, then the temperature is reduced and will range from 930 to 1140 degrees. Such a temperature difference is precisely due to the presence of tin in the composition. If zinc is included, then the alloy can be melted in the temperature range of 900-1050 degrees.
This metal can boil at a relatively low temperature for metals. It is 2560 degrees, during boiling the process will be similar to other liquids in this state. The casting begins to bubble and gas is released.
To know how to melt the material at home, you need to study the step-by-step instructions and various procedure options described below.
Step-by-step instructions for melting
To melt copper at home, you need to make the temperature a little higher than the one at which it will melt. In this case, it will not be possible to use a jar and a fire or similar methods. There will be no result.
It is recommended to use a blast furnace, and it is important that the heat be regulated. You can make a smelting furnace with your own hands from ordinary materials. The exact diagram and principle of operation can be used on various forums, watch the video with step-by-step instructions.
Old fire extinguishers are often used to create a stove. If you choose this method, you need to cut off the top part and make a lid that will close. Additionally, the interior space is treated with clay and a heating element is installed.
Smelting should be carried out in a container that itself will not melt or deform due to high temperatures, and accordingly, can withstand more than 1100 degrees. Additionally, remelting copper products requires the creation of a nitrogen environment; if it is not there, the material will deteriorate.
When everything is ready, you can melt the material and get a single ingot from it, which can be used in the future for your needs.
Melting in a muffle furnace
You can melt copper at home using the following equipment:
- The crucible into which the metal will be placed for melting.
- Tongs that can remove the crucible from the furnace.
- Muffle furnace or forge for heating.
- Mold for pouring liquid copper.
- Steel hook.
The step-by-step casting algorithm is as follows:
- The metal for smelting must be crushed and placed in a crucible. The finer the state, the faster the material will melt. The finished crucible is placed in a furnace heated to the required temperature.
- When the copper becomes liquid and completely melts, you need to remove the crucible with tongs, and you need to act carefully but quickly. There will be chaff on the surface of the liquid mass; use a hook to move it and pour the material into the prepared container.
- It is not recommended to use pure metal to create complex shapes or small objects, this is caused by the poor fluidity of copper without impurities. In this case, it is better to use alloys that contain zinc, tin and other metals.
Melting metal using a microwave oven modified with a transformer
Only metallurgists in Chelyabinsk can smelt metal - this is the opinion of the majority of citizens who heard about smelting only in physics and chemistry lessons in school, but have not encountered the technology in real life. For the process, as we remember, it is necessary to use a blast furnace (for smelting cast iron) or an open-hearth furnace (in which steel of specified parameters is already mined at high temperatures).
This is a complex process of colossal proportions. But is it so difficult to lift in much more miniature conditions? Thanks to technology, the answer will be this: it is possible to melt most steel grades using modern technologies, even at home. For example, today the electric steelmaking method is used, in which the electric arc plays the main role.
With its help, craftsmen actually melt non-refractory metal at home. It looks impressive and, apparently, quite effective. No lighting coke coal, maintaining the temperature using a blower or other manipulations. Modern methods are much simpler, provided, of course, that the arms and head grow from the right places, so to speak:
Video taken from the YouTube channel Fiery TV
There are plenty of variations for creating mini-smelters, and here’s an unusual project we’ve found for you once again.
ATTENTION! The experience is shown for educational purposes. Do not repeat! LIFE THREATENING! Such experiments are not only extremely fire hazardous at home, but also metal melting is hazardous to health. In addition to possible severe burns (the melting point of various metals ranges from 232 for tin to 1200 for steel and higher - in fact, this is the temperature of lava!), the fumes are also extremely dangerous. It’s not for nothing that the work of metallurgists is considered harmful.