( 9 votes, average: 4.44 out of 5)
In this article we will talk about solving a common plumbing problem - a leaking toilet cistern. After reading the information below, you can easily fix this problem yourself.
A characteristic plaque on the toilet is the result of a leaking cistern
Self-adjustment of the float in the toilet cistern
When the plumbing in a house suddenly breaks down, almost all owners immediately call a specialist , although in most cases the problems that arise can be solved without much effort on your own , having a minimum of tools in the house.
Simple DIY repairs will help save money, time, and in some cases, nerves.
The most common and easily fixed problem that arises with plumbing equipment is a breakdown of the toilet, namely a violation of the normal functioning of the cistern float. All components of a faience container can be called shut-off valves, which control drainage and filling.
What is a float
Float is a valve responsible for water supply. It consists of a housing with a membrane and the float itself.
Water is supplied from the plumbing system by a float equipped with an adjusting screw. Rotating in different directions, the screw lowers or raises the float, that is, the water level increases or decreases. In cheap tanks, a rail is installed instead of a screw.
In some toilet models, the float inside is hollow and filled with air, while in others it is made in the form of an inverted glass . The main breakdowns are:
- Hollow float. Stops working if water gets inside. It simply sinks, so it cannot be repaired. Will have to replace it.
- An inverted glass . Does not perform its functions after heavy contamination, for example, limescale.
Before you decide to start troubleshooting the problem in the drain tank yourself, you need to make sure that is to blame .
Quite often, a leak is detected between the toilet bowl and the cistern . The float has nothing to do with this case. The problem here is the abrasion of the o-ring, which is located between the bowl and the tank:
Fixing this problem is simple : you just need to install a new gasket .
It is also possible for
water to leak onto the floor next to the toilet. Here, too, it 's not about the float.
This occurs due to water seeping into cracks in the toilet tank and bowl or due to damage to the fittings connecting the pipes. If the tank is incompletely emptied or consumption when it pours into the toilet bowl in a continuous stream, less often in a trickle, then the problem lies in incorrect adjustment of the float.
Correcting the situation yourself
normalize water flow and eliminate leaks by adjusting the position of the float in the drain tank:
- To reduce water consumption , the float should be placed lower. Contact with the liquid in the tank will begin to occur earlier, the float will float up, blocking the valve and the supply of “excess” water.
- If water continuously flows , then the bulb (sealing gasket) is probably not tightly blocking the drain. If after pressing the membrane the leakage stops, then our assumption is correct and you just need to increase the weight (you can hang any weight).
- You can also raise the float a little. More liquid will flow and its volume will be enough to reliably seal the drain hole with a gasket.
1 . rod ( spoke ) is a small metal rod that holds the float.
To lower the water level bend the rod slightly , lowering the float down, and to increase the volume of liquid, lift it up.
With this approach, it is necessary to ensure that the water level in the tank does not reach 3-4 cm up to its side holes. If there are no holes, then you need to focus on the drain mechanism - it should be slightly hidden by water.
2 . The rod can be made of plastic . In this case, there is no need to bend anything. It is enough to move the float along a special guide ratchet:
3 . Nowadays, manufacturers increasingly place the float vertically . This does not change the essence and the principle remains the same. If your float is positioned like this, it can easily be moved up and down along the rod and ratchet:
Cleaning the shut-off valve
If after all the manipulations the water continues to flow, then it is necessary to disassemble the shut-off valve and clean it.
Despite the tricks of manufacturers, the service life of valves in our water is on average 3-5 years.
The membrane and water supply holes may become clogged with dirt . To eliminate this problem, remove the protective cap and remove the membrane. Then the internal ducts are washed well, and the membrane is put in place, closed with a cap.
The main thing in the process is not to break or lose anything . If this does happen, then read the next paragraph.
Changing the valve
Here the main problem is not the replacement itself , but the availability of the necessary mechanism. We turn off the water, dismantle the faulty or broken valve, take it with us and happily show it to the salesperson at the plumbing store.
After independently fixing the breakdown, each owner receives a new skill that will definitely come in handy in the future.
Source: https://bydom.ru/news/read/kak-sobstvennoruchno-otregulirovat-poplavok-v-unitaze-slivnom-bachke.html
General information
Many people are afraid to “touch” plumbing with their own hands and call specialists if any breakdowns occur. However, the design of the drain tank is quite simple and understandable, thanks to which anyone can repair it without having any social knowledge. To do this, you only need the ability to handle basic tools.
Some breakdowns may require replacement of failed parts. In this case, you need to dismantle the faulty elements and take them to a plumbing store to select a suitable repair kit.
Separately, it should be said about the repair of a wall-hung toilet cistern, which is a much more complex procedure. This is due to the fact that the container is hidden in the installation, as a result of which the decoration of the room will have to be disrupted. In this case, the tank itself may differ in shape from the traditional one, however, the principle of its operation is the same.
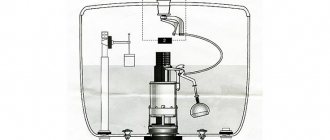
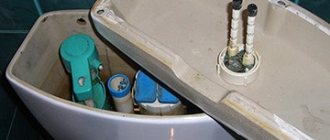
Shut-off valve arrangement
The drain mechanism of a tank is called a shut-off valve in the professional world of plumbers. Before you start repairing it yourself, you should understand how it works.
So, if an uninformed person opens the lid of the container, he will see only two parts there:
Below we will take a closer look at their device.
Float mechanism
The float mechanism consists of two parts:
- A housing with a membrane that shuts off the water supply;
- A float with a lever that regulates the position of the membrane in the housing.
The water filling level can be adjusted by the position of the float.
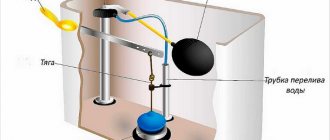
The drain mechanism usually includes three main parts:
- Valve;
- Frame;
- Drain button with lever system.
The operating principle of this device is quite simple - the position of the movable valve, located in a plastic case, is changed using a system of levers by pressing a button. In addition, the tank has an overflow that directs excess water into the toilet bypassing the valve, which helps prevent it from overflowing and, as a result, flooding of the apartment.
The float in the tank does not rise
- What to do if the float in the toilet tank is leaking water
- How to adjust a toilet flush
- How to fix a leaking toilet
Minor breakdowns create many problems. But before we begin to eliminate them, it is necessary to find the cause of the malfunction, and for this it would be useful to study the structure of the toilet flush cistern.
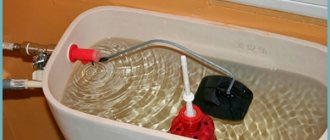
What does a toilet cistern look like from the inside?
There are many designs of tanks, but the principle is the same everywhere. This is a float that operates the water switch, a bulb that closes the drain hole, and a shut-off valve that shuts off the water after it reaches the required level.
In domestic models, water is supplied to the tank from the side, while in imported plumbing fixtures it is supplied from the bottom. The only difference between them is that in the first case, filling the barrel is accompanied by loud noise.
The water drainage mechanism can be of two types: rod and push-button. The rod mechanism is very rare today, since most modern toilet models are available with a button.
The float in the toilet tank allows water to pass through: a solution to the problem
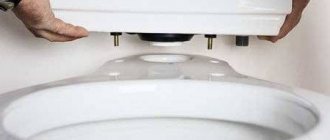
Before starting repair work, it is necessary to study the mounting device for the toilet tank lid, since if handled incorrectly, it can easily be broken, or the lid itself can be damaged, which is why the flush tank will have to be replaced completely.
The float begins to leak water for several reasons, the most common of which are:
- skewed float; - hole in the float;
- membrane wear.
To eliminate a leak due to misalignment, it will be enough to adjust the float. The lever, made of brass, can simply be bent, since by raising and lowering it, you can easily determine in what position it shuts off the water.
There should also be no problems with adjusting the plastic lever. The float in the tank is positioned by means of a fastening screw, which allows you to change the bend of the lever. If a plastic ratchet is used instead of a screw, then with its help you will simply need to fix the lever in the desired position.
When the tank is filled with water, a damaged float becomes heavier and it sinks. In this case, the solution to the problem will be to replace the float or repair it.
Before starting work, close the tank fill valve and drain all the water from it. After this, use an adjustable wrench to unscrew the water supply pipe and remove the old float. Install a new part in its place and restore the water supply.
If you decide to repair the float, remove it from the water and dry it thoroughly. After this, use heated plastic to seal the hole in it or put a plastic bag over it. But do not forget that you will still have to replace it soon, since these measures cannot give long-term results.
To replace a worn membrane, which often causes toilet tank leaks, tie the float lever to the bar and drain all the water from the tank. After this, unscrew the nut that holds the flush pipe. Now disconnect the siphon and install a new membrane in place of the old one. Reassembling the flush tank mechanism is done in the reverse order.
When the plumbing in a house suddenly breaks down, almost all owners immediately call a specialist , although in most cases the problems that arise can be solved without much effort on your own , having a minimum of tools in the house.
Simple DIY repairs will help save money, time, and in some cases, nerves.
The most common and easily fixed problem that arises with plumbing equipment is a breakdown of the toilet, namely a violation of the normal functioning of the cistern float.
All components of a faience container can be called shut-off valves, which control drainage and filling.
Troubleshooting
Any malfunction in the operation of the tank can be quickly eliminated without the help of specialists; a breakdown associated with overflow is no exception.
- Incorrect float setting. Correcting the malfunction in this situation directly depends on the model of the locking mechanism. If the bathroom has an old modification of the tank, where the float and shut-off valve are connected to each other by a metal lever, then you just need to bend the lever manually. In products where it consists of two plastic parts connected by a bolt, it is recommended to slightly loosen the bolt, then change the angle between these two parts and tighten it again. All work is carried out after dismantling the tank lid; to do this, you must first remove the ring that frames the drain button.
- Float depressurization. If there are no problems with adjusting the float, then you need to additionally check how it floats to the surface of the water and how the shutter mechanism operates. When the float is completely immersed in the liquid, it is depressurized. It can be eliminated by replacing not only the float, but also the entire shut-off valve. To do this, the water supply is completely shut off, the residue is flushed into the toilet, the flexible supply line and shut-off valves are dismantled, and then new elements are installed.
- Wear of the rubber gasket. Since this part is responsible for sealing the flush hole, the resulting gap can lead to a weakening of the seal and, accordingly, cause a leak. In this case, a new gasket needs to be replaced. If the exhaust valve is also deformed at the same time, then the entire mechanism needs to be replaced.
Source
Why does the toilet tank leak water into the toilet and how to deal with it
In this article we will talk about solving a common plumbing problem - a leaking toilet cistern. After reading the information below, you can easily fix this problem yourself.
A characteristic plaque on the toilet is the result of a leaking cistern
Before I tell you why a toilet tank may leak, I will introduce you to the design of the fittings so that you understand the principle of its operation.
Of course, there are currently a great many options for mechanisms.
However, the principle of operation of the tank always remains the same, since any fittings include three main elements:
- shut-off mechanism - is a tap that automatically shuts off the water as it enters the tank. The float is responsible for the water level at which the shut-off valve is activated;
Tank fitting options
- discharge system - is a valve that closes the drain hole. The valve is controlled by a button or lever;
- overflow system - prevents flooding of the apartment in case of failure of the locking mechanism. If the water in the tank rises above a certain level, the overflow system ensures that it is drained into the toilet.
Trouble-shooting
So, your toilet tank is leaking - what to do in this situation? First of all, you need to find out the reason why the leak occurs. There may be several options:
Possible causes of tank leakage
Next, we will consider all these troubleshooting options and ways to eliminate them.
Incorrect setting
Most often, the reason for constantly bubbling water in the toilet is trivial - the float of the locking mechanism is incorrectly configured or its setting has gone wrong . As a result, the valve does not shut off the water before it enters the overflow system.
How to understand that in a particular situation it is the overflow that has been identified? At first glance, there are no external manifestations of the problem; at the initial stage, water gradually begins to accumulate in the tank vessel after each drain.
Based on the performance characteristics that the design provides, once it reaches a specific level, filling should stop. But this does not happen, and the liquid slowly seeps into the toilet.
Such an unpleasant moment manifested itself as a consequence of a breakdown of the filling valve or float. You must lift the lever with the float yourself. If the valve works, the main reason is in the float.
Diagram of the locking mechanism
In this case, you need to lower the float to a lower level with the shut-off valve completely closed.
The setting process largely depends on the design of the locking mechanism:
- old model - in this case, the shut-off valve and the float are connected by a metal lever. To change the water level at which the valve will operate, you just need to slightly bend the lever with your own hands.
Soviet type float
Some models of Soviet-style fittings have a plastic lever and consist of two halves connected by a plastic bolt. In this case, you need to loosen the bolt, change the angle between the levers, and then tighten the bolt to fix them in this position;
Old style float with metal rod
- modern model - the position of the float changes relative to the lever by moving it. To do this, you need to apply some force or even press the spring locking mechanism.
Modern float adjustment
As a rule, setting the float takes only a few seconds. The only difficulty may arise with dismantling the tank cap.
To remove the tank cap, you need to unscrew the ring
Usually, to remove it, you need to unscrew the ring surrounding the drain button. Old plastic tanks have clips on the sides.
The depressurized float is immersed in water
Depressurized float
After adjusting the float, make sure that it floats on the surface of the water and the locking mechanism works as expected. If it turns out that the float is “submerged” or even submerged in water, it is useless to adjust it, since it has become depressurized .
In this case, this part must be replaced. As a rule, it changes along with the shut-off valves.
Therefore, the dismantling instructions look like this:
- turn off the water supply;
- flush the existing water into the toilet;
Unscrew the connection nut
- unscrew the nut of the flexible connection;
Some valve models can be disassembled
- then unscrew the nut that secures the shut-off valve.
A depressurized float can be soldered. To do this, melt a regular cellophane bag and seal the hole or crack with it. However, keep in mind that such repairs can only temporarily solve the problem.
After this, you need to take the shut-off valve and go with it to the nearest plumbing store to purchase a similar mechanism. Install the new part by performing the steps in reverse order.
Faulty locking mechanism leaks when the float is raised
Locking mechanism malfunction
If it turns out that the float is working and adjusted, but the toilet tank is still leaking, what should you do? In this case, make sure that the shut-off valve shuts off the water.
To do this, follow these steps:
- drain the water from the tank;
- lift the lever with your hands until it stops;
- see if water flows through the valve.
If water continues to flow after lifting the lever, the shut-off valve is faulty. In this case, it must be dismantled according to the scheme described above.
Stop valve
In principle, you can try to disassemble the valve and replace the rubber bands. But finding a repair kit on sale is not easy. Therefore, as a rule, the best option is to buy a new valve.
The price of a valve with a float ranges from 100-500 rubles, depending on the type of design and manufacturer of the fittings.
Modern flush system with button
Water discharge system malfunction
All the malfunctions described above lead to water flowing into the toilet through the overflow system. However, often the cause of a leak is the drainage system. To check this, simply turn off the water.
If the drain is faulty, water drains completely from the tank.
If water enters the toilet through the overflow, it will soon stop draining. If the drainage system is faulty, the leak will continue until the container is completely empty.
In the photo - an old-style plum pear
Often, the drain system leaks water due to a loose fit of the shut-off membrane or bulb. A similar situation can arise if any debris gets under the rubber band.
In this case, you need to dismantle the drain mechanism, then wash it, and also wipe the exhaust valve seat (the place where the bulb meets the exhaust hole). The dismantling process depends on the type of mechanism .
Turn the drain mechanism counterclockwise
For example, if a toilet cistern with a button leaks, i.e. The fittings are modern, then just grab it with your hand and turn it counterclockwise. As a result, the body will come out of the hooks and you will be able to pull it out.
The seat must be cleaned of dirt.
In old tanks, to gain access to the bulb and drain hole, simply remove the lid. Their drainage mechanism is not fixed in any way.
The cause of a malfunction of the drain mechanism may be the float lever or drain tube, due to which the valve deviates to the side and allows water to pass through. The situation can be corrected by slightly moving the lever or tube to the side so that it does not touch the valve actuator.
In such models, the float lever or even the float itself often interferes with the drain.
If after flushing the toilet tank with the button still leaks, then the reason lies in the membrane itself, which has lost its elasticity. In this case, you just need to replace it or completely change the drain mechanism.
The old membrane needs to be replaced
Flush mechanisms with bulbs are more durable, so their replacement is required very rarely. However, keep in mind that, in principle, they can also cause leakage.
If the rubber seal or rubber bulb has lost its elasticity, dip it in hot water (not boiling water) and hold it for a while. This will temporarily return the drainage system to functionality.
Shut-off membranes are sold in specialized stores
That, in fact, is all I wanted to tell you about eliminating a leaking toilet cistern.
Conclusion
Source: https://eto-vannaya.club/santehnika/unitaz/bachok-unitaza-propuskaet-vodu-v-unitaz-592
Other types of damage
Among the others, we can highlight the deformation of the pear saddle and the failure of the float chamber rocker arm.
If all possible failures have been checked, but the tank does not hold water, and it begins to leak immediately after the start of the fill and throughout the entire waiting period, then you will need to check the bolted connection of the exhaust valve seat.
The seat mounting bolts are faulty
This reinforcement (if it is not made of bronze) quickly becomes thinner in an aggressive environment. To replace you need:
- Shut off the water supply, remove the lid from the tank and remove excess moisture.
- Disconnect the water supply hose.
- Try to unscrew the mounting bolts, but if they are very rusty, you will have to carefully cut them off with a grinder.
- Sealant is coated with the installation sites of the rubber ring and gasket under the bolt heads.
- The tank is put in place, the correct position of the gasket is checked and evenly, without distortion, they begin to tighten it with wing nuts. There is no need to tighten the nuts completely; it is better to do this after the water has started.
- Having tightened the bolts, the tank is connected to the water supply system and the tightness of the connection is checked.
Installation and repair of a float in the toilet tank: what to do if it does not shut off the water
The smooth operation of plumbing fixtures is the key to comfort in a modern home. The toilet is considered the most in demand, so any breakdown of the toilet mechanisms creates a lot of inconvenience.
Problems often arise when the cistern is not functioning properly, when the toilet float is incorrectly adjusted or damaged. Then you have to repair it or completely replace the drain mechanism.
Features and types of float valves
Toilet float design
The float is one of the most important design elements for supplying water to the tank. Its purpose is to control the amount of liquid and protect against its excess in the tank. It ensures normal water supply to the toilet, so if a tank malfunction occurs, you should initially evaluate the condition of the float valve.
Previously, tanks were equipped with spherical elements, but they were not perfect enough, as they quickly filled with water and stopped functioning.
Therefore, manufacturers began to produce modern versions of plumbing fixtures, where the float is made of a glass type. In practice, they are more resistant to filling with water and guarantee the longest service life.
In performing its functions, the float works in conjunction with such mechanisms as: a membrane-type valve, piston, lever or plastic wheel.
The operating principle is as follows:
- When flushing, the water from the tank is drained into the bowl, and the float descends to the bottom, pulling a lever that directly acts on the piston element.
- The piston under pressure opens the valve and water is supplied inside the barrel.
- When water fills, the float begins to float, interacting back with the lever. When the pressure on the piston is released, it rises, blocking access to water by closing the valve.
Using a floating element, you can adjust the filling level of the tank. Using a lever or a plastic wheel, you need to lift it and the position of the float will determine the water level up or down. Toilet floats are available in two types:
- A ball connected to a lever. Located in the upper zone of the tank. An outdated option, as it has its drawbacks: the system is quite noisy; during operation, the ball gradually fills with water and stops working normally and regulating the level of incoming water.
- Glass type float. It moves in a vertical direction and acts on the piston through a rod rather than a lever mechanism. Located in the lower zone of the tank, it is more efficient and durable. The system also operates less noisily.
Modern toilet cisterns are equipped with glass models, as they are more efficient in operation and durable. If a breakdown occurs, most parts can be repaired manually or replaced with an analogue one.
Popular models and manufacturers
On the modern plumbing equipment market you can find various options for floats for the toilet cistern. The most common manufacturers include: Ani Plast, Alcaplast, Wirquin, InkoEr.
The Ani Plast company produces toilet floats with bottom and side connections, made of plastic and metal: 1/2” ANI WC5050, 1/2” ANI WC5550. Alcaplast products are distinguished by models with a stop button and brass connections, which guarantees a long service life of the float mechanisms: 1/2 “A18, A-2000, 3/8” with side connections and a built-in filter.
Wirquin produces floating devices using innovative technologies that have unique bracket designs, adjustable drain and water level, telescopic overflow: ONE 3/6 L, Quick Fit, MW2 with two flush modes. The Russian company InkoEr produces filling and drain valves with bottom and side connections with a backpressure function: NprN, NprM, Bm, SB1-A, SB2-A, SBkpm-B.
Toilet floats offered by domestic or foreign manufacturers differ in the material of manufacture, equipment and additional devices that simplify the use of the toilet.
Many models are made of plastic mechanisms with brass or copper elements. Some products are made exclusively from metal, which is a significant advantage over plastic ones due to its reliability and durability.
Choosing a suitable design
If the float breaks down and it is impractical to repair it, you must purchase a new device similar to the previous one. It is recommended to select an analog model for purchase, even if the broken one has an outdated configuration.
If a spherical element breaks, it is removed and purchased separately from the entire system. This makes it easy to replace and install the plastic ball. The new device is selected in accordance with the pressure in the water pipe and the quality of the material for its manufacture.
The float valve for the toilet is divided into several types according to the pressure indicator:
- at low pressure with the presence of a special supply amplifier;
- at a pressure of average filling speed and power;
- with strong water pressure in the water supply;
- stabilizer valve - with different water pressure, the device will stabilize the power without reducing the service life of the mechanisms.
It is important to take into account the load capacity of the float, so at high pressure the indicator should be correspondingly high. Ignoring this requirement, even a high-quality valve will let water through due to mismatched parameters.
If a wall-hung design with a double flush button is installed, it is recommended to choose a model for medium pressure power. Then a stable supply of large or small quantities of water can be ensured.
Installation of float devices
Placing the float in the tank
After purchasing a new device, you need to know how to install a float in a toilet cistern of one configuration or another. The spherical float is installed without first dismantling the locking mechanism:
- The water in the riser is shut off before installation.
- The tank cover is removed.
- The new float is put on the locking device and shifted from the edge a few centimeters.
- The water is connected and the functioning of the mechanism is checked. After evaluating its operation, the tank lid is closed and the equipment is ready for use.
The glass-shaped float is replaced together with the shut-off device. After dismantling the old one, the new one is installed in the lower hole of the tank and secured with a clamping nut. The water hose is connected to the fitting of the locking mechanism and the lid of the toilet tank is closed.
When installing a float cup, it is necessary to place rubber seals at the point of attachment to the toilet.
After installation, the operation of the float should be assessed for leaks or uncontrolled interruptions when collecting water into the tank.
It is important to know that the float must be positioned perfectly evenly, since all kinds of distortions lead to unstable operation of the drain system.
You should also adjust the toilet float to ensure proper flush functioning. It must be constantly in the water, otherwise the system will not work.
Main causes of breakdowns and solutions
Float malfunctions are not uncommon, but some of them can be fixed on your own. There are these types of problems:
- insufficient filling of the flush tank;
- lack of water supply;
- water flowing from the drain hole into the toilet bowl.
If they occur, you need to know how to properly repair the float in the toilet tank.
If water is not drawn in, the reason for this is contamination of the inlet valve, misalignment, or the appearance of growths and mucus on the float.
If there is a misalignment, it is enough to put the float in the correct position and evaluate the operation of the drain device. If the cause is clogging, then the following actions must be taken:
- The water supply to the tank is turned off. First you need to check the condition of the water hose by removing it and turning on the water again. If it flows with sufficient pressure, then it does not require repair and the problem is in the float itself.
- The valve is removed and the connecting section is cleaned. For cleaning, it is better to use a tight wire so that it does not bend during the process. After this, you can turn on the water to wash away any remaining debris.
- A control check of the system operation is carried out. It is necessary to draw and flush water to confirm that the breakdown has been eliminated.
The formation of mucus and green growths is associated with poor-quality water supplied from water supply pipes. They can interfere with the normal operation of the float, narrowing the amplitude of its movement. To fix the problem, you need to remove it and thoroughly rinse and clean it under running water. After this, it is installed in the working position and a control launch of the mechanism is carried out.
The problem of constant water leakage from the tank is the following: the valve is broken, the pin is out of order, insufficient pressure of the gasket to the outlet hole, unsuitability or deformation of the gasket in the valve. Each of the problems requires certain manipulations that can ensure the proper functioning of the mechanism:
- If liquid enters the valve through the overflow, the float must be slightly raised. Next, the float lever is twisted to fix it in the most effective position.
- If the float is working properly, it is recommended to inspect the drain valve. It has a metal pin that secures the lever. If it is damaged, it will require replacement (you can use a piece of thick copper wire of appropriate length).
- It is also important to inspect the valve itself for mechanical damage or extra holes. If there are any, you will have to replace the entire valve. It is recommended to purchase a model of the same manufacturer or operating principle.
- Often the cause of leakage is the gasket between the drain hole and the lower area of the valve mechanism. During operation, it deforms and loses its properties, allowing water to pass through. To fix the problem it needs to be replaced.
Often the valve itself becomes clogged due to poor quality water. Then it needs to be dismantled and thoroughly washed under running water. You also have to deal with excessive or weak water flow when flushing.
In this case, it is necessary to adjust the level of the float so that it does not submerge in the water, but is at or slightly above its level in the tank. This can be done by adjusting the thrust of the floating element.
Previously, parts were made of soft metal alloys, so changing the position was easily carried out by slightly bending the knitting needle. In modern models, all elements are made of plastic, so it is enough to move the float along the ratchet to the desired position using the adjusting screw. It securely fixes it in the required place.
Source: https://santehnicheskij-mir.ru/unitaz/poplavok-dla-unitaza.html
Installation of float devices
Placing the float in the tank
After purchasing a new device, you need to know how to install a float in a toilet cistern of one configuration or another. The spherical float is installed without first dismantling the locking mechanism:
- The water in the riser is shut off before installation.
- The tank cover is removed.
- The new float is put on the locking device and shifted from the edge a few centimeters.
- The water is connected and the functioning of the mechanism is checked. After evaluating its operation, the tank lid is closed and the equipment is ready for use.
The glass-shaped float is replaced together with the shut-off device. After dismantling the old one, the new one is installed in the lower hole of the tank and secured with a clamping nut. The water hose is connected to the fitting of the locking mechanism and the lid of the toilet tank is closed.
When installing a float cup, it is necessary to place rubber seals at the point of attachment to the toilet.
After installation, the operation of the float should be assessed for leaks or uncontrolled interruptions when collecting water into the tank. It is important to know that the float must be perfectly level, since all kinds of distortions lead to unstable operation of the drain system. You should also adjust the toilet float to ensure proper flush functioning. It must be constantly in the water, otherwise the system will not work.
The float does not shut off the water in the tank
And so, if your water level in the toilet tank is higher than the float, in the article I’ll tell you how to fix it.
The water level in the toilet tank is above the float
Let's consider the principle of operation of a toilet barrel: water enters the tank until the water level raises the float and blocks the water supply. If a blockage has not occurred, and the water continues to flow, then in order to avoid a flood in the toilet room, excess water flows into the toilet through the central fittings. This was the case in our case.
The first thing I decided was that the valve in the toilet was not turning off the water. I disassembled part of the assembly to inspect it. Many people say that problems most often occur with the valve and that the valve of a toilet cistern with a bottom water supply needs to be repaired.
When examining the valve, it is not clear what is wrong with it. A search in the store did not give any results, they say buy the entire assembly at once, there is no separate valve. I decided to put a thin rubber gasket under this valve so that it would press more tightly and the water supply would stop.
Alas, nothing happened, the water still overflowed.
The most interesting thing was something else: when I got tired of fiddling with the toilet, I assembled it to go to the store for new fittings, and during assembly I turned the washer over from top to bottom, funnel down with the flat edge up and voila, everything worked like clockwork.
Why does the toilet tank leak water into the toilet and how to deal with it
In this article we will talk about solving a common plumbing problem - a leaking toilet cistern. After reading the information below, you can easily fix this problem yourself.
A characteristic plaque on the toilet is the result of a leaking cistern
Basic criteria for choosing a float valve
If the float valve is not installed correctly, it will constantly break, causing water to overflow into the toilet. Therefore, it is necessary to understand what criteria such a mechanism for a flush tank must meet. Moreover, depending on the pressure indicators, float valves are divided into the following models:
- device for low pressure water supply;
- medium pressure valve;
- mechanism for high water pressure;
- stabilizing valves.
The latest valve model is recommended for use in homes where the pressure in the water supply is constantly changing. At the same time, in order not to have to spend time constantly repairing the cistern, it is important to remember about preventive measures , which boil down to a banal visual inspection of the device for damage.
When the problem is with the bowl
Problems associated with the breakdown of the toilet bowl itself are extremely rare. Typically, an unpleasant situation occurs due to improper fixation of the housing to the wall or floor, as a result of which the toilet leaks. When the structure is assembled (especially when choosing one built into the wall), it is quite difficult to solve the problem that has arisen, so you should take care of the correct installation at the installation stage, otherwise you will have to disassemble the complex structure, assessing the condition of the gaskets and the quality of the connections.
In some cases, in order to eliminate a leak in the toilet, you still need to carefully inspect the tank first, since the constant formation of a puddle on the floor can be explained by an insufficiently tight fit of the bulb, damage to the seat due to corrosion processes, improper adjustment of the valves, or a violation of the tightness of the nut connection. In some cases, simply replacing the gasket or worn cuff with new elements or tightening the loose nut at the base of the overflow is enough, for which you first remove the tank. For maximum reliability, a fixing clamp is additionally applied.
If water constantly flows in the toilet, but repairs are not carried out immediately after a malfunction is discovered, limescale may form on the walls. A mixture of water and citric acid, which is applied to contaminated areas and left overnight, can eliminate the unsightly formation. Similar steps can be performed to clean the tank itself.
Provided that the repair is carried out correctly, the tank and the toilet bowl itself will work properly for a long period of time, without requiring a complete replacement of the plumbing fixture. Do-it-yourself repairs are an economical and simple option, so it’s worth thoroughly studying the problem and solving it using one of the methods suggested above.
Plumbing fixtures have become so commonplace in our apartments, houses, and office spaces that their presence is taken for granted.
But some fifty years ago, the majority of Russians did not even imagine that a “latrine” could be arranged inside a house or apartment - almost everywhere they used free-standing sheds installed above cesspools.
And today, problems with plumbing terrify ordinary people - after all, without a properly functioning toilet, the advantages of apartments are negated.
One of the most common malfunctions of the toilet cistern is the constant accumulation of water, which occurs due to the fact that water from the toilet cistern leaks into the toilet
or on the floor of the bathroom (read more about this situation). Naturally, this state of affairs cannot suit anyone, because it leads to the following consequences:
- Unreasonably high water consumption
. This natural resource is becoming more and more expensive every year, and given the widespread installation of water meters, its constant consumption leads to prohibitively high utility bills. - Constant noise in the toilet room
. Taking into account the acoustic characteristics of our apartments and thin walls that do not have high-quality sound insulation, the sound of flowing water does not in any way contribute to the good mood of the residents, especially at night, when the overall noise level decreases. - A malfunction of the toilet cistern threatens to flood the bathroom
with all the ensuing (in the literal sense of the word) consequences, leading to the need to repair the flooring and, in the case of low-quality waterproofing of the interfloor ceiling, the underlying neighboring room.