Storage tank device
The design of a toilet cistern with a button is actually similar to the model equipped with a lever. And the purpose of both varieties is exactly the same - taking water from the water supply network, storing it and quickly draining it at a signal from a mechanical shut-off valve.
However, there are certain differences. It goes without saying that it is easier to press down than to lift a lever, but there is also plenty of opportunity to break a more complex structure. According to statistics, repairing a toilet - a flush cistern with a button - is done many times more often than repairing a plumbing fixture with a lever flush method.
In addition to the different mechanisms for draining water, containers are also classified by type of material. The features of each of them are given in the table.
| Material | Description |
| Cast iron | Cast iron tanks were used at the beginning of the last century. This is a very reliable and strong material that is virtually non-corrosive. To this day, it is possible to find similar devices in some apartments. But new models are not produced due to the high cost and complexity of the production process. |
| Faience | The earthenware cistern is included in the delivery set of the classic toilet. Special mounting holes and fittings allow you to secure the container directly to the bowl, ensuring good tightness and ease of use. |
| Plastic | In most cases, polymers are used to make waste containers intended for hidden installation and installation in country restrooms. In the first case, the button is located on the front surface of the container, otherwise it will be impossible to use. Country flush cisterns are distinguished by a durable body and are equipped with the necessary fittings for fastening separately from the toilet bowl. |
A toilet cistern flush system with a button or two is designed according to a design that differs from the one you saw in old storage tanks. We'll talk about its highlights in the next section.
Adjustment
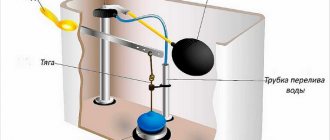
The drain is adjusted by adjusting the flow rate. To do this, you need to open the tank lid and move the float on the drain structure.
This slider can be lowered or raised, its position affects the filling mechanism and will affect the volume of water in the tank; the lower the bar is set, the less water will be collected and consumed.
Conclusion
The dual flush mode can reduce the amount of water consumption by exactly half, and an additional setting can lower this bar even lower. The main thing is to choose a model and make simple adjustments correctly.
Watch the video on the topic:
Source
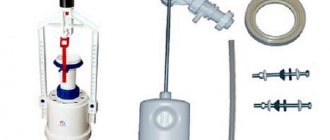
Modern waste containers
With one button
The number of buttons with which the drain tank is equipped does not affect the design of the fittings installed in the tank. Moreover, if the holes in the case and the dimensions match, it is possible to replace the mechanism and enjoy an adjustable escapement.
Let's look at how a toilet cistern with a button works in more detail:
- The float, thanks to which the water level in the container is measured, may be made of plastic or metal. In the latter case, the price of the mechanism increases little.
- This device is connected to a ball lock mechanism that opens and closes the inlet pipe through which water enters the tank.
- To smoothly fill the container and reduce noise, the pipe is also equipped with a diaphragm with a lever that regulates the jet pressure.
- The water drainage is adjusted using a siphon and a special gasket that covers the outlet hole.
Note! There are non-separable and collapsible siphons. The latter are preferable because they are easier to maintain: there is no need to remove all the fittings; it is enough to dismantle and wash the rubber valve itself.
Now we’ll figure out how to assemble a toilet cistern with a button and disassemble it if necessary. It must be emphasized that the need to dismantle the tank arises only if the membrane is clogged. Otherwise, the mechanism is so reliable that it does not require maintenance.
The most difficult thing when disassembling the storage tank is to pull out the button itself, which, if you twist it by hand, rotates freely around its axis.
The dismantling instructions are extremely simple: before twisting, you need to hold it in this state until it is completely removed.
Having finished with the button, it is possible to wash the membrane.
This is done as follows:
- the tap located on the pipe supplying water to the tank is turned off;
- all liquid is drained from the container;
- after this, the nut connecting the siphon to the inlet pipe is unscrewed;
- then the entire mechanism is dismantled and the membrane located at the bottom is cleaned.
With two buttons
This mechanism is used to save water. By using one or the other lever, it is possible to release half or all of the liquid volume into the toilet.
The design of a toilet cistern with two buttons is virtually no different from the one-button version. Only the exhaust fittings have changed a little.
Another difference is the dismantling method. It is unlike the procedure for disassembling a storage tank equipped with only one button.
In this case, it is necessary to function in the following sequence:
- Press the two buttons at the same time, releasing the special mounting groove located on the sleeve.
- By inserting a screwdriver into this slot, it is possible to remove the first button, and then the second.
- Below them is a mounting screw that holds the top of the tank in place.
- By unscrewing it and removing the lid, you gain access to the drain fittings of the container for cleaning, adjusting or replacing it.
Advice! To avoid troubles with the operation of flush tanks, get high-quality and expensive mechanisms. By saving little money now, you have the potential to face a lot of trouble in the future.
How does it work
When you press the big button, the entire reserve in the tank is drained, 6–8 liters, and during the low mode, half as much is consumed, 2-4 liters.
There is an assumption that the economy mode is less effective, but modern toilet models are ready to refute this judgment. The fact is that manufacturers use a system of swirling water flows, unlike single-mode models, when the drain button simply resets the water supply.
"Stop mode"
When pressed once, water is released from the tank, and when pressed again, it blocks and the water stops draining.
This system is easy to use and can have a positive impact on your water bill. Installation of such models is not particularly difficult, so switching to an economical version is easy.
Maintenance procedure for a tank with a button
General troubles
The device of a toilet cistern with a button, as you have had the opportunity to see, is as reliable as possible.
If you still experience any problems with the product, you must operate according to the following scheme:
- Turn off the water, unscrew the button, remove the top part of the tank and make a visual inspection of the interior of the tank . For convenience, it is possible to drain the water in advance.
- During inspection, special attention should be paid to the outlet membrane . Much more often, troubles with the tank are associated with the loss of tightness of this unit.
- As a rule, the membrane must be washed to remove debris, but it is better to replace it with a new one . The fact is that due to the poor quality of water in the pipes, the silicone or rubber seal becomes unusable and ceases to perform its intended function.
- If the tank is not completely filled, you need to adjust the float level with your own hands . It is possible to achieve the desired volume only by an experimental method: pouring water and draining it.
- If it is necessary to replace the fittings, you need to buy a complete repair kit, consisting of a membrane and a bushing . When installing, do not forget to equip the parts with sealing gaskets.
The level of quality of work and durability of the tank is greatly influenced by the correctness of its installation. If you do not want to use the services of experts, you will have to secure the container yourself.
This is done like this:
- Before installation, the purchased tank must be prepared: install drain fittings, pipes, sealing gaskets, and then. All necessary actions are outlined in detail in the accompanying documentation for the container.
Advice! Screws and nuts must be tightened by hand without applying excessive force. By using wrenches or pliers, you can damage fragile plastic parts that are not designed for such action.
- Once assembly is complete, the container is secured to the toilet. For this, iron bolts equipped with rubber gaskets are used, to which plastic nuts with petals are screwed from below.
- The joints must be sealed with rubber gaskets and plumbing gel. After finishing the seams with pipe sealant, the latter must be given time to polymerize.
- After this, the water pipe is connected. It is necessary to install a tap on it in order to block the access of water to the tank if necessary.
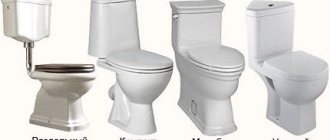
Dual Flush Toilet
To choose an economical tank, you need to know what differences it has. The flush button is divided into two parts, or represents two separate buttons. Otherwise, the toilets are very similar in appearance, the main difference lies in the operating principle of the dual-mode flush:
- the first one drains the entire supply in the tank;
- the second spends half.
Some companies do not limit themselves to two modes and install additional ones, with an even smaller volume of water drainage. Externally, the drain design is a one-piece body covering the entire tank, as in single-button mechanisms.
Buttons also come in different types, differing in operating principle and location. On the market there are:
- standard designs on the tank;
- mechanical buttons on suspended structures;
- pneumatic wall buttons;
- touch panels.
Pneumatic models mounted into walls are common, and all because they can be placed at a distance of more than two meters from the tank itself. Such a system can be found in public places where several toilets need to be located. In residential apartments, the first two types predominate, due to their compactness.
Troubleshooting in shut-off valve assemblies
We unscrew the drain button by hand, rotating it counterclockwise. No tools are required for this operation. Pull out the button and carefully remove the cover.
The push-button flush mechanism in the toilet tank is located in the lid. In addition to the main function, it serves as an element for fixing the stable position of the lid
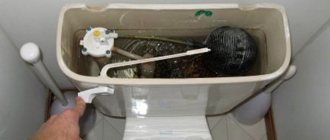
Inside the drain tank there are two mechanisms, the parts of which may have a malfunction that causes a leak:
- drain mechanism;
- a shut-off valve responsible for the flow of water from the water supply into the container.
We carefully inspect the drain mechanism, assessing the height of the water level. If the water is in the overflow area, this indicates that the shut-off device is not holding.
The water in it is above the float, and therefore reaches the drain channel, through which it flows into the sewer system.
If the water level is at the adjusted height in the shut-off device, then the leak is due to a malfunction of the valve in the drain mechanism. These are the two main reasons.
Repair of the drain lock mechanism
The water passes above the overflow device, which means that the drain valve is in working order, and the problem lies in the locking mechanism. We drain, emptying the container of water. Close the water supply valve to the system. We remove the drain mechanism device by turning it slightly counterclockwise. We take the removed part out of the container and inspect the condition of the rubber sealing ring, which is the shut-off valve of the drain mechanism. We make sure of its integrity. Set aside.
How to install and adjust toilet cistern fittings
The first priority after installing the toilet in place and connecting it to the sewerage system is to install the cistern fittings. The smooth operation of the entire system will depend on the correct installation and quality regulation of this plumbing equipment. The fittings of the drain tank are a device that ensures that it is filled with water after emptying during draining, automatically regulating the amount of drained water and controlling its overflow. How to install the tank fittings correctly, read our article.
The tank fittings are not complicated in design and can easily be installed with your own hands
Slowly filling the tank with water
The low rate of water flow into the toilet tank is due to clogged filters. We carry out repair work in the following order:
- by turning the tap handle, turn off the water flowing into the toilet from the cold water supply system;
- unscrew the flexible line from the water supply valve to the toilet, located either below or on the side, depending on the model of the plumbing product;
- in a clogged hose, remove the blockage and check the water pressure in the water supply by lowering the end of the flexible line into the toilet, if it is long enough;
- otherwise, we use a five-liter plastic bottle or canister to drain the water;
- turn on the tap, if the pressure is good, then we proceed to clean the water supply valve from accumulated debris;
- this part is not available in all toilet models, but if it is, it needs cleaning;
- pull the filter out of the valve using pliers, grabbing the part by the small pin;
- We wash the removed grill in the sink under running clean water to remove clogged solid particles and accumulated mucus;
- then we put the washed filter in place, turn on the water and see if the problem is resolved or not.
View of a dirty valve removed from the water inlet mechanism into the cistern. After cleaning the part, water flows into the toilet bowl at a higher speed
If the problem is not resolved after washing the filter and flexible hose, then we wash the entire water supply valve by removing it from the tank, after first removing the toilet lid.