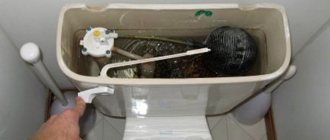
The formation of condensation on the toilet cistern is not a rare phenomenon. Drops of water, and sometimes drips, not only look bad, but can also lead to unpleasant consequences - from damage to metal fasteners in the room to the development of mold.
This problem requires a solution using simple techniques. We will tell you in this article how to remove condensation from a toilet cistern in an apartment or a private house.
Causes of sweating
To get rid of a problem, you need to find the cause that causes it. It is known that dew appears when the air is much warmer than the object on which it falls. However, once it appears on objects, it causes corrosion and provokes the growth of mold, which leads to the destruction of the material. Even at room temperature and normal humidity in the bathroom, the water in the drain tank, cooled to 5–6 degrees, will cause sweating. In this case, the material from which the drain container is made does not matter. What causes temperature changes and high humidity that lead to the appearance of water droplets on the drain tank?
- The exhaust system does not work well or does not work at all. To check, you need to bring a burning match to the exhaust pipe and see by the movement of the flame whether there is draft or not. If there is no draft, you must contact the management organization to inspect the entire ventilation system passing by the apartment.
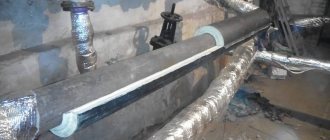
- If there are hot water supply pipes in the bathroom, they will also cause temperature changes. To eliminate the cause, it is necessary to isolate them with special covers for pipes, which are equipped with cuts for ease of installation.
- Increased humidity in the room can be caused by fumes from the bathroom entering the toilet. To eliminate them, it is necessary to separate the exhaust systems of the bathroom and bathtub and organize forced ventilation.
- The cause of condensation on the walls of the toilet tank may be a minor breakdown of the flush mechanism. Because of it, a thin stream of water constantly flows through the drain hole, which means that new cold water is constantly entering the tank, which simply does not have time to heat up. Too cold walls of the tank in a warm room will inevitably fog up.
USEFUL INFORMATION: Design of a small toilet in an apartment
How to eliminate condensation on a toilet tank
There are different ways to remove condensation from a toilet tank. Sometimes drastic measures are needed, but your own comfort and health are much more expensive.
Check ventilation ducts
The formation of condensation on the drain tank and pipes is often associated with poor ventilation. The cause of the trouble may lie in its clogging or complete absence. If there is no ventilation, then it needs to be organized. This may be an exit to the next room or upstairs when there are no more residential floors. It is easier to solve the problem in a house with wooden floors and an attic - just make a hole of a suitable size in the ceiling and bring out a long pipe.
If there is ventilation in the bathroom, but condensation forms, then you should check its condition. This can be done using a lighter, match or candle. The flame source must be brought directly to the vent. If traction is weak or absent, cleaning is necessary:
- removing and washing the grill;
- removing debris from the ventilation duct;
- removing deposits from the walls - a narrow spatula, scraper, or brush will help (there are devices of different diameters with a flexible shaft on sale);
- vacuuming - do not use attachments, only a tube (hose);
- wiping the walls and bottom of the channel with a damp cloth.
If you can’t clean the ventilation yourself, you can contact the management company or professionals who have the appropriate license for such work.
One solution to the problem is forced ventilation; the device must have increased protection from moisture
Raise the water temperature
The reason for the formation of condensation on the toilet tank lies in the temperature difference, so it can be increased from the inside. There are several options:
- insulating the pipe - this method is effective if it is enough to raise the water temperature by 2-3 °C;
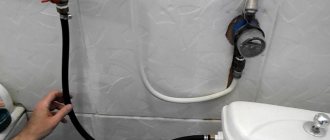
- supplying hot water to the tank, this option is appropriate if its temperature is always low and there is no meter;
- organizing a heat exchanger if there is a heating riser nearby;
- supply of warm water, you need to install a tee and mortise ball valves.
Most of the methods listed are appropriate for eliminating condensation on a toilet tank only in a private house with its own water supply. In an ordinary apartment, meters are installed, so utility bills will only increase.
To organize a heat exchanger, you need to wrap a copper tube around the heating riser 5-6 times and cut it into the water supply to the toilet. The homemade coil needs to be insulated. You can use mineral wool or other material.
Improve the tank
You can get rid of condensation on the toilet tank by upgrading it. One option is insulation inside. For this you can use different materials:
- Styrofoam;
- foamed polyethylene;
- Isover.
You should use insulation no thicker than 1 cm. Otherwise, the internal volume will be too reduced.
Work algorithm:
- Shut off the water supply.
- Thoroughly clean the inner walls and bottom of dirt, rust, and limescale.
- Dry the surface.
- Glue the insulation, treat all joints with sealant.
- Wait for the glue to dry.
- Cut holes for shut-off valves.
- Install fittings and configure.
- Turn on the water supply.
Advice! To insulate the toilet cistern, you can use polyurethane foam. Apply it in several stages, after complete hardening, cut off the excess, leaving a layer of no more than 1 cm.
To insulate the toilet cistern it is convenient to use self-adhesive materials
One of the options for protecting the toilet cistern from condensation is the use of glass microspheres (microballs). It is a composite material with good adhesion. It can be mixed with sealant and applied to the inner walls of the tank. A layer of 3 mm is enough. The mixture must dry completely - the time is indicated in the instructions for the sealant.
You can also insulate the toilet tank from the outside to protect against condensation. The disadvantage of this option is that it is unattractive, but the advantage is that it preserves the internal volume.
Another option for upgrading the toilet tank to protect against condensation is to install a plastic tank inside. Thanks to it, cold water will not come into contact with sanitaryware. There should be a distance of 2-3 mm between the inner walls of the toilet cistern and the tank. This gap is filled with rubber or silicone gaskets.
A drastic measure to combat condensation is to purchase a new double-walled tank. It is usually sold only complete with a toilet.
Insulate the toilet
Insulating the toilet helps get rid of condensation on the toilet tank by reducing the level of humidity in the bathroom. This option is costly, but allows you to provide a comfortable microclimate in the room. This is appropriate for combined bathrooms.
You can insulate only the floor or walls individually or the entire room. There are several material options for this:
- cork agglomerate;
- polyurethane foam;
- Styrofoam;
- penoizol;
- extruded polystyrene foam;
- warm plaster;
- mineral wool.
Before insulation, you will have to remove the old finish. Surfaces must be treated with an antiseptic. If there are large differences or cracks, they need to be repaired.
If major repairs are necessary, heated floors can be installed. This will not only solve the condensation problem, but will also increase the level of comfort in the room.
Fix the drain
A leaking toilet tank means that the liquid in it does not have time to warm up. Sometimes a malfunction is difficult to notice, especially with regular cleaning of plumbing fixtures, which prevents the characteristic trace of water from remaining.
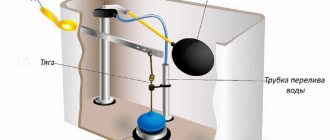
Repairing a toilet tank may involve adjusting the flush or replacing a failed part. This could be a float, a shut-off valve, or a seal. The repair features depend on the design of the tank.
Reduce water drainage
You can combat condensation on the toilet cistern by reducing the flow of water. In this case, the new portion of cold liquid will be smaller, and mixing with the warmer residue will provide sufficient temperature. There are two ways to reduce drainage:
- Double button with minimum drain function.
- Adjust the drain yourself with a light press of the button. This option does not always work, especially if you have small children.
A double button can be installed on an old tank, but you will have to replace all the fittings
How to check shut-off valves
An incorrectly installed, poor-quality or faulty locking mechanism causes big problems if it is not repaired in time. It is this that can cause water to drip onto the floor from the walls of the cistern and cause large puddles to appear as a result. There are several ways to identify this problem:
- After the drain container is filled, turn off the water supply to the tank and see whether its level decreases or not.
- Do not use cleaning products when cleaning the toilet for several days. If there is a leak, then at the point where water enters the tank there will be a reddish trace of leaks.
- Add any bright-colored watercolor paint to the water in the drain tank and mix the water thoroughly. After a few minutes it will become clear whether the drain is leaking or not.
Malfunctions of the interior of the toilet and their elimination
If water, even in a thin stream, flows freely into the toilet, then its volume in the tank must be continuously replenished. Hence the droplets of water on the surface and large water bills. The solution to the problem is to eliminate the leak. Sometimes replacing a worn rubber siphon membrane helps:
- drain the water completely from the tank;
- fix the lever in such a position that the hole is closed with a valve and no more water flows in;
- dismantle the siphon by disconnecting it from the lever;
First of all, you should eliminate possible tank leaks, if any.
- remove the worn membrane and replace it with a new one;
- return the siphon to its place and secure it;
- perform a test drain.
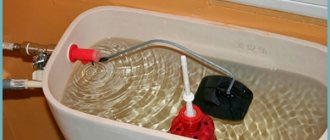
The reason may also be hidden in a faulty float, then perform the following actions:
- remove the float from the tank;
- pour water out of it;
- let dry;
Float repair
- seal the hole through which water enters;
- are installed in place.
If it is possible to buy a new float, then this option is better, because... the repaired part will still not last long. The problem can be solved even easier if the leak occurs due to the incorrect position of the float; to eliminate it, simply open the reservoir and return the lever to its normal position.
Types of locking mechanisms and methods for replacing them
If the drain fittings are to blame for the condensation dripping from the tank, then it must be replaced. First you need to figure out what type of mechanism is installed. Shut-off valves are:
- Rod or exhaust. The oldest and most common type, but also the most reliable. The flush is triggered after the rod rises, opening a hole for draining water.
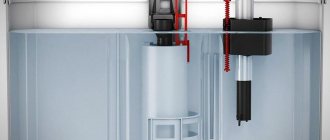
- Push-button. This is a modern system designed to save water consumption. Allows you to press a button to regulate the amount of water drained.
- In the form of a mechanism with a pneumatic drive.
After determining the type of fittings, it must be replaced:
[smartcontrol_youtube_shortcode key=”replacing toilet fittings” cnt=”4" col=”2" shls=”true”]
- Carefully remove the old fittings and clean all joints from limescale.
- Install the seal in the appropriate place in the tank.
- Place the fittings in the drain container and secure with the nut included in the kit.
- Screw on the remaining fasteners, first placing gaskets on the bolts.
- Install the tank in the designated place.
- Install the upper part of the fittings and connect to the water supply point.
- Close the container with a lid, connect the drain mechanism and check operation.
USEFUL INFORMATION: Do-it-yourself lining of toilet pipes with plasterboard
Other ways to eliminate condensation
Never a sweaty toilet
Not long ago, toilet models with a two-piece tank appeared on sale. The water in it is in an internal plastic tank and does not come into contact with the walls of the main vessel, therefore, condensation does not form. The solution is ideal, but the cost is confusing - it is several times higher than that of a toilet with a traditional tank.
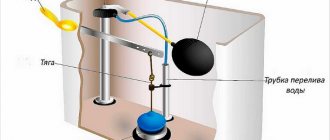
Construction of a two-piece toilet cistern
Minimizing waste
The smaller the volume of water that goes down the drain, the greater the chance that there will be no condensation. There are toilets with a cistern equipped with a two-button mechanism. When one button is used, approximately 5 liters of water flows out of the tank, the other - about 7 liters. And in tanks with an Aquastop drainage system, one control button is built into the lid: with one press, water begins to pour out, and with a second press you can stop this process.
Two-button mechanism for flushing water
Insulation of the cistern
Some craftsmen independently isolate the walls of the tank from interaction with cold water. The modification is as follows:
- Turn off the water supply.
- Disconnect the hose through which water flows.
- Remove the drain tank.
- Dismantle everything inside the tank.
- Rinse the container and wipe dry.
- Cut out the liner from the insulation. To do this, lay it out on a flat plane, place the tank on it in the same position as it usually stands in the working position, trace the bottom around the perimeter, and then cut out the workpiece. Design of the drain tank
- Place the workpiece inside and press tightly.
- Measure the height of the walls from the inside, starting from the liner and ending with the top edge of the tank. Subtract about 3 cm from the resulting size.
- The perimeter of the walls is also measured from the inside, and an allowance of about 100 mm is added.
- Place the pattern inside. The joint is overlapped, so carefully pressing the workpiece against the walls, make a through cut in this place. Take out the workpieces.
- Perform assembly:
- apply sealant to the bottom, around the holes for installing fittings;
- put the bottom in place;
- insert the inner liner, having previously applied glue to the sides;
- fill the vertical joint with silicone;
Insulated cistern
- treat the joint between the bottom and side walls with sealant;
- Allow at least a day to dry, cut holes for the reinforcement, and apply sealant to the edges;
- put everything in place.
Here are the main causes of fogging in the toilet tank and how to eliminate them. If you cannot eliminate condensation yourself, contact a professional.
Checking the central exhaust system
If, after replacing the fittings, the question “how to remove condensation on the toilet cistern” remains relevant, then it is necessary to eliminate moisture from neighboring rooms and check the ventilation. What to do in this case:
- Call representatives of the management company and have them check the entire ventilation system and, if necessary, decide on cleaning it.
- In typical apartments, there is a ventilation hole between the bathroom and the toilet, and the second, exhaust, is located in the wall of the toilet. It is necessary to measure the distance between these holes, buy a pipe for the hood and install it.
With a properly installed exhaust system, the humidity in the toilet will be normalized and condensation will no longer appear.
To leave it or to leave it - that is the question
It is the apartment owners who should clearly define what to do in such a situation. Everything will depend on how you, as well as the rest of the family, feel about it.
In option No. 1. The toilet tank began to fog up a little, but everything managed to dry in the intervals between visits to the toilet and bathroom. Here you can do without radical measures. A slight fogging of the surface cannot lead to irreparable consequences and seriously damage the external finish.
Option #2. If the drain tank is constantly wet, and streams of water constantly flow onto the floor and nothing dries on its own, then the solution is clear - the problem should be fixed. Drops that flow down the outer surface of the container create puddles that constantly have to be wiped off. Sometimes the situation is completely deplorable - in a day you get a huge lake in the toilet. This is not only inconvenient, but also unnerving.
Depending on the volume of condensation that appears on the toilet cistern, rational apartment owners begin to use methods to eliminate the problem. Some people put down towels, and some put out saucers and jars. Constant precipitation can not only cause trouble, but also threaten to cause huge problems.
- Condensation droplets can stay in small crevices and areas that are difficult to reach. Over time, the water begins to stagnate and smell unpleasant.
- The constant appearance of condensation increases the level of humidity, and especially if the bathroom is combined. This situation can provoke the growth and reproduction of fungus and mold. Mold will spoil the appearance of any room. It also negatively affects the human body, causing allergies, headaches and other health problems.
- The outer surface of the tank, being under the influence of drops of water around the clock, can not last long - in the next few years a network of small cracks appears in which mold and mildew appear.
- Due to the high level of humidity, all wood interior items in the room begin to rot. Especially if it is a table, parquet made of solid oak/beech or other species.
- Metal parts of furniture, water pipes and other objects will begin to suffer from corrosion. Even a mirror can be damaged - a huge colony of black mold will begin to grow on its inside.
And the mold that has appeared on the mirror will no longer make it possible to use it in the future. You will need to buy a new one, and this is an additional expense. As a result, constant condensation will not only result in a worse microclimate, but also the working condition and appearance of almost all interior items will be lost. At this rate, after 4 years you can do a major overhaul.
Installation of forced exhaust
If the house is multi-storey and the central exhaust system does not function well enough, then it is necessary to install a forced exhaust system. Its correct installation is not difficult if all the necessary parts are purchased.
- It is necessary to purchase a ventilation duct, which will make it possible to install a grille from the toilet room into it, since the main exhaust duct will be closed during installation. Any plastic ventilation duct of the required size will be suitable for this purpose.
- Ventilation grille to cover the cut out piece in the ventilation duct in the toilet.
- Duct exhaust fan, preferably with a humidity sensor. The noise threshold of the fan should be no more than 35 dB, the air flow should be no less than 25 cubic meters. m/hour in separate bathrooms and twice as much in shared bathrooms.
Properly installed forced ventilation not only solves the problem of how to get rid of condensation on the toilet tank, but also removes odors that appear from time to time in the toilet. It is vital in city apartments with a shared bathroom and poor ventilation system performance.
To enhance air exchange in sanitary rooms, you need to leave small gaps under the doors or buy special doors with grilles built into them.
Tank improvement
Since condensation appears due to the temperature difference between a water-cooled tank and warm air, you can insulate the walls of the tank using polyethylene foam.
USEFUL INFORMATION: Features of choosing a plumbing cable for sewerage
Another option to solve the problem is to buy a modern tank that has an additional plastic container inside. There is a gap between the ceramic walls and the plastic water tank, due to which the outer walls of the tank do not cool.
Consequences of condensation
What can happen if the issue of high humidity and temperature violations in the bathroom is not resolved in time?
- Drops of condensation, stagnating in hard-to-reach places, form fetid puddles.
- High indoor humidity causes the formation and spread of black mold, which is very harmful to the human body.
- Drops of water flowing down pipes cause corrosion of metal pipes and cover plastic systems with ingrained stains.
- If the toilet has a wooden floor, this will lead to its rotting.
- Over time, the flush tank itself becomes covered with a network of small enamel cracks and loses its attractive appearance.
If the problem of getting rid of condensation and, accordingly, improving the microclimate in the toilet cannot be solved in one way, then all measures must be applied in combination. Check the serviceability of the tank, install an exhaust system and increase the gap between the door and the floor. And if this doesn’t help, then you need to buy an air dryer for the toilet.
What are the consequences of this trouble?
In addition to the fact that the toilet tank is constantly wet and cold due to condensation, this excess moisture can cause a lot of trouble. Dampness leads to damage to equipment, which looks unsightly due to stains. The fastening bolts slowly but surely rust, and brown streaks form around them.
Over time, moisture flows down from the toilet cistern, collects in puddles, and penetrates under the floor covering. From there it can flow even lower and damage the thermal insulation, or even make its way to the ceiling of your neighbors below.
Note! High surface humidity due to condensation leads to the formation of mold, mildew and unpleasant odors in the bathroom
